Leaderboard
Popular Content
Showing content with the highest reputation on 11/22/18 in all areas
-
Hooray, it’s all working. Got DHW feed up near 60’ and heating near 35. It’s time to play with the parameters and set it up to suit our house. I was beginning to think, like @ProDave I had bought a dud on Ebay. I will report back on how I have now wired it and set it up after a good play tomorrow.4 points
-
Five years ago a friend had an air tightness result of 0.9ACH and she was disappointed because she had put so much effort into taping etc. The house was very comfortable with no cold spots or draughts. To help her I ran the PHPP to see what the effect of different air tightness values would be on the space heating demand. Results below. I asked on the AECB forum why the PHI had set the maximum value at 0.6ACH and had an answer from Mark Siddall shown below. So until you get to relatively quite high air tightness values, space heating demand is not affected greatly. Of course the PHPP has been designed to work at the low end of air tightness. Pressurisation Test Result ACH Specific Space Heating Demand kWh/(m2.a) 0.2 12.1 0.4 12.3 0.6 12.5 0.8 12.7 1.0 12.9 2.0 14.0 A 2pa pressure difference (what you get over 2 a storey building) would mean that assuming a 1m long, 1mm wide gap would permit about 360g of water vapour to be transported through the gap in 1 day. On the basis of the internal temp being 20C/50%RH and ext. temp of 0C/80%RH then you can expect this moisture to hit the dew point as it passes through the insulation. The air tightness threshold is 0.6 so as to protect structure from moisture damage.3 points
-
The final bit arrived today, the 80mm aluminium duct to connect the stove air in to the duct going down under the floor (the first firing a dew day back was done with the stove drawing air from the room) I was keen to see how it performed, and whether the warnings people have given that it will overheat the room and I won't be able to get in for several days were true or not. So this morning I light the stove and kept it burning for somethng like 5 hours. I was running it at a fairly low load, but enough to keep the flue gas temperature high enough, so a reasonable burn, though no doubt at less than it's 4.5Kw rating. When I light the stove, the room it is in was at 20 degrees having been kept there by the UFH. It's in a reasonably large room, 5 by 7 metres, but this room opens by double doors onto the stairwell, and double doors the other side of the hall to the snug living room. All bedrooms open from the landing above. When I stopped loading the stove the room it was in was up to 24 degrees, and the snug living room the other side of the hall up to 23 degrees. The bedrooms had all risen about 2.5 degrees in the process as well. So no we didn't overheat or make the room unusable, though if you shut the door to that room and stoked the fire up, it would be easy to do so. So the conclusion is managed properly (treat it as whole house heating with all the doors open and don't burn it too high or too long) then it is a perfectly usable source of heat. Particularly so as generally we get all our wood for free. 24 degrees is not "over heated" but warmer than we would pay to heat a room. The ability to quickly get more heat upstairs is useful as we had been finding the heat transfer to the unheated bedrooms is not quite as good as I had hoped and I was starting to get complaints that our bedroom was down to 16.7 degrees. It is now back to over 19. The temperature today was 3 degrees outside so I would only expect the stove to get use when it is this cold or colder. If we wanted to with careful management, I am sure this one stove would heat the whole house with no other heating input. The original plan of having a second stove in the snug living room has been shelved, the one stove heats the whole house so no need for more complication end expense (plus installing a flue for that one would be a bit harder)2 points
-
Welcome to THE forum for self builders and their other halves. Not sure how we can help with your wife. You do need to tell her that this will be a big challenge and perhaps won't go smoothly - you can read any amount of tough news here and you need to be clear with her as there is no point in wrecking your relationship if it all becomes too much.2 points
-
I'm pretty sure it's total external area, not just floor area, including walls and roof so it's a direct measurement of the quality of fabric. From: https://www.stromatech.com/building-performance-testing/air-tightness-testing/air-tightness-compliance/ It's a pain to have two systems in use. The rest of the world (including Passivhaus) uses air changes/hour (often written ACH or AC/h). The m³/m²/h and AC/h numbers are often similar which makes things even more confusing but there's not a direct conversion between them as the ratio depends on the size and shape of the house. For a given fabric leakage rate (m³/m²/h) and a given shape a larger house will have a lower AC/h rate than a smaller one. Obviously, houses aren't scaled up without changing their shape but this is one of a number of reasons why Passivhaus tends to be easier with large houses so encourages building bigger. It's one of the reasons I'm not 100% sold on Passivhaus in detail as opposed to in principle.2 points
-
Yesterday was air tightness test day and MBC's final day on site getting everything prepped for the final test and then finishing off a few details. For those not so familiar with this kind of thing, a few details of the process follow. Our house isn't a passive house as it hasn't been designed with that in mind - it was the design first and then build to passive standards, so no accreditation or anything like that. That said, I wanted a low energy house and hence the choice of the passive system offered by MBC. Part of this system is that as well as the building and foundation being highly insulated, it also leaks very little air, as this is one of the major sources of heat loss in buildings and houses. The leakiness of a house is measured in terms of the number of times the volume of air contained by the building passes out of all the various gaps in one hour. As mentioned on this forum elsewhere, a modern well-built house without any special air tight measures would probably change its volume of air between 3 and 5 times per hour. The final part of MBC's construction method is to tape over anywhere there is likely to be a gap and make the building as air tight as possible; the target is to have 0.6 or less air changes per hour. One exterior door into the house is chosen as the point of measurement and this is where all the kit goes. Note that the air tight test is testing the quality of MBC's work and whilst it will highlight gaps elsewhere, it's not MBC's remit to correct leaks caused by others, only themselves. The point of measurement for my house is the door between the garage and the utility room, where the FD30 rated door was recently installed. The door is sealed up with a membrane that's supported and held in place by an adjustable frame: The hands are those of Steve, of Melin Consultants, who carry out most of MBC's air tests. This is the frame/shield being put in place in the doorway. I really did try and get a photo without builder's/air tester's bum, but to no avail. Those with delicate sensibilities should look away now and skip the next photo. After the frame, the fan is put into the hole in the shield, drawn tight and any gaps between the frame and door frame are temporarily sealed up. The rate of air flow into and out of the building is altered by both the speed of the fan and the number of vents that are opened up on the fan. The building is de-pressurised first, then re-pressurised and the readings taken. Because of environmental factors such as wind, this is done 10 times to get a data set and the average is taken for the final result. When this test was done yesterday, it was a windy day with the wind coming from the north east, the direction that the garage door faces. As the test progressed, it became clear that the house is well sealed and so it needed a smaller fan. The red shield was swapped over and the smaller fan put in place. The rest of the readings were taken and we got our final reading. Darren and his MBC crew aced it - with a target of 0.6 ac/h it came in at 0.25. Brilliant. Darren is a calm chap under all sorts of pressures but the air test was about the only time I've seen him display (slight) signs of nerves. He was equally understated in his satisfaction with the result even though it turns out that this is one of the lowest numbers they've had in 7 years. Well done, Darren and crew. If you're wondering what all that foam is doing on the floor, that's left over from work on the foul wastes over the weekend and foaming them in before putting air tight tape around them to make sure it wasn't detrimental to the air test result. We have a few very minor leaks, mostly gaps between the panels in the windows that have several sections. No surprise and these are due to be siliconed once we've finished most of the pretty stuff. There is also a bit of air flow through the keyholes but I've been advised that a good coating of vaseline on the key and in and out of the lock a few times should seal it up well enough. I daresay that would seal most things. The gaps were temporarily sealed up with a bit of low tack plastic for the air test, so the result assumes this has been done. All the battens are in now and the downstairs was finished off yesterday, and concrete was put into the remaining recess that had been formed for the lift and slide doors to get a level threshold. I am, of course, delighted with the air tight result and really pleased for MBC as well, as they have worked really hard and whenever there has been a problem, come up with solutions. I know that others have had varied experiences but for my own, I have found MBC to be a pleasure to work with right from the start. At the design stage, David worked his socks off liaising with my architect to get all the details right and to work out how to build the design using their system, and this has been the case with any third parties I've asked them to speak with directly. The communication from Trish has been great - I've always know what was going to happen and when and been kept informed when timings have had to change. The guys on the ground have worked like machines; I'm astonished at how hard they work, to be frank, and throughout the whole time I've never heard any rows or arguments. That's not to say that there haven't been any, but if there have, they didn't take place in front of me. For me, this has been a really good experience. What next? There's still plenty to do but the next main contractor is largely doing all of the internal systems, plumbing and wiring (note - I'm no longer giving details of this as I can't recommend due to unfinished work). The MVHR ducting and manifolds have been worked on but will kick off in earnest on 3rd December once the cellulose has been blown in upstairs. The cellulose is arriving on Friday 30th, along with Gordon, who will put it into the walls and ceiling. All 520 bags of it! Before then, my Ryterna garage door is due to be installed next week so I'll report back on that. That's being supplied and installed by Joe from Dorset Garage Doors Ltd, just up the road from me in Lydlinch. There's a lot of work to be done outside, too, but I'll be thinking through that today and get my plan of action together. Whatever else happens, some gentle heat will be put into the slab this week, using a couple of Willis heaters. It's getting pretty chilly on site now and it will be nice to get the house drying out properly and check that side of things is working properly. A good week and, hopefully, more to come.1 point
-
In my case the flue came from flue-pipes.com It has to be 60mm from flamables. That sleeve was sold by the flue manufacturer as an insulated wall / ceiling sleeve so made for the job, you cut it to the angle of your roof, 45 degrees in my case. It is a hard sort of rockwool batt type material. Obviously as it is sold for this purpose by the flue manufacturer, it is a non flamable material, and as it's >60mm thick, it is okay for flamable material to touch the outside of the sleeve as that flamable material will be >60mm from the flue.1 point
-
There is a separate discussion ongoing with the CRT about us creating a side inlet/pond for the blade, which is why we are doing this initial research. We did look at pond mats like Kensa but these wouldn't really be suitable due to the potential flowing water and the space they would need, where as if we can create a side pond/inlet the space is quite compact and ideal for a blade. I did price up everything they had quoted for using the cheapest prices I could find and it came to £11,152.71 so there could be definately be room to negotiate. Its certainly never going to cost sub £1000 for us. If the RHI payments more than cover the cost we'd be silly not to have it, but in my mind we still shouldn't pay over the odds as this is money we have to pay for up front to go to other things.1 point
-
Had a surprise visit from the BCO on Tuesday, and I was glad to be there and to meet him. Finally. So far so good, no structural hitches or queries and a general air of impressed-ness with the quality of the build. I hope I can keep it up. A milestone passed today. TF erectors are finished, with the roof weathertight all internal structures complete and, I'm grateful that the lads had time to knock up a temp staircase on my request. Next? Waiting for the window installers to come back. Just need to sort the scaffolding to suit them, but it'll no doubt be a week or two before there's an install slot again.1 point
-
Glad you got it working. That kind of confirms @JSHarris theory that you need to edit every parameter in turn, even if you then edit it back to what it was previously.1 point
-
Did you get felt up? Cromasol White btw sold in Asphaltic branches. Also "Solaflex" but that's twice the price.1 point
-
Sounds my kinda guy! How old? (Not in THAT sense...unless he's minted! ) You can mitigate UV damage by painting on solar reflective paint direct to the asphalt. I'll take a pic of a can if I have one.1 point
-
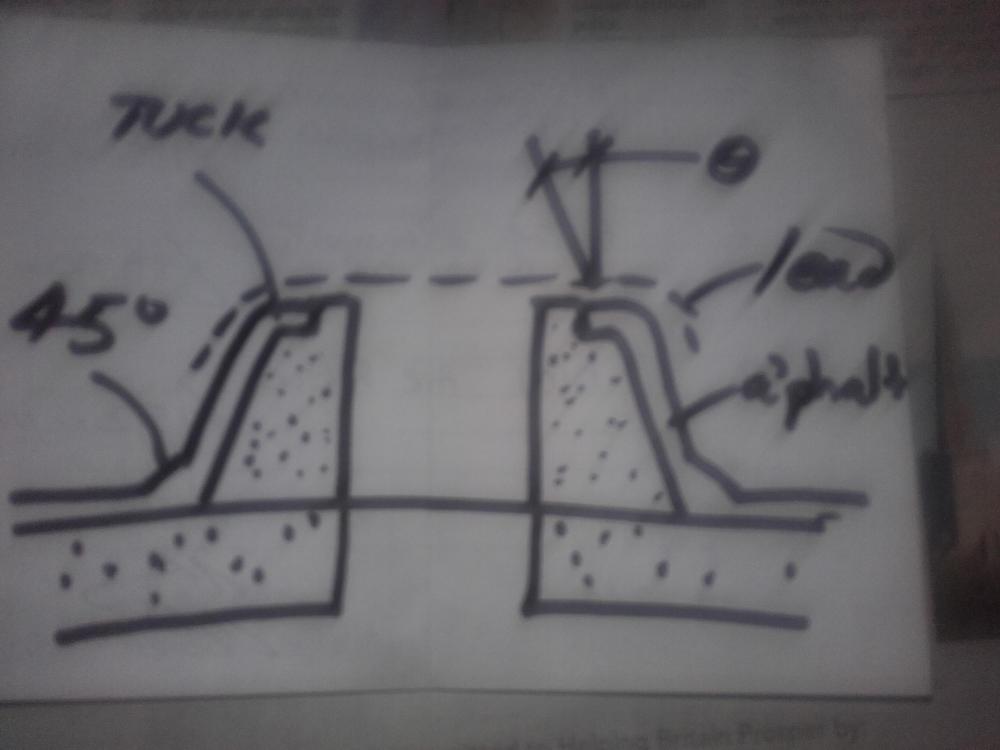
Usually a 45deg fillet at the base of the upstand then an inch thick or more up the sides with a wrap of expanding mesh to support if you feel the need (not essential but do so on a steel post). Needs to return into some form of rebate / tuck in the top. Sides sometimes straight not tapered. Nice lead cap to finish off. ...imho Done a good few plinths like this over the years but always subbed out the asphalting. Top of lead cap usually 6" off of main roof. As the Welshman says, never lost a patient yet! Only got a Sharpie on me...1 point
-
1 point
-
1 point
-
Kudos to @MikeR. I was very skeptical as to whether it could move forward, but the man gets a pat on the back for making that progress. F1 point
-
Well Hello again. Well as you know, we ditched our self build plans with cries of never again.... but. We might have a new, smaller side-project. We have acquired a two-storey garage workshop building. We'd like to convert the 50 sq m top floor into a studio flat and keep the rest as garage/attelier. There is current consent (gained on appeal) to demolish the whole lot and cram in two tiny terrace houses - but we really don't like that plan. Let's hope we can get our simpler option through. D1 point
-
I had a very interesting chat yesterday with @MikeR regarding his progress on his group selfbuild. He has done exceptionally well and has outline planning agreed for 9 good size self builds. And having dealt with South Glos planning, I know how difficult they can be! He has his required 8 other owner/builders onboard and they are all in various stages of their design. But it will be a collection of high end contemporary design.1 point
-
8x8 will be too small for anything more than 2 children - how are you planning on supervising this area ..?? If you put an adult into the area too, then you’ll need a lot more floor space ..!1 point
-
Pretty common, the white picket fence idea remembering the soft play places I used to frequent with the kids. Round tops rather than pointed of course! You can of course get white upvc picket fencing so no splinters. My worry would be whether that's man enough to be clambered over etc as from memory they see it as an extension of the play equipment! I'd suggest something off the shelf in case someone bangs their head and you can at least claim it's fit for purpose. Good range here: https://www.tekplas.co.uk/?1 point
-
I had a good talk with sunamp this afternoon asking questions and getting some sensible answers about things I got the impression that ALL units would be upgraded very soon and they assure me they are on top of the problem . If you think they missed you I would email them ,they do reply to emails fairly promptly1 point
-
You didn't have to waste heat to earn loads you just burnt as much pellets as the boiler could handle. You where paid on what you used, didn't matter if it was chickens that where kept warm or vintage tractors.1 point
-
1 point
-
Back on topic. It's pretty grim being back in the old house. Had to turn the heating up, as when I came back from the new house to here to finish clearing out and packing our last few bits and pieces up it felt miserably uncomfortable (and noisy). The heating's been on, set for 21.5 deg C, but I'm sitting here with cold feet and not looking forward to our last night here. The stark difference between a much-improved (loads of extra insulation, lots of attention paid to improving airtightness, reasonably decent uPVC double glazing, condensing combi boiler) 1986 block and brick bungalow and our passive house is just unbelievable. The room temperature of both is the same, but for some reason (most probably the far more even temperature in the new house, with the walls, floor, ceiling and windows all at the same temperature) the new house feels so much more comfortable. I won't regret finally moving out of this old house. Having experienced the comfort of a passive house I doubt I could ever feel comfortable in any other type of house in future. Good job we have no intention of ever moving house again. Best of all, I'm finally shifting out of "self-build mode", and starting to think about life when we're not working almost exclusively on house-related stuff. First off is a nice holiday, though...1 point
-
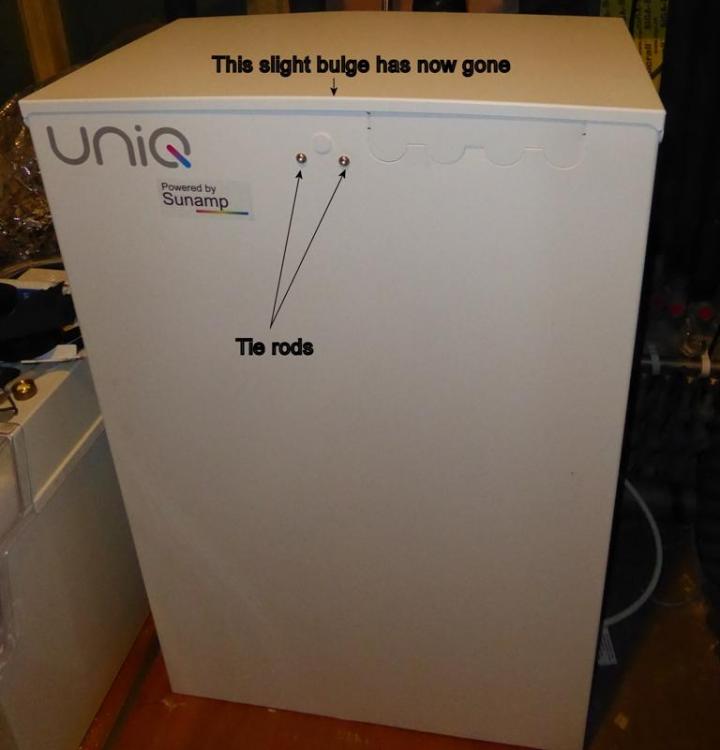
There are two important differences between yours and mine. Mine has tie rods running front to back to stop the sides bulging, and my lid has a flange all around, so that it sits like a biscuit tin lid on the top. If you look at this photo you can see the screws holding the tie rods across the top of the cell and the flange on the lid: It seems clear that Sunamp are making incremental improvements to address the bulging issue, and with one or two minor changes I think they will have solved it. Mine now has a flat top after trimming more of the insulation out and pre-bending the lid to a slight curve in the opposite direction in order to push the centre of the neoprene insulation down first, so it can spread outwards as it compresses. You have the older style lid that mine was supplied with, but which was replaced free of charge by Sunamp a couple of days after my unit was delivered.1 point
-
A bit late but I'm also in Bristol and am part of a group that is self building although organised a slightly different way, this is a touch further south down the motorway at Lawrence Weston. There is plenty of appetite and interesting talks/workshops in the area1 point


