Leaderboard


Popular Content
Showing content with the highest reputation on 03/27/18 in all areas
-
Well, after a day's hard slog we managed to dig out and remove a few more tonnes of crap clay/rubble and replace it with around 10 tonnes of nice topsoil, that filled my nice new "tree planter" as well as the two remaining areas of claggy grot left over from building the house. Seven trees are now planted (not the main screening trees, we're still looking for those), two cherry trees, one either side of the drive ("Shogetsu", or Shimidsu Sakura), two red flowering crataegus "Paul's Scarlet" standards behind them on either side of the drive, then on the front side of the drive we've planted a silver birch, then a Pyrus "Chanticlear" and finally a white beam, Sorbus Aria "Lutescens". I've also managed to weed out between all the surviving bare root hedging we put in at the time of the build (a lot of which didn't survive) and planted a few more field maples. I need to quickly go and get a few more hawthorn/blackthorn plants to fill in some gaps. Working down in the bottom of the slope, where the hedging is, is evil. The slope is steep, and things like the wild rose and hawthorns and blackthorns are just out to get you. I've managed to weed out and lay black weed suppressing fabric down there and although it's pegged down, I'm going back over the steeper, narrow, areas, with some 13mm chicken wire, pegged down with big staples. Wickes have a good offer on bark chippings at the moment, four 90 litre bags for the price of three, at £7 per bag, which works out cheaper than having dumpy bags delivered around here. I managed to get 12 bags in the car this morning (the car didn't like it much, it has to be said - my guess is that the weight in the back was around 1/2 tonne, as the bark chippings were soaking wet inside the bags), but it managed OK. Another two, maybe three, car loads will cover up all the remaining weed fabric, I hope. The bark chippings stay put OK on the more level areas (it was a bit windy today, so a good test), but aren't going to stay in place on the steeper banked areas, so the plan is to spread the bark chippings over the weed fabric, then lay chicken wire over the top and staple it down. Where it abuts against the drive kerb haunching I've got some stainless penny washers and self-threading concrete screws, that I hope should hold down the folded edge of the chicken wire OK to the concrete. Eventually we'll plant some ground cover plants in slits cut through the chicken wire and fabric, once things are more established. The main aim at the moment is to just stop the weeds from competing with the hedging and trees, especially where it's really difficult to get down and weed effectively. Next job is to choose the big screening trees, and plant them in the nice topsoil that's in the big planter. One advantage of putting the other trees in first is that we now have a far better idea of the size and screening effect of just the 2.5m to 3m high deciduous trees that we've already put in. The other good news is that my other half is coming around to the idea of at least one Photinia "Red Robin" standard; I like them and best of all I can get a nice 3.5m standard for a not to horrendous price. A bay tree is also looking a distinct possibility, too, but we're still undecided on the others (I now think we need four, rather than three, bigger trees). I still bloody hate gardening, though....................4 points
-
Another option, which offers some extra control options: https://www.advanceappliances.co.uk/product/151-plug-n-glow/2 points
-
Think positive, when that weld breaks the falling beam won't hurt so much2 points
-
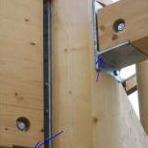
My gut said that connection didn't look right. I just did a quick search and found this:
 2 points
 -
Been a bit quiet on BH as I've been busy elsewhere - rectifying Bodgit Builder's attempt at laying my concrete floor. I started a thread about that here: Having taken ages to lay my circa 300mm of EPS and mesh-tied UFH pipework, I was keen to get a professional in to get me back on schedule and pour a flat, level concrete floor. No top layer screed. A few local companies quoted, one stated that they could not guarantee the pipework so I didn't go for them and the others I had simply had no faith in. I ended up contacting a local architect's firm and they recommended I contacted some of their regular builders. A couple were either too busy or candidly said that the job was not for them. The other chap came and quoted me for the job with the assurances that he could get a level floor finish. As it was a retrofit internal slab, it took him 2 days to pump 150sqm @100mm depth. On day 3, I inspected the 'finished' floor, and it was nothing but flat. I could really feel the varying levels of the floor by just walking around - I didn't need a level to tell it was way out. I also noted that the datum at the big slider was approx 20mm below where it should have been. Having contacted Bodgit Builder he duly came round and he agreed he would come back to grind down and high spots and fill where necessary with self-levelling (even confirmed the latter in an email). Prior to the day of his grinding, I scraped away at some of the high spots to discover that there was only 1-2mm of concrete/latence covering the UFH pipework. He'd obviously had issues with the mesh/pipework raising to the top (yes, I had fully purged all the air out!) and rather than doing his utmost to push the mesh down, he'd just decided to 'cover' the raised pipework with a bit more concrete. He either didn't have any idea that this would impact the agreed floor height or didn't give a damn (and must have thought I wouldn't notice!). He did admit that he'd had an issue with this section of the floor and asked me how I wanted to have it rectified. I duly informed him that this loop of pipework would have to be dug up and re-inserted at the appropriate depth and re-covered. He spent 2 days grinding high spots with little impact. Moaned at the cost of the grinding blocks and started making excuses as to why he couldn't make it back until a few weeks time. In any case, after nearly 6months later, he has not returned (as I expected) and have had minimal contact (just a few lame excuses) as to why he hasn't been able to rectify his work. Spot the issues: Is that a bit of mesh sticking through the floor? Yes! Luckily in the corner where the kitchen cupboards will be (no UFH). Easy to cut out in the end. Bit of a hump (approx 30mm difference over 500mm) Door threshold? what door threshold? Maybe should have gone for a concrete floor finish! Nice high spot by the door. Inward opening door too. May either need to skim off 30-4mm concrete (risk revealing more pipework or may have to raise the whole door frame - luckily it's timber framed at this section) Bit of a 'dump and dash' job Not that clear here, but concrete is well abobe the red mark (AKA the "do not go above here" mark). Yes Bodgit was wearing specs, but obviously didn't go to Specsavers. Can't get worse than that? Luckily I've found a local flooring company who also have experience in grinding, so they've been busy sorting out the high spots (only to reveal a further 3 rooms that have pipework that needs to be dug up). They didn't want to attempt doing that, and rather than risking getting in another 'professional' I've resorted to doing this myself. Intricate work that few builders would get right - not without damaging my ufh! Various UFH pipes revealed when skimming off the first few mm of concrete: Slab above probably needs another 20mm taking of in order to hit the original datum, so hopefully no further pipes to be found! First set fully revealed and ready to be pushed back although one has been damaged when they skimmed the top. You can just make out the grey inner lining: So this bugger needs to be replaced as the grinder's kinda ground it out. So how do you replace a section if the coupler's aren't supposed to be buried??? "16mm Repair coupling for use with Wunda 16mm Pert/Alu/Pert floor heating pipe, when a repair is the only option. This fitting must be fitted in a clearly accessible location and under no circumstances be buried in screed or concrete." https://cdn.wundatrade.co.uk/wp-content/uploads/2017/08/T03-Wunda-Generic-16mm-nut-and-insert-repair-coupling.pdf Tape coupler with self amalgamating tape? Obviously will fully need to pressurize before I cover. I'll need to add the couplers on the straight sections as adding on the bend will just compromise it all. Should I leave a small void around this join in case I need to access it? Or box in around the coupler and fill with a weaker mix in case I need access in future years? It's in a corner in the kitchen with no units going on top, just the laminate flooring. At least I'm not the only one with this issue: Once the flooring company and I have completed the required work, I'll be looking to get a PI to locate Bodgit Builder as he's started moving house which isn't much use when you want to take the bar steward to the small claims court. Lessons learnt: Don't always trust recommendations! Do it yourself! Pay particular attention to the end and loops/mesh in the corner as these are the areas that seem to rise up when pouring It's not the end of the world, there are things much worse in life that will/can piss you off, so don't let the bar stewards get you down.1 point
-
@TerryE has commented extensively on such solutions. I suspect he will be along shortly.1 point
-
I'll try and update the blog with some more photos of the landscaping, once I've finished most of the planting, maybe this coming weekend.1 point
-
YES!!! You only need one bag FFS1 point
-
Good lad pictures please.1 point
-
1 point
-
Balloons You did say you wanted out of the box thinking, work back from there.
 1 point
 -
A Genie lift comes to mind...1 point
-
@Ferdinand Thanks for your detailed reply. All of your points are well made and great advice, but we have already considered them. On the planning angle, our site is restricted to only ever being allowed to have one dwelling, ancillary buildings are fine, but can not be sold off etc. I have met with LPA and was advised they had no real concerns with my proposal and encouraged me to submit the plans for full approval. The existing foundations have already been granted full planning for 1.5 storeys. Regarding the legalities and complexities of living together, who owns what etc, It's quite difficult to go in to the details, but essentially, we all pay in equally and are happy to help each other in times of need. There are no formal contracts to us living together and no one owns more or less than any other, if for any reason one party or other decides they no longer wish to exist in this environment, then we will make suitable arrangements, but this is something we are all committed to and have discussed at length. It's difficult for many people to understand and there are drawbacks to living together, but also many plusses. As to why we want to build, it comes down to space, we would all like our own space from time to time, but also appreciate shared spaces where we can unwind and also entertain. This building will give us the best of both worlds.1 point
-
I know exactly what you mean. I've been repeatedly disappointed with the work of experienced tradespeople, even when they come highly recommended from friends and family. I can't say that we had anyone on site where I felt completely happy with their work, except maybe our electrician and the guys that did the screeding in a couple of downstairs rooms. I've become so disillusioned that I'm trying to finish the work myself, but I'm very slow and often not very good. I don't know what the solution is, but I feel for you (if it helps, I spent around 10 hours last weekend rectifying the plasterboarding in our garage, due to the boarders not listening to the one simple instruction I gave them).1 point
-
PEX is pretty resistant to most things. FWIW I'd not cut the pipe and fit a joiner, I'd make up a small mould around the affected area and pour in some two pack PU potting compound. That#s good enough to seal up high voltage underground electrical connections, and will be a belt-and-braces job around that scuffed section. There are loads of places that sell the two pack PU resin, and it's all pretty much the same. It has a little bit of "give" in it too, so won't be bothered by any slight expansion as the pipe warms up. If your stuck for a supplier, then try Rapid: https://www.rapidonline.com/robnor-el116h-bk-500-thermal-conductive-polyurethane-resin-500g-87-0224 or TLC: https://www.tlc-direct.co.uk/Products/SWJKRESIN.html You'll probably need a couple of the TLC kits, maybe three, to get enough resin to fill the mould. Make the mould as tight to the pipe as you can - it it were me I'd try and make a mould from a bigger bit of pipe with a slice cut off, slid over the UFH pipe with the top open and the ends taped tight to the UFH pipe to stop the resin leaking out.1 point
-
Have a chat to someone at SIGA slate and they will advise on what will / should be acceptable and may be able to provide evidence that their solution has / will stand up in Court.1 point
-
I know that what i am going to say is not much use to you now but we had a thirty sqare meter kitchen wet underfloor heated and then screeded with a fast cure screed called retinol extreme.curing 3-5 days dependant on weather etc roth was the heating manufacturer all pressure tested and ready to go after curing same company laid the uf heating total cost £3156.00 and since our total wally builder could not be trusted as per your photos we thought this company charging the three grand was ok . Fantastic job floor comletely level fast efficient and clean workers , company baised poole dorset called superscreed not sure how far they will travel but have now done our little en-suite to .1 point
-
We had the same problem about ten years ago when doing a major renovation on a previous property. Although our bodgit builder had marked levels, his concreteing gang mainly ignored them. We considered grinding off the high spot and filling the low spots, however having talked to the tiler who was going to tile some of the floors, we went with his recommendation to tile the whole lot. He used a sand and cement mix (as used by the Victorians prior to modern adhesives). He guarrenteed that none of the 900 x600 slate tiles would come up and none did. He started his setting out at the highest point and worked everything back from there. Our UFH worked a treat with the slate, always warm feet.1 point
-
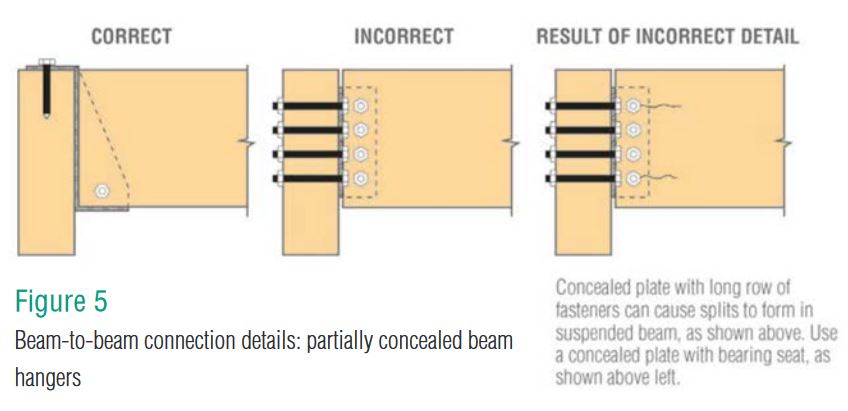
The detail (from Structural Timber Association) is suggesting a single row of bolts is bad practice as it can cause splitting, and that they prefer to see a bearing plate under the glulam beam. For example like this: Typically also glulam connections will have multiple bolt rows, any number of which can be seen here: https://www.pinterest.com/pin/294493263104077506/
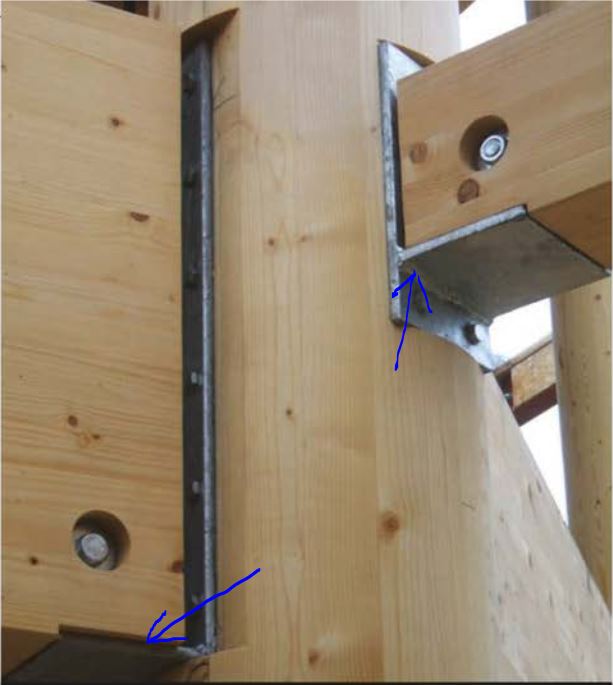 1 point
 -
Look at the region between 18 and 21 as an axample, the bead looks like it's just sittng ON the surface. Not hot enough to melt the base metal. You want to see a smooth transition for base to filler, possibly even wth a narrow dip where the base has melted. Have a look at the other side, and if it looks anything like that, whack the plate with a lump hammer and see if the paint cracks over the welds.1 point
-
If you're taking out a large part of the web (the upright bit) it would be an engineer re-design. First thing would be to see if you could make the hole toward the centre of the span, so if it's a 4m long beam, 2m from the end. At this point there will be the greatest moment but the least shear stress, so the web is doing less. Conversely, near the supports (the ends of the beam) there is going to be the most stress in the web. However, if the beam is already working at maximum capacity any holes in it are going to reduce its strength. For a "rule of thumb", if you keep your opening within the middle third of the depth of the beam, on the centre-line, within the middle half of the span of the beam, ensure there are no point loads on the beam, and click "like" on all my posts from now on, you should be fine.1 point
-
Thanks for the reply PeterStark, I'm just a bit nervous about buying a used machine as I have never used one before and have no idea what type of things can go wrong with them and the costs involved in fixing them. I don't mind getting my hands dirty fixing/fiddling with stuff if things go wrong with machines so would try and do any servicing myself if need be. Ah well I suppose that's what comes of buying second hand machines eh1 point
-
A top tip, I now have some A3 plans printed at my local library for 20p a page. Hope the rest of my build also costs 30% below prevailing rates.1 point
-
HSE can walk on at anytime But the reality is if you are off the beaten track You will only see HSE if something bad happens I was tempted to buy scaffold like many on here and simply sell it on when I had finished with it A friend who owns a small scaffold company advised me that I would get a visit As I’m across from a new development So I got his lads to scaf the whole house Hi1 point
-
I'd only had one beer (the last Estrella). More miffed I might not be able to have another if I had to go to A&E tbh. Going to self medicate with a new Lidl lager whilst the foam goes off.1 point
-
Not by HSE you won't - they will throw exactly the same book at you as anybody else (I would have thought as ignorance is no defence), but your charter organisation might, just might, take a dim view if something goes wrong particularly if you are using your professional insurance to cover aspects of your work on it.1 point
-
If you want a toy that makes this easy have a look at this: http://www.powertool-supplies.co.uk/festool-sword-saw-ssu-200-eb-plus-gb-240v.html?gclid=EAIaIQobChMI-rKK3tGK2gIVbgDTCh2Q1gDzEAQYAyABEgKFtPD_BwE other vendors are available.1 point
-
This is a short update and precursor to the updates that will soon follow once the ground works begin in April. Having now finally sold our house in Milton Keynes, we have made the move north to the Scottish Borders. We are renting a small flat, few miles from our building plot. At £320 per month, I was never going to win the caravan argument! We lost 7 weeks due to the initial sale /purchase of our house collapsing at the last minute. Fortunately it was sold very soon after being put back on the market. On reflection, that was not such a bad thing as the weather in the Borders was awful during February and early March, so any planned works would have just been put off anyway. So, with less than 4 weeks until the ground works start, we have set about making the necessary preparations and will also use the time to visit various contractors, suppliers and utility companies to confirm arrangements. Such as – BT Openreach, Scottish Water and SP Energy. I have to say, my experiences with the utility companies thus far continue to be good – meetings arranged and kept, very informative and happy to help. All approaches were via the internet and their respective websites. Connection costs for all 3 will amount to less than £2k, as BT Openreach appear to be indicating that the connection costs will be covered by their allowances. We have paid a visit to the window manufacturer, based just outside Newcastle, to discuss lead times - All seems good. We will also be popping over to the stone merchants to ensure they are aware of the time frames we are now working to. To help cement in our mind that the choice of stone we are going for is correct, we will visit a couple of buildings in the Kinross area of Scotland to see it for ourselves. It’s OK seeing various stone options on a sample board but you really do need to see it on a larger expanse. It’s not like wallpaper, once the stone is up, you can’t take it down again!! We have met with the Timber frame supplier and our builder who will undertake the majority of the work alongside his various tradesmen colleagues. We lost our plumber two weeks ago due to unforeseen circumstances but thankfully we have another on board. The builder confirmed all systems are go for the 16th April - We will be travelling slightly further north to Dalkeith, just south of Edinburgh, to have a cup of tea with the guy responsible for making and erecting our oak framed car port, log store and man shed! His surname is quite apt – Mallet – I kid you not! I have also secured a site toilet on a long term hire - £25 per week was the best price I could find. This includes a weekly service. Just need to sort out the scaffolding company and plant hire for the TF as and when it arrives. Hopefully come mid April I will have some construction photos to post, so until then take care and thanks for reading. PW.1 point
-
One of my favourites1 point
-
Jesus - should have been wearing brown trousers!!1 point
-
I know it's shot vertically (I forgot) & the wind makes it a little hard to hear, but this is an update as regards the windows etc. Meantime, our lovely warranty people are being difficult again,asking for photographic evidence of *things they've already inspected* which are now buried or behind walls! ..... they *really* do not like SIPS!1 point
-
You ideally want the outside lights on a normal light switch, indoors, at a normal height. Handy if this can be next to say where you can look out onto the lit area as in hear a noise at night, stand next to the "kitchen" window or wherever and illuminate the scumbags trying to nick your gnomes! You can get flash and make this a two way switch with a second IP rated switch outside - it's getting dark and your on the patio - you don't have to traipse into the house to put the lights on. You can come off an existing lighting circuit or a power circuit if you fuse it down. You can have the garden lighting on it's own rcbo back at the board. Anything getting damp / wet won't affect the other lights etc. Have a look at this install manual for instance. Really you want to select your brick lights first. Some come glanded others you have to drill and gland to suit. You can daisy chain or feed a terminal box then individually feed each lamp from that. https://www.saxbylighting.com/UploadedAssets/InstructionManuals/67602_67603 coastal.pdf1 point
-
Thanks but I don’t think solar would be very good here, low down on a north facing wall.1 point
-
I found that the FFX ones worked fine in both a Paslode and Hitachi first fix nailer. It's where I bought all ours.1 point
-
F***! F***! F***! Changing the foam gun cannister over just now and I went to screw on the gun cleaner.....Lucky I had glasses on as I got a full blast of acetone in both eyes! Head under sink asap and the right is pretty much back to normal. Left one slightly more irritated!0 points
-
PS think I might want to 'speak' to the person who ran that weld down the plate joint, probably the apprentice on a Friday!0 points


.jpg.c21f3ac78c9b7efd90cbdcb312744dc5.thumb.jpg.7adcad4c0e384f5ecd7d56b0618df6e5.jpg)