
Leaderboard


Popular Content
Showing content with the highest reputation on 01/28/18 in all areas
-
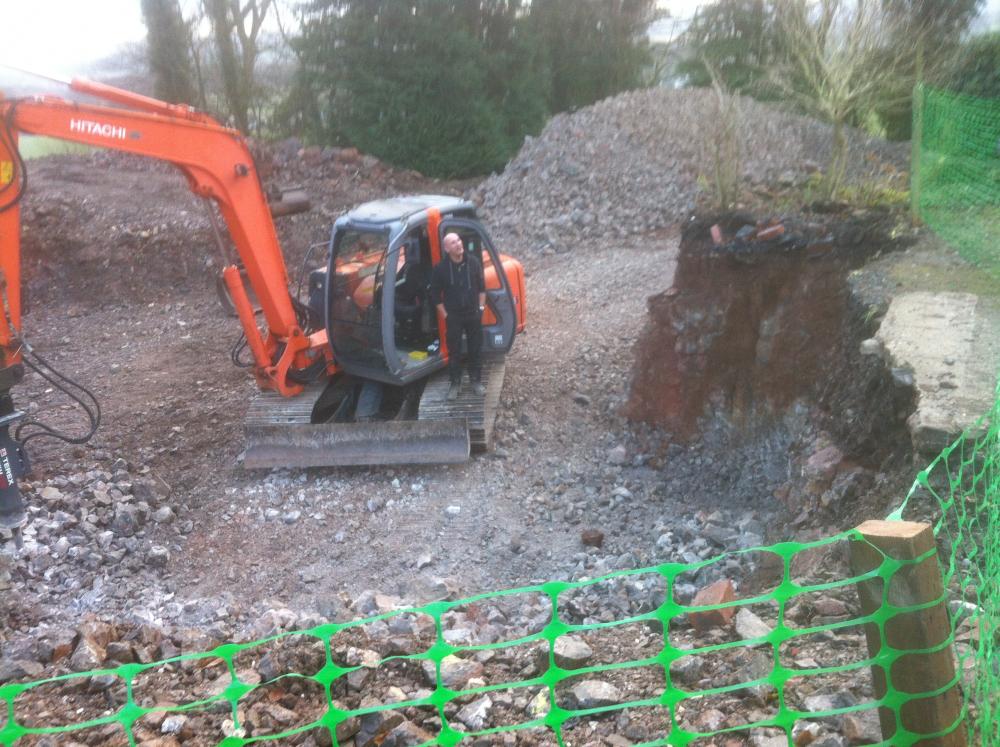
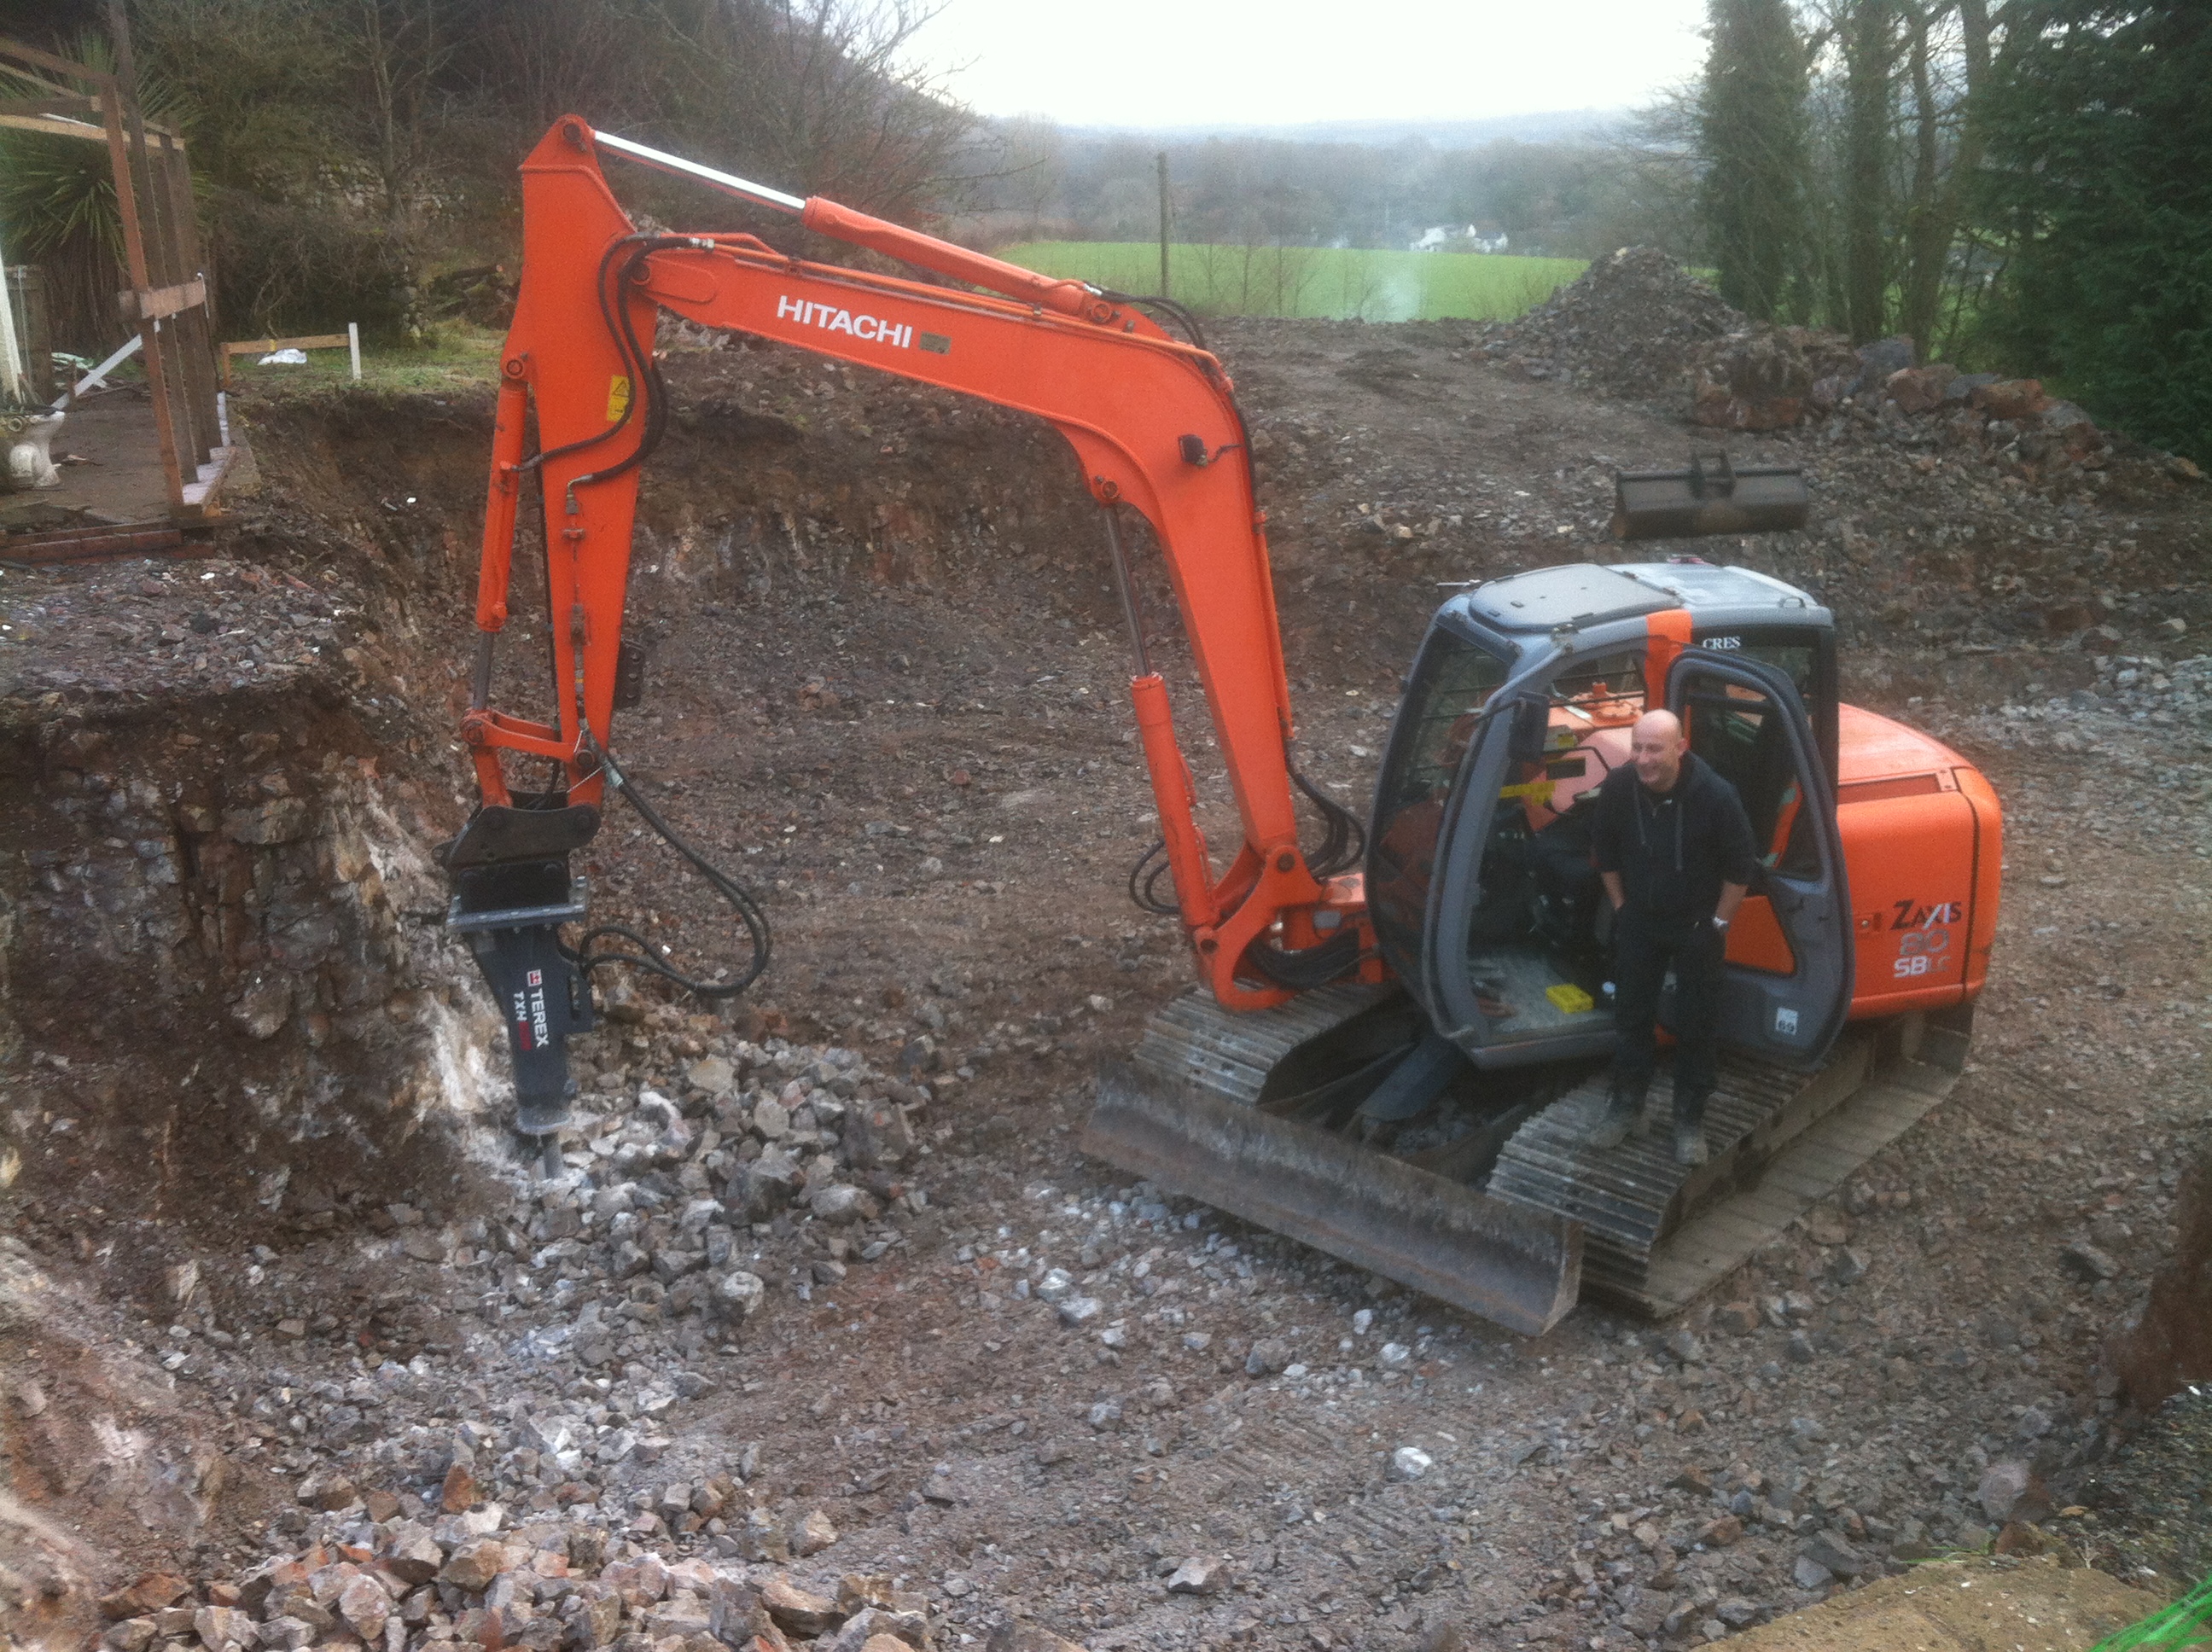
In the end I’ve decided to go with Amvic. They were a bit of a late entry into my selection process, the decision was mainly down to price, they were significantly cheaper than everyone else. For or those who like to see progress, here’s a photo of the hole for the walk in basement.
 3 points
 -
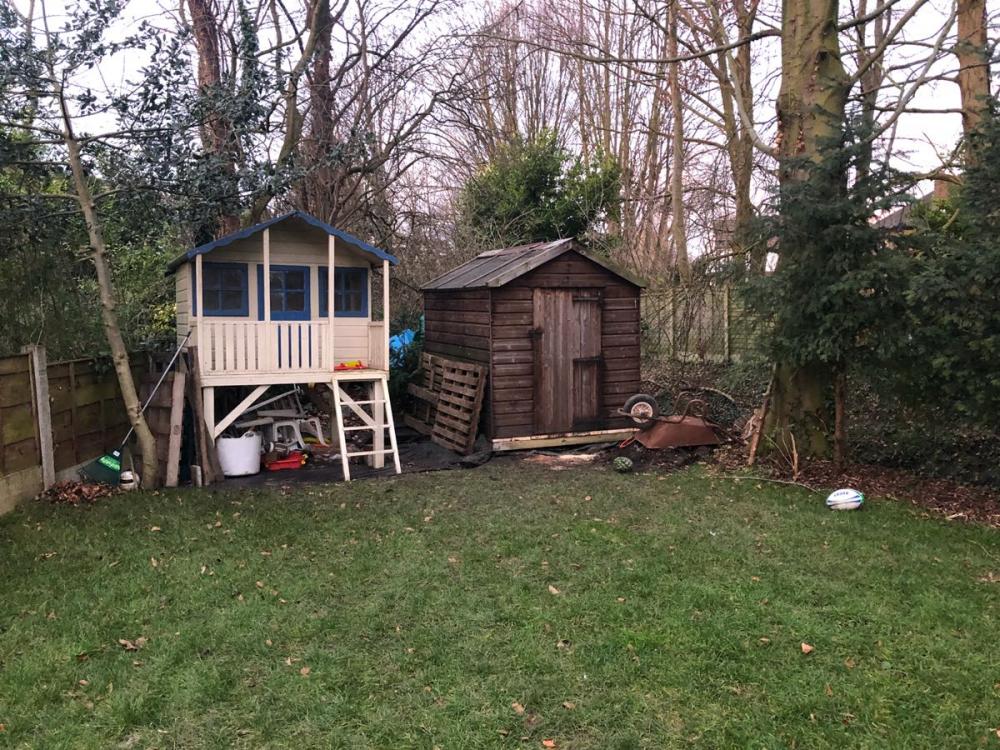
Is the cabin a registered dwelling or simply a temporary/garden structure? I don't know enough about the regs but it would look like a candidate for "DIY" dismantling to me and nothing to do with your build. One thing is for sure; ask the question the wrong way and the answer will always involve a "yes" and a "fee".2 points
-
Have a look at compriband expanding tape. Now is the perfect time to install it, while it is cold (keep the roll somewhere cold until you need to use it) In this cold weather it takes a long time to expand, so plenty of time to unroll it and slide it into the gap then it will gradually expand to fill the gap.2 points
-
I think the floor should lift instead... Descending shower heads are so 2017...1 point
-
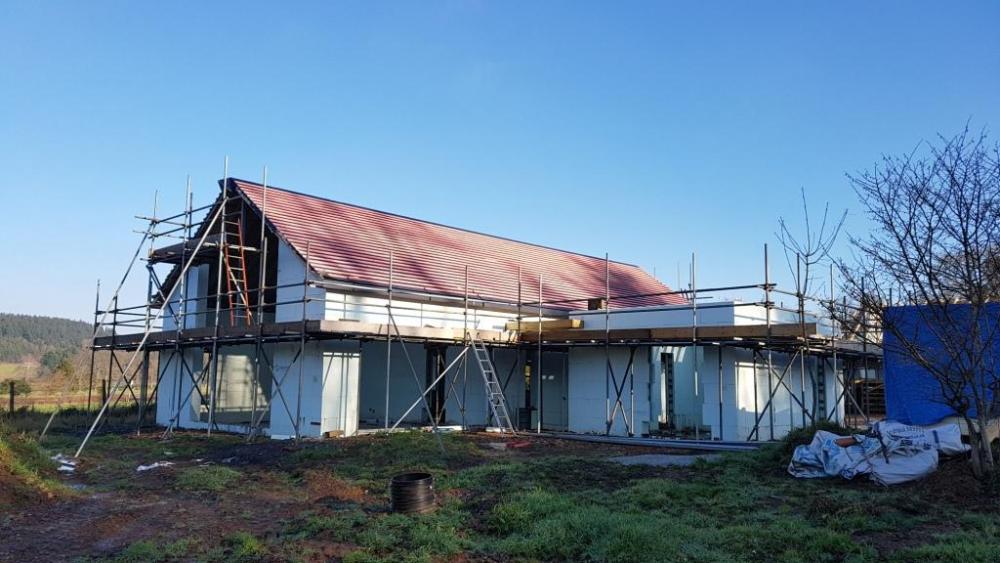
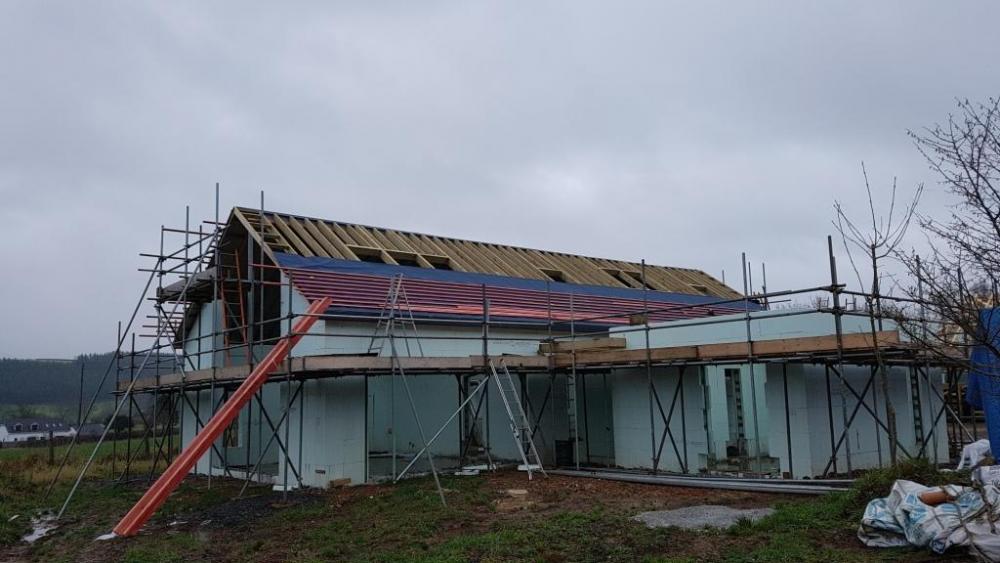
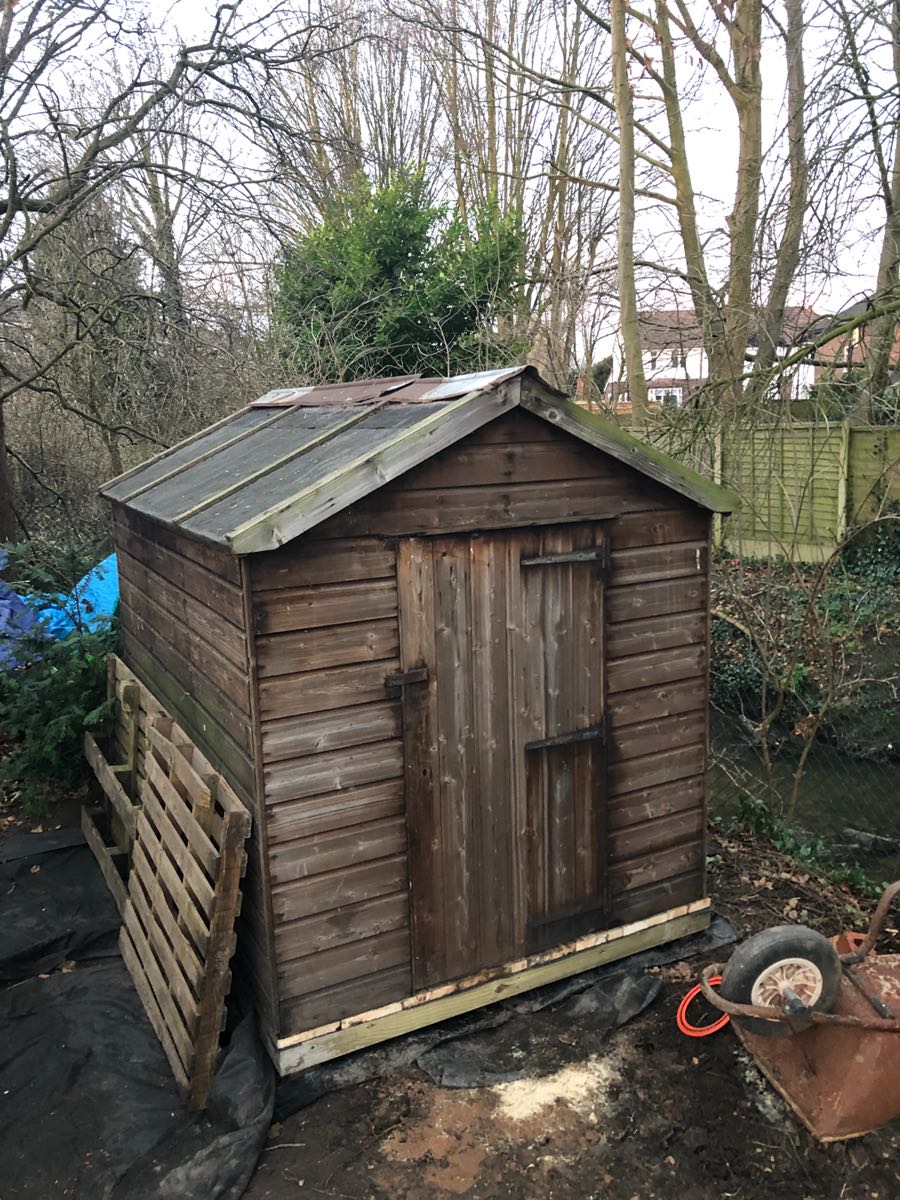
Finally up and part filled. Needs re-roofing but that can wait. I’ll give a paint/treatment at some stage sooner... I’ll clear the house of tools next time it’s light and dry and I’m around. Just hope I can fit a cement mixer down the gap...
 1 point
 -
Turn a screw into the plugs and you'll be able to pull them out of the tiles. A bit of colour match silicone / caulk and you'll be ok, but if it were me I'd be asking for the tiles to be replaced..........1 point
-
Big bonfire maybe.......accidentally of course1 point
-
Good to know.....there goes the render in favour of masonry paint and a new sofa LOL1 point
-
Sounds about right. Watch the demolition starting the CiL process - get that exemption form in tomorrow and don’t even remove a single screw until you get confirmation back ..!!!1 point
-
YOu now need to dig a hole in the middle of the green bit, and put up a sign worded Money Pit.1 point
-
How about doing the bottom foot a different colour as that looks damp and will probably require more frequent work.1 point
-
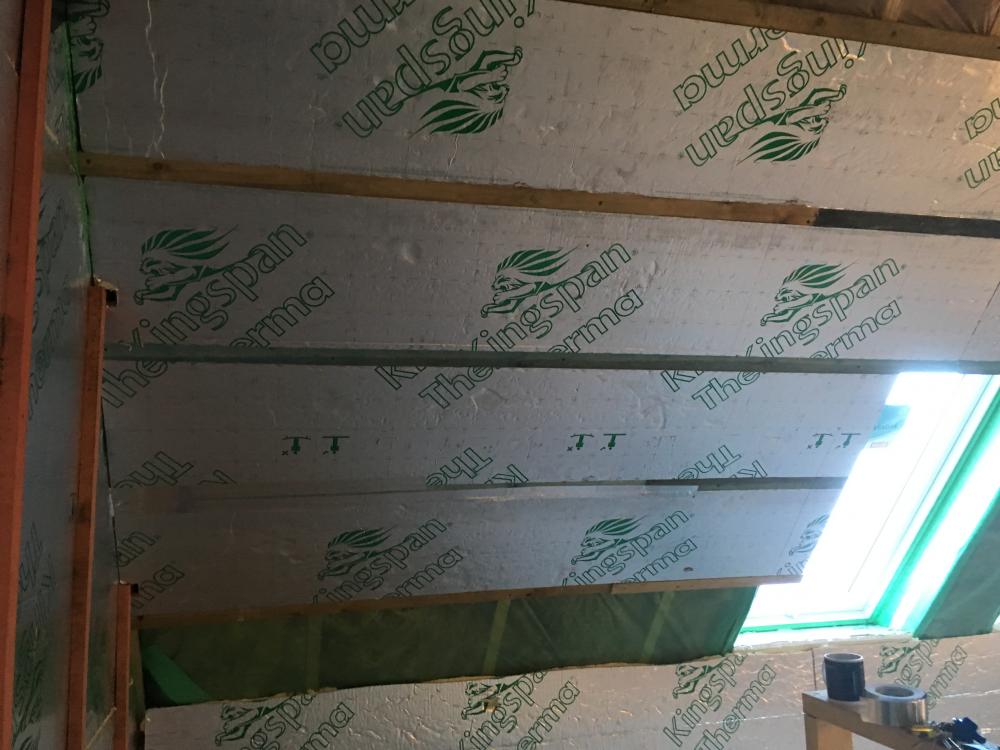
Yes unless you do what we did and go with board between the battens. You’re talking about a cold bridge 50mm square at best that is made up of 200mm of timber - it’s got about the same loss overall as one of your windows so don’t panic ..! Much easier to get a flat finish too. This then has 100mm foil tape over it to form the VCL.
 1 point
 -
There might be something to be said for eh painting it in vertical strokes with a sweeping brush for a texture.1 point
-
I have areas of both red brick and buttermilk over breezeblock in my garden covering multitudes of sins eg back of next doors garages and the red brick paint can be recovered only very 5-6 years or so. If you have windows faving the wall, then I would do something abstract to give interest on the wall eg a frame of cut bamboo canes or even core ten, to make the visual interest away from the window to outside. It makes your room feel that it has window boxes, and is very effective,1 point
-
Scrape all the snots and bad looking bits of the blocks with a trowel/ scraper then give it hose down then paint it whatever colour you like. Simple and cheap is always a winner.1 point
-
I agree that the slate grey would look great. The usual reason for choosing white in a location like yours is to maximise light reflection. Do you have many windows where the light would important?1 point
-
I might be tempted by simple dark masonry paint .. brick red or slate grey. Certainly pros and cons, but could be effective and cost effective. I really would not throw thousands at it as I cannot see a way to get a better or more practical surface easily, and I cannot see how to avoid doing so.1 point
-
Just down the road from us. I'm dreadfully tempted to abuse my Admin powers and delete this thread - only a matter of time before SWMBO will be 'letting me have her way' purely for reference and research purposes naturally.1 point
-
+1 to that. Squirt the inside with a bit of water at each end to make it go off quicker and then fill the last 6" of each side. Let it go off for a few hours then go back and fill the centre section up through all the holes. Strangely satisfying, but don't stand under it once you've done it as you will get it in your hair... ask me how I know !1 point
-
I agree with nick from wales if the pipes move freely and are just touching the unit and the unit is attached to the wall properly then any further weight added is unlikely to cause the pipes to leak particularly as the fittings are compression.1 point
-
... actually, she HAS suggested that! . When we first got it she says "oh, once the house is built we could keep it and maybe have the odd weekend away with it" - 2 weeks later she's fantasising ways to blow it up! I think it's safe to say we won't be keeping it1 point
-
Agreed. There are two height adjustable brackets up top, and another two basic brackets down lower, plus it looks like silicone / other has been used too. That means, if all are screwed, the unit is going nowhere. Is it touching the pipes or resting on them ? If it's the former than I'd not worry. Grab the pipes and see if they move left to right. If they do I'd not move it back as you'll have holes in the tiles which will then be on show on the right hand side ( can't help wondering if you don't already have some showing on the left side ). I'd use this opportunity to sit down with your builder in a minutes drawn meeting and express how pissed off you are with how your clear request has not been executed anywhere near what you asked for. If you don't rock the boat a little here the drop in attention will continue to spiral out of control.1 point
-
Yes, plenty of merit to that solution. Just be sure not to allow the foam to expand beyond the end of the lintel.1 point
-
Have found it really easy to work with TBH. The guys at The Fell Partnership (SW distributors for Nudura) have been really helpful as well. I did end up with quite a lot of wastage from cut blocks but that's more a design issue than anything. It was the first time the architect had used Nudura so whilst the design was tweaked for block heights for lintels etc, which worked well the length dimensions did mean I ended up trimming 50mm/100mm of blocks to make fit. I went with strip foundations so whilst I could move the walls slightly when laying out the first course at the beginning I ran out of room, as couldn't go to close to edge of foundations to completely avoid trimming blocks effectively. As a system works really well for those doing it on their own. I laid every single block by myself, cut and fitted all the steel rebar and only had to have help for foundations and the wall pours. (steel manufacturer craned steels into position as part of their package but they went in in a day with me and 2 guys). So to go from foundations to starting roof I paid for 5 man days in total, which was the help for the concrete pours. :-) It took me nearly 12 weeks though.... With a team of 3 could probably do it in 2 to 3 weeks with what I know now.1 point
-
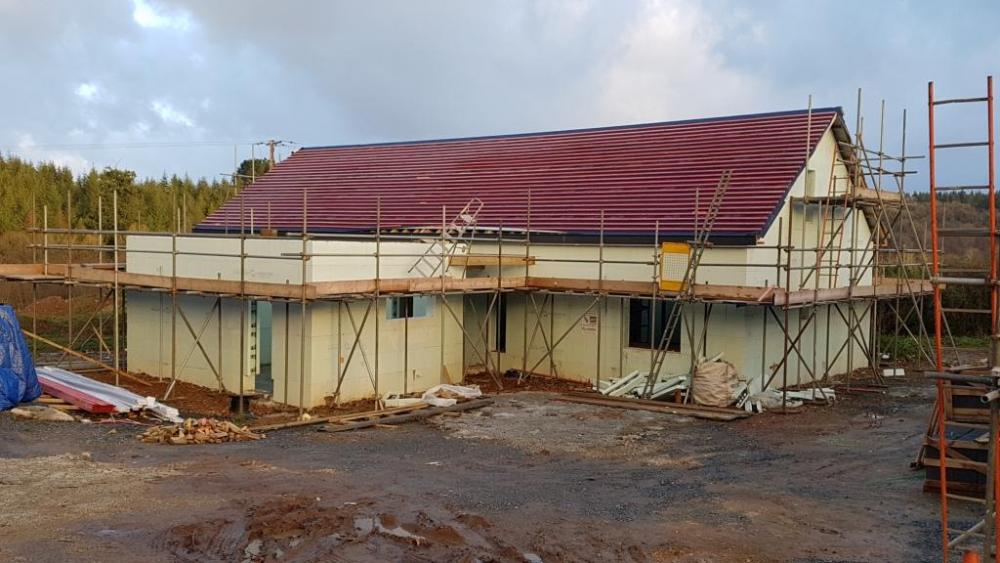
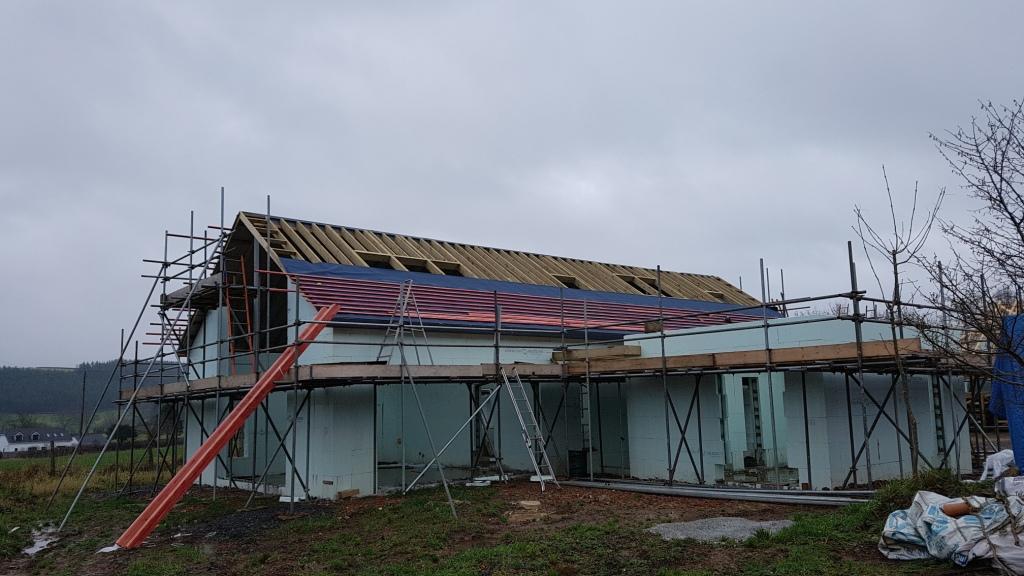
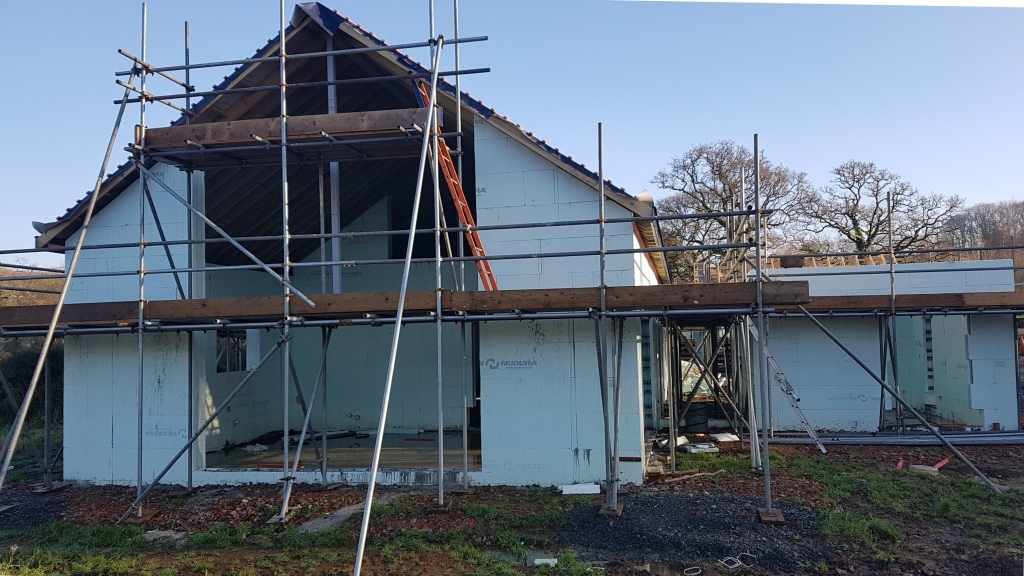
Have literally thousands of photos as am slightly trigger happy when I get the camera out! Here's a few of the main house, but happy to post others if there's something particular you want to look at / compare.
 1 point
 -
I nearly always use 10 mil on floors You can get away with a bit less on Backer board It’s not just the floor Often the tiles you are using can be slightly bowed Exspecially The 1200 long plank tiles that are so popular now Also its much easier and less messy to give the odd tile a tap than lifting and packing up with more adhesive Also it’s worth using the voter clips on the larger floor tiles Hope this helps1 point
-
Standard 10mm floor trowel - double sided ones have 10 and 6 usually. Screwfix do Rubi ones on next day delivery for cheaper than the Forge Steel cr&p...1 point
-
8 mil1 point
-
We used Scotts of Thrapston who designed our metal web joists. http://www.scottsofthrapston.co.uk/page.php?article=997&name1 point
-
Yes, and it’s one of the few of our Internorm windows which doesn’t leak and isnt difficult to lock1 point
-
Think of this issue as a small hint about your builder....1 point
-
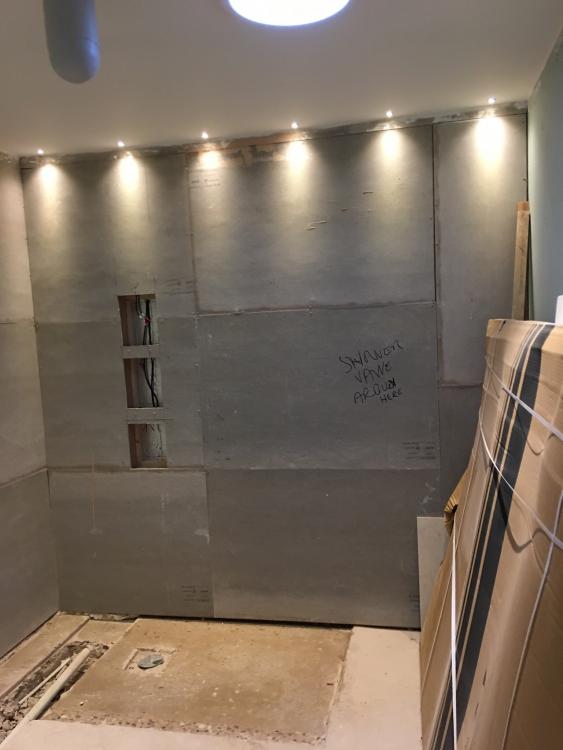
I have a rainfall shower head going in (had one before so I know what they are like) but I am having mine on an arm as it makes it very much easier for cleaning and maintenance. I am also having an adustable head fitting on a rail on the wall all worked from the same shower valve. I would never have just the rain head its not adequate on its own and you try cleaning the shower with just that you will find it impossible to rinse off tiles screens etc. As to lighting we are not lighting directly overhead we are lighting the wall and the niches in the wet area with other lighting in the rest of the room as normal. We have used a professional lighting design company and this is their design. Lights are in and we are first fixed and already I can see how it will look. Try looking at your lighting a different way, I have learnt loads from working with the professionals and it is money well spent. Here is a pic of wet room first fix and lighting in.
 1 point
 -
until
I found out today that the stand had 60 enquiries yesterday and NSBRC told us that we were the 4th most visited stand at the show. More facts when I know it on the statistics including visitor numbers. Today was an exceptionally busy day and I was delighted to have 4 buildhub forum members make themselves known to me when they visited the stand. Happy to put faces to names thank you. More news tomorrow. Kind regards AndyT1 point -
My 2 pence worth. This thread highlights, if you want it done properly, do it yourself. At least you would have got the gap you wanted. Having said that, the unit is fixed to the wall with 2 (or more) brackets, so I very much doubt it's doing much more than touching those pipes, and not putting the full weight of the unit on the pipes.1 point
-
I appreciate where you're coming from on the telling him beforehand basis. But looking at it where you are now, if he isn't prepared to do what you request, then the solution is notch the back rail, as minimal as possible, and seal the raw edges using PVA or silicone.1 point
-
Most of the truss manufacturers can do this for you and specify - and supply - the correct steelwork and calculations to keep the BCO happy. I use DWB in Hull as they supply my BM but that’s down to choice and location. If you are midlands based then Wyckham Blackwell are also very good as they do glulam beams which may work better for you than steel if you want them on show.1 point
-
Russel I am not clear on your roof but ours is 3 sections flat middle and sloping up quite steeply at the end on the sections either side. We have very large fascias and overhangs. It was a challenge due to our windy location. MBC provided us with a flat deck and we effectively built another roof on top. No architect involvement but had SE input because of te loading on the MBC frame and the wind factor. Our trusses were made by Wykham Blackwell in Hampton in arden near Birmingham Airport. The improved on SE design. They are brilliant. If it helps any I can send you some of our drawings so you get the idea.1 point
-
These are tough decisions and we were facing the same situation - home on market for 1 year and still no sale - though we were lucky it did finally sell before it got to a critical stage. One thing I will say is that juggling the incomings with outgoings vs build progress was a big stress point for me. Once we had the monies available I felt a huge weight had been lifted and this let us get on with our life, else the build would have dragged and so would the stress that goes with it. So my input here is to do what it takes to get the money side sorted. The cost of dragging the build out might outweigh the "loss" if you dropped your pants (so to speak) on the sale price. By cost I mean both financially and emotionally. In our case we needed both to sell and get a mortgage to complete the build, it sounds like your situation is different and you only need to do one or the other.1 point
-
Does depend what you mean by an immersion. Assuming that you mean a traditional hot water cylinder, then you can think of it as just a large kettle. You put cold water in, heat it up with a 3 kW element at the bottom (or midpoint/top depending on design), once the water is hot enough, you use it. Then it gets refilled with cold water (does this without you knowing as it is just replacing the hot water that you need) and either automatically turns the heating element on, or waits until the timer says it is time to switch on and heats the water if it needs it (think Economy 7 after midnight). There are generally two ways to 'manage' domestic hot water (DHW) in a cylinder. One it to use the water that is actually in the cylinder, the other is to have a heat exchanger that separates the cold mains water that you want to heat up from a volume of static stored water in the cylinder. The heat exchanger does not have to be very fancy, often just a coil of pipe within the cylinder. The Sunamp is basically a box of 'heat' that cold water is passed though to get warmed up via a heat exchanger. The difference between a normal cylinder is that the substance holding the heat (heat is the old word for energy) is not water but a phase change material (PCM). PCMs are sometimes a little hard to understand, but the easy one is water changing from solid ice to liquid water at 0°C. So imaging that you have some ice at exactly 0°C, as it changes into liquid water, the temperature stays at exactly 0°C. As it changes state (called phase in grown up science) it releases energy. We call this melting (or latent heat of fusion for lab coat wearing grown ups). The energy released can be transferred, via a heat exchanger, to 'something else', usually the air around the ice. The really odd thing is that a disproportionate amount of energy is released as materials change state. So imaging that solid ice can store 2.1 kJ/kg.K (J, joule, is the unit of energy) and liquid water can store 4.2 kJ/kg.K of energy you may think that as it fuses it would be somewhere between the 2, well it isn't. It is 334 kJ/kg, or about 100 times the difference (note that there is no K (kelvin) as the temperature stays the same at 0) The Sunamp does a similar trick but at a higher temperature, about the temperature you want your hot water at (that was lucky or it would be useless). So, when you want some hot water, though some sciency magic and trickery, the material in the Sunamp changes state and releases energy though the heat exchanger, warming up the water. If you want to know exact details, ask Sunamp or a Physicist, or at a push a Chemist (not Boots or Lloyds). This allows the Sunamp to store a relatively high amount of energy is a small box. There are some other odd things that happen with PCMs, one is the ability to store a lot of energy at a low temperature i.e. room temperature, but still release the energy at a higher temperature when needed. This reduces the need to have lots of insulation around the store. To give you an idea of how high thermal losses can be with a traditional hot water cylinder, I was loosing more energy from mine than I actually needed to bathe every day (reduced it with extra insulation, so not insurmountable). Some things just need lots of insulation, a DHW cylinder is one of them. A Sunamp is not much good in an airing cupboard as it looses little thermal energy to the air around it. So pros and cons. A normal water cylinder is well understood by most people, is simple (if electrically heated) and relatively cheap to install. The downside is that they are large, can be noisy (if you have a bad installation), heavy when full of water and can have very high thermal losses. A Sunamp is much smaller and lighter and has much lower losses. It is more complicated as there is a pump and control systems, and can seem, in isolation, more expensive, but that is down to installation and location to a certain extent. I do not have any connection with Sunamp, but have seen @JSHarris installation and was quite impressed with the unit (apart from the old bleed valve position which I think is now improved). There is probably a lot more to discus about the two different technologies, and I may not have got everything correct, or may have got muddles. But basically they are both ways to make cold water into hot water, which is very basic technology and engineering, so don't fret too much when comparing systems/installations.1 point
-
Both very different ..!! immersun uses the excess PV to use a standard immersion in your hot water or unvented cylinder to heat the DHW when excess is available. The storage media is the water itself, and you still need a primary heat source (ASHP, Gas, Oil, E7 etc) to heat the water when there is no sun. The Sunamp contains all of the above in a single component and uses a phase change material to store the excess PV, and uses E7 currently to heat when there is no sun. DHW is provided when cold mains flows through the heat exchanger and the phase change material releases its heat to warm the water. To compare the cost of both you need to add in the cylinder cost and other controls against the Sunamp pricing.1 point
-
So.....what I need then is a rainfall shower head up on the ceiling.....that DESCENDS for cleaning at the touch of a button.....0 points


.thumb.jpg.84720b9262bdfdd639b2257471fce9e7.jpg)


until