MikeGrahamT21
-
Posts
1877 -
Joined
-
Last visited
-
Days Won
1
Everything posted by MikeGrahamT21
-
Adhesive instead of Mortar
MikeGrahamT21 replied to nh26302's topic in Bricklaying, Blockwork & Mortar
Am I right thinking you are talking more brick slips/tiles than actual bricks? If so, you need a blockwork wall to whatever height, render with mesh and then use adhesive to stick the slips/tiles on. What product are you looking at though? -
Connecting soil stack to the existing sewer
MikeGrahamT21 replied to pilgrim's topic in Waste & Sewerage
+1 for everything aside from concrete. Building control do not permit concrete to touch drainage, it should be surrounded in 10mm pea gravel. My new drainage had to be shuttered so the concrete foundation came nowhere near it -
99% sure you’ll have dot and dab plasterboards on your walls, and this is likely a big contributor to your issues, take a socket face plate off on a windy day, if it blows a gale, we’ll I’m sure you can imagine what’s happening behind there…
-
Side Extension moving along, slowly but surely
MikeGrahamT21 posted a blog entry in Back on the self-build waggon...
Just a few progress photos of the inside and how its been moving along since the builders left after completing their work: First job was the warm roof, literally just to get some of the 100mm boards used up as i had no where else to put them I was also trying to get as much of the dusty bits out of the way before opening this room up to the rest of the bungalow, so removed the outer bricks from under the bathroom window (the blocks will be done later down the line, as the new bathroom needs creating first so i'm not without showering and toilet facilities). Cleaned up under the floor and removed the old kitchen window, door and brickwork. 2 new windows went in, triple glazed, with just the bow window to swap out for a standard casement window later down the line. Next task was to get a firm floor to work off, so I set about getting all necessary pipes in, and also got the electrician in to sort the sockets out, and finally another load of insulation, trying my best to use up all my bits rather than skipping them A further 50mm to the roof and 20mm under it: Followed by airtight primer and tape round all of the edges Started working on the box section at the top of the roof which will house the ventilation pipes and cover up any thermal bridges from the timber wall header At this point the building inspector came, and asked me what on earth the pipes were for?! Told him they were for the mechanical ventilation and he looked nonethewiser, but otherwise was happy for me to carry on Another satisfying job using up all my odds and ends of plasterboard this time! Before the front of the box goes on, i need to cut out the 125mm holes for the vent pipe to come through, and install the plenum at each end. Also found a use for the spare render beads i had from doing the dining room (part 1), trimmed them down with the planer to 11mm, which will give me a perfect level base to work from when i put the bonding coat on. Fingers crossed the next time i post, it'll be more or less done, minus the bathroom end. -
Battery Storage - 7 month update
MikeGrahamT21 posted a blog entry in Back on the self-build waggon...
As promised another update, following many tweaks and a firmware upgrade from Solis. So the existing problems were: Whenever the battery isn't at 100% SOC, it pulls an amount of power from the grid, somewhere between 60W and 100W Even when the battery is actively charging, it still pulls the same 60-100W from the grid, regardless if there is enough PV power to charge the battery and cover loads at the same time. Once the battery is 100% SOC and im generating PV more than my load, I import 0W. Pulsating loads (such as induction hob) the unit can find hard to track, due to their pulsing nature, and the delay in reading the CT clamp and acting upon it. The firmware upgrade was to fix the pulsating load issue, it doesn't completely resolve it, however it is much better tracked now. Solis reduced the polling time for the CT, so it is polled more often than before. The problems with the excess import of between 60-100W remained, however Solis put some variables in the new firmware which allowed them to place an offset, we tried many different values and eventually stopped at a 65W offset, now the grid connection fluctuates between +40W and -50W which overall has fixed the issue as good as can be without draining too much of the battery power. Oddly since adding the second US3000C module, my overnight usage (no PV input) has dropped from around 0.35kWh to 0.2kWh, why i'm not sure but no complaints from me there!! Now have 6.6kWh of usable capacity, to note the original US3000C module had just dropped to 99% SOH, manual states to use the newer module as the master, which I did, so its now once again showing 100% SOH, and the 1% drop of the older module is handled internally. Upon connecting the new battery, the old battery appeared to receive a firmware upgrade, as it restarted a few times before staying on. Current yearly graph is looking good, still exporting a lot of power, but at least I'm using what i can now: Shown above is a daily example of the battery charging and discharging. This was after a particularly cloudy day which only just saw me reach 100% SOC for a mere moment. The negative battery power denotes power draining from the unit, with positive being a charge. This is the corresponding grid data for the same day. Previously (March 2022) I reported total import of 48.3kWh. Clearly its impossible to compare with another month, and we will have to wait til March has been and gone once again, however here is the monthly data from April onwards: April - 41.2kWh May - 18.4kWh June - 17.1kWh July - 18.9kWh August - 18.1kWh September (So far) - 18.0kWh The tweaks to the system were finalised on May 5th, just checked my emails from Solis and that was the last contact, so April shows another month before the changes. Full credit to Paul Carpenter, the European Engineering Manager as Solis for sticking with me on all these changes til we found the sweet spot! Hope this provides some good info for someone out there thinking of installing battery tech. I'll post another update at the 1year point, though probably 1year from the tweaks, so May next year, and then I'll also be able to comment on my AQ for the import. -
Do it… it’s still the best thing I’ve ever added to my 70s bungalow!
-
Battery Storage - Nearly 2 months in
MikeGrahamT21 commented on MikeGrahamT21's blog entry in Back on the self-build waggon...
Just had another battery module delivered yesterday to unlock the full 3kW of the inverter, which will make another positive difference. will provide an update from all the changes next week 👍🏻 -
Another section of External Wall Insulation Completed
MikeGrahamT21 commented on MikeGrahamT21's blog entry in Back on the self-build waggon...
🤣 and mine too, just try not to look at it. -
Rendering polystyrene
MikeGrahamT21 replied to Highland build's topic in General Self Build & DIY Discussion
ewistore.co.uk P.S. thanks for the reminder that i'd actually done this, forgot to put it up- 15 replies
-
- 2
-

-
- render
- insulated raft
- (and 2 more)
-
Another section of External Wall Insulation Completed
MikeGrahamT21 posted a blog entry in Back on the self-build waggon...
Forgot i'd done this for some reason 😂 Been a long time coming, but finally decided to get on with it, heres a few before and after and during pics, I did use wall anchors too but for some reason didn't bother taking a photo at that point. Pleased with how it came out, not only looks better than before with the conduit for the wire which is now buried, but should also save some £££. The plinth insulation will get rendered at some point in the future in black, but the tubs are of a size where i kind of need to be able to do all my sections at once. -
Extension completed on the outside
MikeGrahamT21 posted a blog entry in Back on the self-build waggon...
What a journey that was, lying builder and a few no show days caused the finish date to slip, and following a 2month delayed start, but I got there in the end!! Good things come to those who wait eh. So the outside shell of the building is now completed, and yesterday I started work on the inside. The lean-to roof was extremely close, but just squeezed it in with a slight pitch modification. This leaves me with essentially 3 sections of wall to clad: Near side will get done with EWI and brick slips, and the flue will get extended through the EWI, far side will get EWI and brick slips right up to the soffit, and that will leave a triangle with 1 missing corner above the extension. This will get clad with timber, and insulated to match the EWI spec. The EWI will likely get done first, the timber later. Downpipe is to be fitted yet, and will temporarily get routed down the soil stack. I'm going to get several large water storage tanks, but as you can probably see i've got a mountain of block paving to shift first!! Really pleased with my size choice for the windows, had worried they weren't going to be big enough, but think they are spot on! First day of me on the job, got the first layer of insulation in, 100mm PIR. Need to hit it with the expanding foam, there is then a further 50mm to go on top of this, and then 25mm under the rafters, before the plasterboard. Hoping the new Windows for the front of this and also an upgrade for the kitchen to triple glazed will be coming tomorrow, and planning on fitting this bank holiday weekend if they do. Other developments: I also made the decision to invest in another battery, a further US3000C module to take me to around 6.6kWh of usable, and unlock the full 3kW output of the inverter, and given the current outlook to import pricing, I think i made the right choice. Very pleased with how the battery system is performing even how it is currently with only a single module. -
At 18mm thick, those tiles are only a smidge above the EDP flashing. The correct flashing for your tiles I think is https://www.sterlingbuild.co.uk/product/velux-edt-0000-flat-tile-flashing The EDW will kick the tiles up along the sides, the tiles under the rippled flashing at the bottom of the window should be profiled along the top edge of the tile at an angle, and then will be stuck onto the tiles with the butyl strip and smoothed down either with your hands or a tool.
-
Finally got started on the extension!
MikeGrahamT21 commented on MikeGrahamT21's blog entry in Back on the self-build waggon...
Bit more progress... Roof design has had to be changed, a straight lean to roof just won't fit under the existing eaves, so its going to have to have a hip on the front to make it all fit I think, see what the roofer reckons.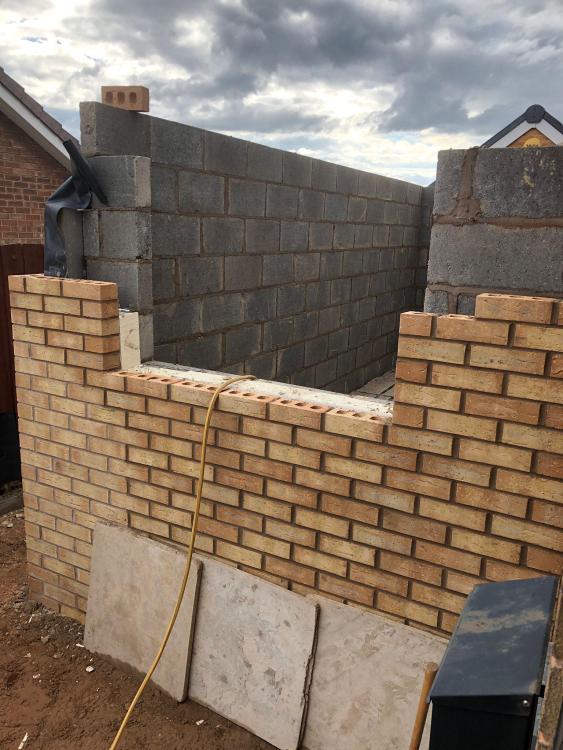
-
The PVC suppliers i've used in past all say that they can send them off to be foiled in whatever colour you want, at extra cost of course.
-
Finally got started on the extension!
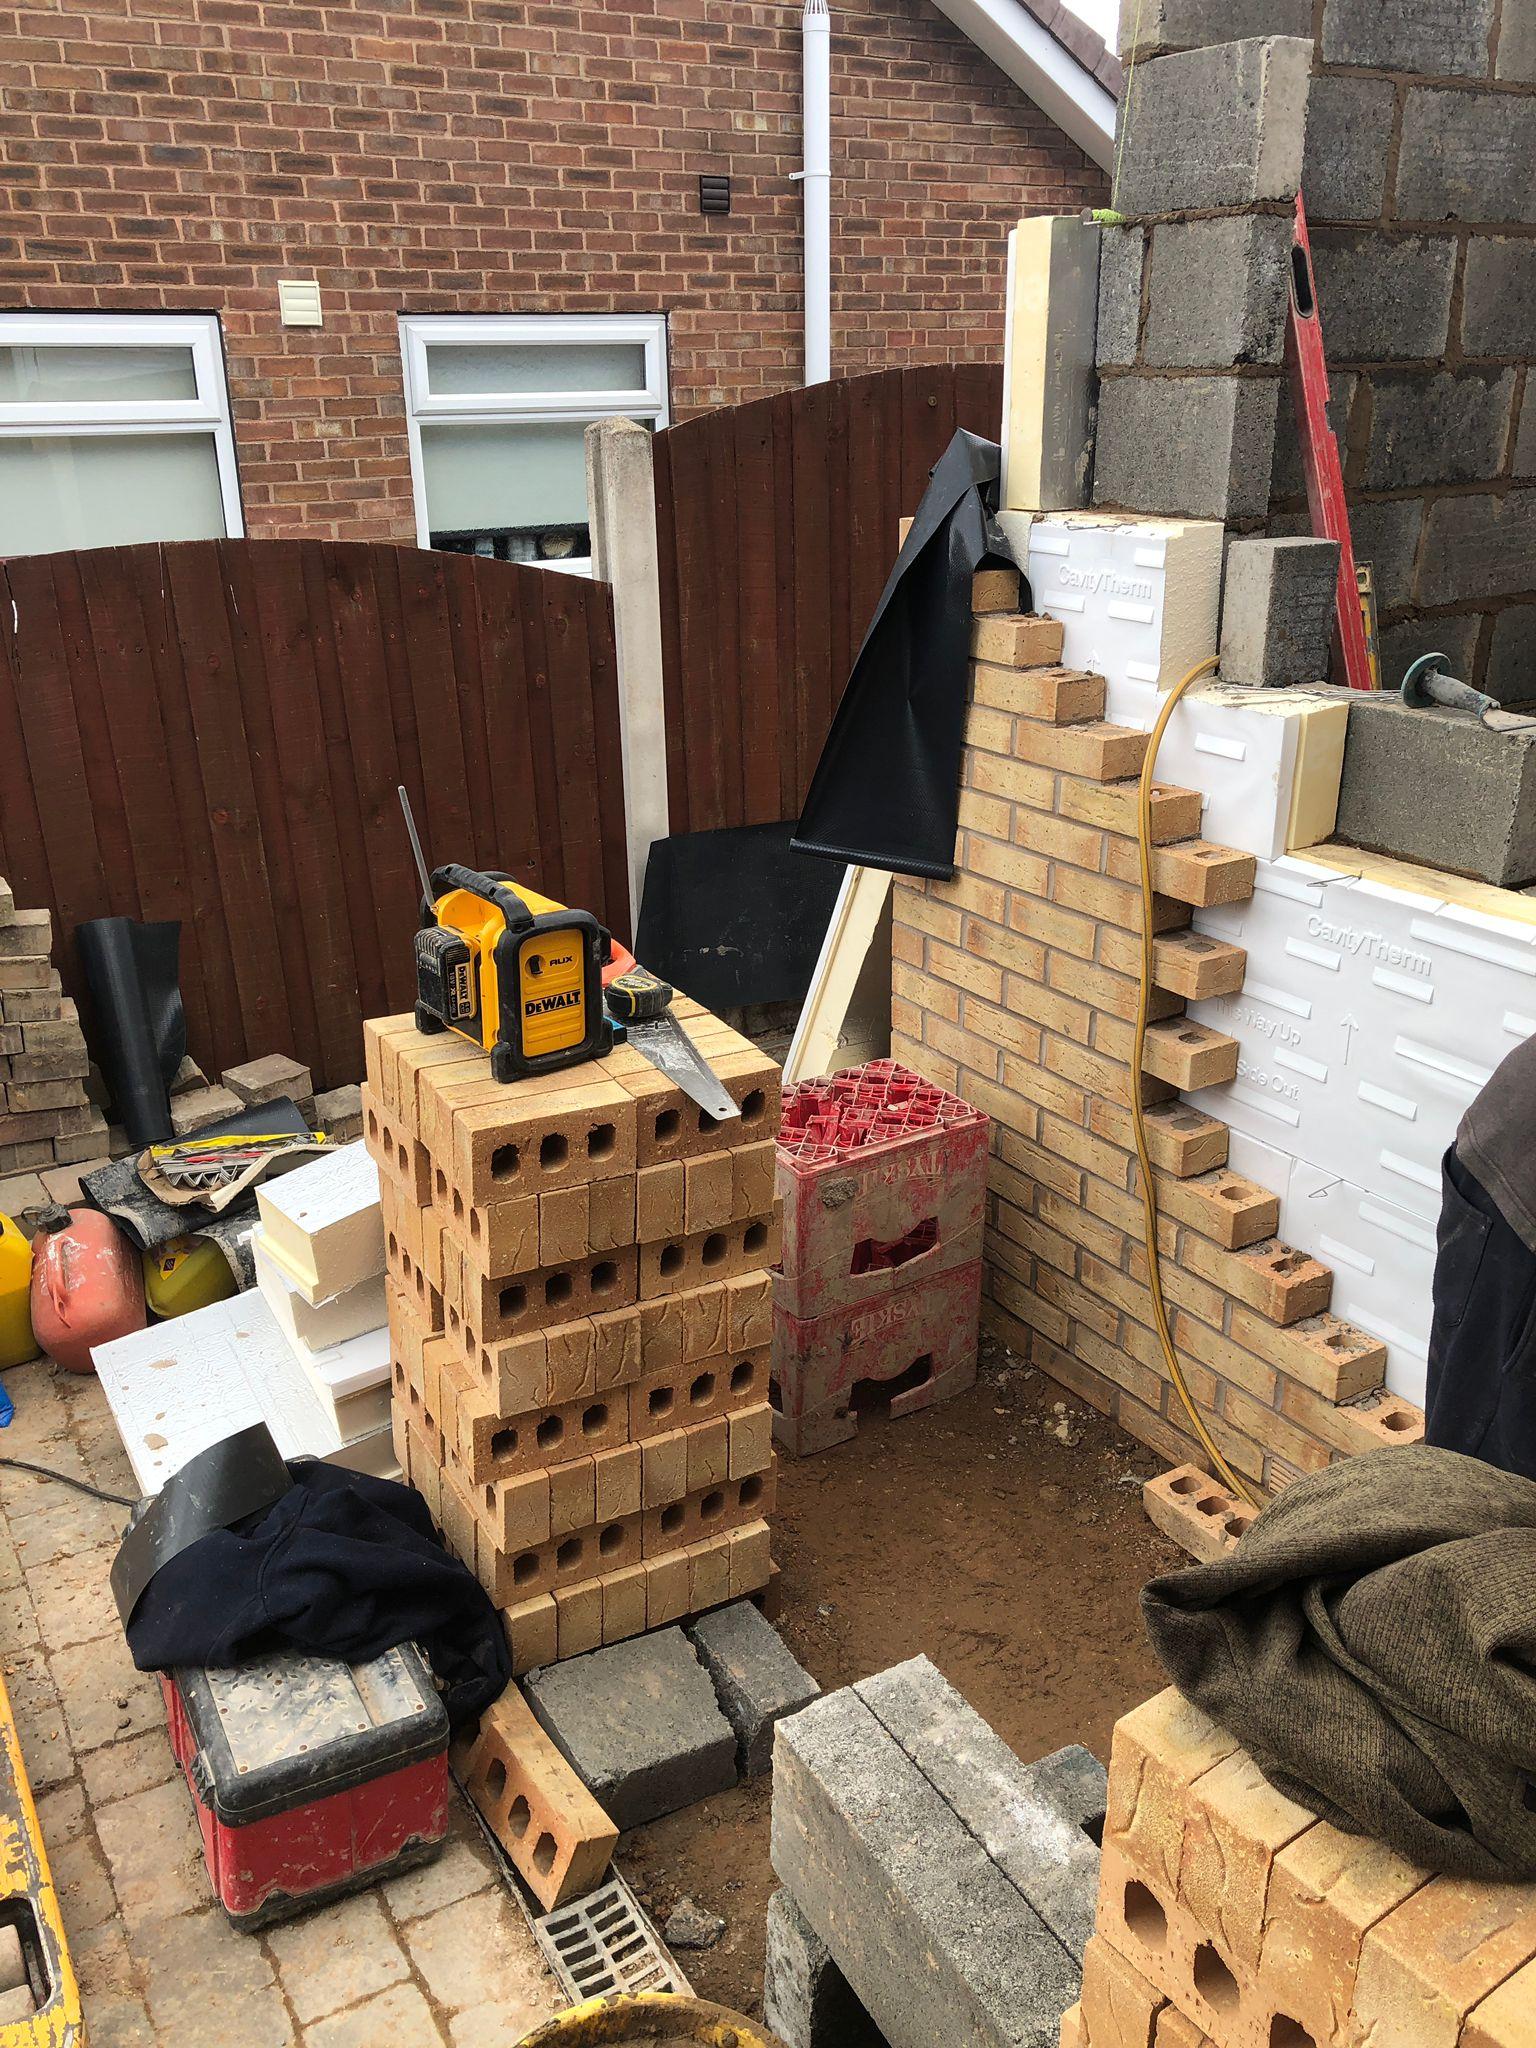
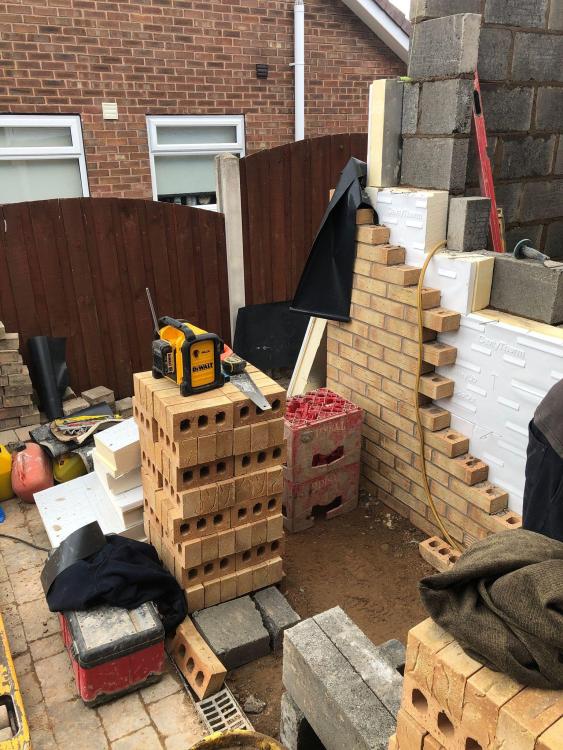
MikeGrahamT21 posted a blog entry in Back on the self-build waggon...
So after 2 years since the planning permission was granted, and a 2month delay from the builders I'm finally underway on what will be the last major building work on this bungalow. Having real trouble finding a joiner who's available to do the roof, so I may end up having to do that myself. The one bit i'm unsure on having never done a lean-to roof before, the wood plate which goes on the wall, is it fixed using thunderbolts? -
Scandinavian log cabin finally finished!!!
MikeGrahamT21 replied to iSelfBuild's topic in General Self Build & DIY Discussion
Excellent work!! Croissants look good too! 😂 -
How does your garden grow?
MikeGrahamT21 replied to recoveringbuilder's topic in Landscaping, Decking & Patios
If they get to the pollination stage, theyre far to far gone. We eat the unopened flower buds essentially -
Is it just me or are there some loose connectors and some empty sockets? I can see two I think, the green set of wires and the blue set.
-
Plastic vs Copper pipes for radiators
MikeGrahamT21 replied to Raks's topic in Central Heating (Radiators)
Yeah you 100% need one of those olives for the compression -
They're tongue and groove blocks laid on their side, probably just what they had to hand at the time! Assuming thats your party wall, id say that there will be no cavity between you and next door (on my street, 70's bungalows, some are like this and some are 2 blocks and a cavity in the middle, very bizarre the difference). Best thing you can do, aside from filling the gaps, and also putting a layer of soundcoat (https://www.british-gypsum.com/products/finishing-products/gyproc-soundcoat-plus), you could use a metal frame, pack it with acoustic insulation and then top with 15mm soundblock plasterboard, all depends how much space you can free up for it, if any. Take a look at my blog, i did a similar project in my living room, might give you some ideas.
-
whats best way to making 47mm up
MikeGrahamT21 replied to James94's topic in General Self Build & DIY Discussion
flexible cement based tile adhesive for sticking cement boards down, or whatever the manufacturer recommends. -
Re. the draining. My dishwasher has a good 2m drain pipe run along the floor, up the back of the sink unit and into the sink plumbing, and doesn't retain any water (also a Beko), but it does go up and over, meaning that other water would never be able to enter the pipe, never had any issues so far. If everything is downhill on yours, then yes, get a pipe extension and make sure that a bit is uphill to stop it flowing the wrong way from the sink
-
Plastic vs Copper pipes for radiators
MikeGrahamT21 replied to Raks's topic in Central Heating (Radiators)
Yeah its bang on, but not all the eurocones fit. Made this mistake on a single radiator that I was rushing to put on, in the end i thought the TRV design must have changed, it was only after i'd put a 16-15mm converter on, did I realise i'd just picked up the wrong eurocone!! Loosing my marbles i tell ya! From memory the single seal ones are the ones that fit, the double seal ones are too wide. -
Plastic vs Copper pipes for radiators
MikeGrahamT21 replied to Raks's topic in Central Heating (Radiators)
And if you get the right shaped eurocone, you can do what I did, and pop that inside your TRV, so you get a direct 16mm connection to the 15mm TRV -
Do old style rotary dial meters go backwards
MikeGrahamT21 replied to Barryscotland's topic in Photovoltaics (PV)
Yes my old meter used to run backwards for a short period of time before the ratchet kicked in, never enough to make any real difference, but i guess over the years it probably added up.