


Roundtuit
-
Posts
1273 -
Joined
-
Last visited
-
Days Won
2
Everything posted by Roundtuit
-
No, not a warranty repair, but was worried about compromising the 2 year warranty by having an 'un-official' repair done. I've withheld a sum from the kitchen fitters to cover it, but the less I have to part with the better. ? I've asked a local independent guy to order the parts and sort it, so thanks for the reassurance.
-
Hi. My pv has been generating for several months now, but as the weather has got sunnier and the family has spent more time at the build, it has become apparent that the inverter is producing some high-pitched noise. It is at a frequency that I can't hear, but both teenage kids (and friends) can hear it, and I suspect it's pi$$ing the dog off too. The 'plant cupboard' doesn't have doors on yet, but it strikes me as not something you want in the house. The installer and manufacturer are both claiming not to have come across this issue before, but are offering to try replacing the inverter foc to try and resolve the problem, which is fine. But; I can't help feeling that the manufacturer should know what noise emissions their kit makes as it is a measurable, and they should, with the aid of a noise meter if necessary, be able to tell me whether my current inverter is in or out of acceptable limits. Any thoughts please?
-
The damage is to the black plastic control panel along the top of the door, and very shallow damage to whatever is underneath (inner door I think). Bosch service failed to call me back as promised today with a new date, so based on the positive comments on build quality, I'll go with a local guy. Thanks!
-
It's a bit of a long story (which I probably should tell if only to make others feel better), but I've recently parted company with my kitchen fitter who, despite being a nice bloke with all the right skills, turned out to be a weapons-grade knob-head. I've got a long list of minor problems to resolve, but the most expensive of which is to fix my brand new Bosch dishwasher that he cut into with a multi tool when finishing off the sink cut-out in the worktop. Yes. I know. Wtf? Anyway, I booked an engineer through Bosch customer services 3 weeks ago, as I didn't want to compromise their 2 year warranty. On the due date - Tuesday - I chased them up to try and get a more accurate time slot than 0700 - 1700, to be told that someone should have let me know that the engineer wouldn't be coming as he hadn't been sent the spares, and they'd have to arrange another date. So, bearing in mind that the repair will probably mean replacing the door with the manufacturers data plate on it, do I persevere with Bosch and their over-priced, lacklustre service, or try an independent for a better value repair, and take my chances with the warranty?
-
I'm project managing our build, and as we approach the end, my observations would be: No one else cares as much about the build quality as you do No one else is as focussed on getting the best best value out of your budget as you None of it is rocket science, but there is loads of it, and learning it as you go is hard graft So, in summary, I'd say: don't be put off doing it yourself if you've got the stomach for it, because if you have got the stomach for it, you'll probably end up shadowing your project manager anyway. Good luck!
-
Don't beat yourself up! Nothing ventured, nothing gained. This site is full of accounts of lessons learned the hard way, and many of us will recognise that sick-to-your-stomach feeling. I'll be honest, I'm winging it a bit, and sailing way closer to the wind than I'm comfortable with. It sounds like that, for one reason or another, both you and your builder find yourselves out of your comfort zone, and that there's no real value in going back over who could or should have done what and when. Unfortunately, when it comes to budgets, maths is maths, but perhaps time for an honest appraisal of the situation and to harness the collective Buildhub wisdom to find a way to work through it and get the best bang for the remaining bucks!
-
No real need to let it dry, unless you're burning it for fuel. I've burned loads of brash the same week as it's come down, often on rainy days so I could be sure neighbours didn't have washing out! Just need some dry wood to get an intense 'core' going, then feed in the rest, smallest branches first, thickest end first into the centre. That'll be gone in a couple of hours! Of course, pick your time, do it safely, respect your neighbours etc etc. ?
-
You're on! But only if you promise to treat me like an irritating inconvenience and not return my calls!
-
11. Or As my plumber would say, £111, and I can't do it for 4 weeks.
-
VAT CERTIFICATE
Roundtuit replied to lizzie's topic in Self Build VAT, Community Infrastructure Levy (CIL), S106 & Tax
I'm no expert, but I've tried to get my head round VAT notice 708 a number of times, I don't think that certificate is intended or necessary for your standard self-build. Look at point 5. Are you really going to cough up the vat reclaim if you sell within 10 years? Section 17.1 of vat notice 708 tells you what you need a certificate for, and as far as I can see, it isn't a self-build. I don't want to be negative, but I'd say your hmrc contact is just adding to the general confusion around what is still currently a 'minority' vat issue in the uk. -
Wow! Stunning location. There's no going back now! Good luck ?
-
Just bought a load of Era 64mm tubular latches from screwfix. Pretty sure they're the same as Benchmarx sell, but cheaper. Don't know what they're like fitted yet though - hopefully find out tomorrow.
-
I didn't use split tape, and it wasn't too tricky once you got the knack. I'd advise running a pencil line down the window frame to work to though. I used a strip of 9mm ply, tapped a couple of small nails through close to the edge and bent them over at right angles so I could slide them down the side of the window frame for a consistent mark. That gave a pencil line at 10-11mm to tape to, which was covered by the plasterboard in the reveals. And I don't have any leaks round windows:)
-
A very timely thread, thanks! Just to expand a bit, any thoughts on sliding wardrobe doors? I think I'm going to need made-to- measure, but googling seems to lead to a couple of manufacturers supplying through a number of websites and diy sheds, at prices that seem rather steep for a couple of rails and panels. Any advice on the best value options please?
-
Top tip: You can't rely on smell or taste to detect food-borne pathogens. As general rule, don't mess with a 'use by' unless you're feeling lucky, but feel free to use your judgement with a 'display until' or a 'best before'.
-
VAT Ground workers
Roundtuit replied to Triassic's topic in Self Build VAT, Community Infrastructure Levy (CIL), S106 & Tax
No, not as I understand it, assuming we're talking about a straight forward self-build. The work should be zero rated, and it's difficult to reclaim vat paid in error. I'd ask him to re submit without vat, and point him in the direction of the appropriate vat scheme documents if he queries it. -
Our sand came from Frimstone, who operate around west Norfolk/north Cambs I believe. I think we had 'Crimplesham soft' but I'd have to check. On the scale of things, the additional cost of white cement won't be a deal breaker if it's the look you want.
-
Do you have a choice of sand colour available locally? We selected a pale sand and used white cement for a similar effect.
-
You're still having a washing machine rather than a scrubbing tub though? I guess it's one of those 'lifestyle' choices about where the line is drawn on energy use. I like the idea of a pulley clothes airer in the utility room with the mvhr doing the drying job, but there is still a tumble drier going in for quick turnaround stuff (got teenagers; you know how it is...)
-
A combination of silicon and strips of vana tape. It won't be pretty, but even if it's not perfect, any leakage won't be worth worrying about, especially if you can get to both sides.
-
I'd trim the perimeter insulation, foam any gaps and trim level first, then prime a strip of screed (I used pro clima tescon primer - stickiest liquid I've ever seen!) and carefully seal screed to frame with airtightness tape. If you've got oak boards going down, you should be able to lap up the frame at least 10mm, which should do the job. Top tip - mark a pencil line to tape to; my free-hand attempts were always regretted. Alternatively, if you can trim the insulation back a few mill below the screed, just fill the gap with a flexible sealant, something like sikaflex ebt.
-
Hi. We're just second fixing. In the lounge, rather than wall lights for 'mood lighting' we've put in three 5 amp sockets in strategic locations for table/standard lamps switched by a dimmer switch on the wall (which was an idea I picked up from someone on here or the previous site, thanks!). Where we do have wall lights, I've bought some simple ceramic up/down-lighter fittings that are painted the same colour as the wall - they don't chuck out much light, but should be plenty to find where you put your beer down and won't break the bank if I change them at a later date. I've largely steered towards fittings that take bulbs rather than 'integrated' led fittings to give me some more flexibility on brightness, colour temperature and dimmability if I don't get it right first time. I'm rapidly developing a preference for the cool white (4000k) and daylight (6500k) bulbs rather than the warm/yellow tones. When you say 'spotlights', do you mean spots, or downlights? Just need to consider fire rating if downlights.
-
Bottom driven piles.
Roundtuit replied to Russell griffiths's topic in General Self Build & DIY Discussion
Yeah, fenland, so an underlying layer of peat. Engineered foundations are pretty much par for the course round here. I've just checked the paperwork - my mistake, 24 piles not 26; in round figures, £9.5k for the piling and £13.5k for 111 linear metres of ring beam ...and this is what it looked like!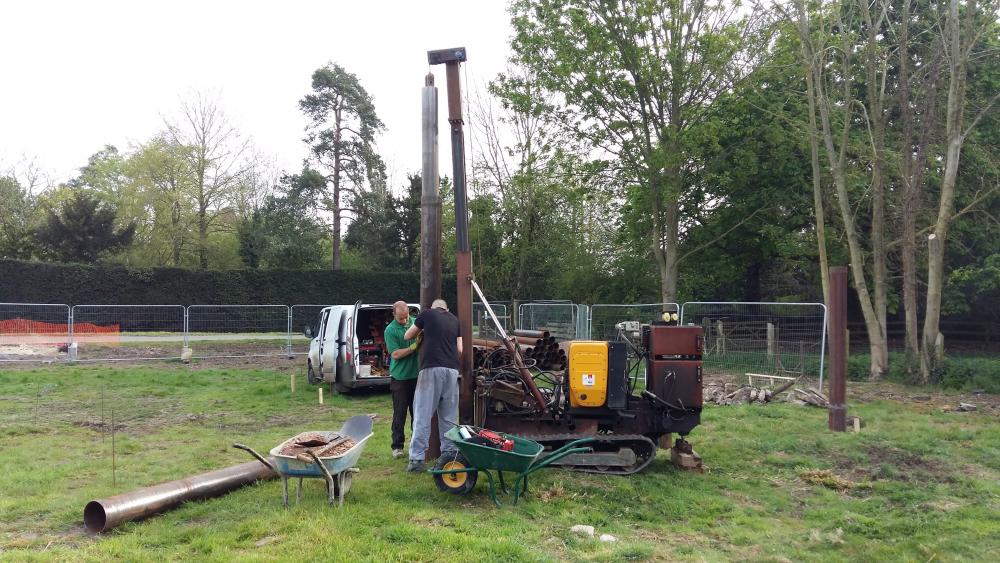
-
Bottom driven piles.
Roundtuit replied to Russell griffiths's topic in General Self Build & DIY Discussion
We had 26 x 10m deep piles as you describe. It took about a week. The little tracked rig arrived on trailer behind a 4x4 so no big mobilisation fees, minimal noise and disturbance to neighbours. Filled with concrete with rebar down the centre for tying into the ring beam. I've no experience of other methods, but I'd happily use this again without a second thought. -
Shop around. My initial quote was > £6k, and I ended up paying about half of that. Watch out for the extra costs for bricklayers adaptations and additional weeks if things overrun!


