


Gus Potter
-
Posts
2340 -
Joined
-
Last visited
-
Days Won
29
Everything posted by Gus Potter
-
Designing new flat roofs with PV from the start
Gus Potter replied to low_and_there's topic in Photovoltaics (PV)
Good point. Often if converting an attic you run into head room problems and you want to try an avoid having to strengthen / deepen rafters if you can. PV panels have become much lighter as time has passed. SE wise you check the roof for the following: 1/ The self weight of the tiles / rafters and so on plus an access load of about 60kg per square metre. 2/ If a low pitched roof.. access plus wind loading.. sometimes critical if a big flat roof 3/ Snow loading plus roof self weight. Now in many parts of the UK the snow loading is much smaller than the access load. And under normal conditions you would not expect folk to be standing/ placing scaffolding etc on your panels (this would be what we call an accidental loading case). Thus you can primarily design for the self weight of the roof plus the panel weight plus snow which could be less than self weight plus access and you may find that works to give you head room inside if you get stuck. You could go further and go for an in system (if you can detail the ventilation ok) where you just have lightweight trays. Load is reduced further (no tile weight etc) and you save a bit on the tiling which offsets the cost of the trays. The difference is small but if you are struggling for head room have a chat with your design team. -
Hope this helps you crystalise your thoughts and good to hear you are using light gauge steel.. always worth considering for attic conversions. For all. A bit of general background info. On a bungalow when converting the attic we consider (not least though) these main elements: 1/ Fire prevention..eg making sure that electrical cable sizes are designed for possible embedment in insulation so they don't over heat, correct installation of say wood burning stove flues and so on. 2/ Fire detection and warning.. smoke / heat alarms. 3/ Means of escape should a fire break out. Sometimes called travel distance or, if you have an internal room how you get from that to say and escape window, the sizes of these windows and how high they are off the floor and above the external ground. 4/ How the fire service will effect a rescue should you not be able to escape. 5/ How to protect the fire and rescue service so they are not endangered. It's the last bit of this (item 5) that is probably relevant to @Babak The Scottish fire regs are slightly different but have based the following on the English regs. For a bungalow attic conversion we generally allow the pitched part roof to burn away and fall in. What we don't want is for the attic floor to fall on the Fire Brigade thus we give the attic floor 30min protection. No need to protect rafters, purlins, partition walls in the attic. However there are a few caveats. 1/ If you are converting an attic that has been formed from trussed rafters the ceiling chords are often too small compared with a traditional timber cut roof and thus these are often not condusive to achieving a 30 min rating. But you may have had to beef these up anyway to convert the old ceiling chords into attic floor joists. Thus by insulating between the attic floor joists (you may be doing this for sound insulation anyway) and fitting a new floor you may by default achieve a 30 min rating for the new attic floor. 2/ Your new attic floor needs to be able to restrain the ground floor walls in a similar fashion to the existing roof when the pitched roof parts and attic internal walls burn / start to fail.. to avoid the ground floor walls falling on the fire service. Again, if you have been strengthening the attic floor you often achieve this by default. 3/ If say the gable end of your house is within 1.0m of a boundary (particularly.. covered in the regs to some extent) then you need to make sure that any masonry spandrel panel does not collapse when the roof burns away. This is very vague in many UK regs / not well understood but in New Zealand their design codes provided some guidance on this aspect.. the UK have yet to catch up / developers / designers are resisting grasping this nettle in my view. Here your local BC may not explore this with you. In summary I think the bit you need to concentrate on is the attic floor and let the rest just burn away. Have copied extracts from the regs below for reference.
-
Hi @daunker Yes, it's out of genuine interest and not intended to be any form of criticism. There are few folk floating about on BH that have designed a lot of these structures so was curious how you SE was making it work. I'm particularly interested in the conversion of these types of structure and their nuances. The photo you posted sparked my interest as the frame looked slender, purlins were relatively small looking and I could not see any restraints to the rafters. I see it's a propped frame..central support to the rafter. This relieves the bending force in the rafter thus you can make it smaller. One consequence of this is that the frame tends to sway more in the wind and these types of frame can be more prone to buckling under certain loading conditions.. they are more sensitive and more likely to misbehave. I would hazard guess that the critical loading case is downwards load plus wind load for this frame and this is reflected in the diagram that shows the deflected shape to some extent. I can quite see the load case used but I assume that at some point the load case of downwards load plus wind has been checked as it's often critical on a frame like this. The bending moment diagram (first diagram) shows the bending forces in the members. You can see that at the bottom of the columns there is a bending force which is a bit less than at the eaves connection. I think your SE has assumed that the columns are fully fixed at the base, this makes a big difference to the analysis and thus you have to be sure that the base connection is really fixed and not just a bit of kid on fixity. Presumably you have investigated some of the column bases and checked their size, the base plates and bolting / encasement? Sometimes you get fixed (Constrado) bases if one of the walls is near a boundary. I may not be relevant but the extract from the report mentions that the existing members are 152 x 76 RSJ's, later in the hand calcs the member sizes are referenced as 152 x 89 UB 16's? I would assume that the sections used in the design checks match up with what you have. Lastly it may well be that your SE is taking into account other factors (maybe connection to the other structure that will remain for the life of the building) that we can't see and thus the frame will be good to go!
-
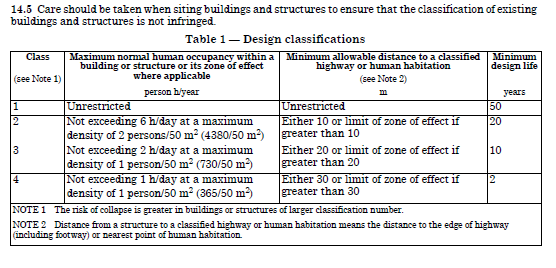
@saveasteading raises some serious safety issues here. I would love to see how your SE is justifying this. It may be that your milk parlour was over engineered in the first place and you are certain of the steel grade / quality, bolt strength and assessed any corrosion that has taken place over the years. You have an old milk palour probably build before the argicultural codes of design were developed. But to give it the benefit of the doubt lets say that it was designed to an old class 4 agricultural standard. BS502 part 22- 2003. For a class 4 building the design life is 2 years. The latest update of the code has dispensed with the old class 4 as there were too many farm building collapses occuring! Copied below are some extracts from BS 5502 part 22 2003.. this code is now superceeded. To put this into context a house roof designed for the normal 50 year life span (equivalent to class 1) should be able to carry a load of 0.6 kN/msq about 60kg/m sq. Lenders expect that a house structure should have at least a fifty year life span, 60 years is sometimes mentioned by insurers and lenders. The agricutural code class 4 lets you away with half that access load. Part of the reason is that the design life is a lot less, part is to do with deflections and the roof not leaking. They (farmers) did not mind if it bent, swayed a lot under snow and wind load, you will if you are living in it. Also it could invalidate a lot of your cladding / roof covering / window warranties if you exceed the manufactures allowances for movement.. horizontal and vertical deflections.. advise you check their specifications. The other main point is the snow loading. For a class 4 building it is only 22% of the design snow load of a house. Hopefully you can now start to see where the safety issue requires closer examination and why I and others? are curious. Also there are restrictions on how close a low class building can be from a highway, this is to ensure that if it does collapse it reduces the risk to the public. To explain a bit. Pretty much all structures are designed on the basis of probablility of collapse and consequence. A flood prevention scheme for farmers fields may be deisgned on a two year probablility of a flood event occuring (only live stock get killed), a house on 50 years (a few people get killed), a dam above a town / city 200- 500-1000 years (lots of people killed) and so on. Now the access load on a farm building is reduced from 0.6kN/m^2 to 0.3kN/m^2 using the same principle. To summarise and to turn back to @saveasteadinghow do you make / justify that an agricultural building steel frame of a different class and designed (if at all) for lower loading can now suddenly be able to carry the design code loads and life span that are required for a house? unless the steel was over engineered in the first place, the foundations have been investigated and proven to be of adequate size to carry the extra loads and the steel and base fixings have not been compromised due to corrosion and will not be in over the design life of the house?
-
Hope this helps. If it's a chalet bungalow then you may stand back in the garden, look at the roof and think.. hey there is not much load to hold up there.. and often you would be correct, thus a simple beam would be in order. The vertical loads on a typical chalet of (normal construction) are easily calculated and the design is simple. As the loads are small then often you don't run into difficulty working out how to support the point loads from the end of a beam. All the SE needs to do is talk to the Architect to understand what is required, see if the drawings they have can be overmarked without requiring other details particular to the structure, determine the vertical load, specify the beam say and over mark the Archictect's drawings. Maybe all done for £500-£750 But..the first thing the SE will do is to look at the size of any openings you propose to the external walls and see how they will impact on the sideways stability of the building. Next they will look at whether you are removing any internal walls and if these walls, although probably not load bearing (on a chalet the roof tends to span over the external walls) are contributing to the stability of the external walls (lateral restraint) and / or contributing to the overall horizontal stability of the building (racking / shear wall) .. so it does not blow over in the wind. Last but not least. If you have a say masonry walls then perhaps on the rear elevation you have a window and a door at the moment. Quite often folk want to lower the window cill and put in French doors. This leaves a slender piece of masonry between the now the new doors and when you check this it often fails under horizontal wind loading. The concept here is that if you are turning a wall that is connected to a return wall (thus stiffened up one vertical edge) into a stand alone column then this needs close examination. For the curious. Often when these houses were built say in the 60's they had good solid metal / timber window frames that stiffened the masonry and the original designers took advantage of this when designing the walls. These get ripped out and replaced with uPVC or Aluminium. The modern windows are isolated thermally and are fixed with slender brackets thus no longer stiffen the masonry. This means that you can't just use the original design assumptions of restraint to the masonry. If horizontal stability is an issue the SE now has to do a lot more work and drawing. The £1500 can be justified in this way. Hopefully this helps you form a view on the fee level. All the best with the project.
-
Ah.. but how thick are your firring pieces at the thin end? That is what you need to check first. Be careful here and make sure your builder is not telling you a story or you have not understood how the loads are transferred from the OSB3 to the main joists if DIY.
-
@daunker Interesting. But a few questions first. Is it a planning condition that you retain the existing structural frame? That frame from the one photo does not look like it will support a domestic roof load .. 50 year design load as opposed to even an old class one agricultural loading. Can you tell us a little more? Also, the steel frame looks like it will deflect a lot horizontally and if you are relying on it to restrain the walls then the walls will crack if the design is based on this premis. A standard deflection limit of an agriculatural building is column height /100. With blockwork it's height/300 sometimes more. Farmers built these things to just stand up and no more, (they did not mind if the roof dripped a bit - excessive deflection ovals out the fixing holes in the roof cladding so the roof drips a bit in places) to house cattle/ sheep etc not their family.. the main farm house was often of a much more robust construction, houses for workers less so. It may be that your SE has designed this so that the steel frame appears to be intact and doing the work to keep the planners happy, but has actually designed the masonry to stand alone thus you have the solid 9" blockwork. Check with your SE before changing the block specification as going from a solid wall to say a cavity reduces the effective thickness of the wall to resist the loads. It's an interesting topic this.. how you convert agricultural buildings into a house.. made more interesting design wise by the planning constraints in England.
-
What are you proposing to build? If you could provide more info you'll get much better feedback on what you maybe need to pay (fair rate) to get your requirements met. It may be that your project is really simple, maybe one simple beam and some written specification. But if more complex then finding the right SE will often save you money in the long run. SE's do a lot more than just calculations and over mark drawings. Experienced ones (SE's) have a wide range of knowledge for example.. how different Builders work, they can pitch the design to make it easy for the type of builder that you maybe have in mind and this often results in an overall saving. Remember that a good tradesperson will cost about £1200.00 per week each. An SE can easily save you that amount if they put the thinking time into your job. But if you have a race to the bottom then the SE will give you a low price, over design, caveat the drawings heavily and you will pay more later at the end of the day. A point I always make is that a good SE who understands your project can often easily save you more than their fee, sometimes a lot more on top of that, if you get them in early in the design process.
-
That's fine as the vertical stud (loaded parallel to the grain) applies load to the sole plate. The load the stud appiles to the wall plate is perpendicular to the grain of the sole plate. Thus the packer should have the grain running in the direction from the inside of the wall plate to the outside. If the joiner has just cut a packer off the end of a timber (cross grain) the packer timber grain will be running vertically and just fall apart. Hopefully your joiner has not installed the packers with the grain running vertically.
-
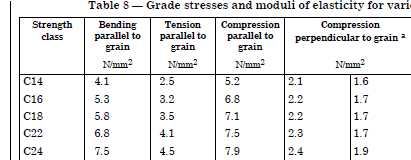
The vertical load comes down the studs. Yes, the OSB shed's load but ignore that conservatively. The studs are checked not least for the following load cases: 1/Full roof and wall loads plus anything else acting as a downwards load. 2/ Other case which include wind and snow. The main thing here is nearly always load case one. The compressive strength of timber is much more when axaily loaded parallel to the grain. The critical compressive (bearing) check is at the base of the stud. Here you have the stud loaded parallel to the grain bearing on a horizontal wall plate, the grain of the wall / sole plate here is loaded perpendicular to the grain and this has a much lower compressive strength. Conservatively assume that the load goes straight down and does not disperse through the sole plate at 45 deg. Thus if you use a timber packer under the sole plate of the same width as the stud and same length as the width of the sole plate with an equal or greater compressive strength perpendicular to the grain.. that will satisfy the bearing check. If in any doubt get some 50mm (same width as the stud) wide oak / hard wood and rip that down to make a selection of packers the width of the sole plate. Soak them in preservative after cutting for good measure. Have copied part of a table from the BS below. You can see here how the compressive strength of a timber is much more when loaded parallel to the grain as opposed to perpendicular. You can see for a C16 the compressive strength of the timber loaded axially is 6.8 N/mm^2 and the the sole plate (loaded perpendicular) is 1.7 N/mm^2. Fill in any gaps with something else, maybe add the odd extra packer if you have any doubts about the above and get some extra load spread due to the load sharing properties of the OSB / sole plate / bottom rail of the panel. You may want to do this to spread the load more evenly over the underbuilding if you feel this may be an issue. For all .. do not use plastic window packers under your timber frame as the are not solid.. they are for windows.. not structural loads. You can buy the right plastic packers for timber frames on line etc.
-
Laser Level/Builders Level...
Gus Potter replied to Mulberry View's topic in General Self Build & DIY Discussion
One easy basic check is called a two peg check. @saveasteadingAgree, just because it has a laser in it and some spec does not mean it works just out the box or a week or two after, or it after it has been dropped. Don't get fooled by the "self levelling" sales pitch. For DIY recommend to learn this basic check on your laser for horizontal levelling. No matter if you have an instrument costing £100.00 or 10- 20K you need to know how to do a basic check. Set up two posts in the ground 30.0m apart, measure carefully (use a steel tape if you can as plastic / fibre ones stretch) and try and do this on level ground. If the ground is not level then it gets a little more comlpex but can still be done. Sit the laser 10.0m from one post, run it and mark the level on each post. Move the laser to 10.0m from the other post and do the same again. The height of the laser will not be the same as the ground won't be level even if you don't change the height of the tripod/ instrument on top (called the height of collimation). Measure the distance between the marks on the two posts. If they are not the same then your laser is off and thus what you build will be off... but by how much? If you have a laser that also does vertical lines then sit it next to a wall. Drop a plumb bob down the wall and sit the plumb bob in a bucket of water to help reduce it swaying in the wind. Check the distance the laser to the wall top and bottom. Check the distance of the bob line from the wall and you can then work out if your laser is projecting accuratly in the vertical direction. Now at 30m you always get a different reading. If anyone is interested I'll show the maths (caveat..would like some real numbers from you to work with) and, how you can cross check this with the declared instrument accuracy and what you need it to do. This will suit most small domestic applications but for larger projects we need more attention to the details and use other techniques. At the high end even the temperature of the air for example has to be measured. I did some levelling a while back in a tall building and the thing was going all over the place, nothing wrong with the level, it was the building swaying in the wind. If you are going to be spending money on your project then 10 -15 minutes checking your kit is a small price to pay. -
This can be quite confusing. I'll come back to @Alchemist in a bit. Al long time ago we had the "Water Board" They covered most of the UK. The regulations were standardised, in Scotland for example we had the Sottish Office who applied the UK regs. We had the early NHBC who were a public body that covered all of the UK. The Water Board was split up and privatised in England, in Scotland an arms length body was formed called Scottish Water. But they all in the main still apply the same standards thoughout the UK to this day. For the uninitiated. For older housing imperial sizes of drains are installed. Generally a private sewer (usually 4", inches inside diameter, often made of clay) is a drain that serves your house only, it belongs to you and you are responsible for it. A public sewer is one that often serves say 2 or more houses and often runs down the back of houses, if it is a shortish terrace, pipe is usually 6" inside diameter. This public sewer does not belong to you. It is a water company asset and it belongs to them and they have responsibility for maintaining it. This applies in most parts of the UK. A Main sewer is usually found under the road, this is often big and deep, can be 9" up to massive. Now the planners may have put a general condition on the application.. the 3.0m. However this is a general condition. Planning is to do with what the buiding looks like visually and so on. It has little to do with the Engineering aspect and Building Control Compliance. The drains are hidden below the ground. They may have put this condition on as the planning application was poor and lacked information. The planning condition could be lifted if an appropriate design solution that satisfies both the building regulations and the water company regulations was put forward.. which we often do in the case of a public sewer, main sewers are a different animal. @Alchemist If you have concerns then you could consider the following. Make sure you have a set of record photos of your house both before and up to date... call this a delapidations survey. An old trick is to show a copy of the day's paper in the photographs. This means that the photo must have been taken on or after the day of publication. Send this to a friend so you have record. Next maybe consider writing to Building Control and say they are building on the boundary and that you are concerned about the following matters of public safety: 1/ Is the structure compliant with the fire regulations as a fire boundary condition applies. 2/ Are the foundations or superstructure in any way encroaching on your property, even if not, have they been designed not to compromise the bearing capacity of the soil for example below your foundations that your house relies upon to hold it up. Point out that the drains are very close to your house and that you are concerned that an appropriate site investigation has not been conducted. 3/ Has the depth, location and size of the drain been established and has an appropriate Structural Engineering solution been developed that encompases the temporary works and permenant design that will ensure your house remains stable. Maybe point out that the drains are very close to your house and that you are concerned that an appropriate site investigation has not been conducted? 4/ Does the design comply with the building regulations. In particular with respect to differential movement (due to the change in loading) that could result in cracking of the drain and thus leakage from the drain that would compromise the integrity of the soil under your foundations. 5/ If any work starts pop you camera over the fence and take some photos of what you can see! The objective of the above is to try and make sure that what is being built will not compromise your house and to have a record of such communication regarding your concerns. It is difficult to resist a valid planning application, that is life. Have you checked if in England that the party wall act does not apply. Is there a change in ground level, maybe a shared retaining wall? While the above is a bit forensic bear in mind that you want to get on with your neighbours in the long run, most folk do so diplomacy is a key requirement here. It maybe that even though they are building something bigger you can negotiate a wall finish on the side you see that is to your liking in return for not you rocking the boat too much?
-
Here is a bit of background info / my thoughts. In clay, for example soils, you can design a large heated square warehouse with only insulation under the slab around the edges that preforms quite well. As mentioned by others provided you don't have significant ground water flow then you can often treat the clay as being of infinite depth. Ground water does not tend to flow that well in clay, particularly London clay (was used to make dams) say but usually if you go deep enough you will find ground water and water flow. Now BRE 443 indicates that the thermal conductivity of a clay soil with some hard core over the top is 1.5 W/m.K. In other words if you have a clay layer 1000mm thick then the U value of this layer is 1.5 W/m.K .. Compare this to a window which may have a u value of 1.4 W/m.K. The window is much thinner than a metre of clay but hopefully you get the jist of it. Just because something it is more conductive than say glass wool if you make it thick enough it will perform the same function. Say wattle and daub houses.. made of clay and straw. In a domestic application the foot print of the building is often quite small so the heat leaks out the sides. That is why when you look up floor insulation tables they ask you for the perimeter / floor area ratio. The smaller the ratio = less heat leaking out the sides. A lot of the software we use relies on these principles. For the mathematically minded the analysis / maths are founded on the principles developed by Laplace.. a very clever mathematician.
-
That gusset plate at the top of the column with the oval hole looks interesting. I was wondering if someone has been looking at lifting and handling hence it may be a lifting point. But putting my SE hat on the strength and stiffness of that connection has been significantly reduced to the point where I would want to revisit the calculations and explore the "design journey" that connection has gone through.

-
On our own house we went for the Origin sliders. They have a 20mm wide mullion in the middle so very little frame to obstruct the view. They are not the lift and slide type, just have a small locking handle, all very neat and elegant. My own view is that bifolds have a lot more moving parts and are more sensitive to structural movement and deflection, looking ahead for say 5 - 10 years.. parts will wear and so on, can they (bifolds) be fixed.. easily. The sliders we have open from both sides so that offers up the opportinuty to rearrange the furniture in the room in some ways. They have some roller bearings on the bottom and although pretty big and heavy they run well provided you run a cloth over the running rail at the bottom from time to time. On the down side the sliders are probably less air tight as they have brush seals where as the bifolds will have compression seals mostly. But over time the compression seals lose their flexibility anyway. My choice would be to favour sliders first. Dilemma or what!
-
How to play - The SunAmp Guessing Game
Gus Potter replied to ToughButterCup's topic in Energy Storage
Being a philistine (maybe like @ProDave) here but also greatly appreciate the thermodynamic knowledge of everyone and learning a lot. In the not so old days on big houses we had a hot water cylinder. The water was heated by the boiler via a exchanging coil in the bottom part of the cylinder, when the boiler broke down we had electrical heating elements, one near the bottom and one about 2/3 to 3/4 up the height of the cylinder that could be deployed. About 200mm from the top of the cylinder we took off the main hot tapping, this was to partly reduce air getting into the system as we are talking vented (gravity fed) cylinders not mains pressure, say up to 3 bar unvented cylinders. We then run a loop of pipe around the house, often called a secondary loop and this was really well insulated. We installed a secondary pump that circulated the water around the secondary loop, but this pump was on a timer set to run when the house was mostly occupied and hot water demand was most likely to occur. The kitchen tap was off the top of the cylinder as this is where the water was hottest and if you got a bit of "air" so be it. The secondary loop acted like an electrical ring main. Each bathroom was tapped off the ring so when you turned on the hot tap the hot water came out nearly right away as it does not have far to go, or if you ran a big bath the hot water remained at a constant temperature. Now my question is. Can you marry up these old principles with the new, just install a secondary pump to circulate the water to avoid statifcation? But of course the secondary pump needs that valuable electricity / energy we are trying to make most use of. Maybe in the round this is a simple way to do this as too much complexity often leads to higher maintenance costs etc? -
@Barryscotland Hi Barry. If the trap is holding water then the seal is maintained. But you may be getting vacuum in the system. This often happens when you flush the toilet or use another sink say. The "plug" of water either fills the pipe to full or nearly full bore and that sucks the water out the shower trap as it creates a vacuum behind it and thus the smell comes out. These types of shower trap often have a very shallow water seal depth. 40 - 50mm as opposed to a kitchen sink washing machine trap with a 75mm water seal. Look outside to see if you have a soil vent stack. Has the top come off and/or birds been nesting in this? Is it cranked and some bits have fallen off and it is now facing into the wind or on the leeward side say. Next try first filling the shower trap. Then go around each sink/s and toilet/s one at a time. Use them in the way you have been doing and get someone to listen to the shower trap, or smell. Sounds weird but the first objective is to look for the simple stupid. Don't rush this, be patient. Now some sinks have an anti syphon trap fitted. It may be that one of the anti syphon traps is sticky and not letting air into the drain to relieve the vacuum. The objective is to find the appliance or the thing that has changed in the system as it was working ok before. Working up you may have a 110mm drain line that is like a branch line in the house. It may have a 110mm air admittance valve, a bigger animal than the small valve on say a sink trap. That may be sticky. Try this and let us know how you get on.
-
Wall starter kit not used! What can I do?
Gus Potter replied to johnannik's topic in Bricklaying, Blockwork & Mortar
Yes they are an important component. The standard wall starter kits Catnic / Sabre fix mostly work in horizontal shear. In other words when you build an extension with the extension wall at right angles to say the back wall of the existing house they stop the wall from moving horizontally in the plane of the existing back wall. They don't contribute much to stop the extension wall from moving away (tension effect) from the existing house wall and leaving a gap. This can happen due to a little settlement of the new wall, shrinking (concrete blocks shrink mainly) and swelling (clay bricks) as it ages, moves season to season with temperature changes. The same roughly applies to what @johnannik has. The starter kits are intended to primarily stop the new wall from moving horizontally at the junction between the old wall and new one. You have some pretty solid looking walls there, particularly the new one, laid block on the flat? Give your SE a call and see if the new bit of wall will work as a stand alone column or something to that effect. then all you need to do is deal with the shrinkage / swelling between the old brick and concrete block. It may be that all you need to do is to put a couple of plaster stop beads on the outside to create a movement joint in the external render. -
Structural roof design help...
Gus Potter replied to matthyde83's topic in General Structural Issues
That is a cracking and interesting job you have there, especially for an SE. Have had a brouse through the posts and the drawings and it looks like there is a lot to get your teeth into SE wise. The SE drawing you posted looks like a preliminary sizing drawing to give the Architect a feeling for the structural envelope. Maybe there is a lot more detailed information? On a job like this, to review and value engineer, if there is only preliminary sizing information available, I would probably look to model in 3D the ground floor primary walls on the two floors to see how things all line up and the vertical load paths and just as importantly check to see that the building stability system proposed looks adequate. Nothing special, just enough to check the loads paths and get a feel for the structure. This gives you confidence that what is supporting the roof is ok and nothing serious has been missed. This would provide the platform for the roof design and associated steel work in detail. The 3D software is then used to generate the sections, particularly the bits where that are really hard to draw in 2D and the steel fabrication drawings. The great thing about this is that the model is in basic colour so you take screenshots and put them on the construction drawings, if the joiners have a "picture" to look at life is easy for them. You can turn the model into a file that can be spun round using a laptop and say using Navis Works (free viewer) on site to help the joiners visualise where all the bolts go, the awkward timber cuts and so on. Question.. What level of drawing and design information do you have to work with? As this is a new house it could be worked up in a lot of detail as there is much less uncertainty compared with say a renovation in terms of dimensions for example. That would include all the connection details, steel fabrication drawings, timber connections and all the tricky bits. Is it the case that the Architect and SE have included a lot of "contractor designed elements" and left it to you to figure out the construction / steel fabrication details and sequence? Below is a small trussed rafter roof screen shotted out the software with some quirky angles and cuts. Joiners love the visual aspect and can then easily understand the dimensioned 2D drawings and wind bracing system Keep us posted and posting as very interested, wishing you good luck too!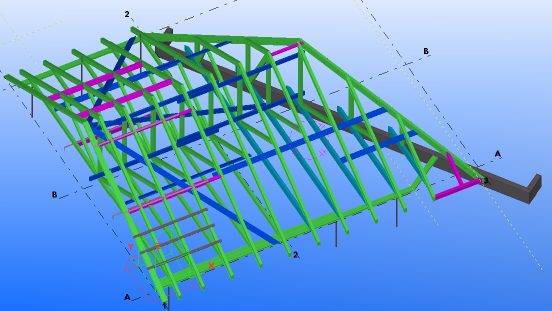
-
Argree @CharlieKLP There is no free lunch in this world. No contract the more risk the customer takes on board. Contracts written by builders themselves tend to favour themselves. It's a big and emotive subject.
-
If you look at the plate sizes you can see that they are not standard. When designing stuff like this you want to think about minimising cutting. The plate shown is 360 x 260. But what you want to do is to cut the plates out of standard flat bar widths if you can. Standard widths each side of 260mm are 250mm and 275 mm at 10mm thickness. Now to fabricate this connection the plates need cut at an angle to form the gusset down to the valley. You can get really clever and really reduce the amount of cutting if you don't mind the appearance. For a small order like this you may find a price for the 6mm fillet weld comes in at £30.00 per metre run. Then spray paint it yourself with galv spray... in your own taste of tint / colour.
-
Interesting, but if you don't want to use an industry recognised form of contract (often gives you the most protection) then don't forget to inform your home insurer. They may for example insist that your builder also has contract works insurance. Builders can purchase what is a called an "all risk" policy that is intended for small jobbing builders for example. This is different / over and above public and employers liability insurance. Employers liability insurance is a statutory requirement. Say your builder / roofer goes away for the weekend and you get a burst pipe or water ingress that floods your house. Who pays? If you want to not use a recognised form of contract then at least check to see if your builder owns their own house, it is not a matrimonial home, is not a limited company, then in the worst case you may have an asset to go after but that is to be avoided if you can. You can find info on the net about contracts, I have written some stuff as have others on the internet. You may be paying in cash.. I've written about that too. All the best, but continue to be cautious.
-
Looks like you may have a bit of a "disconnect" between what you actually have and the drawings so can see why you are raising some queries. Starting with the roof. Looks like you have prefabricated fink trusses which are resting on the timber frame with a stud thickness of 89 -95mm. I'm guessing at the span of the trusses from the photo but over the existing window you'll have maybe have a timber lintel made up of 2 no 145 or 170 deep timbers or a Kerto beam (some composite) of a similar size. The soffit is level all the way round so that tallies with a standard kit. The timber frame is the skeleton of the structure and holds the masonry in place although they both interact to resist wind loading. With that type of roof detail I would not expect to see a lintel on the outside masonry leaf. Now when you widen the opening you get much more deflection, bifolds are very sensitive to this hence the flitch beam. But the flitch beam looks too deep! How do you fit the doors and what is under the concrete lintel shown? I would ask someone to go in the attic and check to see how the eaves are formed and then make sure what is drawn can be built and hold the roof safely wthout excessive deflection. The steel grade of the plate suggests that this may be an old generic detail that is recycled and not maybe applicable to what you have as does the lack of a bottom truss chord in detail D1. That said I can't see all the drawings hence it's just suggestion.
-
@Onoff Like the veg patch. Would advise your mate to give the "shed" idea a rethink using these sections. Also could be false economy.
-
Hello @Marlin That's a good first go at a concept. I see you have picked up on the inline purlins.. for a domestic type application that makes sense particularly if the frame is to be kept on the warm side of the insulation envelope. There are many reasons for this, some relating to the Architectural design some to do with the structural design and a lot to do with insulating and detailing. There are certain nuances that apply to domestic design. Long story so won't explore in depth just now. Structurally you seem to have a suspended ground floor, there are other options such as a ground bearing slab. What you have there structurally is a half way house between a true portal ( two columns / two rafters) and a tied portal ( two columns / two rafters tied at the eaves joint) which is a different animal. One way to think of what you have is akin to a portal frame with an integral mezzanine floor. This too behaves in a slightly different way but it's no great drama. Your soil type does not appear to be a big issue so standard pads under the columns look to be the likely outcome. I can't see your bay size but it looks about 4.0m? A 140 deep purlin looks on the ball park. You can play with the thickness. Also you can play about with the number of frames you need, maybe larger bays to fit the intended openings? For me, if I was designing this for you I would want to look first at the Architectural intent, planning constraints, then have a quick sizing of the sections, foundations and any key detailing that is off piste. Iterate the design process.. then do the final structural design and detailing once you have the go ahead prom the planners.


