crispy_wafer
-
Posts
1194 -
Joined
-
Last visited
Everything posted by crispy_wafer
-
grouting - I did, as there was a slight difference in level between the infill blocks at the top of the beam, meaning that the insulation rocked a touch (of course the screed then weighs it all down and flattens the insulation out, but being green I didn't want to risk it). I mixed it up as a really runny slurry, and poured over the whole lot and used it like a filling/levelling mix. Just make sure the blocks are wet. Cant remember the mix, but think it was in the region of 5:1 ish... I did my grouting after watertight, but that meant lifting the blocks to clean out all the crap that had accumulated.
-
What building regs apply to a wooden garage,?
crispy_wafer replied to joe90's topic in Garages & Workshops
Great point, our stables that we inherited are built soleplate onto concrete base, albeit, they are probably subjected to a bit more moisture. The soleplates do rot out in time. You can remove cladding etc and knock them out and replace, but it's time and hassle, when really a slight design tweak at the beginning that doesn't cost an awful lot extra can easily mitigate against. -
Minimum height of insulation build up on concrete slab
crispy_wafer replied to seano's topic in Barn Conversions
Quick check @ Insulationhub.co.uk would be about the same -
I incorporated a bat box in to my build, as specified by planning. Inexpensive, simply slips into a cavity. Might be an alternative.
-
Cheap sturdy vacuum cleaner for DIY cleanup
crispy_wafer replied to Gill's topic in General Self Build & DIY Discussion
I use an old vax 51 something cylinder or other downstairs and a karcher thing upstairs, only got 2 because we don't have stairs in at the moment. Both bagged models but they were both very cheap 2nd hand from FB marketplace. -
Just the quote/equipment list, then thought thanks for the unit suggestion, bet I can do it better and cheaper. So I did.
-
I put a vent axia sentinel s in, twin 75mm ducts to all rooms, apart the master, where I split to two single 75mm ducts feeding low level vents. I ran the system up last weekend, as boys with toys just want to play. Bear in mind the build has no plasterboard up, and is pretty much open plan at the moment. The unit is located in the loft (insulated between and under the rafters). Tried it at its pre-set normal and it's boost setting. I was happy with the noise levels, which made no real discernible difference to me. Noise levels at the Supply and extract plenums, nah, nothing that I could really tell unless I stuck my ears at the vent. I reckon I'll be happy with my choice based on cost/performance. I got BPC to quote, I then had a good guess at the layout plan, based on their number of supplies and extracts, and reading some of the best practice guides. Plenty of plans have been discussed on here too, which helps with design decision. I shopped about, ventilationland, isells, blauberg, and bpc, for components. I did add a couple of metal duct silencers on the building supply and extract.
-
I had one stud, it decided it preferred to smile rather stay straight faced. took my circular saw to it 2/3 the way through at the bend, leant on it then wedged in a timber packer, then braced either side with ply. Perfik now, but required extra work. That's why metal frame is now taking over, nobody on site has time for remedial action.
-
Sorry I don't know, but I would be interested to find out what is acceptable for a spread to take out, because I'll be bloomin surprised if I manage to get all my boards up without a deviation, even though I've been running string lines and straight edges.
-
Daylight robbery, <expletive> bandits.
-
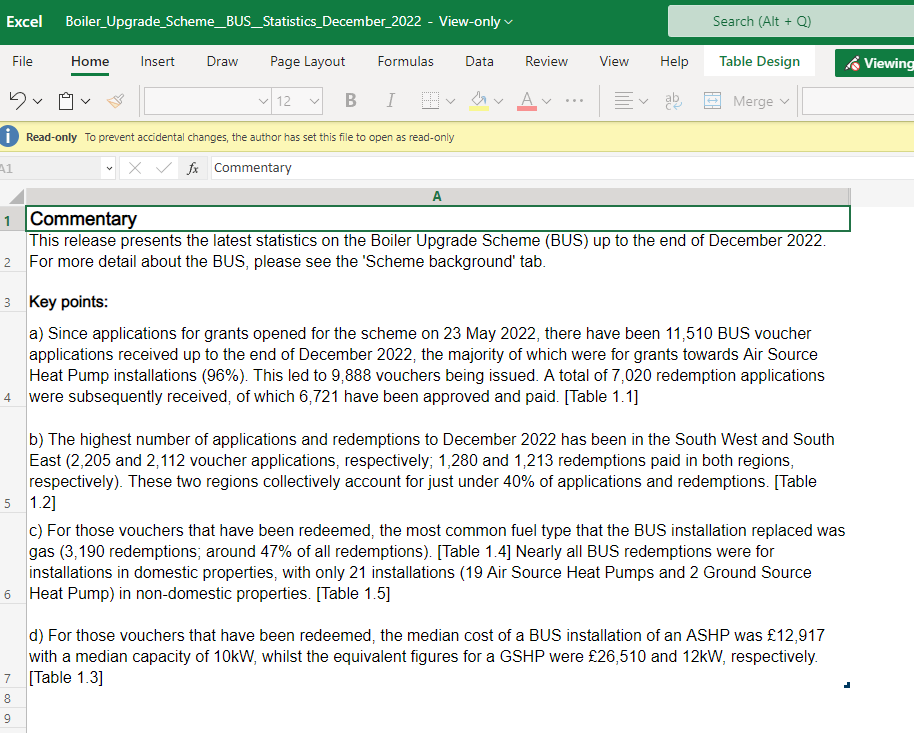
Found this on the statistics for BUS. found here Boiler Upgrade Scheme statistics: December 2022 - GOV.UK (www.gov.uk)
-
Octopus energy launch 'their own' Heat pump
crispy_wafer replied to Post and beam's topic in Air Source Heat Pumps (ASHP)
Although not particularly great for you, that is great feedback for others. 3.5 hours survey, should be nice and thorough then. -
July 2020 we started. Yes & No, We paid a builder to get up and roof on, I then bought the windows, so that took us to approx £165k. I've got a little bit of capital left, so we are doing as much first fix work as possible on what's left of the salaries. Material costs are just about manageable if taking your time - take a month to do the studding out, plumbing the next month etc, I refuse to look at what it's cost to date in total, in a way it's almost meaningless to us (ofc it matters though), it will cost what it costs it's just a matter of how long it will take, and of course trades cost money as they've got mortgages and bill to pay too! Trying to pick up bits and bobs from peoples finished projects also helps the pocket money stretch a bit further. I also refuse to become a slave to it. If I start a part of the job, I'll finish it. But, I do like to take some time out and spend it with friends and family too every now and then for my own sanity. Almost ready for FF electrics and plumbing.
-
Yep, true, got to read the blurb and make sure you don't get your pants pulled. There are a couple of different types of these, according to the flyer only the R version has the element. Then there are some different ones at appliance direct too. The efficiency isnt anywhere as good as the split types, I guess you could work out the real world difference
-
Do it! or if you have an external wall, get one of the wall mounts. Like Unico Air Conditioning - Air 8 HP - Heating and Cooling (saturnsales.co.uk)
-
Sounds/looks like a nice easy solution, thankyou.
-
Ok, seen them and atplas chambers, that would leave the the T & Elbow outside, are they ok to bury in Sand, or something easy to dig out at a later date if needed?
-
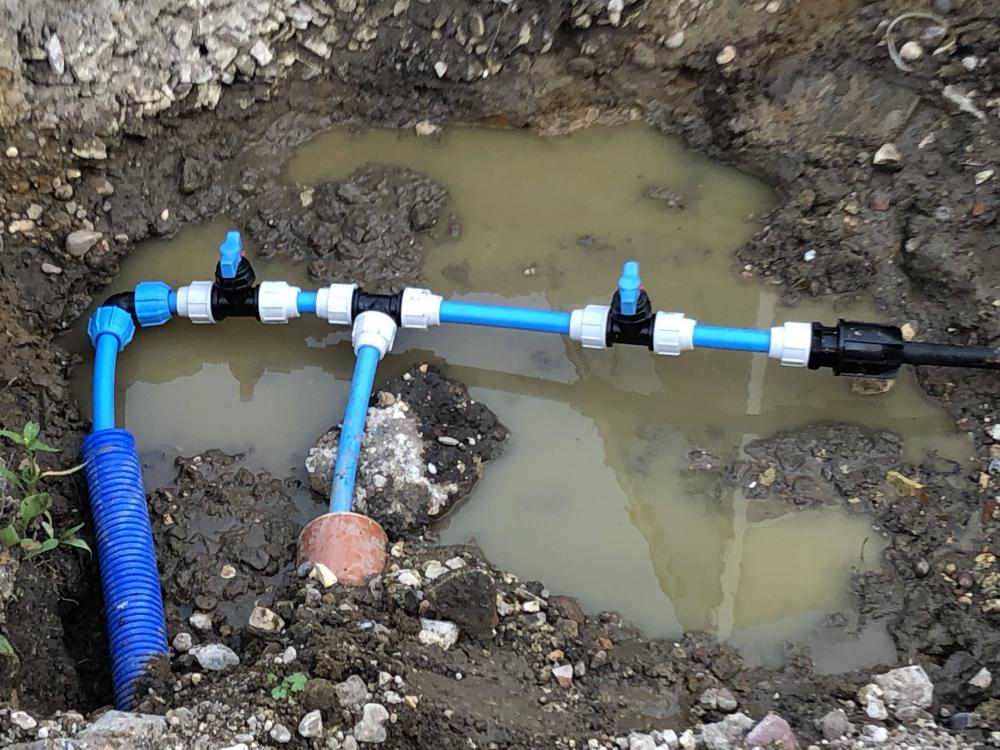
So, on this theme of There’s always someone who has done it worse and taking the, if it looks wrong approach. I cobbled together this lashup last year to get me out of a jam (please don't shout at me), threw a sheet of ply over the top and then forgot about it. Anyway this year I want to rip it out, tidy it up get the hole filled in and get on with life. It would be awesome if I could tidy this up and have it self contained in a box that I could access if needs be. The water table rises up above the pipes on occasion, so could/should I try to make it water tight? Is there an access chamber of sorts for this sort of thing and are there such things as MDPE manifolds, a little 2 port jobby would be perfect? There is a bit of extra on the far end of the MDPE pipes that could be pulled through if required. One supply is to the new build (in the brown pipe), and the other will be to the stables. The tap to the stables could go at the stable end of the pipe if needs be. Any thoughts on how to proceed to make the best of this? Thanks Marek
-
Just been at this, started with a Stanley knife, worked but if I wasn't diligent enough then it is quite easy to cut/slice not in a straight line and end up cutting through one of the ridges... Then I swapped over to a hacksaw blade, and used it to cut on the pull stroke, worked awesome for me, but leaves some swarf on the pipe which needs a bit of a rub, to loosen and clean up. Try both, one will work for you.
-
Octopus energy launch 'their own' Heat pump
crispy_wafer replied to Post and beam's topic in Air Source Heat Pumps (ASHP)
I didn't actually know about the RED stuff until today, reading through whatever I can today I like what they are trying to do, and I wouldn't mind one of their Daleks sitting outside... -
Octopus energy launch 'their own' Heat pump
crispy_wafer replied to Post and beam's topic in Air Source Heat Pumps (ASHP)
I've done a couple of the more popular heat loss calc spreadsheets and they both come to about 5kW so within the 'standard' install parameter, but I will want a larger cylinder that's for certain. I guess we might find out what the brand is one day, but I'm in a situation now where I wonder if I can carry on chugging away with the plumbing and install the supply and return pipework to my UFH manifold (different locations) without actually knowing what heatpump or Heating source I may or may not install in the future. -
Octopus energy launch 'their own' Heat pump
crispy_wafer replied to Post and beam's topic in Air Source Heat Pumps (ASHP)
And that's the deal, if standard install is £3k + maybe a grand or so if I wanted a bigger cylinder and few extras then I'd gladly stand back and let them get on with it. The key is, if they can get the correct standard of qualified subbie who knows what to do and how to do it to, in a new build at first fix it shouldnt be a trivial task, key is in the heat loss calcs and specifying of the unit. I would like to think that a company like Octopus would be a better proposition than the shiny suited renewables salesmen, who now also want to start charging 350-400 for a heat loss calc. -
Octopus energy launch 'their own' Heat pump
crispy_wafer replied to Post and beam's topic in Air Source Heat Pumps (ASHP)
I've applied, purely as a punt to see what they can offer, and at what price. However no installers in my area until the summer as they are looking to take on subbies. -
I'm trying to plan a media wall at the moment, unfortunately I'm about 9 months away from buying a tv to fit in it. There's some lovely crisp/clean looking ideas on google images, without the obligatory fire undeneath (not a fan tbh). Openings either side for shelves if you want, with some LED strip lights for a bit of mood lighting etc etc. Makes a nice feature I think.
-
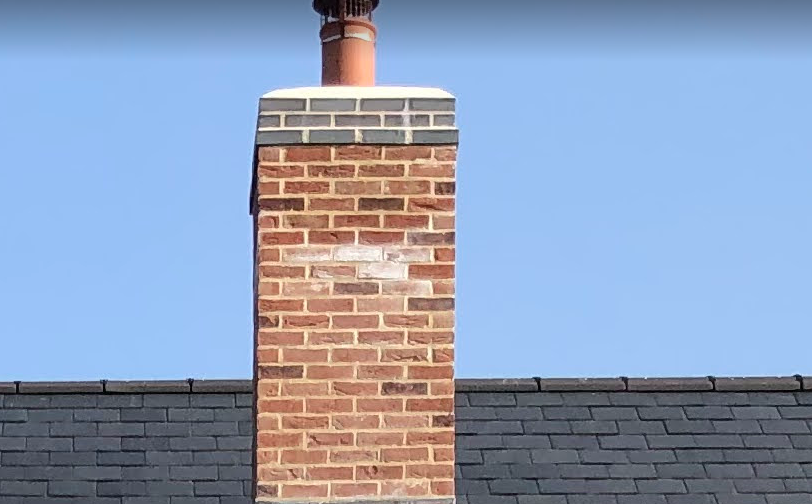
New log burner install-Cowl at chimney pot fixing !!
crispy_wafer replied to Marcset's topic in Introduce Yourself
Snap!