
Russell griffiths
-
Posts
7790 -
Joined
-
Last visited
-
Days Won
60
Everything posted by Russell griffiths
-
There are companies that specifically look at faults in new builds. Look one up and get them to investigate. it’s a shame it’s getting warmer. Get a thermal imaging camera thing, crank the heating up and stand outside to see where it is escaping. or set up a home made air test, set a fan to suck air out of the room and stand in the room hunting for the cold draught.
-
 I think that’s about £140 In materials. so a bit steep.
 -
Buy a new roll get some of the black dpm joining tape get some scissors and get on your hands and knees and patch it all up. fairly simple really. If it wasn’t important then why put it in in the first place.
-
Pea shingle or sharp sand between the drainage pipes
Russell griffiths replied to Porthole's topic in Waste & Sewerage
If he’s constantly cutting corners then this is you excuse to let him go. pea shingle for me. -
Try Icf supplies in Essex I know they are linked to the company somehow.
-
You don’t really want shiny, you want flat, you will want a nice key for you mist coat paint to suck into. When tape n joint is sanded it’s surprisingly rough, I think they use 180 grit paper for the last sand. A glass like finish is in my book not what I want.
-
@Onofffo yourself a favour and change your foam. look at illbruck airtight foam for all sealing jobs, and soudal Instastick for fitting the reveal boards. totally different to the crap your using. you probably won’t need any other airtight strategy if you use this stuff. Icf supplies in Essex are a new distributor for the illbruck stuff.
-
Depends what you want. I intend sanding every inch of mine, then apply a surprising amount of filler to little imperfections then sand again. it’s never as good as you would like straight off. it’s surprising how much work the painters do before painting.
-
Is installing guttering an easy job?
Russell griffiths replied to Thorfun's topic in Rainwater, Guttering & SuDS
I used guttercrest, all aluminium powder coated. When you look at it it looks expensive, but all the brackets are fitted to the gutter as standard, if you add up a section of another gutter it’s cheaper but then add a joiner and 4 brackets per 3 m length and the galv stuff was actually dearer. Easiest gutter I’ve fitted, no brackets, no fall required, but you will need a brain and a good idea how to use a drill and pop rivet gun. -
Does the safe zone apply for this, in which case you should run directly vertical from the light fitting in case of future drilling cockups.
-
Reynaers vs Lumis - Alu vs Alu-Clad...
Russell griffiths replied to Mulberry View's topic in Windows & Glazing
If it’s a new build not an extension then you want the best you can get. I would say those u values are poor, and are more what I would have in an extension to a poor house, not a new build to a high spec. don’t overthink this sight line mumbo jumbo. I spent ages making dummy frames to check all the mullions would line up, the windows we chose upstairs are a lot thinner than the door down stairs. Do we notice it ,nope not one bit. Was a waste of months of time worrying about how thin the frames where going to be. in the end we went with enormous fat ally clad, but they have a brilliant u value and terrific air tightness. I think it was the better choice. -
Are you thinking you are going to buy sand and aggregate separately then buy cement. just buy concrete ballest already mixed together and add cement and water. 5 ballest 1cement will be perfectly adequate for a footing mix. can you not just get a couple of metres of readymix.
-
What do you want it to do. Dpc you shouldn’t need anything, use a waterproof additive in your concrete and your good to go. I used it for something completely different, just to keep bc happy. don’t use black Jack for anything, it’s bitumen based and will melt your blocks.
-
Is an eaves support tray needed?
Russell griffiths replied to WWilts's topic in Roofing, Tiling & Slating
Don’t do it, they don’t grow on bloody trees you know. -
Is an eaves support tray needed?
Russell griffiths replied to WWilts's topic in Roofing, Tiling & Slating
Btw you don’t have a screw missing in that bracket, you either use the centre hole or the two outer, not all three. -
How best to resolve old toilet soil pipe
Russell griffiths replied to Loz's topic in Waste & Sewerage
You do realise that you are not connecting to the white pipe. Pull the white pipe out and chuck it in a skip. Then you are back to the grey. Work out what you need from there. -
@Mr Blobby time to get a company used to dealing with low energy houses. I purposely changed my manifold to the Ivar as it had the lowest temperature mixing valve.
-
Are kitchen extractor designs all rubbish?
Russell griffiths replied to SimonD's topic in Kitchen & Household Appliances
-
Are kitchen extractor designs all rubbish?
Russell griffiths replied to SimonD's topic in Kitchen & Household Appliances
Isn’t it 29x225. -
Are kitchen extractor designs all rubbish?
Russell griffiths replied to SimonD's topic in Kitchen & Household Appliances
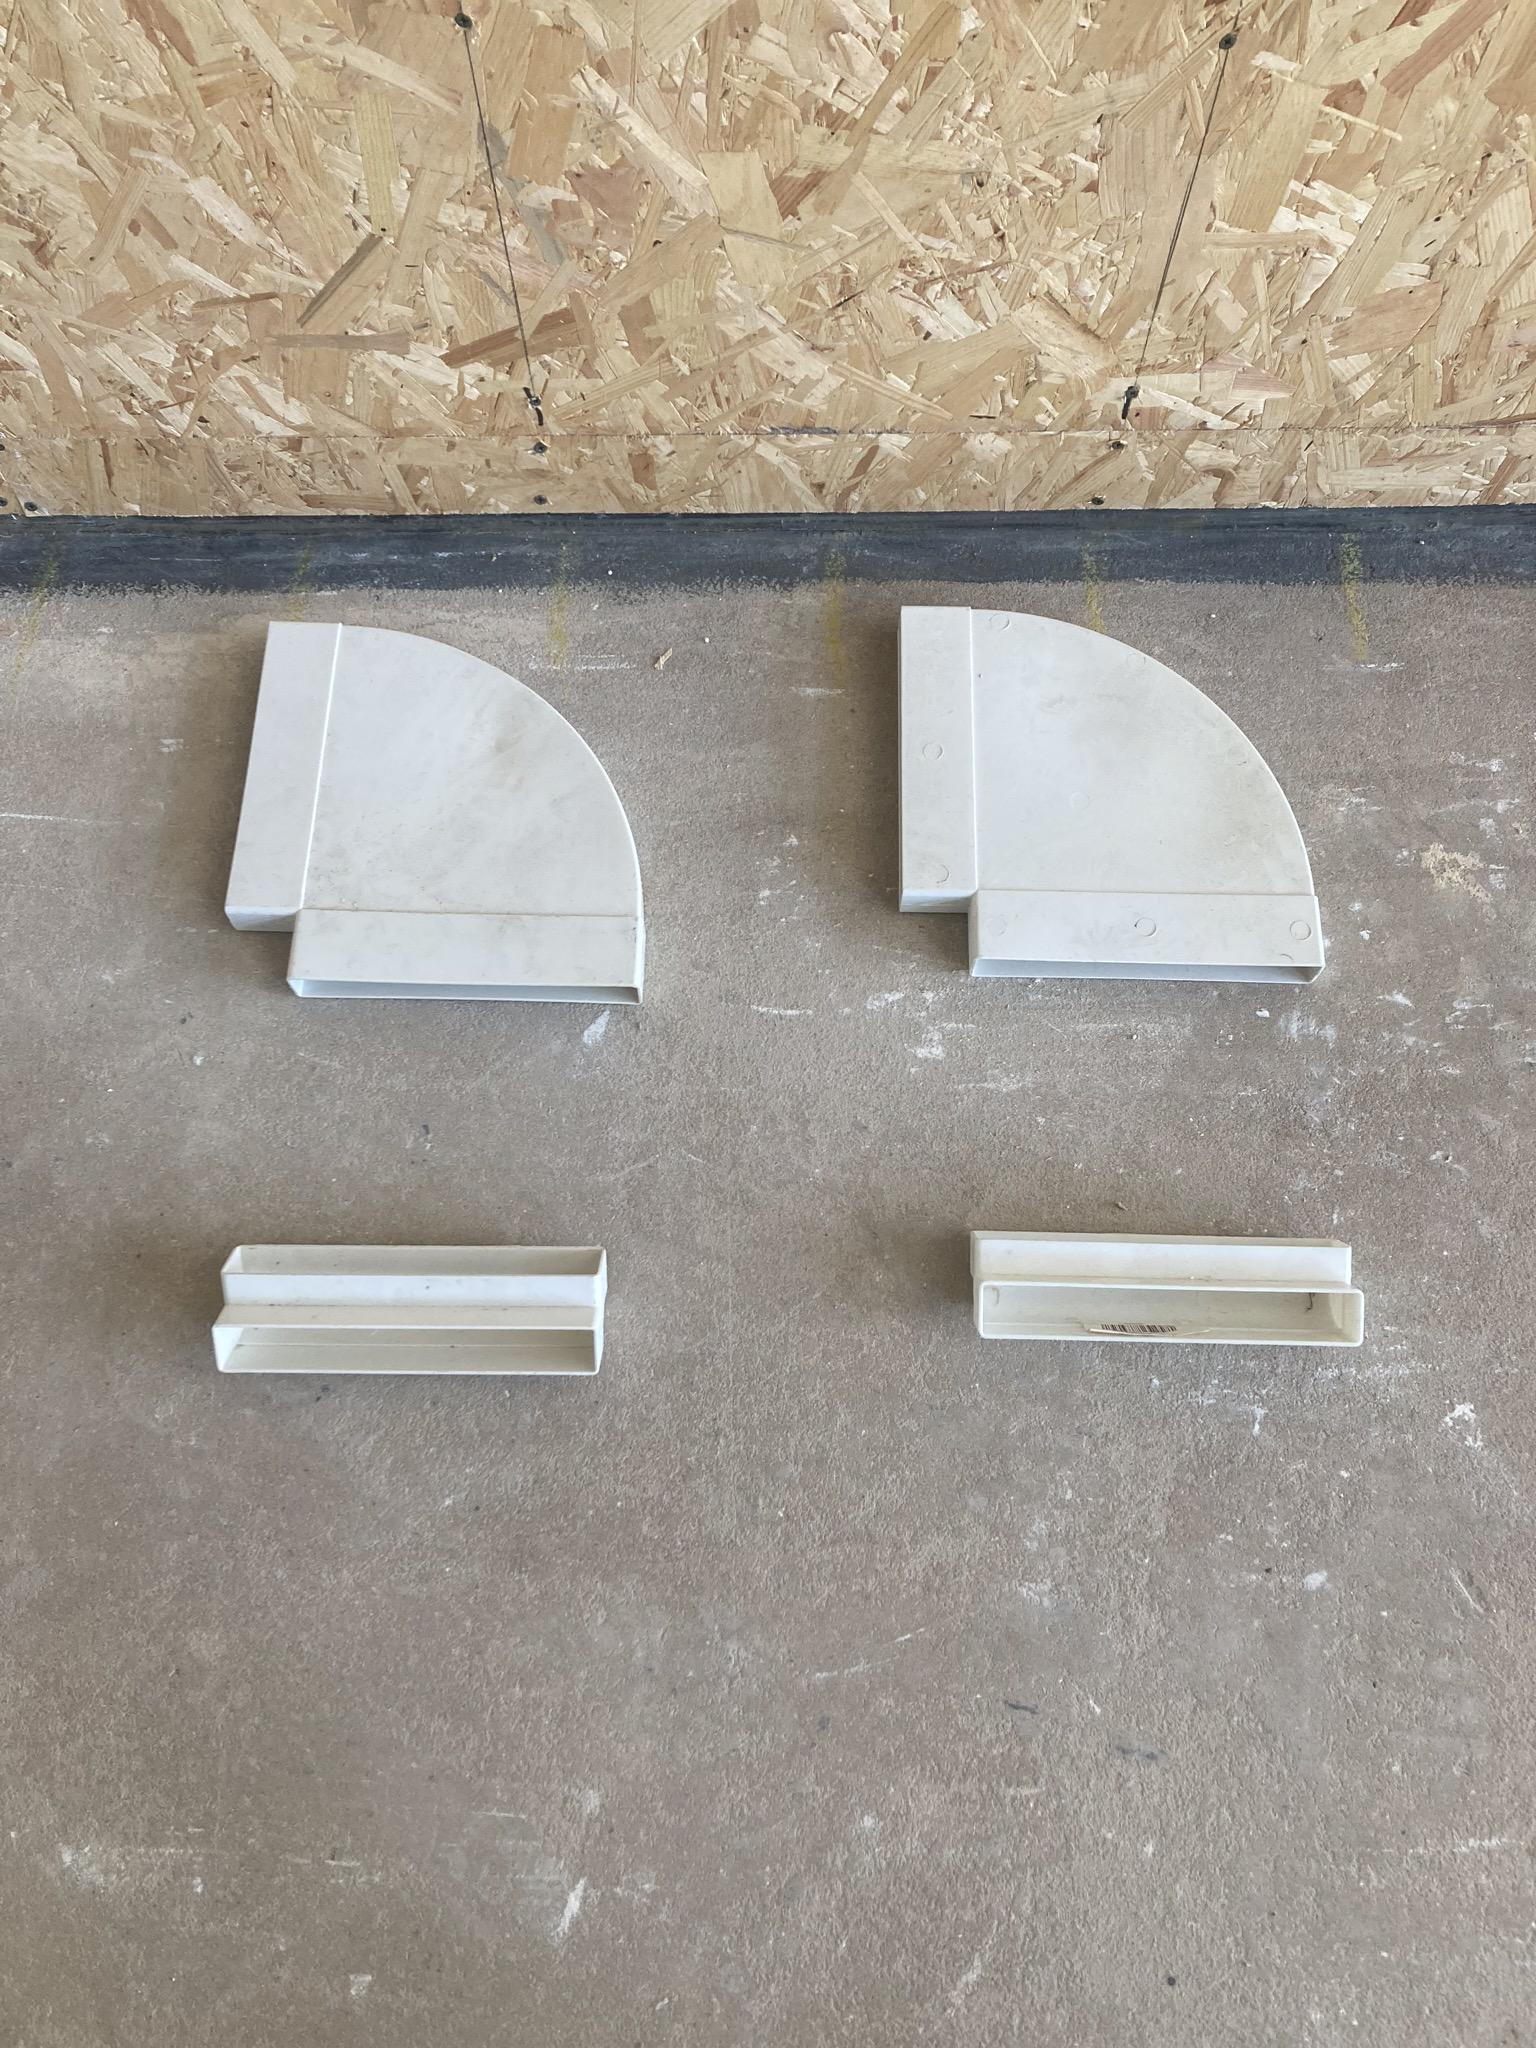
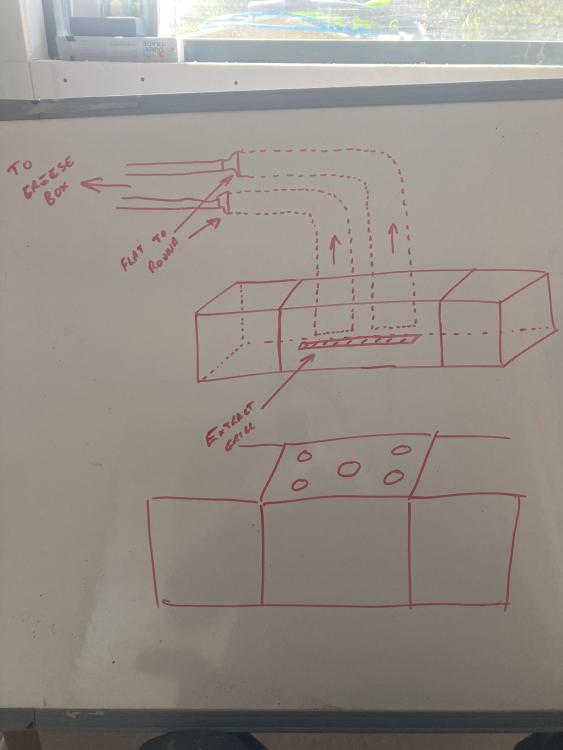
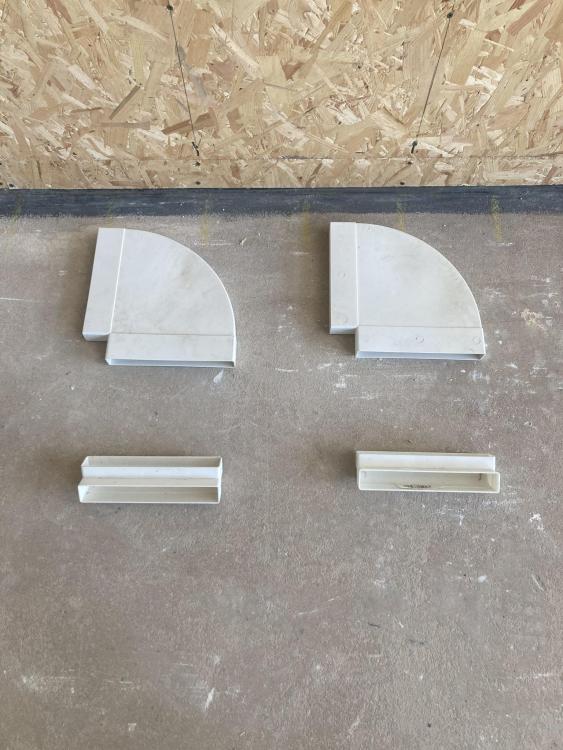
We did a design for something similar on my wall in marker pen, spent a good couple of hours on it, it might still happen. Basically it was two 225x25 ducts hidden in the wall, turning 90degrees to project outwards. The outer opening would line up with a decor panel that was on the underside of the upper cupboards these ducts would have a 3D printed grill over them. Ducting then went back to an in-line unit with Greece filter on the loft above kitchen. -
We seem to have a fascination in this country of keeping old shit, the majority of the grade two listed houses aren’t worth keeping. When we were in Australia I brought a house built in 1980 and it was prime for redevelopment, it either needed a full refurb or knock down, we took half down and extended on the end and built it all new, this was in 2007. So 25 to 30 years over there they need a full strip out and rebuild. Why do we continue to live in 1900 built rubbish and keep smearing a bit more polyfiller over the cracks, just add some 3mm polystyrene sheet to the walls and then woodchip over the top, will be ok for another 100 years.
-
DIY hot water system needs replacing - Sunamp?
Russell griffiths replied to Nelliekins's topic in Boilers & Hot Water Tanks
You will all be growing extra fingers, oh hold on -
DIY hot water system needs replacing - Sunamp?
Russell griffiths replied to Nelliekins's topic in Boilers & Hot Water Tanks
It’s probably all the lead and tin keeping the scale away 🤣🤣🤣 -
Revised timber frame details with stone cill
Russell griffiths replied to maxdavie's topic in New House & Self Build Design
What are your thoughts on services. where are you running your pipes and cables. if you go down this route it would be more suitable to be built on an insulated raft, which will remove a lot of cold bridges. -
Airtight seal from footing to timber sole plate.
Russell griffiths replied to saveasteading's topic in Building Materials
@saveasteadingyou are overthinking the bolt placement. it’s actually very simple. you basically have a plan of a run of wall showing where the stud spacing is, if you have a 600 centre on the studs then you have a 550mm gap in which to place the bolt. you start at the corner and mark on the shuttering stud placement, you then measure 600 for next stud, this gives you 550mm to place your bolt, all you need then is the measurement in from the edge, so a 150mm sole plate will be 75mm in from the edge of slab to centre of sole plate. push your bolts into the wet concrete at the approximate rough locations. when dry you lay your sole plate all around the perimeter of your build and using a square mark a line from the bolt to the timber. Drill a 20mm hole for a 12mm bolt and you will have no alignment problems. the threaded stud that goes up to the top plate only goes in strategic points, normally on the racking corners, so the first bolt closest the corner then 1200mm away, then your first sheet of racking board is added and it’s all turned into one big braced corner. probably very OTT for most of England, but could be handy for some coastal areas. we also used to add cyclone straps to our trusses, these wrapped over a truss and underneath the two top plates instead of just nailed on the top. not had one of my houses blow away yet 🤣🤣