


Russell griffiths
-
Posts
7971 -
Joined
-
Last visited
-
Days Won
65
Everything posted by Russell griffiths
-

Kick-starting the week
Russell griffiths replied to ToughButterCup's topic in General Self Build & DIY Discussion
Jack Daniels honey. Lots of crushed ice. -
Construction environmental management plan, that's a mouthful. My ecology guy said I will need one of these. Anybody done one or got any useful pointers I can use. Just reading our ecology report and and it seems that although nothing was found of any interest on our actual building plot(good planning) the rest of the site is very interesting and I need to put measures in place to mitigate any risk to all the silly little wriggling things that may want to visit the construction site. You couldn't make it up ?
-
I think it is to do with a big flat panel the angle of the sun and the light colour. I bet if you put a straight edge on it, it will look really good with hardly any gaps behind the straight edge, but to the eye with that white you will pick it out. Have you ever looked at a poor spray job on a car? You can spot it a mile away in the right light, but at other times you would never know.
-
I have seen this on a number of houses in Australia, only cure I remember was changing the colour.
-
Range cooker or hob/ovens
Russell griffiths replied to Shah's topic in Kitchen & Household Appliances
The choice is yours, will your house suite a range or would a fancy glass induction hob look nicer,only you can answer that. As for make I think we are having a mercury. Expensive but our friends have one and they love it. -
I would think @ProDave this is a different system to yours, correct me if I'm wrong but your wood fibre board it waterproof, whereas the osb is like a big sponge. Im going to put my hard hat on now?But this video shows why I dislike sips, relying on two sheets of osb as your main structure doesn't add up to me. Sorry.
-
The stucco thing is a very silly idea if you think about it. Render onto a timber frame, any cracking or poor areas around windows and other projections is asking for trouble. This his has made me think about different types of house wrap. The standard tyvec type flapping in the wind stuff that you see on most timber frames always looks badly installed to me. I am going to be leaning towards a system that is fully taped and sealed. Opinions.
-
The damage to the osb was a bit scary.
-
Kick-starting the week
Russell griffiths replied to ToughButterCup's topic in General Self Build & DIY Discussion
Anybody got a nutra bullet? I work with a young lad all bloody muscle, when we sit down and have a big chunk of cake he's slurping on his smoothie. I seem to run run out of steam at three in the afternoon and reach for a bar of chocolate, I keep thinking if I had a cool box with a couple of shakes in it I could slurp on that instead. My my wife thinks I should just give £90 straight to the charity shop as that's where she thinks it will end up ?? -
How do I dispose of ... ?
Russell griffiths replied to Ferdinand's topic in General Self Build & DIY Discussion
When I lived in oz (yawn). You could go to the tip as much as you like but there was a standing charge of $12, I would happily pay a tenner to get rid of a boot full of crap, I wonder if it has been thought of. There were here a lot of revenue gathering measures over here that the government seems to have missed. -
I think we need a topic on dodgy shit you found while doing a Reno or a bit of demolition. I think I could write a whole book on the house we are in now.
-
I'm a firm believer in that you can learn from looking at others failures and working on things that have failed in some way. Look at this video and tell me your thoughts on the weather proofing of this timber frame house and what should we be doing to prevent failure. Cheers russ.
-
How do I dispose of ... ?
Russell griffiths replied to Ferdinand's topic in General Self Build & DIY Discussion
Ok I will add one. How do I get rid of 70m of loft insulation the old itchy type stuff. -
How do I dispose of ... ?
Russell griffiths replied to Ferdinand's topic in General Self Build & DIY Discussion
Cut a groove in a piece of timber to cover blade, tape up, hand in at council tip. -
Guess what insulation this is.
Russell griffiths replied to Russell griffiths's topic in Heat Insulation
The bit I think they got wrong, Is the bitumen coating under the ceiling tiles, effectively sealing in any moisture from escape. Your thoughts.
-
Guess what insulation this is.
Russell griffiths replied to Russell griffiths's topic in Heat Insulation
I can't imagine the time it must have taken to batten out these walls and stuff all those tiles in there. Just think this was was done in 1980 so I think the hammer drills where not what they are today. All the screws in the battens are straight head so must have been put in by hand. -
Guess what insulation this is.
Russell griffiths replied to Russell griffiths's topic in Heat Insulation
Give that man a clap @Barney12 you are the winner sir, they are in fact ceiling tiles,piles and piles of ceiling tiles they are quite thin so they put three layers on. -
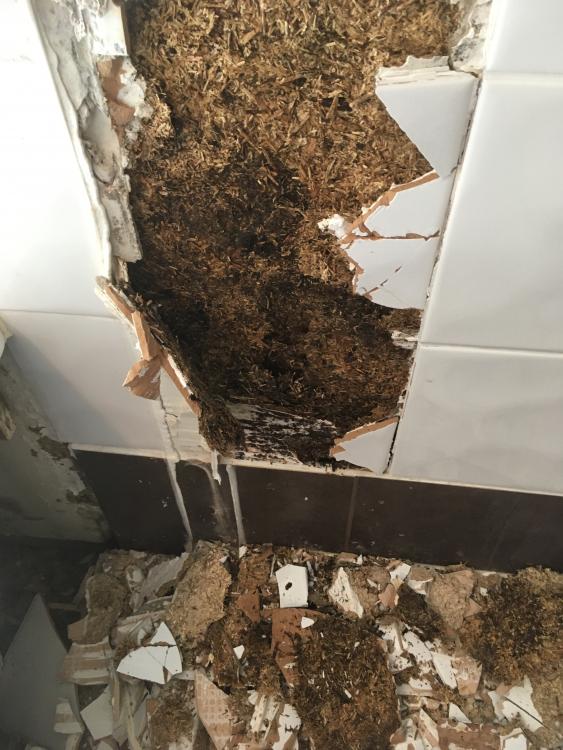
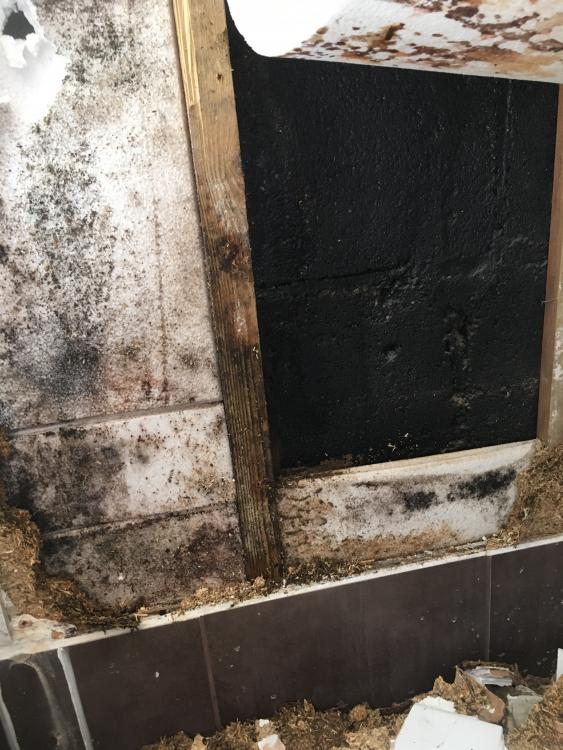
Yeeea haaaa had a red ants nest behind it that made me reach for the hoover quickly. What a bloody mess.
-
This is exactly what they have done. Except they have insulated behind the chipboard.............. see my other thread in insulation to see what they used. ??
-
I knew you wouldn't be far away. You want to see what I uncovered today in my house of horrors. Every job I do here confirms the need to knock it down. Pics to follow.
-
So I've uncovered some white insulation stuff behind my wall surface. Who wants to have a punt as to what it is.

-
Just want to do a little survey, would anybody recommend chipboard as a tile backer in a shower enclosure.
-
Splayed Cladding - Weather Protection
Russell griffiths replied to Barney12's topic in Building Materials
That sort of makes sense all the creepy bitey things around our place like a warm dry gap. Not a draughty bright area. -
Welding Aluminium, specifically
Russell griffiths replied to MikeSharp01's topic in Tools & Equipment
What are these frames for. Screening? Why not get the main frame welded by someone else and then fit them out yourself. I have been looking at industrial type pop rivets for fitting ally planking on a frame. That is a tool I could find a use for very regularly. -
Welding Aluminium, specifically
Russell griffiths replied to MikeSharp01's topic in Tools & Equipment
I do a lot of mig on mild steel, but always sway away from Ali as having to get different gas with the cost of the bottle and other bits unless you have at least a project a month lined up the initial outlay is just to high.




