
Leaderboard


Popular Content
Showing content with the highest reputation on 02/17/24 in all areas
-
Just a very short blog to show the windy roost ( not fully finished, is a self build ever?) plant room. I'm quite chuffed I got it all to fit, and I think it's quite neat. It's full DIY and house's the UVC and combined buffer, UFH manifold, MVHR unit, inverter, consumer unit, network hub. All in 4M³. Plus storage to come. Yes, the printer doesn't fit, but it's coming to its end of life so that's all it's getting for now. Jobs to do: Ceiling Insulate MVHR ducting / box in Shelves on the left hand side Clothes Airer ( a Scottish requirement to have one)3 points
-
Came downstairs from painting to this
 3 points
 -
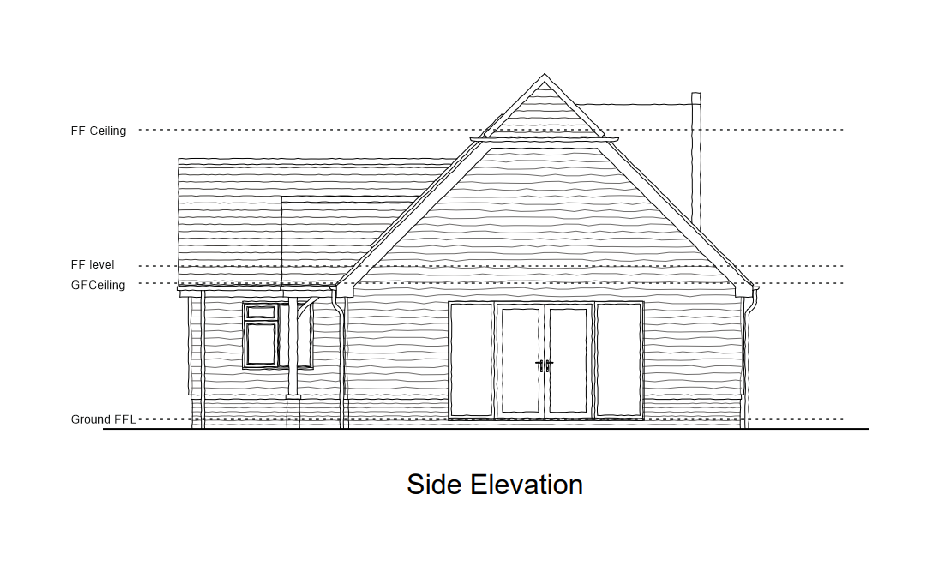
Based on the scale, a 2400 room height and 300mm floor zone as per @Russell griffiths, this is how it would be:
 2 points
 -
To be honest I would contact the architect who's name is on the approved plans before I exchanged and sound them out about making changes, you should get a very good understanding of what scope the planners gave them or what hoops they had to jump through to get the original plans through. At least then when you sign on the dotted line you know exactly what you are buying.2 points
-
Also when pointing stone I like to wait till it’s fairly stiff (which might take a few days) then wipe with a soft paint brush to give a better finish.2 points
-
Copy and paste your post to Masons Mortar of Edinburgh and take advice.. these folk know their stuff! Off my own bat. The stone you have looks like much what we encounter down the east coast of Scotland.. not well "sedimented" sandstones or more likely "conglomerate" in other words they tend to not weather well. These houses were built by the gentry for workers, they were not good quality. You need to get your head round the fact that these houses are what they are.. they were built as cheaply as possible for the land / estate owner so they could extract the most they could from their workers.. they are basically shite structurally / in terms of workmanship and let water in! Get it out your head (if you have had that thought) that they are quality buildings...they are not. @Tapster my post is encouraging later. You are trying to now make a silk purse out of a pigs ear!. The Scottish gentry lived say in Edinburgh / Glasgow and built in Ashler commonly ( oh! yes it was the Scots taking advantage of their own! nothing to do with the "English" or the "Welsh" or the "Irish" it was a "big boy" that done it and run away for those who are seeking factual history) .. faced sand stones.. the best.. I'm happy as an SE (and have done so) to convert these Edinburgh Ashler buildings all day long.. You'll see this in most Fife and Ayrshire coastal towns where the middle of the stone has weathered and the mortar is sticking out and that just drives water into the wall. Sometimes with a bit of thought you can recover the situation and live happily ever after. You need lime mortar.. you'll see often recommended a NHL3.5 lime mortar, bin that idea and go for a NHL 2 lime mortar which is supposed to be used for internal work only. But on this type of stone it's the angle of the pointing to shed the rain outwards that matters and acceptance that it needs regular maintenance. The idea is that you use a soft lime mortar that erodes faster than the stone.. you maintain that.. like cleaning your gutters. Eventually the stone will erode and need replaced.. hopefully it won't happen during your tenure.2 points
-
I really hoped that now we are progressing after our suspended floor saga that things would get better, but something somewhere is determined to make sure that doesn't happen. The only change is that this time the things that have gone wrong are not build related. Firstly, my brother, only 63, died of a heart attack with no history of problems. I spent 5 days with him and his wife / kids in intensive care hoping against hope that he would pull thorough, but at 6am 6th Feb his heart gave way for the last time, no more restarts, RIP Alan 😞 Just before that, 6 days before, I got told that I've been made redundant, as the only breadwinner that's another major blow, the build funds are sorted, but we still need to eat and pay the bills and run the cars. So, forget build PM I'm now looking for a job that offers enough for us to live on. The only snifter I've had would be a 20k reduction in pay with an hour's drive each way and 24hr on call once every 4 weeks. I may be desperate, but I'm not that desperate yet. The trouble is I'm in my 60's so although age discrimination is illegal you can't prove it's happening. But, with ALL the experience on my CV it shows that I'm not just out of uni. Right, back to the build. In December we had just got the details about our suspended floor. It had to have a bearing of 130mm, plus 20mm expansion foam, plus shear links. After much huffing and puffing it was prepped and ready for inspection. The BCO came out and just said yes with no hassle and went on to talking about the other parts of the build and our future under pinning of the back wall. He was really helpful and has even sent a message to the SE saying that he feels that 2.5m deep foundations is over the top with our sandy soil. He wants us to dig two trial holes of 1.5m deep and then have a site meeting with BCO & SE to discuss what we really need. He feels that the SE is being over cautious bearing in mind we are converting the barn into a single storey bungalow when there have been no issues with the existing barn over the last 70+ years. This will all happen about March as hubby is going to build this 'room' first. This will actually be our hall and snug. The above is the inside wall of the cavity wall up to DPM. As I speak the mostly external wall is finished although the bit nearest stays internal as that borders the kitchen. I wanted a 'proper' wall for hanging a sliding door and kitchen cabinets. It was already a separate space when it was a barn so it is a bit like an extension. The long awaited concrete pour happened, at one point it looked like they might not make the slope as it was raining, but after a lot of slipping and sliding they got there. bit of a wet day for it, but all dry now The only other thing we did this month was buy a block saw at auction (for not a lot of money), it needs a new engine as it's been stood outside for years, when hubby took off the old casing it was obvious just how long. This is how it arrived and this was what was under that casing. I wonder how many years the birds were nesting. We actually got 2 for the price of one, when we got to the auction to collect they said, oh there were 2 of these in a lot. So, hopefully we can make a bit of money by cleaning, replacing the engines and servicing. These beasts are seriously expensive to buy working at about £750. Hubby has worked with a company in the paste who are going to do the work for us and refurbish so we should end up with at least one working machine for less than £250. I've not been able to work for over a week on the build and we stopped for 10 days over Xmas so a very short month. Once again, I'm just hoping next month will be better, but somehow I'm losing hope on that front.1 point
-
Just to let everyone know I'd sent my reclaim on 26th Jan. They called me two weeks after that to check something, then letter received on Thursday there confirming payout. Mine was quite a large claim £35k, they had taken £1k off but I discussed with them and will send an explanation to resolve - they also might take my PV solar invoice which I'm about to buy on Monday (thought I wasn't doing this for 6 months hence didn't include it) as additional invoice. I'll update on that, I'll also attach my excel which I used which should be helpful for others.1 point
-
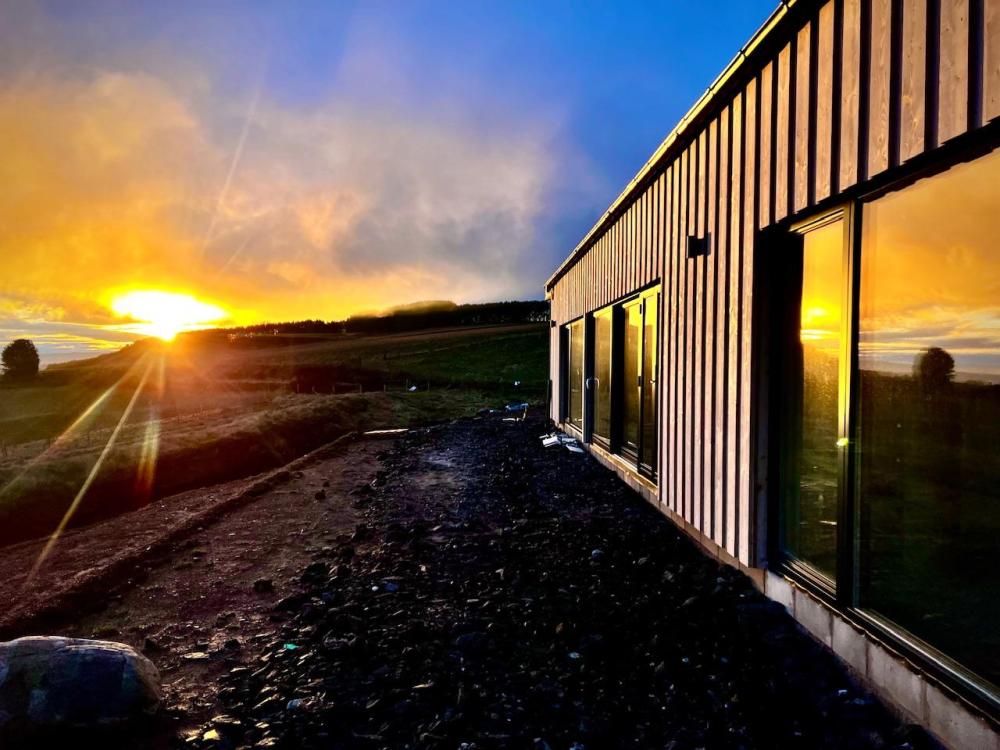
Around 11 months ago, we started from a stripped site, the treatment plant was in and running the cabins / static so drainage just required connecting up. we had to wait for the warrant to be amended (change to the certificate of deign) this held us back ma month or so until the BCO just said "get on with it, we can sort that later"- top guy!! If we had waited for the amended certificate of design we would still be building, it took him 5 months to get it to us. I've documented most of the build in blogs on here, partly to have a refence to remember the process, partly as pay back to Buildhub for the inspiration and pointers in the planning / design stage. I'm so glad I spent hours looking at and reading others blogs that we made the switch to ICF. I'm convinced there is no way I would have achieved the efficiency I have for the money spent. Budget was always tight, so some decisions have been made due to Hobson's choice, leading to triple glazed UPVC windows and composite doors. The front door, south facing GRP Composite with low threshold and a slim glass panel leaks with 40mph winds, this leaks through the gazing cassette, and the low threshold. as I know we wont use this door much, we went for a slam lock, another mistake, it blows a gale through. To be fair the company are re making, I'm just not sure if there re-making the panel or the full door, I did ask, if they were remaking the full door to change to standard handle and lock, so it can be adjusted to minimise the drafts. we will see what happens, a full door replacement will mean taking off the reveals in side so a complete PITA, but worth it for no drafts. We had the airtightness test carried out, and they used the front door for the blower door to mitigate any issues with that door. I had put caps in the MVHR. so he just cracked on, the back door is not perfect again due to the low threshold. He didn't seal the blower door to the frame, not sure what the procedure is but seemed a little frustrating. We achieved 0.88 Air permeability, which I'm very happy with, budget wise we didn't spend hundreds on airtightness tape, just designed good solutions, and the doors leak a bit . Our As built EPC came back at A103 , with a possibility of A128.. the report say A105 if we install Thermal Solar EST saving of £40 pa , and A128 with a wind turbine EST saving of £1100 pa, so pretty much the best we could hit. To finish we need to sort out some paths outside, ramp, and the rain water pond, but other than the second bedroom need decorating the house is done. Next week we will hopefully get building control around to see what he 'needs' to get a completion cert. I'm hoping for some flexibility on the ramp and pond, . We need the VAT refund to pay for this stuff. We are working our way through the invoices, but we built for less the 90K and we still need the VAT refund. I've enjoyed it all, and we both agree we have a home. Good luck to all of you with your current builds.1 point
-
Concrete was poured via a pump on Monday. Finally have a Concrete sub foundation! Took delivery of the Kore insulation for the actual foundation. Lots of angles sheets, L shape and other ones. I've 88 silver EPS boards too in packs of 8. They needed 2 men to move, the others could be handled one by one. The delivery driver helped offload as getting a forklift and driver for 4 Pallets (@150kg each) was going to be expensive and on too much short notice to arrange insurance for me to drive one. Plus I don't know how!! We got it all offloaded in about 30 minutes by hand and then another 45 to shift it to the back of the site. There seems to be a dip where water is collecting in the middle there and some rebar patterns are showing up in one corner, will discuss with groundsworks lead next week. Next is to find a blocklayer to place two courses of blocks on their side around the perimeter to hold in the Kore and lay the DPM/Radon barrier on. Stops the Kore moving around. That's the holdup as brick layers are flat out over here currently. I put a call into a 2nd who said 7-10 days give him a shout. Plan is for Timber Frame to go up in early March.1 point
-
Maybe you need an extra helping of that muscle fuel, ya big tart.1 point
-
To get the pipe out you need to remove the little blue clips, then depress the ring. Kinda like JG speedfit. Works every time for me with no need to cut the pipe.1 point
-
Remove and replace Nothing will stop that1 point
-
I used this on my bath to get a rust mark out successfully https://www.protilertools.co.uk/product/lithofin-rust-ex-non-acidic-rust-stain-remover-500ml1 point
-
I bought some German rust removal stuff and it worked a treat on our tiles (same issue) at our previous house. I shall try and find it.
 1 point
 -
Yes I'm afraid so. But if it went in, and it's visible, then Snibbo might also get in, and neutralise or remove it?1 point
-
@flanagaj a couple of thoughts on this question, as I understand it from other posts you are (potentially) purchasing a building plot with pp approved for the above design. I also see you have asked questions about alternative layouts ,plinths and room in roof possibilities. Forgive me if this sounds rather obvious but you have brought a piece of land with pp for the house above but you don't have to build that house , you can build whatever you want as long as the planning department approve it . You cannot lose the right to build the design sold with the land as long as you start within 3 years so if the design is not quite right for you now is the time to ask a few questions re-sumit and change it .1 point
-
Yes - stop worrying.... Depends what you put down them. Some users tend to gunk any plughole up with all their creams etc. We had this on a sink with the tap over the plughole, so not sure that makes a difference.1 point
-
I have used these several times and they are fine.1 point
-
Hi everyone I'm in the middle of a renovation and there seems to be a a lot of knowledge here that I can add to and absorb so looking forward to contributing.1 point
-
It's all in BH already. If it seems boggling, it is. Research a thing at a time. Beam and block is a problem solver, and I'm not against it. What you're asking is all ultrasensible. 1,2, 3,5 leave til later. In simplistic terms: 4 is what to look into first. Slab if it's good ground, and level B and b perhaps, if it's poor ground or has to be elevated, or on a big slope OR if you can't get lorries near.1 point
-
To use stones, the principle is to minimise the volume of mortar. Have a collection of stone sizes to hand. Infill a void at the back with rammed-in mortar, then press in the biggest stone, or stones, that will fit. Repeat until at the surface. This provides more strength and reduces porosity. Granite uses harder lime than sandstone. Stipple the finished lime surface with a brush, to give it more surface area for evaporation. I knew none of this 2 years ago: it's findable with a lot of searching. @Gus Potter is right about the landowner's intention. However this has been built with skill and the 3 skin construction has advantages too: it's still there after 150 years or so. NB the foundations will be 400mm deep probably....leave them alone.1 point
-
You can take a very rough punt and say that the top of those doors is 2100 high, you then need 300mm above those to ceiling height 2400 then 300mm for floor thickness, enlarge that drawing up and do a rough scale. looks to me like that room will be a tiny triangle without adding a large dormer.1 point
-
90% of the answers for all the questions will change depending on your ground conditions, your finished floor level,FFL, and your design choice for the floor and house. you need to understand the differences between different floor construction and which one you prefer before you ask the questions on how to install a certain one. you mentioned block n beam, this would have been my last choice, but I was pushed in this direction by the ground conditions. have you been to the self build centre in Swindon, this place has every different build method on show and is a wealth of knowledge, I think I would slow down a little and get your plot purchase sorted and go and sit there and get a feel for what you would like to build and the quality you want to achieve, then get some ground investigation done, come back and ask about that, then do some research on different methods. it’s pointless getting your head around strip footings if your ground investigation says you need piled foundation. and it’s pointless designing an insulated slab if your flood risk says the house has to be raised up 1.2m so I think your a little bit early with worries about foundation type without knowing some of the site constraints.1 point
-
Sounds like you have the basics approved i.e. house will look like this and X number of bedrooms etc. You now need the detailed drawings, in Scotland that would be move to the building warrant stage, think it's the building regs stage in England. In Scotland you would also have a full structural design package. That would detail much of what you are asking. Soak aways need to be designed and are based around a percolation test of the soil. Never seen why people build a house with a cold air stream blowing below the house, but many think block and beam is great. 1. Engage an architect or architectural designer to get the details sorted and approved. Then you start at the bottom and build up. Foundation design will depend on the site and conditions it could also vary depending on house construction type.1 point
-
They do it electric only - the ss80e: https://www.plumbnation.co.uk/smiths-space-saver-ss80e-electric-plinth-heater-with-stainless-steel-grille-777-173541 point
-
Great to have you chipping in. You may get a bit of slagging off.. but just stick to your guns. Stick with it. BH can be great fun and rewarding if your are happy to give pro bono advice. Gus1 point
-
Replace it for an LED tube, which comes with it's own starter. You will never go back. Flicker free instant starting and far more reliable.1 point
-
Very on the spectrum thinking🤔1 point
-
I used automotive Sikaflex to do the same job - the tricky thing was making sure you didn't apply too much cos it's messy - mine you had to put the glass into the seal and then the seal into the frame and then fully insert both and there was very little clearance for additional adhesive and it goes off quite quickly..... I chose to apply sikaflex to the seal and then fit the seal to the glassand squeeze out any excess (two long battens and multiple clamps) - then when the sikaflex had gone off cut away any excess and then fit glass with seal to the frame using the good old fairy lube assist. It's been done 5 years and hasn't moved at all but one thing I would say (without doing that) is don't leave the shower screen in a position where it isn't supported for long periods of time because that is very likely to be your primary cause for the glass coming out of the seal of the seal (and glass coming out of the frame)1 point
-
The good thing about lime is it goes off very slowly so big batches can be made without fear of “going off”.1 point
-
Get a wire brush and screwdriver and rake out some of the old mortar at ground level. Then a bucket of lime mortar, a small trowel and some gloves and have a go at repointing yourself. It's not rocket science. By the time you get to the chimney you'll be plenty proficient to make a tidy job of it.1 point
-
It’s covered up still but this gives an idea

 1 point
 -
To the external wall then up into the frame, it’s going to be a bit of a ballache tbh. Something that should have been requested and pointed out to you tbh, for the reason mentioned.1 point
-
Geotechnical engineer here. It’s difficult to assess validity of a spec without understanding the desk study and proposed design. That said, it doesn’t look totally unreasonable. I would probably spec this for a a small multi-plot development, so not sure the size of your house? Cable percussive seems overkill presuming foundations will be circa 2m deep max. In good ground window sample should get 5-6m. However window sampling won’t achieve enough sample for shear box testing. Needs approx. 30-40kg of suitable material (basically means enough material with a certain grading). Double this minimum amount of material for PSDs. Why is shear box necessary for sand at 5m+ depth? It’s an expensive test. An SPT in base of window sample hole, then use established correlations to get phi. Saves you £3-400 of a test, never mind the sampling. I would seriously consider replacing the CP rig with trial pits if depth isn’t a concern. Do a soakaway test in one whilst you’re at it. £5k for all that (incl. CP rig) sounds too good to be true. Does it include testing, reporting, supervision? Watch out for ‘delays’. Is it lump sum or day rate. Also lump sum never means lump sum in GI world!1 point
-
I was thinking the exact same thing, if the Western isles are anything like Shetland, if it's not fixed firmly to mother earth it will make its way to Norway rapidly. Built a storage shed on my croft back end of last year, made concrete piers formed with an upturned plastic bucket with the bottom cut off, cardboard concrete formers are not common/cheap in the UK for some reason. I used 6 piers, so I could save on timber thickness for the beams and use what the builders merchants had in stock, getting chunky Douglas Fir off the shelf is not an option up here.1 point
-
Hiya. Good post. What you are doing is hard and taxes the mind. When doing a detail like this it's common to feel.. am I making an idiot of myself here and am I making a big mistake? Well done you for asking the question and posting your detail. Hat off to you as you have identified a big elephant in the room .. how do you marry up a warm roof at the eaves with the walls below, and how do you make / detail the transition between a beam and the rest of the wall. These details are very, very tricky. Every job is different and very hard to.. to get everything perfect. This is what we face as designers.. we balance what we really want with what is achievable to build on site and cost efficient. Next we try and construct an arguement that will satisfy the building regs... we are not cheating.. we are innovating, understanding and improving design. The regs don't tell you how to do this and you won't find much stuff on the internet. Here are my thoughts, I'll make some assumptions as I can't see all the detail.. what is below and what structural loads are involved.. cut me a bit of slack too? For all. Let us start with buildability. The rule of thumb is simple stupid works. This drives down cost and then as you drive down the cost you can then reintroduce the things that really matter, we offset heat losses/ bridging by improving else where. If you value engineer this you also get to consider the extra stuff you also want.. be able to spend more on the things you see visually.. like a better kitchen. Ok the top detail where you have the box gutter. If you think about the sequencing of the works.. make it simple. You do the structural roof and then add bits on once you have selected your roofer and taken advice. Try and build in some flexibility in case you have to change roofing contractors or go for a different membrane / system. Keep your options open as prices are changing. Can you plumb cut the rafters at the outside line of the flange of the UB. Most joiners are ok to do a checked (birds mouthed) rafter but you have quite a complex shape.. I'm not shitting you.. a lot of modern joiners just can't do this simple stuff... they work with battery powered tools that have no poke.. they will faint if you ask them to cut a check they way you have detailed cut along the grain.. cut by hand with a saw? Frankly a lot of them need a dose of National Service.. or something like that.. for those on BH that have other views.. Some of our European neighbours have national service.. I say this out of frustration with the building trade at times. Next scab on some 95 x 45 C16 timbers at 1200mm centres say to every third rafter. Now you have less repeating bridges, rather than every rafter they are only one in three. To the ends of the scabbed timbers attach a runner timber behind the fascia, make it straight and that gives you a continous piece of timber to fix the gutter brackets to.. a get out of jail free card when you come to fix the gutter and fascia... For me I would say.. put the main roof on first and the ply, run the VCL under the upstand edge kerb and decouple the job, extend the VCL as far as you can. Give the roofers a flat bit of ply with continuous VCl below and let them form the kerbs the way they want to. That also lets you change horses / insulation thickness if you want to change the kerb detail once you get the prices back. It's not just a buildability thing as follows. On the top detail I would introduce a strip soffit vent (although not technically required on a warm roof.. but we are innovating here and designing using first principles) just behind the fascia as I know that in real life there needs to be a compromise between the SE and Architectural Design. You have this dead zone where it is really hard in practice to marry up the warm roof with the wall below and still make things work structurally. I'm not surprised you can't find any details on the net.. BC themselves often have no clue either. But this is not their resonsibility, the basic regs are some 500 pages long, then you have on top of that loads more regs. BC are there to do their best..don't knock them without good reason.. delve into it and at the end of the day it is you responsibily to comply..with all the standards that the regs refer to. If you want to protect your asset just do it properly and don't try to be a smart arse, innovation.. yes go for it, use first principles, save money in places and spend on the things you enjoy. If you accept the weak spot between the wall and roof then condensation / the dew point will happen but how often you will hit the dew point where you have water in the structure.. the objective is to say how often and how do you remove that as quick as you can once the weather / temperature changes. The air tightness is hard to detail and complex... think about first what is the simplest way to do this that the builder will actually do / deliver at a sensible cost.. next think about.. if I ask for complex stuff how do I make sure it will get done and do I need to be there every day to check the builder has done what I want? How will that impact on your relationship with the builder? The alternative is that you pay someone like me to preform a Clerk of works function.. that is very expensive...and will have a knock on effect on the prices you get at tender stage. Keep it simple so everyone is in their comfort zone. My view is to say.. you can draw stuff to death with complex detail but it is never going to happen on site on a self build job where every penny is a prisoner. Go for simple stupid, you can enforce that easily on site without someone like me turning up. Let's just accept that some water vapour is going to get into the eaves and condense from time to time. What can we do to get that moisture out before it cuases harm to the timbers. My starting point is to often look at a soffit strip vent, extend rockwool out half way say over the soffit so you shift the dew point outwards, examine the location of the building, the prevailing wind, take view on that, make an Engineering decision, check it is buildable and say.. well I can rest easyish now. Ok, have a go at re detailng this with a solid bit of timber behind the facia and running the rockwool out half way over the soffit. Now you have shifted the dew point outwards. Put in strip vent to ventilate that. Have a go at thinking the construction sequence through. One last couple of things. Don't use OSB to form the box gutter, spend a bit more on doing it in a WBP ply.. you are asking for trouble here if you use OSB. Make sure you have a good support over the gutter area as this is where folk step when accessing the roof and point load the roof... like the window cleaner... think ahead.. in real life where is the roof going to get loaded / subject to trafic on a regular basis? Hope this gives you some food for thought, even if to say.. no Gus it's not for me. Design is often about identifying what you don't want and this lets you concentrate on the things you do want to achieve.1 point
-
Your not in Bristol!0 points


This leaderboard is set to London/GMT+01:00