Leaderboard
Popular Content
Showing content with the highest reputation on 03/13/23 in all areas
-
Yes it was put in as an experiment really in ASHP's in general and A2W vs A2A. Some early notes: The product delivered was actually eiQ-12WMINV-V4, though the user guide linked on the store page is V3. I can't see any obvious differences other than a couple I came across installing. The V4 manual states 100mm clearance is needed above the internal unit whereas the V3 manual states 250mm. Also the V4 data sheet shows a minimum room size which the V3 does not. I've uploaded the V3 installation manual for interest as it's not available on the site I used a 65mm diamond tip core drill with an SDS plus drill with safety clutch. The clutch kicked in when the brick core separated along a mortar join as i reached the internal hole from outside, up a ladder, so I wouldn't recommend drilling without a safety clutch. The pipes, wire and drain actually fit through a 50mm drainpipe which I used as a sleeve inside the 65mm hole, packed externally with strips of pipe insulation and siliconed in. The manual mentions the sleeve and packing but none are supplied with the unit There is very little space behind the internal unit for the pipes, drain and wire so avoiding a tight bend on the coolant pipes means the bottom of my unit sits several mm proud of the wall. It may be possible to improve this by trimming insulation as the unit can be pushed flush with force or it may just be the design of the bracket, I'm not sure. The internal unit is charged, I presume with nitrogen, so once the internal work is complete you can be confident there isn't a leak as there is a release of pressure when the plastic pipe caps are removed You have to use the supplied 3m pipe extension even if not required as it has two female ends, converting the internal unit's male end I used a hand vacuum pump as per this video: https://www.youtube.com/watch?v=2RDfAkmDId0 - The unit can be installed without a vacuum pump and my hand pump only reached -26.5 rather than -30 so I did one flush of coolant as described in the installation manual. I have no idea how much better this is than just doing the three flushes without vacuuming at all as per the instructions so it can probably be skipped The unit seems to be able to modulate down to 400W input from it's nominal 1.2kW then starts cycling on/off to reach lower gains. I've been running it between 400-800W so far The wifi module uses the Tuya smart app, which has a Python library here: https://pypi.org/project/tinytuya/ - Some customisation is needed for the data registers which I can upload if required but this allows control of the unit via Python, so I intend to put together a more intelligent control system using this. The input power seems to be some function of set temperature and difference between set temperature and current temperature so combined with tracking power draw via a smart plug this could be adjusted to divert solar export without any expensive hardware and with a high CoP. This needs to be coupled with heat requirement modelling to prevent overheating. Hopefully that helps those interested. Installation Manual V3.pdf3 points
-
I got planning permission for conversion of three barns into a home in 2007. I converted a small byre, part of that project, in 2010 to comply with the condition to start work within 3 years. Building control signed the building off, which in hindsight was a mistake as It should have been part of the whole project and signed off when the rest was finished. Fast forward to 2022 and the entire project was nearly finished ( I was forced to get my Architects Certificate signed prematurely as the Architect was retiring at 88 !) I didnt know if I could make a successful VAT claim because the project had essentially started in 2010, been signed off, and no claim with the required 3 months made. I came across Andrew after some online searching. Andrew McDonald MAAT FCCA SELF BUILD VAT 33 Ocean Way, Pennar, Pembroke Dock, Pembrokeshire SA72 6RA Tel: 01646 687599 He is a self builder, and an accountant. He talked me through the rules and advised that I had a good chance of a claim, on all the building work EXCEPT the small byre completed in 2010. He was clearly used to challenging the revenue- in court if necessary, if he felt they were not applying the rules correctly. I sent him all my invoices, and he prepared the spread sheets and made the claim, with appropriate covering letter. As my build wasnt finished entirely due to my elderly Architect forcing my hand, I continued to rack up bills after the claim was made, which had significant VAT attached. After about six months of waiting for my VAT refund- to no avail, I contacted Andrew and mentioned I had more bills. He argued that the claim process was a two way street, and it was unreasonable for the revenue to refuse to add these claims to the original claim, as they had been keeping me waiting so long. A further collection of invoices was submitted, the VAT element of which, came to over 3K. Twelve months after Andrew lodged my claim with HMRC, I received a full payout of 16K, with no queries or rejections. I am of course delighted, and felt I should share the details of this superb professional contact. Andrews fee was a very modest £500.00. This account is entirely my own personal experience and I have no other relationship with Andrew other than as client. In fact I have never even met him in person ! I hope my experience is of interest to other self builders. Simon.2 points
-
Sounds extremely familiar to me. Total shysters some local councillors ime. The councillors (all one party) unanimously refused it. Some clearly had not been to site/didn’t know where it was judging by comments. Local councillor spoke against it, neighbours who put him up to it didn’t show up. Says it all really. We even had the support of the planning officer. Who then had to argue it should be refused when it went to appeal. Ludicrous really. Needless to say we won at appeal, very nearly also winning compensation from the council.2 points
-
Cast iron rule. You attend. Cast iron rule. You make your case. Cast iron rule. You make every single word of the case count. Cast iron rule. You practice what you want to say in front of a competent Critical Friend. Cast Iron rule. Make them reject you , dont by your absence make it easy for them to reject you.2 points
-
Welcome. Insulation is really very simple. For any given material, it has a thermal conductivity, usually denoted as k or ⲗ. This is amount of power, in watts, that can travel though the material for a given temperature gradient. It is usually expressed as W.m-1.K-1. Dense brick is around 1.3 W.m-1.K-1. Mineral wool around 0.04 W.m-1.K-1. From that you can calculate the R-Value which is just proportioning the k value for the thickness. This gives the derived units of m2.K.W-1. Just a case of dividing the thickness of the material by the k value. So take a 100mm thick brick. 0.1 [m] / 1.3 [W.m-1.K-1] = 0.08 m2.K.W-1 Mineral wool at 50mm 0.05 [m] / 0.04 [ W.m-1.K-1] = 1.25 m2.K.W-1 All that is saying is for the same power transfer, you would can have an area 16 times greater for mineral wool than brick. It is more usual to use U-Value as that is more intuitive. The U-Value is 1 divided by the sum of the R-Values. It has the derived units W.m-2.K-1. U-Value [W.m-2.K-1] = 1 / R0 + R1 So 1 / 0.08 [m2.K.W-1] + 1.25 [m2.K.W-1] = 0.75 W.m-2.K-1 Doubling the thickness of the mineral wool insulation to 100mm. 1 / 0.08 [m2.K.W-1] + 2.5 [m2.K.W-1] = 0.39 W.m-2.K-1 Always worth making the insulation as thick as possible. There is nothing to stop you having insulation thicker on some walls and thinner on others, it all contributes to the overall losses.2 points
-
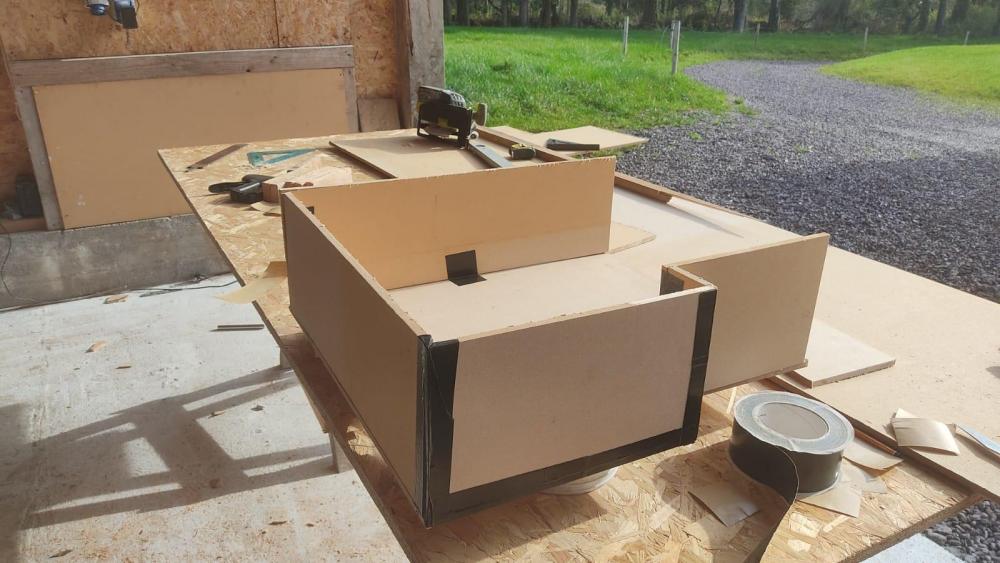
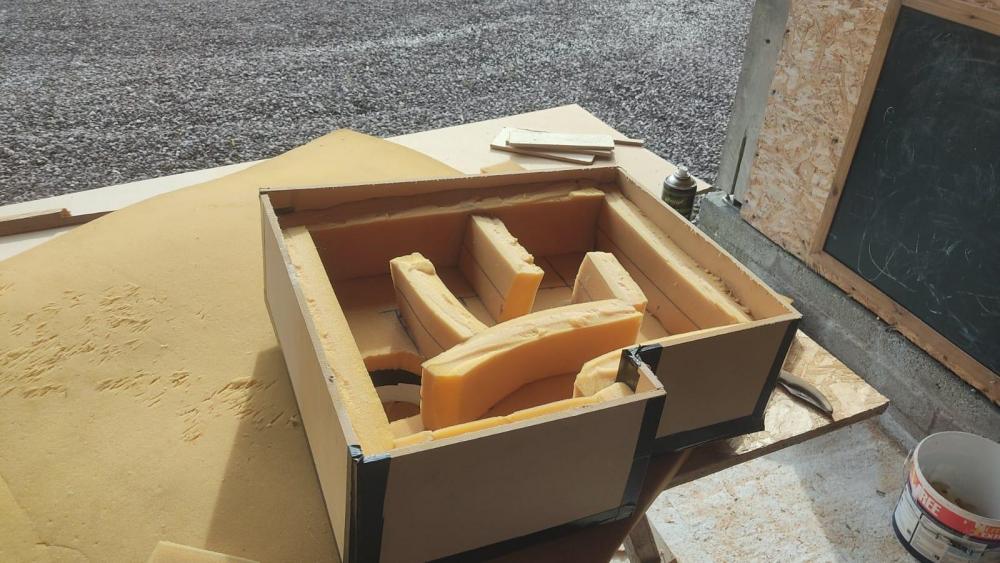
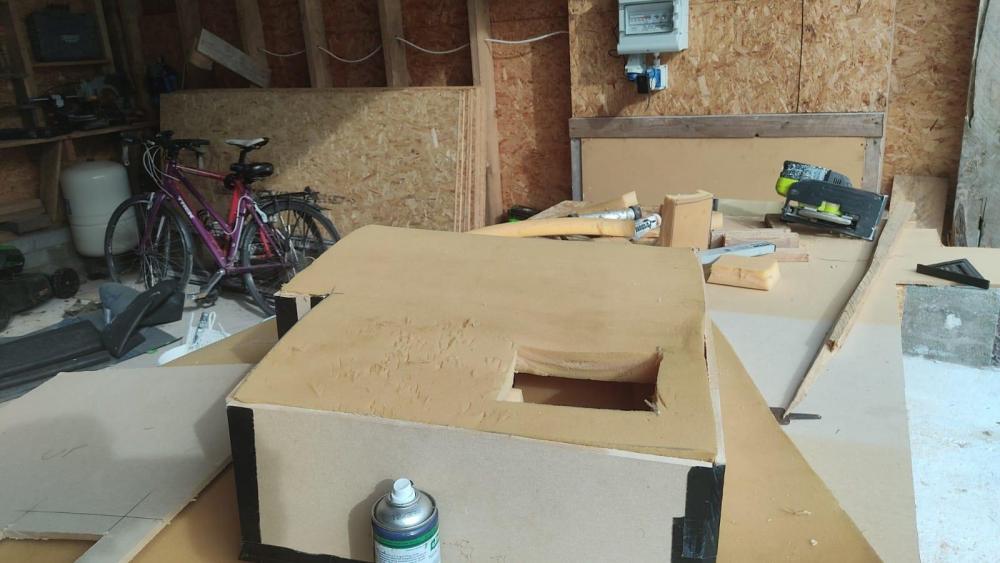
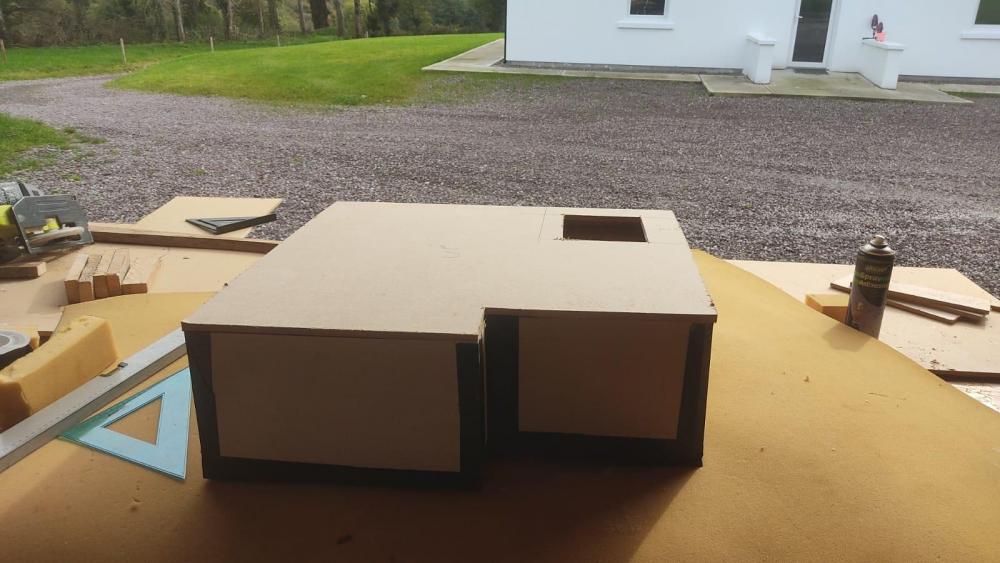
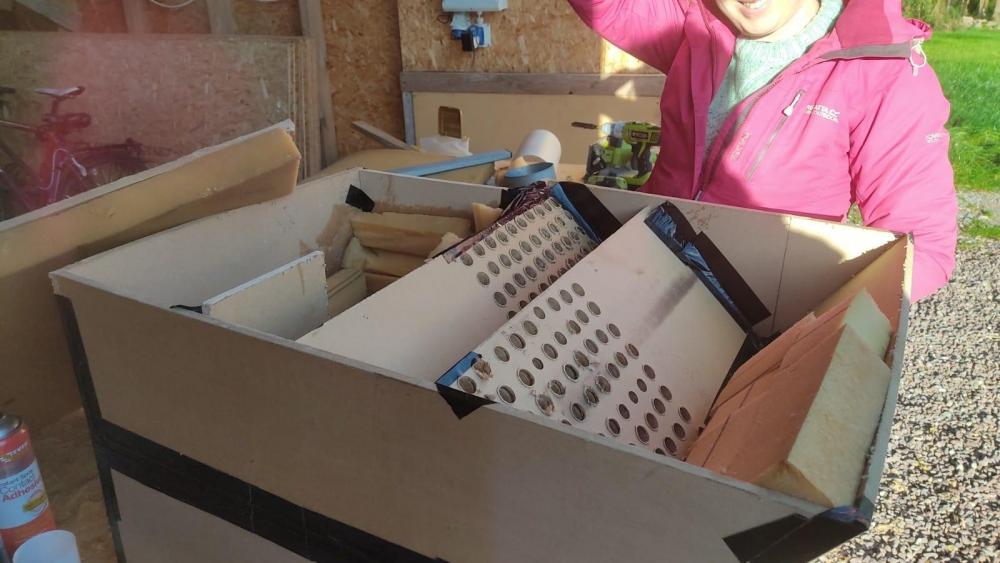
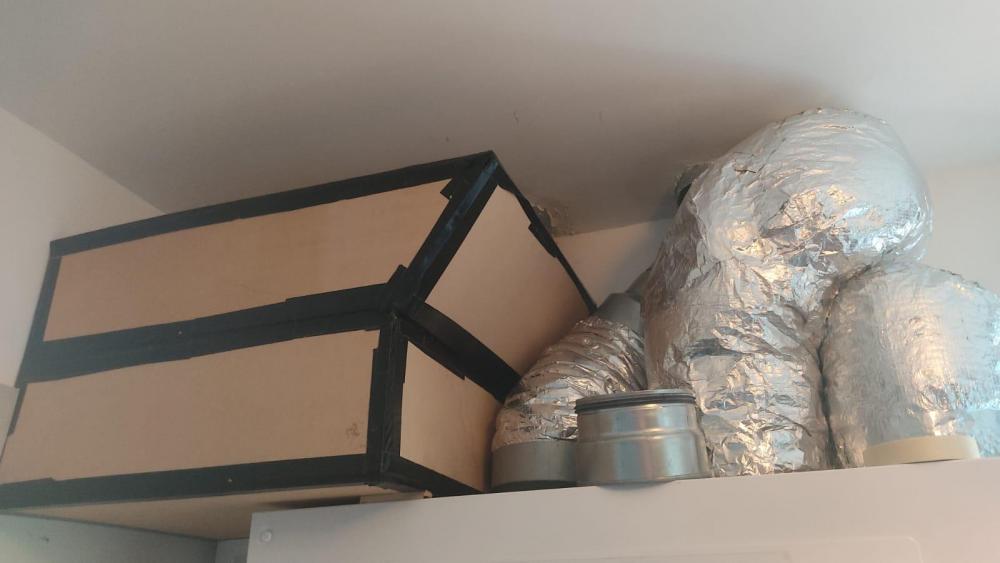
We're in now with 7 months. I've never been chuffed at the noise of the MVHR at night in the bedrooms. We had a flexible acoustic silencer from BPC but it's been of limited value so I decided to rig my own scrappy attempt. Firstly it's in an awkward corner so I had to go for an irregular shape. MDF and airtight tape was the order of the day. Some discarded foam formed the maze for the air to transit through the first level. All held in place with spray adhesive. You can see the entry hole at the left of the box. Capped with another layer of foam. And a sheet of MDF all taped up shortly afterwards. A hole for the air to enter the second layer. The second story was a little different. I drilled 160 18mm holes (yawn, boring!) and offset them to try and diffuse the noise a little. The first layer seemed good at getting rid of the 375Hz and 7500Hz noises that my phone recorded but not the 53Hz, after some googling of car exhausts the many small holes method seemed like a good idea. Mostly fingers crossed and little science involved. I shoved it into the corner and connected the ducts up. (Supply enters straight from the top of the MVHR unit and exit is above it in the roof. I might enclose it at some stage if I can be bothered. And hey presto. I took the opportunity to use my iPad to do a sound level recording before and after with the unit on boost. Pretty pleased with that. All we have to do now is enjoy the sweet smell of glue as we drift off into silent slumber tonight.1 point
-
As I recall the builders felt the roof needed some extra restraints, so they're semi-structural. Think I'm going to see if Building Control will come and take a look before we seal anything up..!1 point
-
It looks like a ceiling joist connected to a purlin. Eg the room below is a room in the roof with part sloping ceiling. I think it's probably OK provided the ceiling joists aren't triangulating the roof.1 point
-
Definitely attend, some people will say things behind your back that they won’t say if you are there. It should be but in reality people have to make decisions and they are subject to being influenced by what other people say. Politics in other words.1 point
-
do you have support of the voting councillor that covers your build?1 point
-
1 point
-
A lot, in fact, I did a BA in lighting design (and I had the opportunity to do a PhD) and specialised in it for about 15 years, although now I am a consulting building services engineer I still do a lot of lighting design as every project we do still needs lighting. Don't get too hung up on lux levels and uniformities and glare and what not for domestic lighting, even when I do domestic lighting I still just use my professional knowledge and best practise. The issue with domestic is that it is not used like typical commercial buildings, offices, it is an office, you light it like an office, or a warehouse, you light it like a warehouse. Houses are a different kettle of fish, you can put a single pendant kit into most rooms and that complies with what BC want to see. However, we all know we will add desk lights and table lights and floor lights. Kitchens are about one of the only rooms in a house that needs proper, as close to a "design" as you need for task lighting. If I am doing a kitchen in apartments etc. I usually go for about a 500-600lumen downlight, say 2.4m ceiling height, spaced at about 1000-1200mm in a row or array to suit along the counters - typically I will pull out a second row if there is a dining room table shown on the architects GA's. Bathrooms being about the only other room that needs dedicated properly "designed" lighting or else you are stuck with it. Corridors I would typically put the same in in about a 1200-1500mm spacing. I have my go to downlights for these applications and I know the optics will give me the right distribution to work in these spaces for me. Very occasionally I will fire up the lighting design software and do a quick check calc if I want to do something a bit different. "Design" when used in a domestic situation, to me and for many interior designers and even lighting designers is just picking nice lighting, and placing it in such a way to create some nice ambient and useable light. A well placed downlight to create a scallop of light down a tall wall above a stair, or a row of small (e.g. 35mm) down lights along an oak balustrade in a hall, or some recessed LED strip into shelfs. Dimmers are also your friend when it comes to domestic lighting as it lets you add all the light you want, but without the concern you might end up with your living room sitting a 600 lux!, however, make sure you pair your source and dimmer or you will have a hell of a time. I have often put in standalone DALI dimmers (Osram DALI MCU) with DALI driver luminaires to guarantee nice dimming and when done wisely, the over-cost is not that much. Houses, in my opinion should always be 2700-3000K light. I hate seeing 4000K (or worse) in domestic settings, however, that is my opinion, I think some people like the clinical look.1 point
-
The cost sounds not unreasonable to me. Simplified Method is simple-ish (say, an hour or so) once you have the window / door / room sizes. Do your quotes allow for iterations - it's likely that if you're over the limits, that you'll want to do a bunch of what-if calcs? So, if that's cost per iteration not so useful, if it's cost to get to a workable detail design, that's much better. Does 'dynamic thermal modelling' handle solar gain and shading? Who's the supplier, a bunch of us would be interested I'm sure? I think the various simulation packages (as opposed to 'Simple Method') may come up with quite different results, so it's possible some people will want to do 'simulation shopping' to get the most favourable results.1 point
-
Roof is SSE, about 20 degree pitched with minimal shading as above (the darkest days of Dec there’s a tree about 200m away that’s big enough to put a little shade on us). We got 122kWh in December ‘22, 201kWh in Jan ‘23 and 283kWh in Feb. I’ve already had more in March than Dec total. I saw your tank insulation and was very impressed. When I finally put the tank in it’s final location I will attempt to do the same. Although the losses could be argued to be straight to heating the house!1 point
-
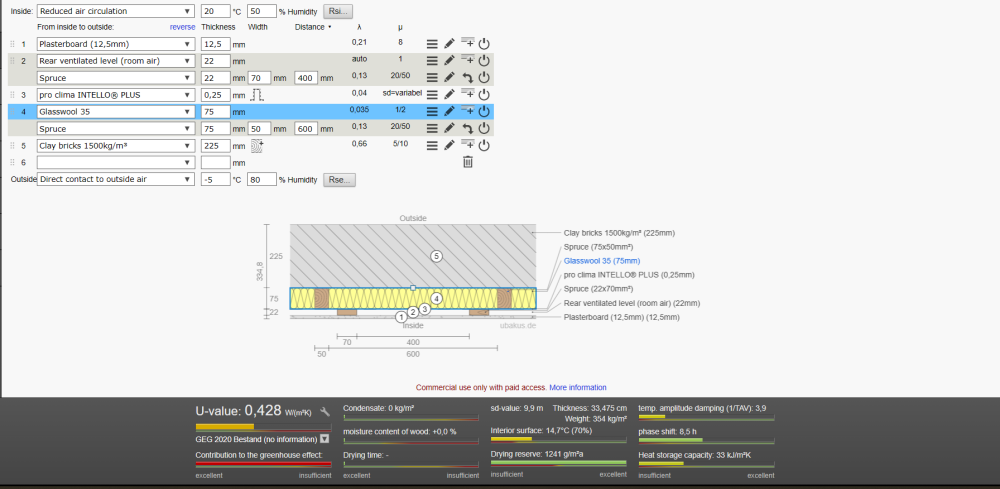
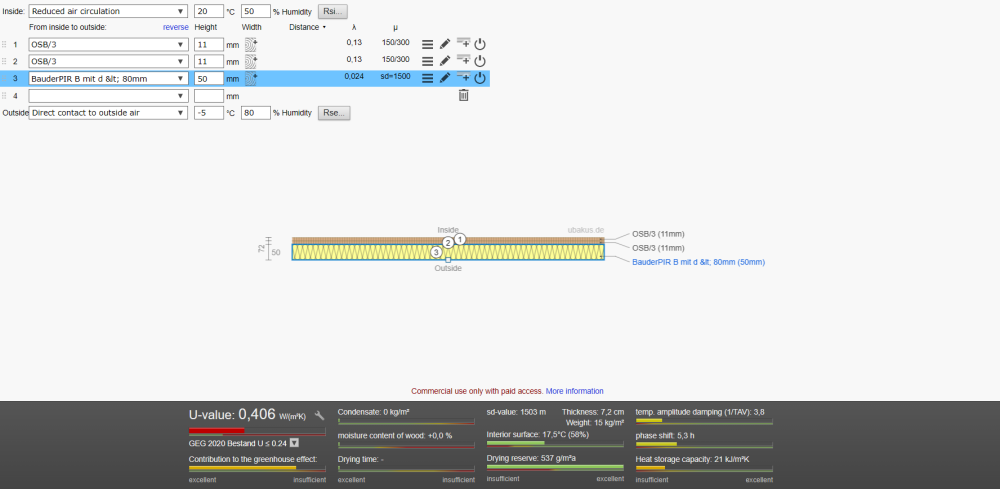
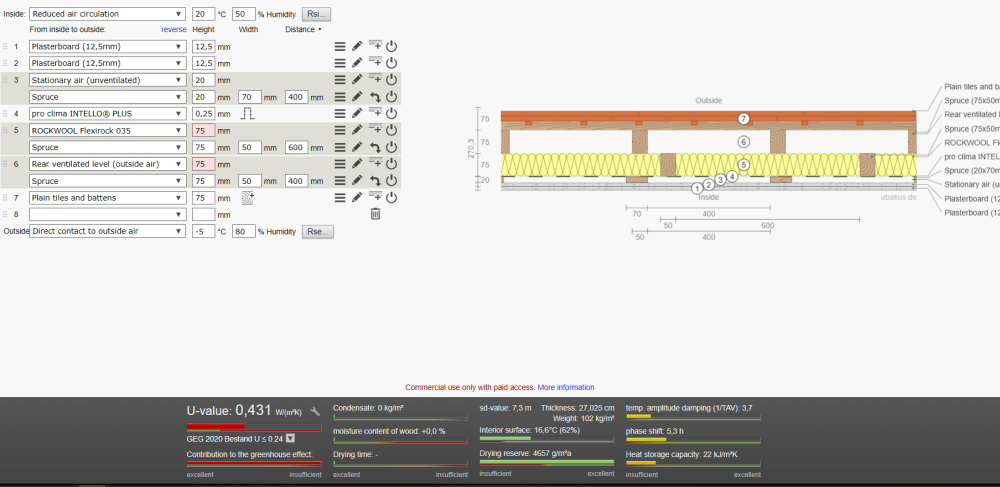
With that in mind I would propose the following. FLOOR: 50mm PIR to the floor ( or as much as possible) 2 x 11mm layers of OSB staggered, glued and screwed) WALLS: 75mm Cavity wall mineral wool slabs to external walls between 50mm X 50mm battens at 600 centres stood off the wall by 25mm spacers. Variable diffusion membrane to the inside like Siga Majrex 200 or Intello Plus. Taped very diligently to all penetrations, roof and floor and returned at least 300mm to all internal walls. It's important this has ZERO holes. All wires etc should be in the service cavity or taped completely airtight. 20mm service cavity with battens ( or resilient bars) at 90 deg to wall battens for service cavity. 12.5mm plasterboard CEILING: 75mm mineral wool batts placed across the rafters between battens to maintains 75mm ventilation above. 20mm service cavity as above. 2 x layers of 12.5mm plasterboard for noise. Obviously the suggested insulation values are only notional and more is always better. For ventilation a small MVHR unit like this would do the trick. As it's gym you probably wouldn't need any heating.1 point
-
50 degree design temp, hmmm... I'd have liked to see that closer to 45 personally.1 point
-
From a structural and safety point of view you always need to consider the effects of moisture on a building. Firstly external moisture. This is easier to visualise. 1. Make sure the roof isn't leaking, valleys chimneys etc. 2. Make sure that gutters are all working and taking water away from the building. 3. Make sure no water is pooling by the external walls, correct sloping/french drains can solve this. 4. Make sure that the water table isn't trying to push water up through the floor, again a french drain is a great and cheap way to solve this. Secondly internal generated moisture. Tougher to see as it's largely water vapour from breathing/cooking/showering drying clothes etc. It stays as suspended tiny moisture droplets in the air and forms into water droplets when it gets cold. Much like steam from a kettle condensing on a single glazed window. This is a real problem in almost all houses as it is hard to see and it's poorly understood. The consequences , mould, rot, damp and smells are widely known however. The air can suspend a certain amount of water vapour particles per m3 depending on temperature. At 4 deg it can hold 6.4g of water vapour per m3 of air. This is the maximum and is called 100% relative humidity (RH). You will see this as fog outside. However if you bring that m3 of air inside the house and heat it up to 20 deg it can hold much more moisture, 17.3g/m3. Given that it only has the 6.4g, that means it is nowhere near it's capacity to hold water. It's absolute humidity ( 6.4/m3) is the same but its RH has dropped to 37%. This is why weirdly if you open the windows and doors briefly on a foggy day, let in 100%RH air, close the doors, allow the air to heat up it'll really aid the drying of the house as it can take on much more moisture. A similar thought experiment can be done in reverse. Take your kitchen RH 70% and 20deg. That is 12.2g/m3 in absolute humidity. Unfortunately you have a poorly insulated window where the surface temperature is 12deg. The air that touches this gets cooled and it's RH climbs to 100% at 14deg. This is called the dew point as it is where dew begins to form. As the temperature of the air beside the window continues to drop the water vapour has nowhere to go and condenses out of the air making droplets on the window making an area for mould and damp. Not a massive problem if the window is in a breezy area of the house where it can dry when the RH drops again but a real issue where air movement is limited like behind furniture etc. The solutions for this are four fold. First ensure you have proper ventilation. It needs to be forced and continuous. Trickle vents and hole in the wall vents do nothing in still weather and too much in windy weather. This will take the internal air and replace it with external air that can help keep the house dry more. This was the a job of the fireplace in ye olde houses and mechanical ventilation in new ones. Secondly, build your house in such a way that no internal surface gets cold enough to collect condensation. This is typically a surface temperature of 16 deg for most houses. It can be easily achieved in a solid walled building by just running the heating a lot. A better way is to add a continuous layer of insulation. Thirdly, you need to do your utmost to prevent any moist internal air from getting into the structure of the house via cracks, holes and incomplete construction. Thirdly, keep the damp air out of the structure of the house where it could condense. This is done with a good airtightness layer. Fourthly you need to ensure that any moisture that gets into your structure can dry out as quickly and painlessly as possible again. Vapour open construction is best. I hope that wasn't too much theory. TLDR Deal with bulk water from outside, it's easy to see and solve. Then deal with damp caused from inside via 1. Ventilation. 2. Continuous insulation 3. Airtightness 4. Vapour open construction.1 point
-
I must be having some luck for a change. Open reach installed a junction box a few weeks ago without even notifying me, right where I would have wanted it. Then today without any input from me are on the phone offering me ducting and drawings for installation ( he did say that the ducting had to end outside the houses )he also offered me all the assistance I need and his mobile number. Free installation as well.1 point
-
I finally get to speak to a local openreach guy whos coming out to look at the site tomorrow. It looks like fibre from the pole is free, fibre underground means they need to dig a trench that will cost a couple of thousand. Is it worth paying for the underground connection or do I get the free option from a pole and a wire to the house?1 point
-
Looks like it was taken here:- The Depot Eatery | Gallery Get yourself down to Ilfracombe,1 point
-
Last page has some info on brick/stone slips.. https://www.nudura.com/media/1880/14_0_exterior_finishes.pdf1 point
-
The one I used. Search the local planning portal to see some examples. However, if you follow that document it’s straightforward.1 point
-
1 point
-
I have nothing much useful to say, other than i did limecrete over foamed class downstairs in the old part of my house. Its very nice. Rest of house is on conventional rads, and runs off an oil boiler. Input temp to floor is 40c if that helps. Quite easily holds the room at 21c regardless of outside temp. 9 inch walls, no insulation. Though they are a very lightweight brick which, now they are dry, by any measure of logic makes it twice as good as a conventional, old, cavity walled house.1 point
-
https://forum.buildhub.org.uk/topic/23724-diy-mvhr-acoustic-silencer/#comment-3667441 point
-
Before you *choose* to get there. I go on gut. Spent €2.5k on 3kWp of remote solar last year. (you can fund a share of a large solar farm in Lithuania up to the kW connection capacity of your home; and just pay the distribution charges for getting it to you) We absolutely overbought given our usage and the fact you get no export but I don't care it was the morally right thing to do. My father does what he's told by me. "Fill the roof with as much PV as will fit; use what you need to use; chuck the rest at the grid it won't go to waste." Spent £6k on 6 kWp fitted early last year. Meets 50% of annual load. 50% of production is wasted. My brother is a pathological cheapskate. Everything has to have a payback else doesn't happen. Spreadsheets galore. Spent £20k on 10kWp fitted late last year (partly the cost of dithering and over analysing whilst a war was on) and 10 kWh storage and PV divert etc. The payback for him is really fudge all different. You're pretty much as well off buying too much generation and chucking the rest into goodwill as you are investing in crap whose sole purpose is to fudge the market rules/play financial engineering. On the contrary. When you buy something expensive and efficient you should use it for everything. Rinse it for everything it's got. It will rust out before it wears out.or get replaced with a more efficient one before it wears out. This is like not driving an old Volvo because you're worried about putting miles on it. Heck no. You could be buried in the thing if you wanted to. Use the heat pump for everything it's the whole point!1 point
-
I understand that you can't have sockets within 3m of the edge a bath or shower (which rules them out for most bathrooms), but I think switches are OK if not within 600mm. I am no expert on this though.1 point
-
1 point
-
Hi @russellfeeed and welcome. Congrats on the planning. Photos are always encouraged....1 point
-
Just wanted to tell about my long and hard fought planning battle to finally get approval for anyone else in a similar situation who's losing hope. I bought a plot of land in a development area of a town with FPP for a traditional detached house back in 2020. I then worked with an architect to create a new highly contemporary design that better suited my needs and preferences and submitted it to the LPA, optimistically expecting a decision in 8 weeks time. There were no objections from the local town council nor any technical objections. The plot isn't in a conservation area, AONB or in any other special zone which might cause planning issues. Myself and my planning consultant expected this to be a quick and simple application. My planning consultant had an initial call with the case officer who said they didn't see any issues. All seemed good so far. Then a month later, after chasing the CO again, they came back and said that they had decided that there was no way they could give us approval for the house as it was too out of character for the area and that there was nothing we could do, revise or prove to change their mind. We argued that it wasn't out of character for the area, and that the same case officer had actually themselves approved several applications for contemporary houses nearby and written in their reports that there was no overriding architectural style in the area. They told us to argue it at appeal. At this point, I contacted the head of the LPA who seemed confused why the CO was refusing to allow us to even submit any additional evidence to show that it wasn't out of character. The CO reluctantly relented and said we now could submit additional evidence. I went all out on this - I had drone surveys mapping the whole area showing the house would be completely screened from the road, additional consultants came in to conduct character reviews of the local area, numerous additional architectural drawings etc. Upon informing the CO that all additional evidence would be submitted the following week, they replied and said they'd changed their mind about allowing additional evidence and were going to just reject the app. I contacted the head of the LPA about this to complain a few days later, who replied saying that the CO had actually just quit their job, we would be assigned a new CO and they'd be happy to review any additional evidence. A friendly local councillor passed on information about why we were having so much difficulty with this app - a local married councillor duo, who had a reputation for 'shouting the loudest' to get their own way, were doing everything they could to get the LPA to reject my app. At the town planning committee when my app was discussed, they had said they wanted to prevent all contemporary houses from being built and were apparently outraged that the committee sided with me and voted to raise no objection. This was their revenge. The new CO was far more amenable - he wanted to work with us to tweak the design to something he felt he could then approve. We spent two months going back and forth with designs and changes until he finally said that he was satisfied and would write a report giving us approval. This was about 7 months after the application was originally verified. I was obviously very pleased with this outcome and patiently awaited their report. A month passed before we followed up with them to see how they were getting on. Imagine our surprise when we were informed that this CO had also quit two days ago and we'd now get a third CO. The third CO looked at the original plans and the redesigns and said he much preferred the original plans to the redesigned version and would be happy to approve it with some minor tweaks, which we happily obliged. He then began writing his report recommending approval, and we waited and hoped this one wouldn't quit too. A month passed and we received confirmation his report was ready and just needed to be signed off by their line manager. A few weeks later and we find out there's a problem - the line manager refuses to sign off on it and tells him to re-write it as a refusal, stating 'overlooking' as the reason. This particular line manager is known to be friendly with married councillor duo. We obviously push back very hard on this as we have 3d drone surveys showing that overlooking is not possible, and that there is substantial distance between neighbouring properties which are well above guidelines for new builds anyway. I once again get the head of LPA involved and the line manager agrees to at least to do a site visit with the CO. At the site, the line manager begrudgingly admits defeat and allows the recommendation for approval. It's a little over a year since the app was verified. The journey's not over yet though, as it turned out that a ward councillor had called in the app to committee when it was first submitted but had gone unnoticed due to the multiple CO changes. I felt reasonably confident going into the committee though - we had an officers recommendation for approval, there was no 5 year housing supply in the area so development was favoured, and I wrote a very strong speech putting forward my case. At the committee I gave my speech and then listened the councillors debate. To my horror, this was when I found out that councillors don't actually bother to review planning documents for applications they're voting on - multiple councillors said they couldn't support it because they didn't know what materials would be used (despite all materials been listed numerous times in the docs) and one even saying they couldn't support it based on architectural drawings as they wanted illustrations (but there were multiple CGIs submitted in the docs). In the end, 4 councillors voted to refuse the app (2 were the married couple duo who said nothing during the debate and the other said they 'didn't like it' as their reason) but that was enough to overturn the CO recommendation as so many others abstained. Not willing to give up after how much work had already gone into this, I had my planning consultant start work on the appeal. We submitted a 50 page rebuttal of the committees one reason for refusal (contemporary design would be out of character). The LPA barely even tried to justify the committee decision, they submitted a 3 paragraph argument, seemingly acknowledging that they were fighting a lost cause. 6 months later and just in time for Christmas, we received the Inspectors report that the appeal was allowed. Almost exactly two years to the date after the app was first verified. The two year battle cost me ~£30k and building costs have gone up ~£300k during that time (the GDV has gone up by more than this but it is still painful). It was worth it in the end though to finally be able to build the house I want to build. Just wanted to tell my story for anyone else who's in a similar struggle at the moment and advise you to just keep pushing forward.1 point
-
Just wanted to extend my profound thanks for all the replies and useful info. Both my partner and I spoke at committee last night - jointly. We spoke about our motivations, how we had made efforts to integrate the proposal into the neighbourhood and the compromises we had made. We also included some brief information about the sustainability of the house we are proposing. Neighbours, parish council and local ward councillor all rallied together and spoke against the proposal. At times their behaviour felt like playground bullies ganging up on us - the 'newbies' to the village, not helped by the fact we are a good 10-20 years younger than them and trying to do something a bit different. They told lies and waffled on about drainage for a while which isn't even a planning matter. The local councillor, which I assume does this a lot, was actually very poor at speaking and did talk about a lot of non planning matters, which was a surprise. Even said the only reason the original planning permission was granted was because the old owner was disabled. That was quickly shot down by the officer. The most obvious and upsetting lie they told was that we hadn't even consulted them about the proposal, when we took round the plans, stood in their kitchen and went through them - with no adverse comments received. I guess they must have developed selective amnesia 🙄 One of the committee members was very negative about the proposal, but luckily the rest of them all spoke up in support and on the vote we had 1 abstain and the rest support for permission. All in all, a incredibly stressful process that I do not ever wish to repeat. I think I read a little nugget on here a while back 'you only find out how unhinged your neighbours are when you apply for planning permission'. i can sure say I 100% agree with that now! Onwards and upwards with our project now!1 point
-
0 points
-
I am sure the GBF will make some nice lentil broth to go with some long words. Or a lot if swearing, and inappropriate comments.0 points
-
0 points
-
Thats the killer. The day job. OK , you are 'in the business' Gary. But we all know of local trades folk whose partners moan about the leaking roof - ' call yersel' a roofer and you won't mend your own ' : ' I've been after a new front door for year an' ee won't fit me one ' (local chippie's wife walking her dog past our place the other day ). Worse: I bet many of us have heard of marriages that have broken up due to self-builds. And you two .... grafters.0 points
-
We never had a problem with rats around the chickens for several years until we put the house on the market. They had obvious seen the for sale sign. Despite my best efforts they’d moved into (under) coup. It was quite fascinating what they had built. Living quarters well insulated with feathers and some actual insulation, a larder, and an en-suite loo. My only criticism was too much wasted space to hallways.0 points


