
Leaderboard


Popular Content
Showing content with the highest reputation on 04/09/22 in all areas
-
As promised a little update on the Battery Storage. Firstly i'm very glad I bought when I did, as everything battery storage wise has skyrocketed in price since, even the prospect of adding a US2000C seems unlikely for now, though to be honest, going on my usage I don't think it would add a great deal of benefit. So I'm running the Solis 5th Generation AC Coupled Inverter, which does have a couple of niggles, which at present are reducing its savings potential. Those issues are: Whenever the battery isn't at 100% SOC, it pulls an amount of power from the grid, somewhere between 60W and 100W Even when the battery is actively charging, it still pulls the same 60-100W from the grid, regardless if there is enough PV power to charge the battery and cover loads at the same time. Once the battery is 100% SOC and im generating PV more than my load, I import 0W. Pulsating loads (such as induction hob) the unit can find hard to track, due to their pulsing nature, and the delay in reading the CT clamp and acting upon it. Now my base load is around 45W, so that means that since i've had the battery, i'm actually consuming more during the nighttime than i did previously, which is a negative. I got in touch with Solis UK Support about this issue, and they say they are aware of it, and are going to be adding 2 offset values which will be user configurable to combat this problem, and they've told me it will be available in around 2 weeks time, so we shall see. So although it will be a static value, i should be able to get much nearer to 0W import from grid whilst ever there is charge in the battery, but its not at 100%, and its not over its maximum demand (around 1.8kW). To better news, aside from the issues above which should get resolved, the system is essentially running off grid now, and has been since the middle to end of february, pretty much every day without fail, just with the odd bit of import for things like kettle and oven, to cover above the 1.8kW if the Solar isn't generating enough at the time, which is getting an ever smaller occurence. So the graph above is from March, with the Red bits on the top graph being the bits of import. The bit at the top showing 22kWh import, the majority of this was during the early february days after install when solar PV wasn't doing an awful lot. As you can see I'm still exporting ample amounts to the grid also, not that it would make any difference at this stage. Until I get the full years amount, its almost impossible to say how much this will have reduced by. Today I've done a load of washing and then dried it in the heat pump dryer, and following that I ran the oven on its Pyro clean cycle, and come tea time, i'll be fully charged again and ready for the evening (Thai Curry if you were wondering!). This one I'm keeping an eye on, obviously we know that these inverters will never be 100% efficient, but from those figures i've sent 177kWh to the battery, and only been able to get 124kWh back out again. Some of this will be down to the BMS consuming power to keep the battery healthy. So the inverter is 94.0% efficient at charging (100kWh sent to the battery will yield 94kWh of charge in the battery), and 94.5% efficient at discharging (1kWh being discharged from the battery will yield 945Wh). Please correct me if my maths is off! Entirely possible as I've got the plague at the moment! For how much its changed my import amounts, another tricky one which will have to wait for the end of this month, or maybe even next. I didn't get the smart meter installed til the end of March last year, but as a comparison: March 2021 (18th to 31st) - Imported 46.9kWh March 2022 (1st to 31st) - Imported 48.3kWh And this will drop further with the firmware upgrade. Will keep you posted in another couple of months time!2 points
-
I use wet and forget for green build up on paths etc. I think the brick acid would be a better shout2 points
-
Not sure I would want these things in my house. Any fault on them (while rare) would be a disaster. It'snot just the battery but the charge controller which tends to e the expensive bit. I have a couple of 48v batteries used in MHEV I have been looking at. These batteries are used for the stop start function and power other systems including the charging of the 12v cold start battery. These batteries require an external controller to switch them on and typically its not just a switch wire but a code via the ODB2 bus. I have "parked" them for the moment. I expect as more of these batteries come on the surplus market the price will drop and the solution more simple.1 point
-
You can get a square 100l buffer that is designed to sit under the cylinder. So find the cylinder and buffer sizes and there you go.1 point
-
As we built using ICF, only time we had to air tight electrics was whee we drilled through for external lights and sockets. Then we just filled the conduits with acrylic sealant.1 point
-
Generally the bigger the unit, the less it has to do, so is used at the low end of its performance curve, so for a given duty will be more quite. Pre heating - we are in NE Scotland and not needed it so far this winter, I wouldn't bother. Only really needed below around -5 (ish) Post heating, unless your heating demand is below 10w/m2, there is not enough heat carried by the air to be effective. Enthalpy, again would not bother, not really any benefit in our (UK) environment. We don't get the long periods of sub zero temperature, which leads to air drying. Which is where enthalpy comes into effect. The other thing to consider is Coanda effect supply nozzles. These can be used to throw air across a room and simplify pipe routes. I used two units one small doing two bedrooms and two en suites and a large unit to do the rest. Simplified the routing considerably.1 point
-
Sorry this didn't post for some reason. Wet plaster and skim over the airtight paint.
 1 point
 -
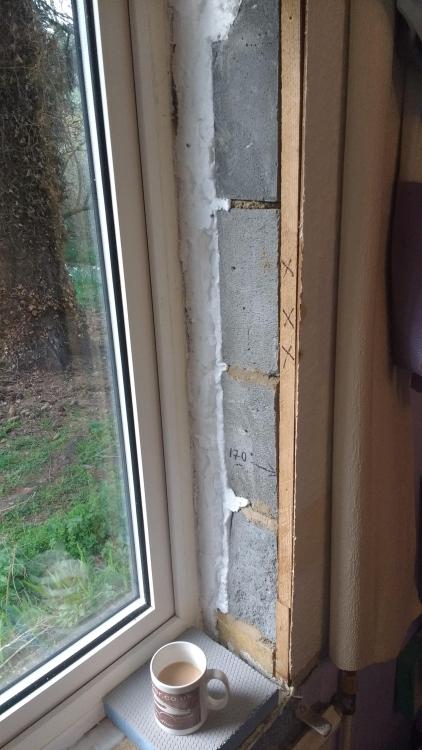
As there's a skin the other side i.e the non cut side of the foam I'm hoping that will provide the airtightness. Primer at the ready, got some battens ready too for bracing.
 1 point
 -
https://mcdonaldwaterstorage.com/wp-content/uploads/2020/11/POWERFlow-Installation-Manual-Iss-3.1.pdf1 point
-
It's a strange world we live in, we are told there is a need to save the planet, but before you can help, fill in all this paperwork and we'll let you know...and once we have had our say, now go through another organisation for them to have their say...1 point
-
that’s an even better idea.1 point
-
That Bostik type stuff cleans Mortor stains as well so may clean up after your coping stone bedding 🤷♂️1 point
-
A looks pretty central and already provisioned for. Hot pipes would go up to the ceiling void then as direct as possible to each point of use.1 point
-
An option could be to put in a suspended ceiling up to 100mm below the metal web joists to take services. Depends on your ceiling heights and whether you can afford the space. Have the posijoists been designed yet? You may need to go larger for the spans, perhaps 253mm, and then there might be space above or below the steel, between the webs.1 point
-
Sorry but how long is a piece of string??, depends on how many coats have been applied and what’s under it, I doubt anybody could give you an accurate answer.1 point
-
I use this, found it very good
 1 point
 -
Best practise guidance now recommends against using moisture closed insulation systems on retrofit iwi. Where it is used, a ventilated cavity is recommended. If you're going to below u-value of 0.30 then you have to have a good look at cold bridging, not just interstitial condensation and moisture. If you were to go with a moisture open insulation you can fix this directly to the wall, not worry about your vcl, just air barrier. Government guidance here: https://assets.publishing.service.gov.uk/government/uploads/system/uploads/attachment_data/file/1019707/iwi-guidance.pdf1 point
-
Bet you're a proper fanny magnet! 😂1 point
-
Believe you can only the vat off if being installed as a package. You will need G99(?) approved inverter this will self limit export in an approved manner. I think it is connected to the incomer on the main house meter. The signal will talk to the inverter to control if export occurs or not based in the setting you select on export limitations. Everything else gets complicated as DNO approval is required and will want to charge to loads to study if they will say yes or no.1 point
-
You could always connect it off grid, to immersion heaters for example.1 point
-
Hi @joe90 Apparently about 70% of wind directions are ok.1 point
-
Helping out on one now, not a terrace but Victorian property none the less, taking the roof off adding another floor, putting roof back on. New steel frame back to ground level is taking the weight of the new level.1 point
-
Depends on shading - two inverters is simple (and they're cheap / not mounted on the effing roof under the effing panels, for when they fail before the panels do) - but optimisers will make better use of the PV in shading conditions1 point
-
I have tigo optimiser and Growatt inverter. But mines 10 panels in a row as a single string. All seems to work ok. With panels on different elevations you would ideally do two strings. But I think I would just go down the route of micro inverter, no optimisers required keeps it all simple.1 point
-
Good thinking - it's great seeing "will do what I can do" 🙂 You need to consider: - Max current - Max open circuit voltage of the string (not going to be a problem for a small string) - Minimum startup voltage and MPPT tracking range for the string (can be tricky with small strings) - Shading (with conventional inverters you'll want one MPPT input for east and one for west) - Maximum DC power / AC power (it's usually ok to attach more panels to the inverter than it is able to convert to DC; output will only be clipped occasionally) Don't go too big. The efficiency of inverters is poor at low load. If the shading isn't horrible I'd stick in a pair of these:in the appropriate (overall power) rating. One east. One west. Does 15A. Has WiFi. Stick them somewhere that you can access them to replace them later when the fail. https://midsummerwholesale.co.uk/buy/sofar-inverters/sofar-1100-tl-g3 Else keep it stupid simple. Panels that work with any old inverter. Put the inverter somewhere easily accessible. They're the only bits that really fail. No solaredge stuff. They company appear to be grade one a-holes and it's pushed hard by sales because once it's on the roof you're stuck with it due to the cost of getting up there to rip it out. https://www.mcelectrical.com.au/solaredge-inverter-optimiser-review/ Batteries probably don't pay for themselves over their lifetime. They don't last forever. Do the math on the how much each charge/discharge effectively costs you and you'll probably decide that the batteries aren't worth it. PV on the other hand 30+ years. Inverters 15+ years. I think you push panels down the front roof to avoid the chimney shading. Push the panels on the extension as far away from the house as you can to minimise shading. The panels are made in strings. If you shade the bottom of a portrait panel then you shade all three strings and you knock out the panel. If you shade the bottom of a landscape panel then 2 of the three strings still work, the bypass diode will bypass the third, and the panel will produce. Depending on your shading landscape may (often will) perform better. On-roof fit installers hate landscape because it needs more rails and you're faffing more finding rafters etc. With GSE trays it matters not one jot. https://www.sciencedirect.com/science/article/pii/S0038092X21003868 If you do need optimisers go with Tigo. They'll work with any inverter.
 1 point
 -
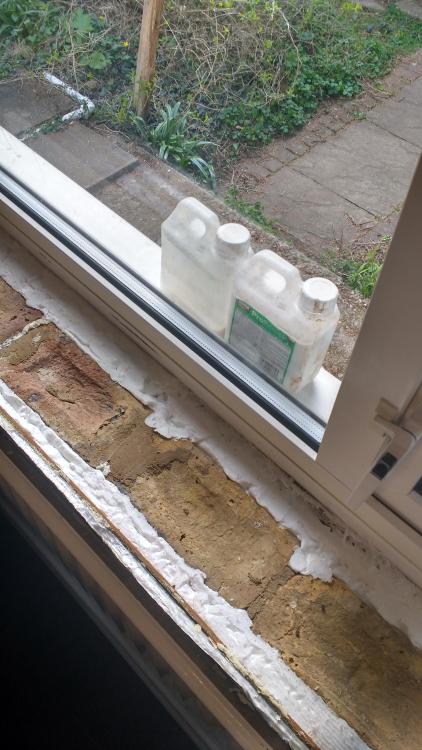
OK I concede. Illbruck FM330 is whole different can of foam! To trim the excess I struggled to cut it with my normal fine toothed hand saw or the couple of old bread knives that are my usual goto. Resorted to the 18V Fakita multi tool. It's weird. Not like the crunchy run of the mill expanding foam. This stuff is like rubberised merengue...but in a good way. Not sure if when you cut into the shiny top skin you bugger the airtightness properties? I suspect not. It's bloody tough stuff!1 point
-
We paid €28 +VAT for 400mm for a cold roof in 2020 per m2. That's €70/m3 +VAT /m3. It's probably increased a bit and I can imagine the labour for dense packing between rafters might be a bit more.1 point
-
What you can do, is set the timers on the heating system so the ASHP does not turn on to heat DHW until 11AM. By then solar PV production should be good, so it is likely the ASHP will be using up a good chunk of your solar generation. It's about the best you can do, other than (if you are in all day) manually turning on the ASHP when the sun comes out. That, and shifting all the big appliances to the middle of the day and the immersion diverter means I don't export much of my PV.1 point
-
No. For the simple reason your heatpump will have a min draw of something like 1.5kW. Your excess PV generation could be something as low as 200W... Which would mean if your heat pump is on, it'll be drawing much more power from the grid, negating any COP advantage over a immersion coil. The solar diverter will control the power to the immersion to match the excess generation, and can do this from a few Watts up to 3kW. We'll be setting our heatpump if for cooling and time for during the peak afternoon... So if cooling is needed in theory most of the power will come from the 4.5kW array, and only some from the grid. At this time of year we're not producing enough to power the heatpump, so still on the immersion1 point
-
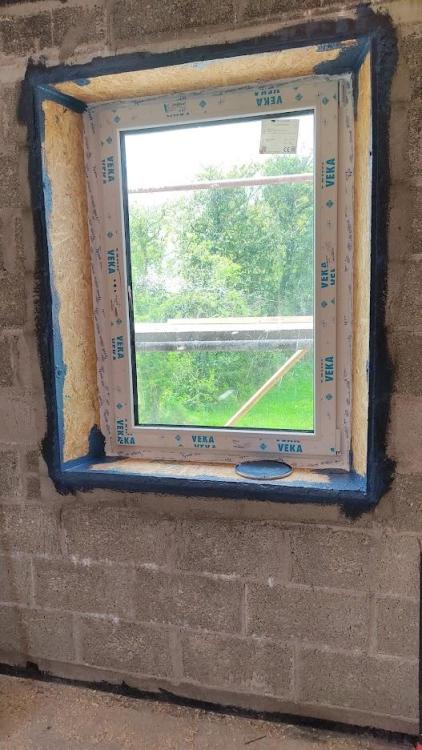
+1 to avoiding cavity closers. OSB window boxs here. Easy to tape to the windows and fix plasterboard and window sills to. Very robust during the building process. EPS bonded beads filled all the areas behind 100%.1 point
-
As an aside-you are putting an admirable amount of thought & effort into detailing. With that in mind,I’d suggest ditching the PIR cavity insulation. Search the site here for others’ experiences. It’s too complex to summarise in a sentence why it’s such an impractical solution for masonry construction,but if pushed for a one liner I’d say the real world performance is NEVER anything like what it says on paper.1 point
-
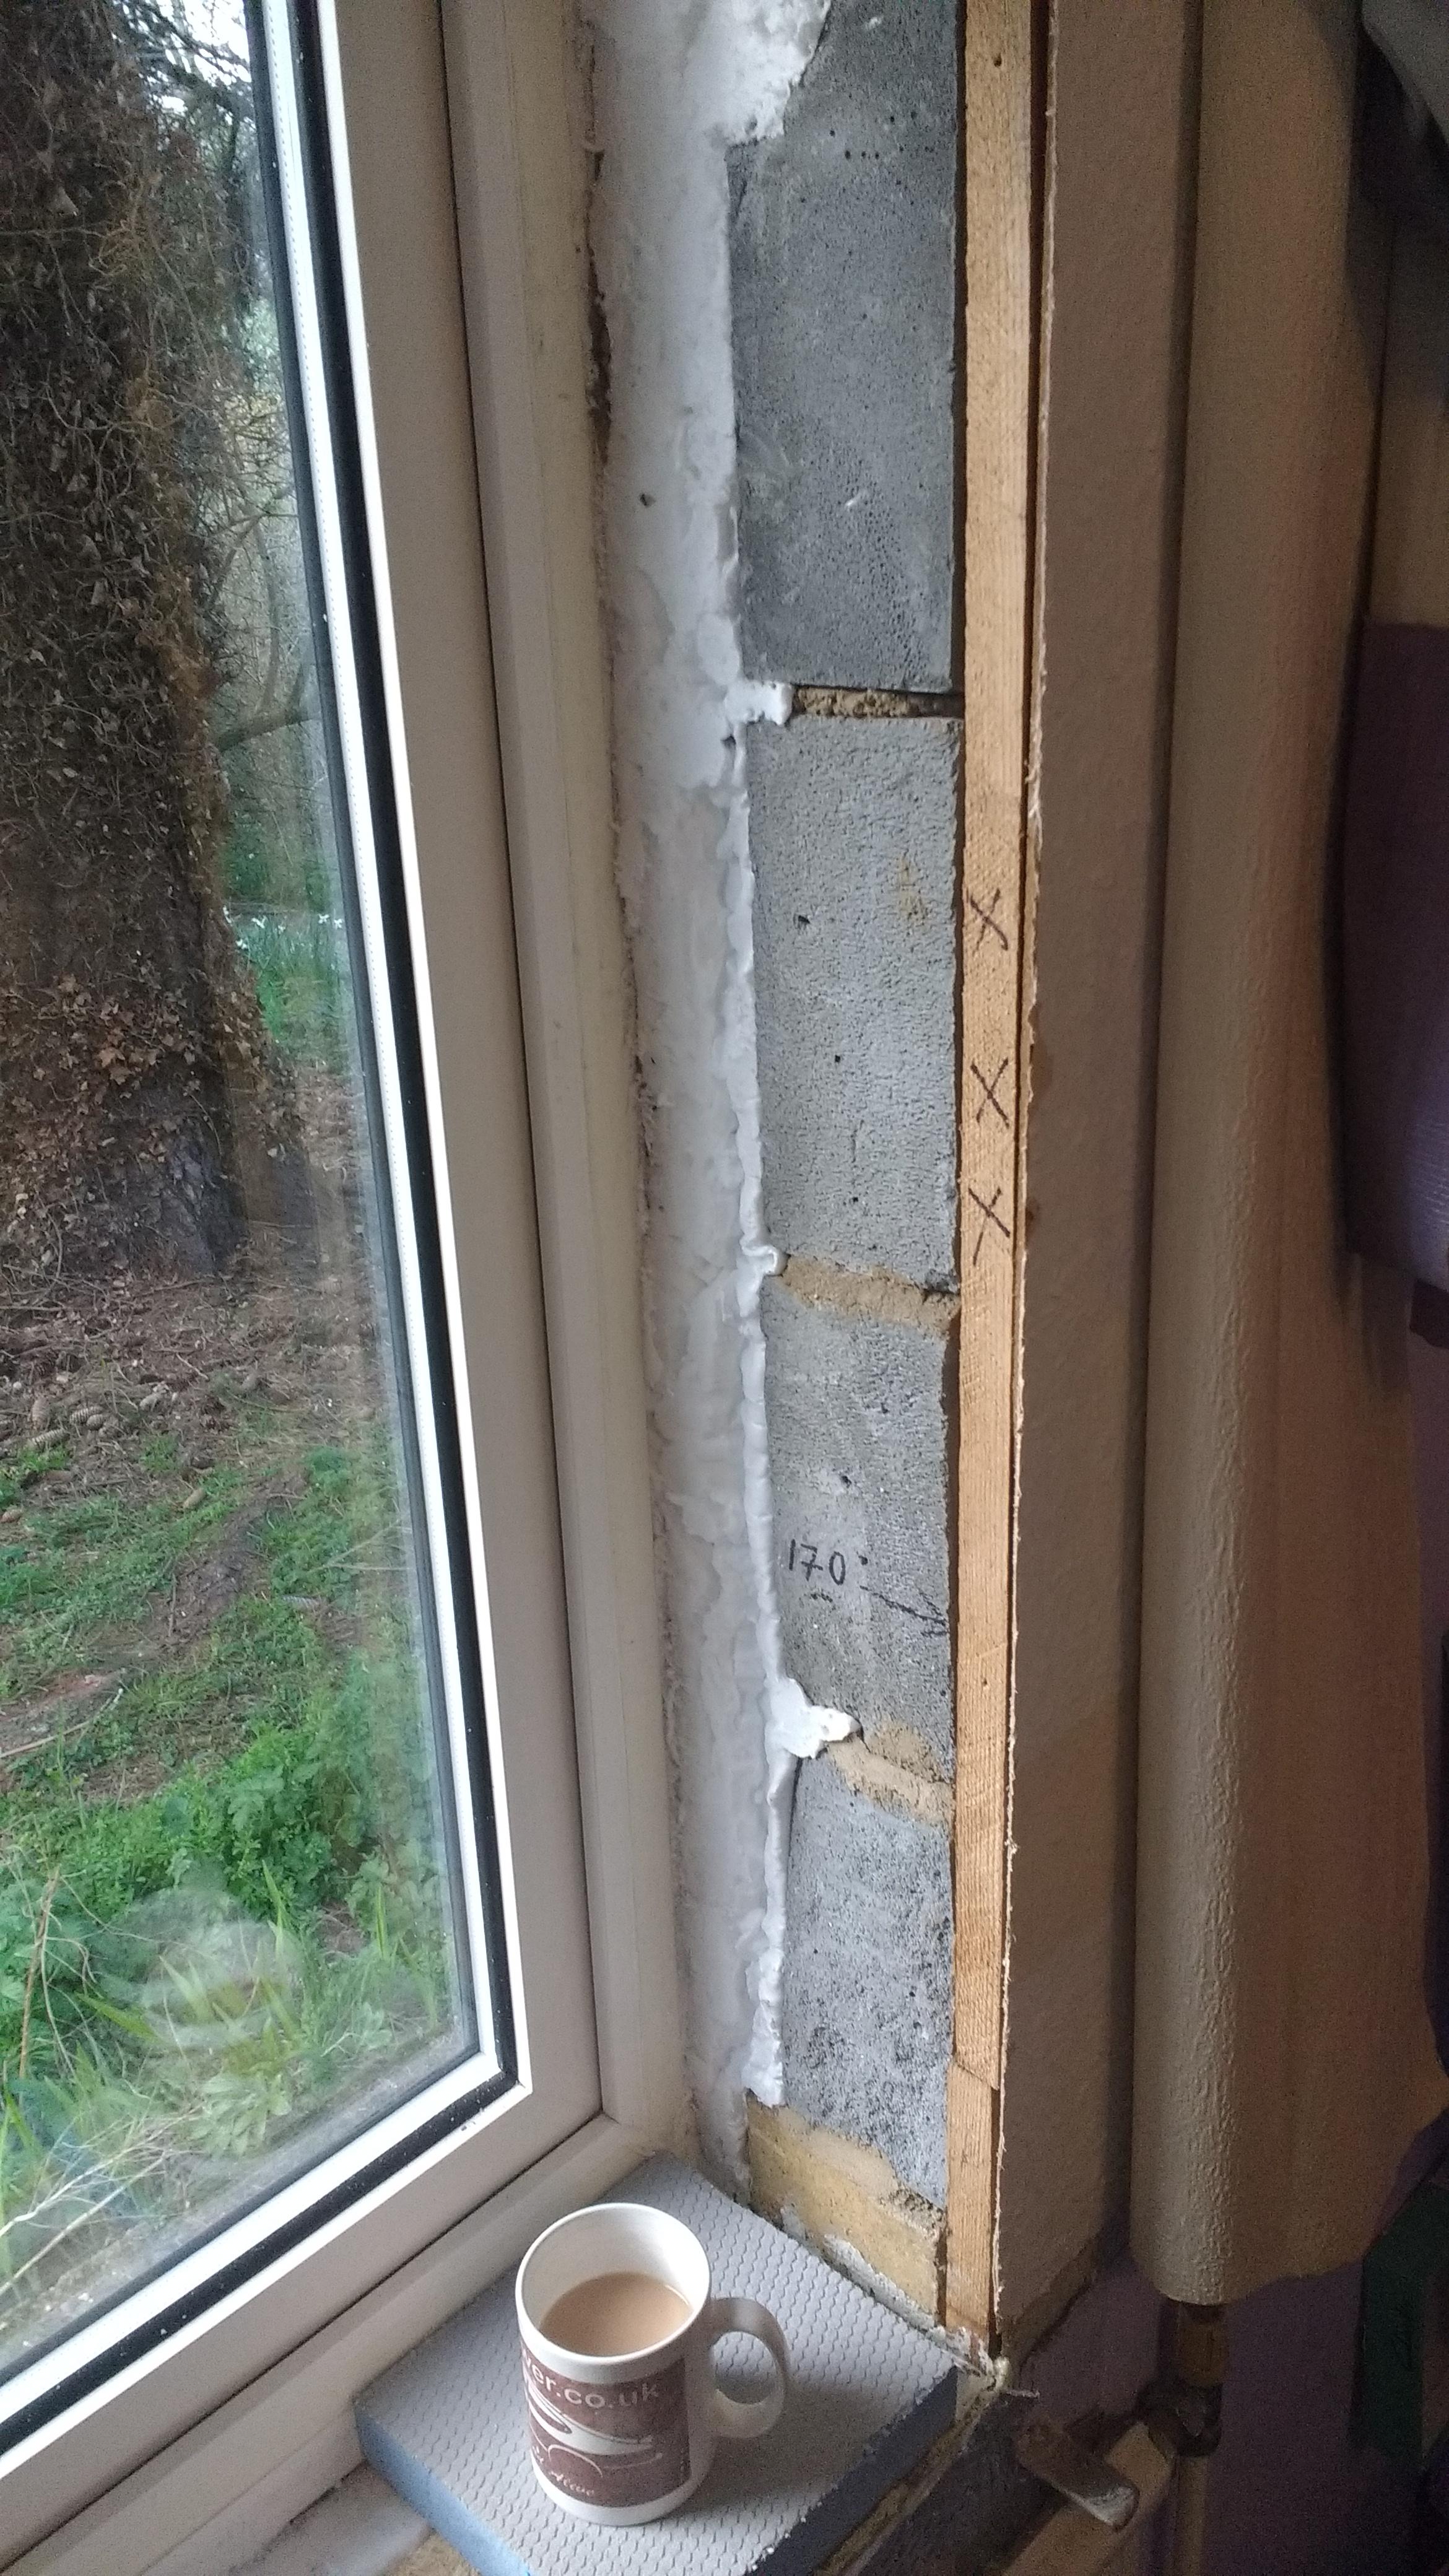
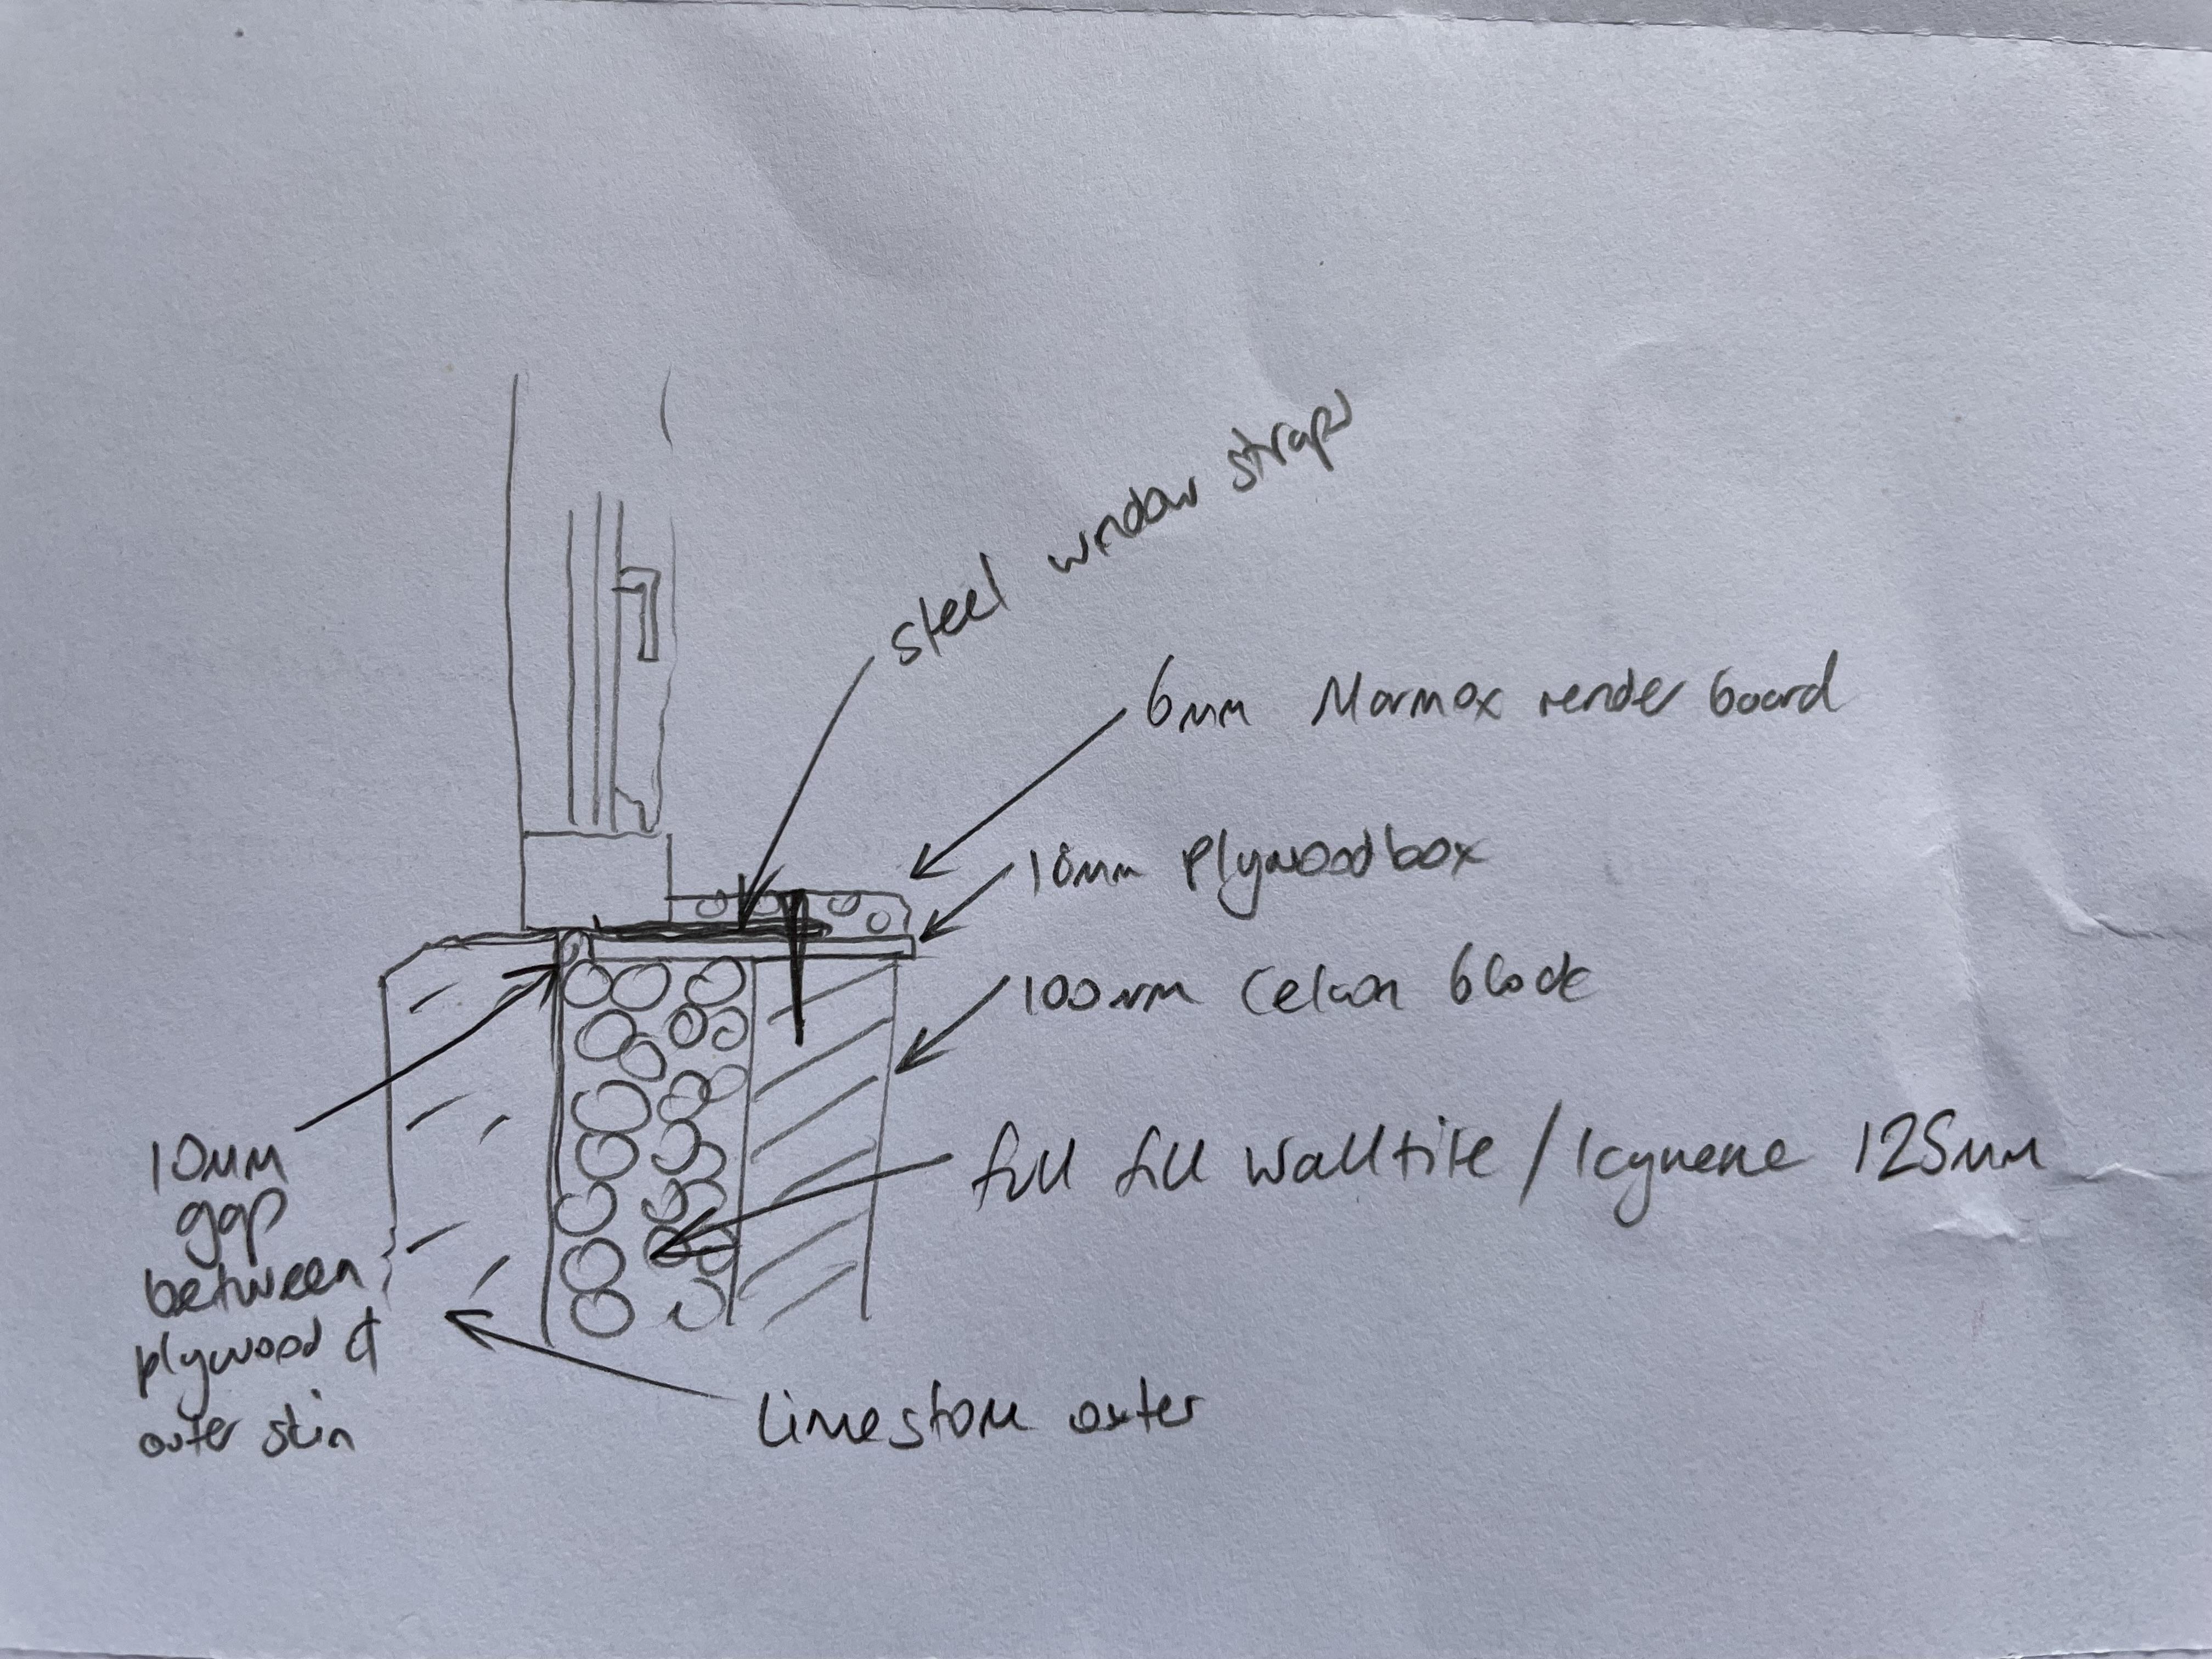
I don't like the cavity closers as they're difficult to fix to. Also, in the past I've had just as much success of cutting and wedging a piece of 50mm Celotex between the leaves and foaming it to create a much more sealed cavity closer. You still can't fix to it so need to take the fixings back to the inner skin via straps. I've also found you need to use insulated plasterboard on the reveals, as it's more rigid (and you can only fix to the inner leaf really). Below is what we did on the current build (essentially built a plywood box BEHIND the outer leaf with a 10mm gap). Unfortunately this only works easily if you aren't tied to matching course heights between the outer and inner leaf (in our case the outer is cropped stone, inner is blockwork). Our cavity is fully foam filled, but I don't see why this sort of setup wouldn't work with other insulation.
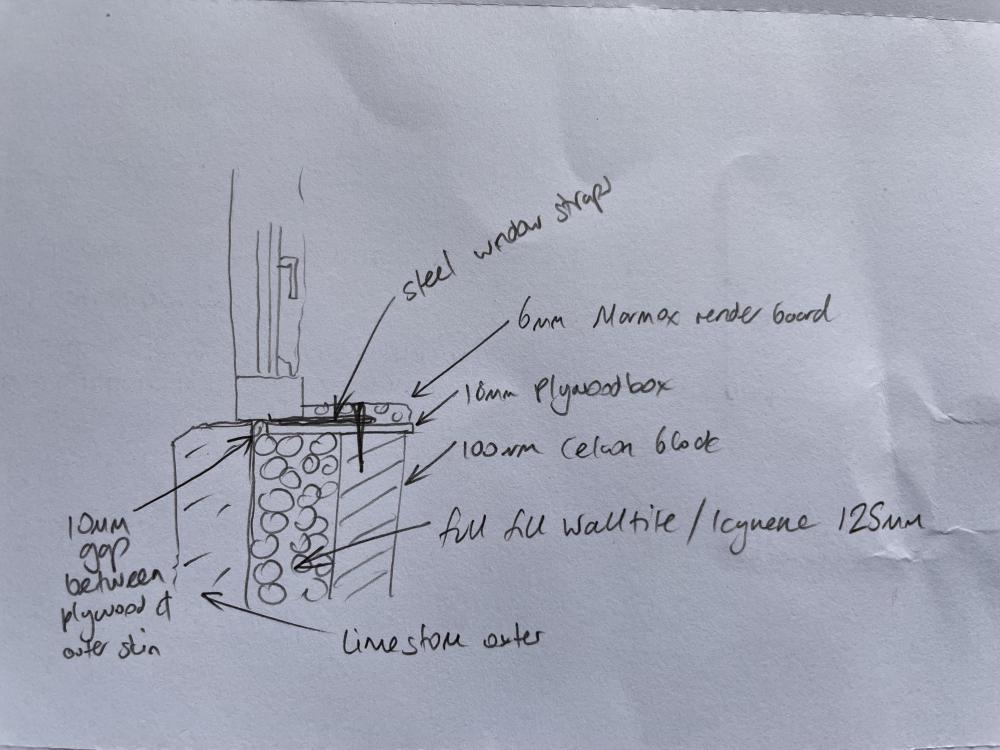 1 point
 -
I was told that Anglian Water were realy strict so I bought the insulation from JTM plumbing that met their requirements. Stopcock and stop end required at pipe end outside where connecting to the meter as it said the red stopper that came with the water pipe was not acceptable. I didn't connect anything beyond the stopcock as nothing else was requested by Anglian water. They classed it as full service not building supply and all they want is to inspect once everything is connected up. When the person came to inspect, he didn't check the external end for the end cap, didn't want to see the insulation and just passed it. Strange they insisted that the pipe should be embedded in sand, when they connect from the road to the meter, they didn't use any sand, just shovelled the same material they removed back in. We now have water1 point
-
@CharlieKLP and @Gus Potter - thank you, some really useful advice. Much appreciated. Just going back to the porch, if you take this house, stretch it a bit wider, and move the dormer left a bit, you get something akin to the shape of our house. Please could I get the committee's views on whether a porch like in the picture below might look okay on our house?
 1 point
 -
Trench dug through the ivy covered top layer with 3' wide bucket. Down to the clay. Not quite 2' deep, 18" maybe and the length of the frame. Bunged all the hedge and branch trimmings in and set fire to it. Nice bit of wood ash!


 1 point
 -
It reminds me of something but I can't quite...1 point
-
Yeah but mines called “ wet & forget “ - reminds me of school0 points
-
You dirty (expletive deleted)er0 points
-
Is that your back alley on the right? Looks quite tight for getting anything up there.0 points
-
How about a trip wire that activates a mechanical switch.0 points


This leaderboard is set to London/GMT+01:00