Leaderboard
Popular Content
Showing content with the highest reputation on 05/10/21 in all areas
-
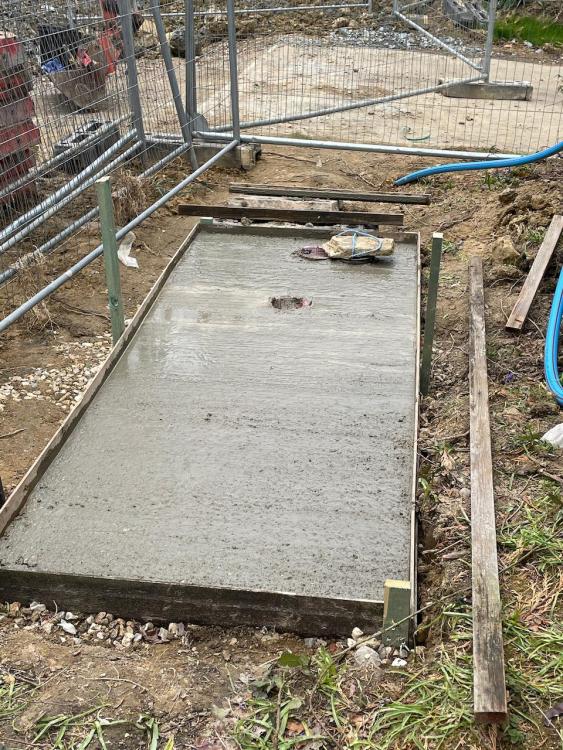
so, here we are at the end of the 3rd week of our build with the groundworkers having dug the basement to depth and put the sub-base down ready for levelling and compacting on Monday with the blinding and insulation to also be completed on the same day. We got a second digger driver on site this week and things have really got going and on Friday we even had a 3rd person to stand around with the laser level to assist. Here's the time-lapse video of the week. The basement contractors were due to start on Monday but as the groundworks aren't quite finished they've been pushed back to Tuesday. Despite that we're very happy and even happier since I've been told that the basement construction should only take 5 - 6 weeks, whereas previously I'd been working on around 8 weeks to complete. This is brilliant if they can do it in that time frame and I've already given the timber frame company notice that we might need the TF a couple of weeks earlier than anticipated if they can accommodate that. only time will tell if that's the case. The week finished off with me laying my first ever slab. It will house the electricity kiosk and also be a place for our wheelie bins to go. it was actually the UKPN surveyor who suggested to me to make the slab for the kiosk a bit bigger to allow the bins to go there. I thought it was a great idea and saves me creating something further down the line. Being a bit of a cheap-skate I use some of the old shiplap cladding from the pool house that got pulled down so it probably wasn't the best wood to use for the formwork and, after I put one piece down I did notice is was a bit warped but figured it's just for bins so just left it there. if it's not obvious it's the piece on the left hand side. Also, the 150mm ducting for the electricity cables made tamping the concrete down quite tricky around them so it's not perfect but it'll do. And if anyone asks I'll just say it adds character. seems to be a one-stop excuse for shoddy work. I promise I will take more care over the actual house! For mixing the concrete I was going to hire a cement mixer but at the last minute decided to cancel that and save myself £25 and a drive to pickup and drop-off the mixer and ended up mixing it by hand in a wheelbarrow. that was pretty hard work for someone who sits behind a desk all day and I'm feeling pretty stiff and sore right now but I'm sure as the manual labour progresses it'll help get me in shape in the long run. I'd like to finish with an observation.....this self-building is a funny old thing as I've never ever looked forward to a Monday morning so much in my entire life! I'm just so excited to get to Monday to see what next week will bring. Hopefully I'll go back to hating Mondays once the build is completed. that's about it for this week. I can't wait to see what next week brings.5 points
-
Interesting thread this. Good technical points made by Peter,Craig et al. To add my thoughts, partly technical, but mainly to open up design options you can consider that are cost effective, that won't lead to problems with your mastic etc on the finishes, sticky door issues, glass that fails due to adverse unforseen loads etc and the subsequent arguments. Don't forget that these large glazed openings cost a lot, the glass, slim frames etc. A bit of technical stuff. The formula for deflection of a steel beam is 5* w* L^4 /384 EI. For the keen, often domestic steel beam design ignores what is called shear deflection but for timber beams this needs to be accounted for as it is significant. To explain the formula for typical domestic steel beams. E is Young's modulus.. a property of the steel which does not change with beam size. w is the load per metre run of the beam. I is what is called the second moment of area and L is the length. Now you can see that if E, I and w all stay the same then if you have a beam 3.0m long then L is to the power of four i.e. 3*3*3*3 = 81 units, if you have a four metre beam we have 4*4*4*4 = 256 Now 256 divided by 81 = 3.16. So you get over 300% more deflection on a four metre beam than one that is 3.0m long all other things being equal. The thing to draw from this is that beam deflections are very sensetive to length. Extrapolate this to an 6-8m opening and you get this exponential deflection which plays havoc with your doors. The next parameter you can vary is the second moment of area "I". To get your head around this the formula for a rectangular beam is I = b*d^3 / 12 where b is the width and d is the depth. You can see here that if you have a rectangular beam 200mm deep beam d^3 (cubed) is 200*200*200 = 8*10^6 mm^3 (mm cubed) but if you have a same width but 300mm deep it is 300*300*300 = 27*10^6mm^3. So buy increasing the depth of the beam by 100mm you reduce the deflection by 27/8 ~ 300%. The way a steel I beam works is that you cut out the sides and place more steel in the flanges. This give a much more efficient shape so by moving the material to the top and bottom flanges you get more "I" for your buck! Now for a big glazed opening design the starting point is how much deflection will be ok over the head of the doors. There are general structural recommendations in the codes that go along the lines of beam span / 360 but these are mainly to do with the other elements of the building. If you have an effective clear span of 8.0m that is 8000mm / 360 = 22mm. That is going to jamb your doors, break the mastic seal (at times you will notice the bend over the opening) on the outside and probably damage any wall paper inside. It's easy to fall into the trap where you see the deflection as being say 22 mm, so you put in 25mm of say compriband.. but if you compress compriband or similar down to 3.0mm it will start to extert load on your doors.. it's good (squashy) but not that good! You also need to make sure that when the load is not there that the compriband will recover and not leave a gap. The next thing (Craig, Peter etc have touched on this I think in the past) is that there is a difference in how you install bifold doors and true sliding doors. A sliding door head can be installed with a bit of a gap over the head as they now tend to be all bottom supported, but bifold door heads need tighter packing at the head. In other words bifolds are less forgiving in terms of beam deflection. If you think about it. When the bifolds are open there is a lot of glass weight hanging out from the building so the mechanism at the head of the doors needs to be held firmly in place so that over time they still perform, the tolerances are tighter and less compatible with the structure. As promised. If you have read this far then if you have a single storey extension with a large opening you may have a flat roof above. Here you may be able to use the upstand on the flat roof to accomodate a deeper beam thus reducing any downstand in the extension. If you have a two storey house with large bifolds etc below you can start to look at turning the upper floor external wall into a big truss. This in the right circumstances can allow you almost take the doors right up to the ceiling! The secret is that there comes a point where a big steel beam is no use / economic if you have some height above to do something. If you have a modern house, say with an "L" shaped roof" and go in the attic you may see lots of thin prefabricated trusses. But at the "L" bit you may see some sturdy looking trusses.. girder trusses. You can apply the same principle to creating a large glazed opening on the ground floor. If I was looking at designing a 3.5m plus opening for glazing I would use start by saying.. I want no more than 6 - 8mm deflection at concept design stage under say snow loading or roof access. I would then look at the type of construction.. masonry, timber frame. Timber creeps over time so that has to be accounted for. I would also look to see how much the founds may settle.. if there is uneven loading.. differential settlement. Once you get a handle on the "feel" of things you are on your way to getting a problem free solution. This all may sound expensive as you need an SE, experienced designer that can look holistically at this but it may only cost a little more for the extra design input. Ideally it may end up that you save money!3 points
-
Hi and welcome, I retired to self build mine ( I was a small time builder before) and still I learnt soo much from this forum and its members. Finding the plot is the hardest thing which can take forever (I married into mine ?) I think you have to decide what you want which can take an age, size, rooms, facilities, orientation etc. I changed my mind several times but had a rough design in my head for a few years anyway. The mantra on the forum is not location location location it’s insulate insulate insulate. You only buy it once but buy fuel forever. Read a few blogs, don’t be afraid to ask questions here, you will get feet on the ground good advise not sales pitch. Best of luck ?2 points
-
Today I learnt to lay a slab. it's my first one and not a very important slab as it's just to house the GRP electricity kiosk from CCF Fibreglass and a couple of wheelie bins. it was about 0.2m3 and I mixed approximately 1 part cement to 6 parts sand/ballast pre-mix with some water by hand in a wheelbarrow and then tamped it down to get a rough but level-ish finish. There are 3 x 150mm ducts in the slab for the electricity supply in, out to the house and out to the STP which is nearby so these got in the way of getting a nice tampered finish but, all things considered, I'm very happy with what I've achieved today and think I did an alright job for something that I really didn't care how good it looks. I'll have another one to do to house the ASHP further down the line which I'm sure will be better. what did anyone else learn to do today?1 point
-
Your electrician should sign the Part P for the electrical work. One would expect an MCS installer to take care of that.1 point
-
Insulate the cupboard, not the cylinder. Then pipe out the warm, damp air with the MVHR. Or buy a washing line for a quid at Poundland. You are at home most days.1 point
-
1 point
-
Right, so buy a standard blank door with frame to match, then customise both?1 point
-
Why we should use the MJ, megajoule, as a unit of energy.1 point
-
Great to see the progress - makes me nostalgic I also remember pouting the slab for my kiosk and hand mixing concrete - I did it in the dark with a head torch and it turned out ok. Not in the ideal place now that everything around it has changed but what can you do ! I also hand dug the 10m of trenching for the electricity re-direction and the jointing pit - the self build game does get you nice and fit!1 point
-
You can also get GSM power failure alarms that are about £150 and they have battery backup. It can be useful to have some of these sorts of alarms when you’re very dependent on the systems working !!!1 point
-
Yeh it should - most of the pump station controllers have pump failure alarm along with a liquid level alarm, but some come fitted with a power failure alarm. This sort of thing should be used with a battery backup. https://www.tanks-direct.co.uk/high-level-alarm-battery-backup-for-sewage-pumping-station-cw-float/p3139 They can also be retrofitted with a power failure alarm.1 point
-
1 point
-
After an unsuccessful visit by the plumber last week with lots of head scratching we were still waiting for a solution. Last night's toilets all started backing up and we still have the issue above but noticed the utility sink drain outside wasn't going down either. Guy who did all drains and septic tank came out today. The issue.....Get ready for this you won't believe it... When the electrician came out 19 days ago to work through some final issues/snagging he turned off the fuse to the treatment plant/pump but didn't tell anyone or turn it back on. It took 19 days of not having the treatment plant or pump working before everything slowly started to back up and not flow. Flicked switch back and hey presto everything hunky dory. Spark must have flicked it off at some point. He's coming back on Wednesday so I'll be having words!1 point
-
1 point
-
You need to stick to the same manufacturer, if it’s old EBay may have something or post a photo with the info and someone may have old ones kicking about1 point
-
I am not sure it was really.1 point
-
1 point
-
TF (with windows / doors..?) Roof Insulation UFH Screed Studwork MVHR Sparks/Plumber1 point
-
@Construction Channel's photo of the cill moulding is very instructive. I assume the metal reinforcement grid is stainless. If I copied that I think I would raise the grid 20mm above the bricks below for increased strength. I like the rear overhang detail, I now reckon I should form the rear of the mould using PIR that will permanently sandwiched by the finished cill. I notice @Construction Channel solved the potential for leakage down the facing bricks by squashing some foam between the brickface and front moulding. He well and truly cramps the front moulding to the inner block wall with long cramps, not sure of their correct name. The taper at each end will look good in the final cill and also helps the release I assume. And he used cable to form the drip channel.1 point
-
I would hang fire with the beam and block. Leave the piles and ring beam as they are. If you install the beam and block and leave it for a few years then if something starts happening in the void under (water ingress, mould etc) then you'll have to fix it.. that won't be easy and not good for moral. Also, it does limit your options. Practically you may want to run services in the solum space.. planning that far ahead? Maybe get some free draining goetextile membrane (B&Q?) and lay it over what you have. Then infill back up to ground level. Pick an inert infill material that is easy to dig out and recycle... hence the geotextile membrane. This could be a layer of recycled aggregate. Or you could just dump some broken brick, another layer of textile then some decorative aggregate, some plant pots etc so you can use the space while you wait. It may be that you have a gravel drive.. use the same aggregate so you can "top up the drive" once the work is complete. The key really is to provide a layer of material to protect the underbuilding and solum from frost. Gardeners turn over the soil before the winter to let the frost get in and break it up. Same will happen to the soil under the solum if you don't protect it from frost. The concequence will often be that you end up having to dig the material that has softend.1 point
-
I learnt about ovens from my Father in law, what to look out for in terms of cleaning, the control display sizes and so on. Off topic.. Don't panic Jilly. NHBC regs touch on this, have copied below their text in italic from section 5.2 D10 of their regs. A minimum void of not less than 150mm should be provided below the underside of floor slabs and beams. On shrinkable soil where heave could take place, allowance should be made for the void to accommodate the following movements according to the shrinkage potential of the soil: high potential - 150mm medium potential - 100mm low potential - 50mm. If you get stuck then I would look to see if the ground has recovered from any trees / hedges cut down in the last two years or more.. this causes ground to swell. Also, have a look at what time of year the solum is installed, at the end of the winter where moisture contents are high and the ground has lifted/ swelled. If conditions are right you can make the point to the BCO that the ground has swelled (heaved) upwards close to it's potential maximum so once you put a dry building on top it will go down and increase the void. A reasoned argument coupled with a pragmatic BCO could resolve. This is a bit of last resort stuff to get you out a hole if you get stuck.. say main underbuilding levels set.1 point
-
wisa are the only ones that make spruceply in 22mm T&G from memory. https://www.buildersmerchant.com/product/plywood-flooring-boards-tongue-groove-22mm/1 point
-
Thanks for clarifying that it was soil infiltration tests you did for surface water soakaway assessment. You stated that your results were bad. How bad? - it would be helpful to confirm this and also what the surface water drainage arrangements are for the existing house. It has been the wettest winter since 1910 in the east of England so if your garden has been dry throughout this period it suggests the ground water level is well below the surface and the conditions are reasonable. My site is sandy/gravelly clay with infiltration rate measured at 2.2 x 10⁻⁶ m/s. The proposed solution is to discharge rainwater from the roof into pervious paving which stores the water in the granular fill and eventually allows it to infiltrate into the ground over a large area. I am required to have rainwater harvesting for water saving purposes but this doesn't really help with stormwater management as the volume of the tank is small and you cannot rely on it being empty when the storm arrives. https://forum.buildhub.org.uk/profile/8466-saveasteading/ has already given you good advice regarding other options from the SUDS manual including attenuation tanks and swales. If you are able to discharge to the ditch then you'll be expected to control the flow to the existing runoff rate.1 point
-
In important consideration in all of this is Part E of building regulations: 18mm OSB3 and CaberFloor are below that 15kg/m2 requirement. I think 22mm OSB3 is also below 15kg/m2, but it is hard to find information on that. I spoke to a technical person at Norbord and they said it may have an issue there. [NOTE: normal 12.5mm wallboard plasterboard doesn't meet the 10kg/m2 requirement either]. Link to document1 point
-
That is a expensive plot, i would do a sanity check to make sure the house prices in the area reflect that and your build cost. it would be pushing it a lot with about £1,100 /m2 and you will be having to do loads of work yourself. I think to give yourself a fighting chance budget for £350k (~£1,500 /m2) There are people on here that have done less than £1,000 /m2, but they are generally in the trade and have done loads themselves and it has taken years. Where are you and your family going to live during the build? How much is the Fleming timber frame going to cost you, as that its going to take a good amount of your budget.1 point
-
Forget the blockwork, I would not want to live where you are jammed that close together with such tiny gardens, and where everyone feels the area is dodgy enough to have such search lights outside their house. Once you have lived in a detached house in the countryside with 1/3 acre garden, there is no going back.1 point
-
1 point
-
hey that might even work out to be cheaper still. Its cute stuff I like it already.. gonna look great. Onoff should write a book: " 'Gizmos & Gubbins' (How to help an idiot tart up their gaff)".0 points
-
Do an Open University BSc in Physics and Mathematics. And another one in Law.0 points
-
I have an insulated tank and er indoors complains the airing cupboard is not warm enough ?♂️.0 points
-
Sparkies are good at stuff like that: fiddle with your system (whatever it is doesn't matter) and in our case has managed to defrost a freezer (*king 'ell I was cross) put two switches on our SunAmp where one used to be OK, left one switch on, t'other off - why should I tell the customer eh, tell me that now - freezing bloody shower arrive with a second export meter '... gorra fit this merrrt... ' only to see he'd already fitted one last year and always, but always leaves one or more circuits breakers 'off' and leaves the site gurning like an eejit, I shouldn't wonder.0 points
-
They're are if it's me. My bathroom floor was like a billiard table.....before I tiled it!0 points
-
I think there may be, just wait to you hear the queens speech tomorrow on planning and building safety.0 points
-
0 points
-
I learn the same thing every morning, my body aches.0 points
-
I missed that. Yes, not great. I've come across uk framers who believe that if you tape the insulation joints you don't need a vcl - I've also seen it approved by building control.0 points


