
Leaderboard


Popular Content
Showing content with the highest reputation on 02/09/20 in all areas
-
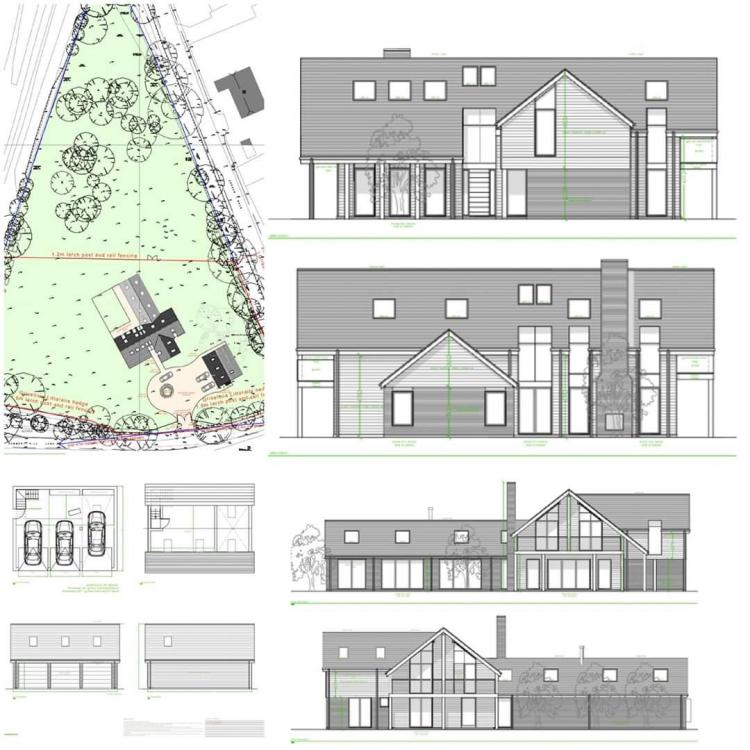
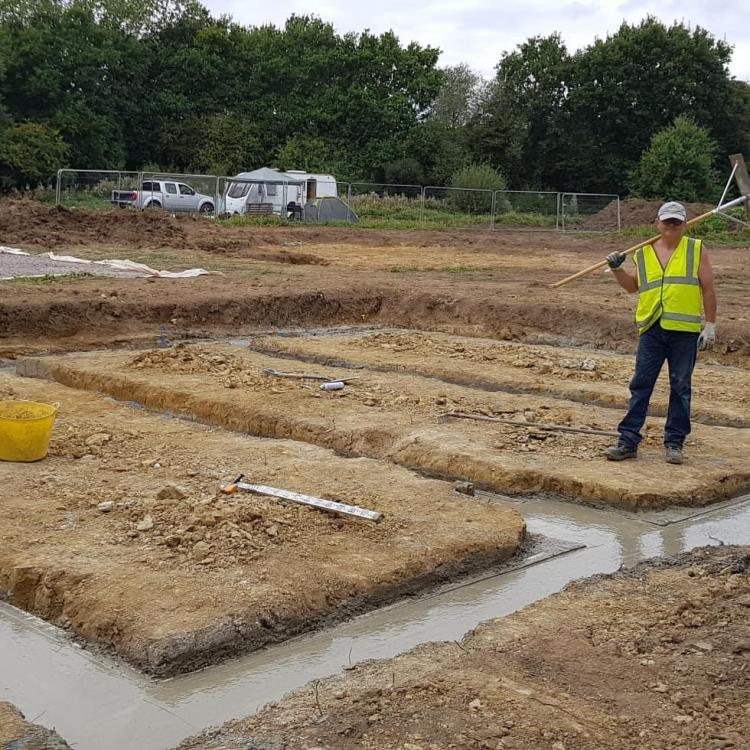
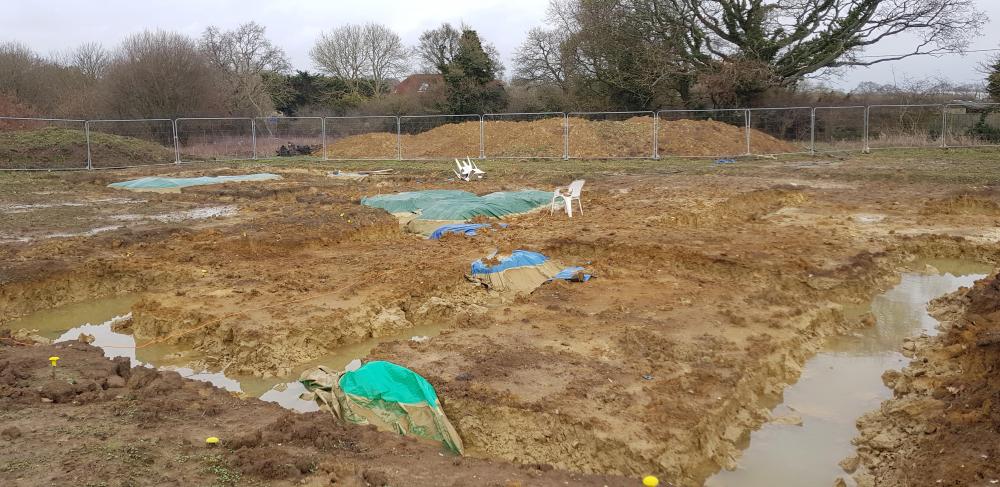
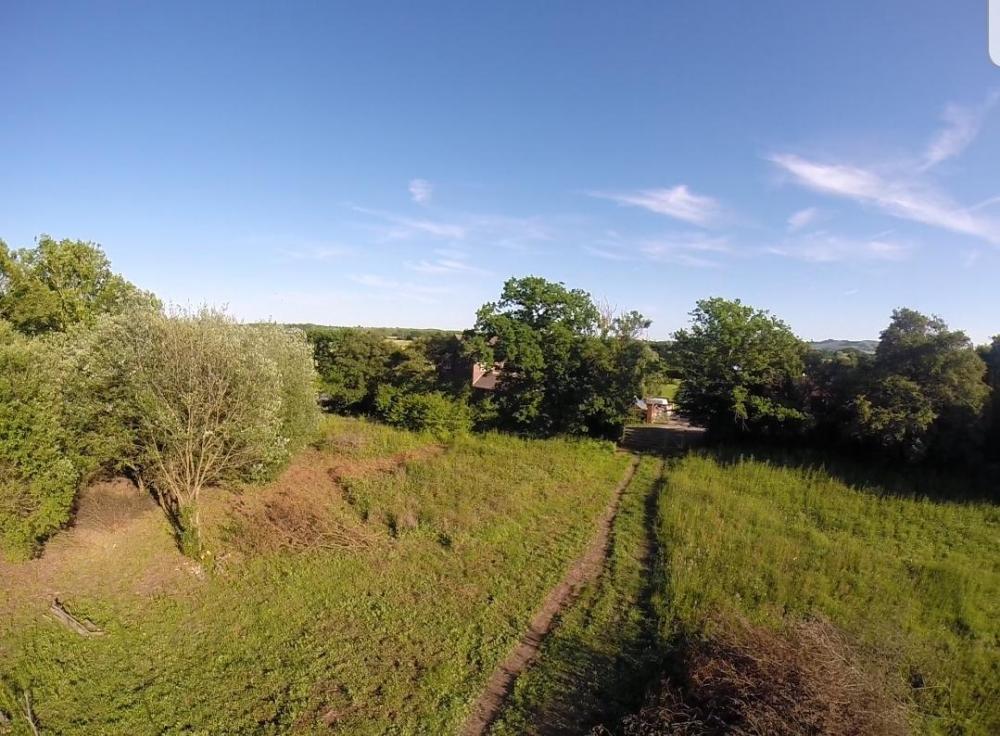
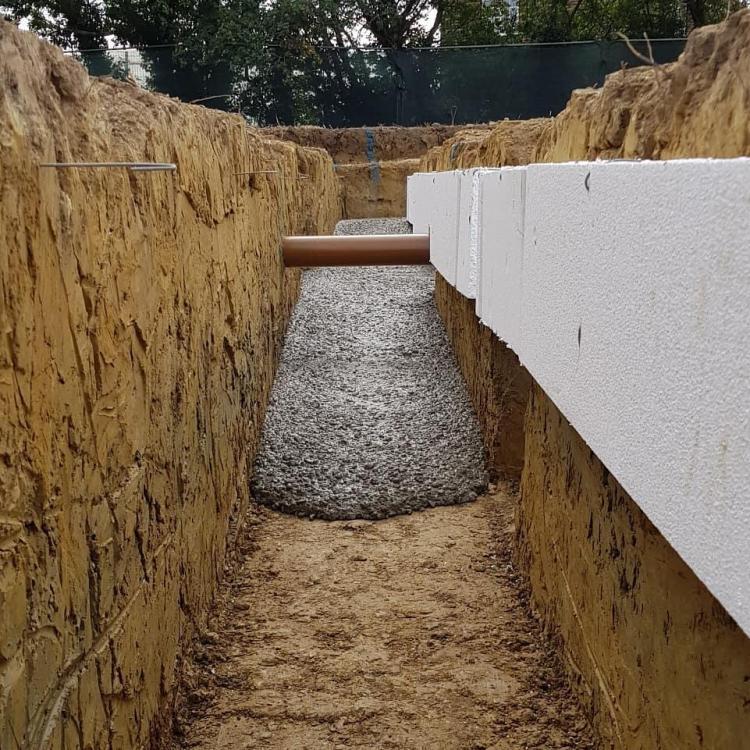
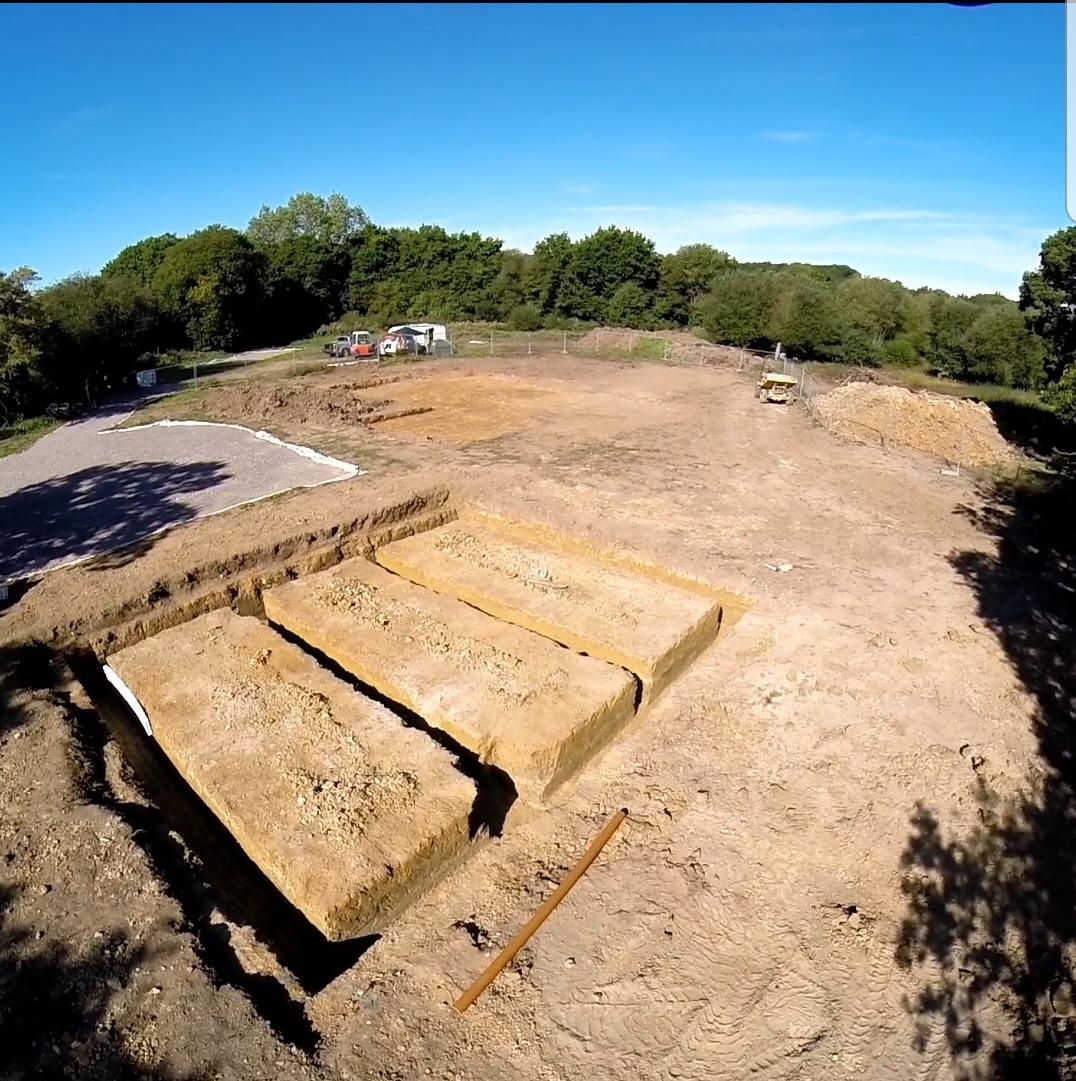
Hi all, I have been a member here for at least a year now and have found everyone so welcoming and helpful, I should have posted this many months ago so apologies for the slack! Sorry for the long post, and I'll also apologise now for any of my (expect many) stupid questions. So, 4 years ago my wife and then 1 year old daughter (my now 1yr old son was nothing but a future plan at that stage!) made the crazy decided to buy a 2.2acre greenfield site (very very overgrown and untouched for 30+ years - I have never seen brambles & blackthorn so thick!) without planning permission in a relatively rural area near Hailsham, East Sussex. Outside development area but with slight hints of positivity from our local planning office made us take the leap - land never comes up here and costs a fortune if permission in place. 3 architects and 2 approvals later (and a lot of near mental breakdowns!) and we finally achieved the design we wanted. In March last year we sold our house and following a brief period with the inlaws we are now all living on site in twin-static caravan - best decision we ever mad I must say. We're building a large 5 bedroom 'contemporary barn style' (ie lots of glass) house and large garage/workshop utilising brick & block construction with a 200mm cavity (filled with grey EPS beads) and jablite insulated beam & block floor system. The philosophy behind the build is a low-energy house using relatively standard building methods. Externals to be clad with a mix of fair faced brick a black wood cladding. I dont have any experience in the building trade other than being a keen DIY'er with an eye for detail - I hope to do as much as I can myself but know when to use professionals (brickwork being one prime example!). I do however have knowledgeable people around me (friends, google, and you lot!) and a retired builder (father in law) to draw from. Annoyingly due to delays with getting our B-regs plans signed off we couldn't start on the building structure until late summer, which has had horrendous repercussions! Most notably my father came over from the states in September for a week to help me dig and pour the foundations for both buildings, we got the dug & filled but the house is an entirely different story... rain hit 2 days before we were ready for concrete and we are now left with 150m of 1.2m trenches that are full have water and completely destroyed due to cave ins etc. As a result I've parked the house founds until spring but will be reverting shuttered trench-fill and blockwork. Not a problem as we've more than enough to be getting on with, bricky starts on the garage on the 24th! I've attached a couple of photos/plans but plan to track our journey via instagram (there is also a cool little aerial video), should any of you at all be interested feel free to follow me 'sean1933' Sean


 4 points
 -
I had a call from a family friend They are having there bathroom fitted out Walls tiled just the floor to do 7m2 Tiler asked to be paid on Friday and Leave £150 in Knowing the Plumbing company will be back on Monday to fit out No show Saturday Rang me in desperation It’s taken me an hour and a half to get there Will be the same to get home Two hours to do the tiling and a couple of hours to wait to grout it Rang the plumbing company and they are happy to do the silicon Saves me another three hour trip Dont pay out out till the job is complete and you are totally happy
 2 points
 -
OK, given feedback here, and as soon as everything settles down from the funding round we just closed, I'll try and get this moving again. UniQ6 + CombiSol + Eddi + hub + Combimate phosphate doser plus possibly a little extra wiring to make a following phase easier plus just possibly some kind of flow meter is about the long and the short of it. Hurrah! Rgds Damon2 points
-
Having got all my water issues out into the last post, it's time to move on to happier things and talk about other progress. Actually, that's a little unfair because there is a lot of work in all the flat roof stuff, far more than the pitched roof, and aside from the wet stuff it's going well. At the end of the penultimate post, the solar PV panels were just going on and the pitched roof was also still a work in progress. The building was still a shell with no power and plenty of work left for MBC to do, and outside was largely untouched apart from the buried mains cable that was terminating in the garage, into the meter moved by the meter fairies. Let's start at the top and work our way down. The solar panels are all in now and all the slates around them are done. All the velux windows are in and the ridges were done last week. We have a dry ridge system. I had to ask what this was and was told 'that means there's no gunk underneath the ridge tiles'. So technical that even I could understand it! Here's the stuff that they line it with. When they roll it out, it has a corrugated wave shape to it and each side is sticky - one for the roof ridge surface, the other for the ridge tiles. This is Mike, one of the roofers, bringing the final tiles right up to the ridge before putting the dry ridge stuff over it. And here's a view of the ridge tiles in situ, fixed to the sticky stuff and clipped together. We have 3 ridge lines on the roof, all meeting somewhere over the north east bedroom. A plate of good old school lead was shaped to cover the meeting point of the 3 ridges, creating a neat flashing for the centre. Here's Terence welding the lead to create the flaps going down each gully. Here's Terence putting it into position on the roof: And here's a close-up of the same thing. You can see the fixing for the dry ridge system unrolled next to it. Staying with jobs going on outside, there were some groundworks that week, too. I needed to get the electricity supply cable trench back-filled and whilst we had the plant on site I decided to get a few other jobs done. The Openreach guys turned up that week and the old redundant BT cable was removed, so that old electricity pole is all clear now. My neighbour has already bagsied it, so there's no problem with disposal. One of the groundworks jobs was to open up the ground between the garage and the lane. I'm not getting the driveway done quite yet but I did need to get it clear because my sunamps will live in the garage and it will be a lot easier to get them forklifted straight into the garage from the lane rather than trying to drag them all through the house. Keith got onto it, clearing around the side of the garage a little, too. There is an area of concrete there that used to have a shed on top of it. For the time being, I'm keeping that there as it's nice to have a surface that isn't clay. And then this is the view from the lane up to the garage. This is, in fact, where the pedestrian entrance to the old bungalow was, hence the gate that is still there. Once we've got rid of the scaffolding, we can clear the remaining few feet of the entrance and make the proper driveway. Keith will be doing most of the work on this, but I need to get someone with a ticket to do the dropped kerb between the lane and the verge. It's outrageously expensive for what it is - just for the 6m stretch of opening and 2m back, tarmac surface, that will be the princely sum of £1,200 plus £285 for the licence from the council. And that's the cheapest quote out of 3!!!! I will be continuing the tarmac for the driveway, and also around to the side of the garage so that there's hardstanding for a couple of vehicles next to it. And Keith's final job for that week whilst the plant was still on hire was to scrape the grass from what will be Paul's pond. I marked out the original perimeter and he took out the line for this but then I did that typically female thing and told him it was no good and I wanted it to be bigger. Naturally, he obliged. Not that we had much doubt, but for the sake of interest, Keith dug out a small trial pit within the pond perimeter, about 1m deep. It has filled up nicely with the subsequent rain and shows no sign of draining any time soon. I may have cursed our clay for its giving the need for piles, but we certainly won't need a pond liner. That's most of the outdoor stuff for the time being, so let's step inside and see what MBC have been up to this week as they've starting on the prep work prior to the airtight test. This is scheduled for next Tuesday, 20th November. The velux windows have all been boxed out and they've been drawing the airtight membrane up around the web joists forming the roof/ceiling. This will be the main/shared bathroom and it's only natural light source is the velux. It's rather nice to think I can lay in the bath looking at the stars. Assuming it's not raining. The green tubes on the far wall are for the MVHR. A close up of some of the MVHR tubes to show the careful taping around them where they come through the membrane. This is the main bedroom that has been battened out now. I've wedged some bits of timber under the membrane that's underneath the window to dry out the water that came in at the weekend after the tanked balcony incident. All the battens have been screwed on, much to the chagrin of Darren. It's probably not so necessary somewhere like a bedroom, but in bathrooms and the like where the weight of tiles and mirrors can be considerable, I wanted the peace of mind that the battens weren't going to move for anything and so requested screws rather than nails. This is the north east bedroom, below where the three ridges meet. The guy putting up the plasterboard will be cursing me here. Heading downstairs, the insulation changes a bit here. Instead of being all blown cellulose held behind the membrane, there is celotex in certain places. This is beneath the parapets and the balconies and it's been used here because less depth is required than for the cellulose, allowing the ceiling to be level throughout the ground floor. If blown cellulose had been used, the entire outer edge of the ground floor rooms would have had a step down to allow for this. That's pretty much it for now, but the next lot of work has been scheduled. The vertical slate cladding is booked in to start on 3rd December and this is being done by my roofers as it seemed logical given that they're using the same materials as on the roof. I'm nagging and cajoling them to see if they will do the stone board cladding on the stairwell walls as well; they may say no eventually, but I'm working on it as that will be pretty much all the stuff at height done other than rainwater goods. It would also protect the south west corner of the building nicely, as that's the direction for the prevailing weather. I'm aiming to get some more groundworks done in early December; at some point I need to get the sewage treatment system set in and also the rainwater storage tank. There is, of course, the rest of the pond to be dug out and that will need some muckaway. I'd rather get it done this side of the winter as we can then let it fill up with rainwater and see how it settles. Internally, there's some work on soil pipes and the MVHR, but no sign of the MVHR unit itself. Once MBC have completed their air test next week, we can really go at it with first fix, so I need to make decisions on external electrics. On order is the big brise soleil for the floor to roof window in front of the stairwell. The plans for this look great but I'm waiting on a production date at the moment as the framework is a first fix item. The wooden fins can go on any time after that. Similarly, I have a guy coming to measure up for the external motorised roller blinds for the other large south facing windows. As long as sufficient clearance is left with the cladding, these don't need to be installed as part of first fix so we're not so reliant on a production date for these. They have a lead time of 3 to 4 weeks. There's plenty that I've omitted, I'm sure, but it will all follow in due course. It will be great to get past the air test and make some good progress in doors. No aviation buzz this week, but the hunt was out today. I stood on the top lift of the scaffolding late this afternoon watching the horses and riders galloping over the distant fields down near the river and could hear the hounds baying and the horn being blown. I'm not sure what they were hunting but it all seemed very evocative on a late autumn afternoon and really brought home just how rural our place is.2 points
-
Lots of interesting stuff on the OpenEnergyMonitor site. https://community.openenergymonitor.org/t/integrate-a-openevse-charging-station-with-a-9kwp-solar-system/110182 points
-
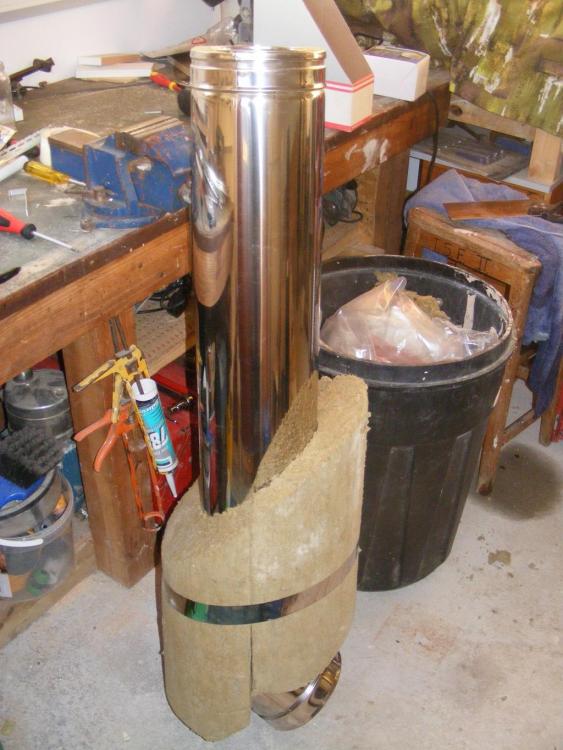
Where I bought the flue from https://www.flue-pipes.com/ they sell an insulating sleeve. This is clearly made of a non flamable material and / or certified by the manufacturer for this purpose and is 6cm thick, This means that anything, including flamable materials can be in contact with the outside of this sleeve as they are the required distance from the flue. So you can seal up the hole around the sleeve and get an air tight penetration. Our chosen stove was a Medip Stoves Churchill convection model. Rated at 4.5Kw it has a ducted air intake for both primary and secondary air so is room sealed. so no vents needed to let cold air into your room. We are very pleased with it. I can honestly say this is the first stove we have ever had, that genuinely keeps it's glass clear, I have never had to touch the glass or clean it at all.
 2 points
 -
The major problem with ordinary polythene sheet is that airtightness tape will not remain adhered to it, due to it's very low surface energy. VCL materials are treated or formulated to have a high surface energy, so that their self-adhesive features or ordinary airtightness tape will adhere well to them and will remain well bonded for decades.1 point
-
possibly, it will be bridging the cavity1 point
-
Took me about half a day to install and commission a monobloc ASHP, and I'd never installed one before (and I'm not a plumber/heating engineer). They are dead easy to install. The hardest part is setting the things up well, as the manuals are often pretty damned impenetrable.1 point
-
I've done quite a few through work, though unfortunately can't pass them on. A CEMP seems a bit overkill for a domestic self build, so I'd want to ensure they really meant to do this and it isn't just a cut and paste accident? If you're using a contractor, then the CEMP really needs their input, as they'll be bound by what's written in it. Otherwise, just stick to what they've asked for. I'd advice committing yourself to the bare minimum required and to make sure you understand the financial implications of what's written, as you can be held to it. CIRIA can be useful for guidance in relation to CEMPs. It doesn't need to be a big document.1 point
-
@Declan52 just shine a torch into the fan when you have the heat exchanger removed. You WILL know if you have a problem.1 point
-
like @PeterW we used Warmstar but used 100watt just to take the chill of the floor.1 point
-
Floors first. Then tile down to the floor with a 1mm gap. No dirty, bottom grout line etc. A old Welsh boy taught me that trick.1 point
-
Floor first baby. ?1 point
-
OOOOOoooooo boys. First last, last first..... Remember this thread?1 point
-
Has the layout oh the house changed? They used to be common in a pantry to keep it cool.1 point
-
I have found the sticker, and the A5 booklet. Neither been completed. I'll be chasing him now. Thank you.1 point
-
if it's at the top of a wall under the slates it will be a dentil1 point
-
It looks like a terracotta or brick decorative moulding. Moulding is probably one word you can start from. Take one to a salvage yard, and say “this”. If there are lots of those on houses in your locality, then someone local should have one. May be worth gossiping down the street to see if anyone has a spare. Really need a wider piccie.1 point
-
Can't really see what the middle bit is. Could you cut a ridge tile to shape?1 point
-
Try an architectural salvage company. Heres a list of our local ones - if you hint at your location in your profile, we'd be able to help you by suggesting sites local to you. ( Click on your Profile image - currently the green letter D - and edit you profile - top right> Edit Profile)1 point
-
I am doing a lot work myself but getting trades in to push things on when required, the story so far: Demolished old house summer 2017, piled raft foundations installed done Aug 2017 due to adjacent trees, treatment plant and drainage field installed autumn 2017, Bricklayers on site end of March 2018, beams and joists June/July 2018, bricklayer back to take up to wall plate August 2018, Roof trusses delayed, finally lifted on 29th November 2018, January brick layer back to take chimney up though roof frame, Roofers arrived mid-February last tile (plain tiles) installed April 18th 2019, PIR insulation installed on sloping ceilings May 2019, first floor windows installed June 2019, soffit and facia July, august 2019, gutter September/October 2019, porch roof timbers December 2019, nogging for first floor walls and some ground floor windows January 2020, currently snagging the roof, chimney leak, window in wrong place etc. hope to get secure and scaffold down soon. Do I wish I never started? Yes on some days. Best trade so far: the brick layer, now retired I was his last build. he was full of experience. "why do you want to do that?" he would say. the house is better because him. If I did it again, I would do it differently, may be the errors would be different as well! (140m2 two storey house)1 point
-
If the gas boiler is working OK, and is still supported with spares, then my inclination would be to leave it as-is, as that's probably going to be the least expensive option. Tempting as it is to look at replacing it to reduce your carbon footprint, there's also an argument for retaining it until the house gets demolished, as that way its manufacturing carbon footprint gets stretched out over a longer working lifetime. Always hard, these moral vs. economic decisions.1 point
-
Don't forget the UFH tubing can also be used for cooling as well as heating. Give how cheap it is to include it, perhaps that could a motivation to install it even if heating is not anticipated?1 point
-
In my case, I found that the local structural engineering firm had one (relatively junior) engineer in the firm who specialised in SUDS and was able to do my SUDS designs and calculations that satisfied the planners. A general mid-sized engineering firm near you might have the same. As it turned out, using them was one of the biggest mistakes so far with my build, not because of their work but because of their approach and attitude, but that's quite another story. Also, I don't think its relevant for you, but in my case I subsequently learnt that the manufacturer of the system I was intending to use (in my case a green roof) would happily provide SUDS designs and calculations free-of-charge (so long as I also bought their products) and I wish I had used them from the start.1 point
-
I use Warmstar on eBay for all the UFH mats - good value and they ship with a variety of different thermostats1 point
-
Our wetroom has only an electric towel rail and MVHR and dries very quickly. We also dry our washing in there when we can't hang it outside.1 point
-
I bought a blending valve that is accurate down to about 20 degrees although I have found that running it at around 26/27 works best. The boiler is a worcester bosch greenstar 12i that modulates from about 3.5 up to 12kw. I have never had issues with short cycling and with just a wall mounted temp sensor it controls the temp well. I also use it to run 4 x 600w towel rads which is all the heating we have upstairs. I have these on for an hour in the morning in the winter and overlap them with water heating as their output is even slightly less than the lowest boiler modulation. The UFH comes on a max of twice a week mid winter and often only once for about 4 hours. It was a bit of punt as I sort of designed it myself but it is dead simple and has worked really well. My plumber didnt believe that the boiler would be powerful enough to heat the house. Getting a plumber that understands low energy housing seems to be quite tricky.1 point
-
I think the master en-suite and dressing are not a happy arrangement .. not least because the loo flush backs on to the spare bedroom guest pillows. I would try and swap those two round somehow perhaps or adjust the plumbing to the other side of the en-suite away from the guests.. and imo you want a widow maybe 8n the dressing area so you can check your beauty in daylight. Leaning over the bath that window looks a sod to clean. Ferdinand1 point
-
This is the link to the video Finished floor was tiles over concrete. You are never going to get a very good standard of concrete floor from polishing a structural slab. Concrete thickness is dependant on the design of the slab and ground conditions. Mine is technically different to the majority as it is structural with more steel in and also thicker. I wanted decent insulation with no thermal bridge so didn't look in to cost for a 'normal' raft.1 point
-
When you take out the Land Owner Insurance ask about any options for 'short term upgrade' to cover for any unforseen work needed e.g the Architect may need 'trial pit(s)' dug by JCB to ascertain ground conditions for the Foundation Design...no 'trial pit' is one way to pour money away into unnecessary foundation design costs BUT also allows for correct foundation design. Bad ground is an expensive, unforseen cost to put right and could kill the Project. If you saw the field in Summer and bought it on that basis ask yourself how does it perform in Winter rainfall conditions, wear wellingtons and at least walk the field this Winter, check for Winter Springs / not part of historical river flood plain. Ask the neighbours etc. My Site's Trial pits info of heavy clay soil + grey clay + flint boulders had significant cost implications for Foundation design and dealing with roof / surface run off / drainage / soak away calculations. To help buffer water run off from large roof area I piped it to large, underground, reinforced concrete water storage tanks which overflow into a 'wildlife' pond. This seasonable Pond was also created to deal with regular winter flooding of the access track from a higher adjacent field (now piped to pond), overflow pipework from buffer pond went to drainage ditch. All this work was part of Planning Application / Permission detail.1 point
-
Traditional screed with fibres is normally fine with ufh and tiles or stone. However some care is required where two areas of screed meet at a doorway. You should form an expansion gap at this point and not tile over it.1 point
-
How about; a row of piles 120mm 'out' - (allowed tolerance 130mm) meaning our front wall needing some creative thinking later this year [surveyor error] ICF blocks laid - over a few meters - more than 20mm out of line causing significant expense and aggro extending the first floor joists walls built and left without concrete in them for 5 weeks, blowing down in a turbulent easterly gale in July ( cost several thousand ) wall blocks hammered into line (rather than being relaid) thus causing fractures in the ICF and a huge blow-out - ( cost a few thousand ) steels manufactured 300 ish out of line at one end, correct at the other, meaning several weeks delay and about £1500 of remedial work concrete slab laid to 25mm below FFL - GOK how to sort that - posts to follow Getting out of bed in the morning feeling cheerful. BIG mistake. (PS, apologies Ferdinand ...)1 point
-
Although heating up anything at 15p per kwh is always going to be costly. Mine is affordable at 8p and it's not right that these guys have to pay double for a similar system from the same supplier. The 'change my tariff' option in Scottish Power's app is bullshit too. It tells me that I can reduce my £140 per month payment to £55 a month by selecting one of the 2 suggested tariffs. When I look they have only taken the standard meter into account and note that my annual usage is circa 3000kwh. My actual usage is over 14000kwh. Oh, and the 'cheaper' tariff on offer is over 17p per kwh (I pay a touch under 15p for standard use currently).0 points
-
Ugh ! Might use the girlfriend's old tights, instead. F0 points


.thumb.jpg.bac90f3bbf6868cf2118d010d936c99d.jpg)


