Leaderboard


Popular Content
Showing content with the highest reputation on 02/13/19 in all areas
-
This is one of the best designs that I have seen posted on here with very few issues. Most issues are interior layout which is not a planning issue. The only exterior/planning issue. I would consider swapping the WC and the hall cupboard around so the WC can be larger and have a small window to the side. It also looks like the stairs will encroach on the head height where it currently is. Seems a shame in such a nice spacious house to have a compromised WC, a room which many visitors will use over time. If you are planning a gas or solid fuel fire it is not going to be easy to get a flue/chimney out from the current position. The longer it is the more expensive it is and you could also need unsightly inspection hatches. The kitchen layout may not be finalised, but I wouldn't want the freezer in the utility room and I would consider putting the hob on the island so that if you are cooking you are looking into the room not at the wall. I would consider accessing the playroom off the hall as you already have a very large open space there, but it depends how you want to use the space and the age of your sons. Making it easier to close it off may be better as they get older. I think the master en suite could be better arranged, unless there is a view out of the window the bath might be better on one of the sides. At the moment the entrance between the sink and shower is a little tight at only around 70cm. But the interior arrangement does not affect planning. It seems a shame to have an ensuite reserved for occasional guests and not your own family, I would give one child the en suite and the other child has sole use of the bathroom, so everyone has their own space. Neither having an en suite might be fairer, but I would guess they would prefer having their own spaces.2 points
-
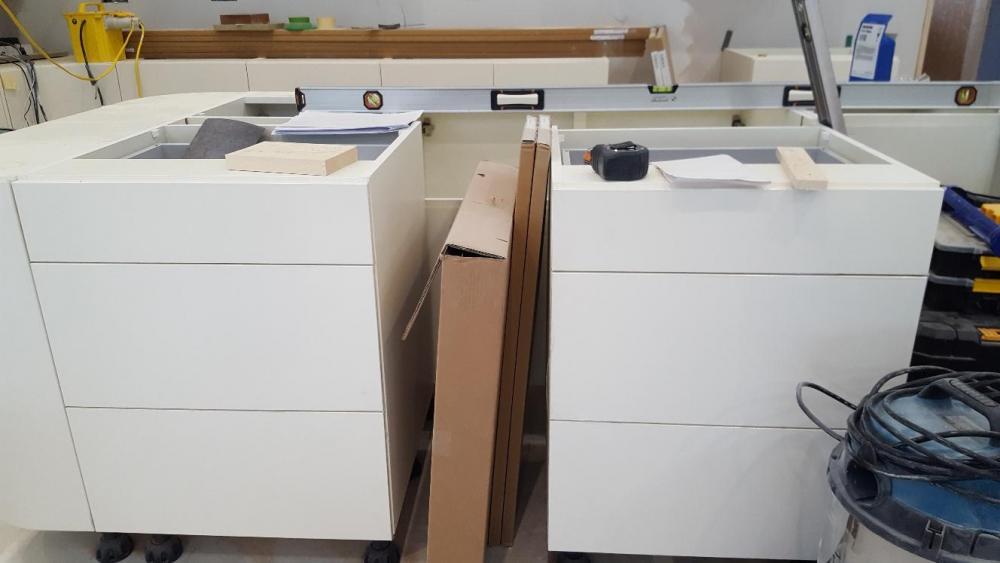
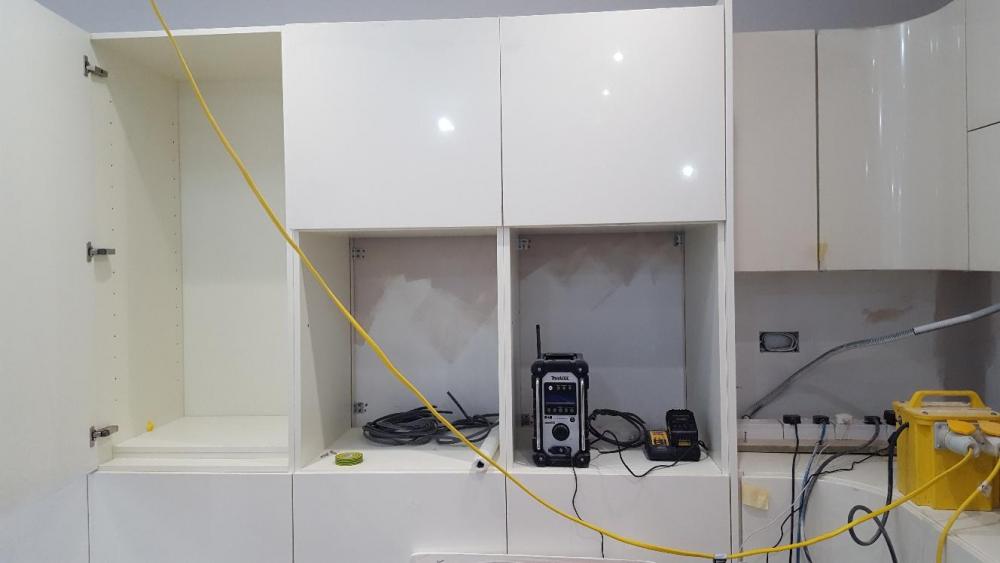
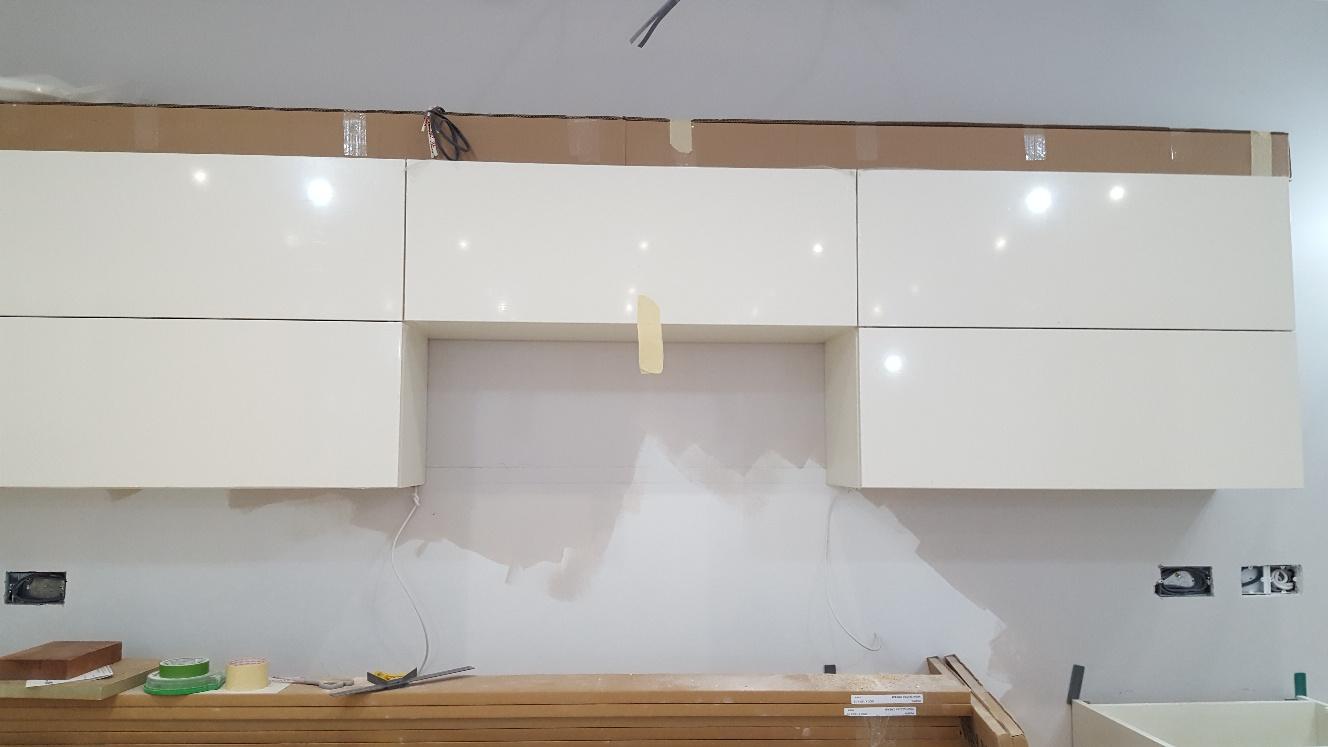
I recently posted on my blog that I was waiting for some extra end panels to arrive to insert between units for my kitchen, sourced from DIY Kitchens. @ultramods asked why this was and where they were going, so here's some detail. The first couple of locations are obvious when you see them, but as a novice kitchen orderer, I missed them at the time of the original one and had to add them on afterwards. These are bi-fold wall units with a top box straddling where the sink will be. There will be a plinth ( pelmet / cornice ) below the top box ( bridging unit ), but this still means that the inner edge of the bi-fold units either side have the external carcass exposed and whilst it's a reasonable colour match, it still looks like carcass against the gloss finish of the doors. A wall unit end panel will go on either side of the top box, giving an 18mm insert on the top section and a nicer looking, gloss finish on the inside of the bridge section. The next additional inserts are going into the island. I have a freestanding drinks cooler that will be going in there (they were out of stock at the time the rest of the kitchen arrived and will arrive in due course). The cooler is floor standing and the ventilation grille sits on the floor. Because of this, the run of the plinth will be interrupted and leave a not very pretty edge at the bottom. Again, to give a better finish, a base unit end panel will be added in on either side of the gap (leaving enough room for the appliance). Here's the start of the island and the location of the drinks cooler. Finally, I'm having two single ovens, side by side and at the level of the top of the base units. These come as standard oven housing units with pan drawers. In my current kitchen (old and very worn out now, not expensive in the first place) the sides of the built in oven get pretty mucky and it can bleed over slightly to the units/drawers either side of the oven door. For this reason, to the left of the left hand oven, a full length end panel will be inserted between the units to give some separation and an easy, wipe down clean for anything that escapes the oven over the course of time, rather than also having to clean the adjacent cupboard. Here are the oven units: Hopefully, this answers the blog query.

 2 points
 -
1 point
-
@Mrs CFS wanted to be the first to give you a *like* as I think this looks like a smashing space. lots of various opinions from the forum but folks do take the time to consider and type this stuff out so don’t be put off at all...it’s your house! And you have a curved wall upstairs, how cool is that @jamiehamy1 point
-
Thanks Lizzie, just out of interest why would you not house an MVHR in the loft? This was what we were planning to do, so really keen to hear your thoughts thank you!1 point
-
If using the radial duct system, the "design" is really easy. You just have to find a route to get ducts from all outlets and inlets back to plenum boxes then a large pipe from there to the mvhr unit. I found that easiest to work out on the hoof with a complete bare shell. then it was barely a days work to pull all the ducts through. I have worked on a building where they guys were trying to follow a detailed drawing that showed every single joint and bend overlaid onto the timber frame drawings, and in many places it was blindingly obvious there was an easier and simpler route to run the ducting.1 point
-
I just meant don't compromise your house for the sake of two similar houses, decide yours first which you seem to have done. If you want 1200sq feet, and you have permission for 3000 in 1 house, I would be looking to build a second house at 1800sq feet to maximise your retirement pot. Start there and see what the planners say. If you cannot get permission for two houses, build one sell it and buy yourself something the size you want with the profits is probably your second choice. There is probably a point where planning for two becomes so difficult, time consuming and costly that this might be the better option. As for planning - We bought one house to knock down and spoke to the planning department about replacing it with two. They were quite against this as it "changed the spacial aspect of the area" If you ask me you can only see this from Google Maps, but they were pretty firm on this. We ended up building one house the same size as the two houses mooted previously and they had no issue at all. Is there some kind of character appraisal for the area that deals with this kind of matter? Or is there some kind of greenbelt development guidance that he council uses? Often you can refer to this if it helps your case. I think the argument that two houses will make a greenbelt site seem more built up than one is not unreasonable and you need a way around this. Building a big extension or a big rebuild is still not two houses. My suggestion/question is could the site be split leaving the current building in place. If it can I would apply to split the plot and build a second house. If you get permission for that you can then apply to demolish and rebuild the original building. If this is possible it might be an easier route.1 point
-
IMHO silly idea how will you install cavity closers ? you will end up with lots of 400-500mm long bits, what you going to do with these. A lad near near me has just done a nudura house with literally no wastage ( I have tons of it ) his answer was to adjust all sizing to block sizes so in effect a window must be either 1-2-3-4-5-6 courses high so a lintel sits on a course, as well as the window cill height 1-2-3 blocks from the footing, doors set 1block up from the footing, its very doable, it just didn’t fit my design i should have laid another block all around my footing to save 2 days of cutting the icf to get the correct ffh but you could procrastinate about this for months. 1 course of extra blocks for me would have been about 160 blocks, so buy them and lay them would be £500 or you chop up some polystyrene for a couple of days unless you have costed this to the nearest grand I think it would be hard to pick between the two. Now my angry bit. How many icf houses have you been and viewed whilst being built ? how many pours have you been to and watched. I think the best way to get a grip of this is to get hands on and touch some blocks. I viewed 4 houses mid construction, and went to two pours. I then chose the product I liked it happened to be the dearest of all 3 quotes I got.1 point
-
I find the best method for me in a meeting is to sit right next to my wife at the hint that I’m about to start ranting she gives me a swift kick on the shin under the table. Regarding our planning consultant, I really wanted a cut n thrust go get them attitude but she used to stand very quite at the meetings, all I wanted was her to grab the council guy by the throat and start throttling but no she stood there in silence then 10 minutes from the end blurted out, so according to paragraph 5 of the town and planning act, bla bla bla bla bla, you don’t really have any reason to object she earned her £5,000 in under 10 minutes my plot of land and went up £500,000 over night if you confident go get em tiger.1 point
-
Interesting read from a former member: https://web.archive.org/web/20140702001732/http://www.ebuild.co.uk/blog/20/entry-184-part-1-in-the-beginning/ https://web.archive.org/web/20140701233548/http://www.ebuild.co.uk/blog/20/entry-185-part-2-the-planning-saga-episode-1/ https://web.archive.org/web/20150424213045/http://www.ebuild.co.uk/blog/20/entry-186-part-3-the-planning-saga-episode-2/1 point
-
You only need to demolish the existing bungalow to lock in the as-yet-not-applied-for consent for a replacement dwelling. Your planning consultant is best placed to deal with the application.1 point
-
There is an insulation compathat will cut and trim anything you want. Cant think who it is though.1 point
-
Semis do not have to be the same. You could build something big that could be subdivided by blocking up one or two doorways, to give 2 halves ( or a 2/3 and a 1/3) which are different and distinctive, and happen to align with a straight through division of the plot. And that when divided naturally give good privacy. The extra cost required would mainly be in thinking time, and you seem to have the skills and contacts to achieve it. The expensive things are bits like 2 potential sets of services etc. [Bonus comment: There are lots of creative divisions of old buildings into 2 or 3 - a modern version of that?) Ferdinand1 point
-
I totally see where you are coming from @Big Jimbo. Money can't buy you time with your family. That's why once I thought about it, I came down on simply decide what house you want for yourself. It seems like you can build whatever you want for your self and you may or may not be able to build another house too. Don't start from the position of wanting to build two similar houses as that may not be best for you. Best for you is living in a house that suits you, near to your family. So I would design that and if that allows for another house to be built then that's good, but I would make a decision for you and your family first and then see what possibilities you have after that.1 point
-
Can't be that difficult as I did all mine . I've got layout drawings you could use as a basis for yours if you want. I found the building regs. extraction rates too high and after the house was signed off I reduced them to PH levels. Again I've got my tables of PH ventilation rates if they would be of any use to you.1 point
-
The rates are in Part F, the section dealing with continuous mechanical ventilation. There's worked examples in there to help in Appendix C.1 point
-
I have a dedicated morticing machine that I only use rarely but when I do it’s a godsend, I find I use the pillar drill a lot more but I am living in the sticks and have to repair my own fleet of old bangers also doing my own house renovations and shed building all by myself so need a whole plethora of toys in the workshop...... well that’s what I tell people.......1 point
-
It's here: Heat loss calculator - Master.txt Download it, save it and then edit the file extension to change it from .txt to .xls (the forum doesn't like Excel files).1 point
-
The wife and I used a Geocel silicon eater years ago to remove the stuff around a bath. Small room, poor ventilation. Evil stuff. I got it in cut and it bled for days. The wife came on early I kid you not! Tried and failed to get the COSHH sheets for it.1 point
-
I think the main thing is to try and ensure that the path from the fresh air supply point to the stale air exit point in any room is as long as you can practically make it. It's often the case that rooms with a fresh air supply will have a stale air exit out through a door that has a gap underneath it for this purpose, so there may be a slight benefit in having a high fresh air terminal in the ceiling diagonally opposite the door, but I'm not convinced that having it in the ceiling is an essential requirement. I tried to position all the terminals in the house so that air would have the longest path to travel across a room, but didn't achieve this on our bedrooms, just because fitting ceiling terminals in the vaulted ceilings would have been a lot of faff, plus it would have significantly increased the length of the duct runs. In practice our low-level fresh air supplies in those rooms seem to work OK.1 point
-
All the stuff I've read about MVHR air movement suggests that the primary process is diffusion, not forced air movement as such. Diffusion will ensure that stuff like water vapour and CO2 will move naturally from areas of higher concentration to areas of lower concentration, so it probably doesn't matter too much where fresh air vents are. Extract vents are slightly different, as we usually want to ensure that water vapour is drawn out quickly, and water vapour is lighter than air, so will tend to rise to the top of rooms that have a high concentration of it (bathrooms, kitchens etc). For that reason I think that extract terminals are best placed high up.1 point
-
My floor-level vents are in the bedrooms, so they're outlets/supply. I've heard it suggested that a higher supply position helps ensure that the fresh air being introduced diffuses better, but I'm really not that fussed. I don't notice any difference in air quality in these rooms compared to others with ceiling-mounted outlets.1 point
-
This is all a bit creepy. I lurve the "don't worry, they are synthetic" disclaimer. I have another theory where the arm came from, but that is unmentionable on a family forum. F
 1 point
 -
You are missing the big difference. What you have @newhome is a timber frame where there are big structural timber members inside that gives the building it's strength. The fact your was supplied with the insulation in and the outsides closed in, does not stop it being a timber frame. A SIP panel has basically just sheets of something like OSB on both faces and insulation in the middle. There are no big structural timber frame members, the strength comes from the 2 skins bonded to the solid insulation.1 point
-
That is not a SIP. A SIP is just OSB/Insulation/OSB. They have connecting "spines" on them and they just push together like jigsaw pieces, no studs. The detail above to me looks like a fairly standard timber frame construction with foam injected between the studs rather than PIR foam cut and installed. A SIP is just a panel construction, these can just be bought as 8x4 panels and you can work them yourself to your build, or a SIP kit company will buy in SIPs and make them relevant to your build or indeed make the SIPs onsite themselves. You can make SIPS at home if you can be bothered.1 point
-
@Dreadnaught There's a discussion here about MVHR duct routing where I have shown pictures of low level supply ducting. Is it possible to have a small flat ceiling at the top of the vaulted ceiling to conceal the ducting. I have the extract vents high and supply vents both high and low.1 point
-
I just read the instructions you posted...properly! Makes sense. "When working on corners, first start with the vertical wall grout lines and let them bond. Then proceed to the floor grout starting out of the corners in both directions".1 point
-
Dad used to buy acetone by the gallon when he was doing fibreglass columns and specials. It was used to clean non-set (ie the raw material) resin off my school uniform when I brushed up against the wrong thing by mistake so I would test it before trying on stone resin, though should be OK but I would not leave it sitting on it for long. Steel should be fine unless it affects the coat. Might be sensible to wear surgical gloves, though I did not used to and I am still here. Very good accelerent for bonfires, as is set resin (but that puts out as much smoke as diesel iirc). ==> well-ventialed area. Evaporates quite quickly, so feels cold on your skin. It should remove supergue residue. F1 point
-
the difference is in the name. the idea is the same to deliver fully insulated panel system to site SIPS (structural insulated panels system) are skins (osb usually) bonded to foam core, like an ice cream sandwhich , that gives the structural strength to just slot together and thats your house, closed panel --again its in the name - -TF assembly -- but not built on site completed panels ,built in factory . full of insulation skin on both inside and outside and delivered to the site ready to slot together- could even be as big as half a wall in one piece or small as 8x4 --so no crane is needed1 point
-
As an aside I used isopropyl alcohol (IPA) to degrease the tiles, bath etc prior to applying the silicone. (Think in one of the videos they were using meths or acetone). Prior to this though it's real important to run your finger along and physically remove any lumps & bumps; tiny - snots of adhesive or grout, plaster etc or even a little smear of grout. It takes the tiniest bit to stop the tool as you slide it along. As it rides over the debris that reflects in the bead shape. A question; do I first do say the horizontal beads in the pockets, let them set THEN do the vertical beads so the wet vertical head sort of comes down over the horizontal one? Why hasn't @Construction Channel done a video on this yet? Too busy making newlywed, home movies I reckon!1 point
-
Still can't decide which system to use. Just fed up with all the "we're better, rebar/no rebar, no propping/shuttering needed, pir vs graphite, local support, and all the sales patter. What I'd like is guarantee in writing that they will send enough material , I wont have a blow out if layed correctly, they will hold my hand on the first and second pour, they will find me local tradesmen who have experience in the pumping, rendering and anything else that is specialised to the icf and not just give out some names that in reality when I speak to them they are either too expensive or not really convenient for my area. Like a holy grail that isn't to be found. I haven't got the luxury of using a contractor and so any mistakes in time or materials is going to cost me.1 point
-
I doubt the chap @vivienz and I have in common had more than 4k off me for a 2 team labour, to level and blind approx 180 Sqm, and lay approx 70m of drainage inc 2 IC’s and 5cu of crates. I’m guessing at materials here, around 2k, I paid for direct. @vivienz at £11k I can see why you are questioning!1 point
-
On a Wren ( aka wretched ) kitchen, I chopped the base décor ends, as you say to get the extra free mileage, and added around a half dozen additional décor end details to the customers delight. When I asked Wren to accept returns for the 11 various wall and base décor ends that were surplus AFTER the extra details were executed, they got their "lead designer" ( guy was a total penis ) to ring me to tell me I hadn't followed the plan properly and they should all have been utilised. I had a 'quiet word' with him and they were picked up around a month later, as they don't let you return direct to store. It was during the 'quiet word' that I mentioned that the "lead designer" ( 11 years experience mind you...……….) had purposefully omitted the customer's washing machine from the kitchen plan. When I asked where it was going he said "in the utility room, out of the way"......to which I replied "you've been here 3 times for a survey. WHAT UTILITY ROOM ?!?" as the customer didn't have one . Dickhead. Great trick with expensive kitchens, and can be an easy way to half the cost of décor ends ( which are usually massively overpriced for what they are ). Another trick is to work out if you have any shadow gaps to make up at the ends of the runs and to slice that out of the middle of a décor end panel during the 'halving'. Then spend the saved money on beer. Cheers!1 point
-
"Mrs Patterson, you cheeky girl!"
 1 point
 -
Just remember nobody likes a smart arse! ? Seriously though a massive thanks for pointing me at the Fugi kit!1 point
-
"Des never regretted that £2K on the second hand digger!" ?1 point
-
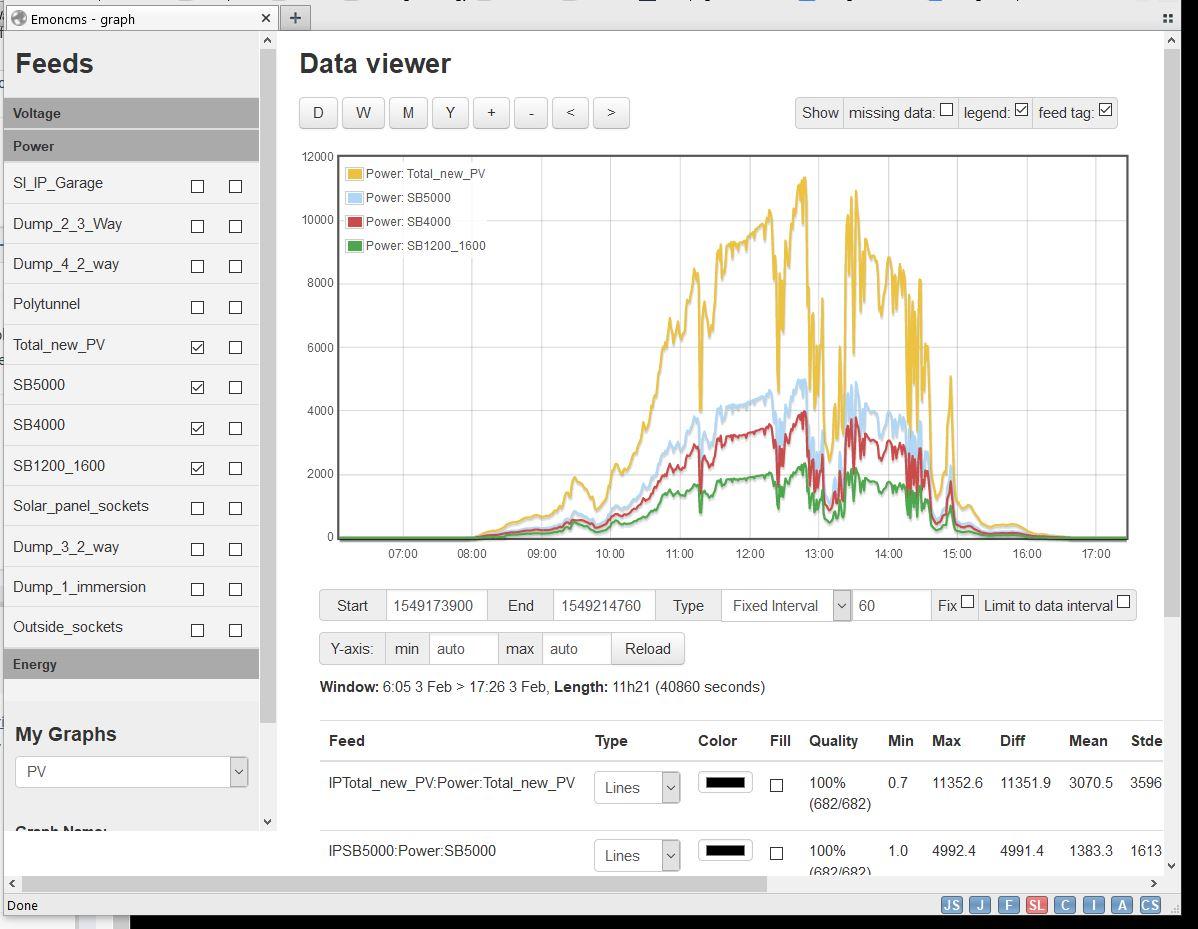
A bit OTT, but the Iotawatt (https://iotawatt.com/) sold in the UK by https://openenergymonitor.com/iotawatt-wifi-connected-14-channel-electricity-monitor/ is a very versatile multichannel monitoring device. It's ready built, uses clip on CTs and is fairly simple to set up. Stores data locally with its own web server but can export data to the Open Energy Monitor server (or a lcoal version), PVOutput.org or InfluxDB. It's a bit expensive, but much more useful than the commonly available simple versions while still being fairly easy to install.
 1 point
 -
Youtube video of using the fugi tool1 point
-
An acquaintance has asked me to put a question to the hive mind on his behalf. He has an old house in Bath in which he is planning to replace the windows thies year. He intends to replace like for like on the aluminium frames but is unsure of the pros and cons of the various glass types and brands available, for example, is Saint Gobain glass better than Pilkington, etc. Ideally, he would like some solar shading but without an obvious tint as this woukd look too different next to the windows that aren't being replaced. I will get some more detailed information tomorrow as to his objectives. Thanks, all.1 point
-
Giving this a little bump as my acquaintance has come back with a very detailed summary of his query regarding the properties of different products for his replacement windows. Hello Vivien Thanks for your, and others (the "hive mind"), interest and assistance. I hope that I can summarise the context and our objectives sufficiently succinctly. Our house started off as a low-efficiency 1950s concrete block cavity wall ('reconstructed' Bath stone) horror, with Crittall windows, but over the past 30 years we have increased the energy efficiency considerably. So each small improvement does make a noticeable difference. Back in the late 1980s we installed thermal-break aluminium double-glazing from Smart Systems, using a Bristol installer. The windows were fairly cutting edge at the time, with 28mm glazing, and the fairly narrow aluminium section kept the look of the original Crittall windows fairly well. Smart Systems have grown over the years and we used their current windows when we altered our kitchen 5 years ago. Now, as the 30 year old windows are in generally poor condition, we plan to replace all the other windows with Smart Systems current Alitherm 300 system, with 28mm argon-filled DG units. The question then arises as to whether we should go a step beyond standard DG units, at least in some of the windows? Our primary and possibly sole objective is to improve insulation, as we are replacing relatively large windows in both our dining room and lounge. A secondary objective, if achievable, would be to reduce solar gain in our front-facing bedrooms, which catch the full afternoon and evening sun during the summer and can reach around 27 degrees C during the evening. However we do not want glass which is, or appears to be, tinted or reflective compared with standard glass. Our proposed window installer is currently suggesting that we use "Planitherm" glass (from Saint-Gobain, www.planitherm.com) for additional insulation in the dining room and lounge windows, and we have not yet discussed the bedrooms. Attached is a photo of the west-facing corner of the house taken at 3.50pm today (equivalent to 2.50pm in the summer), and the sun can clearly be seen shining onto both the south-west and north-west side and front elevations. It is perhaps surprising how much sun in fact falls on the front north-west facing elevation even at this time of the year, and during the summer it has sun from around 2pm until sunset. The large window in the photo is the main dining room window, 2.45m wide by 1.8m tall, the sliding doors on the right of the dining room will be replaced by fixed windows as we never use the doors, and the front-facing end of the lounge can be seen to the left of the photo. The main bedroom window is above the main window of the dining room. I'd be very interested to hear if anyone has any experience of or comments about Planitherm 'Energy Standard' or similar products, which I assume are coated on the inward facing face of the inner pane to reflect heat back into the rooms. Do they noticeably decrease heat loss? Is, for example, the benefit of using a glass which is coated to retain heat within the rooms negated or outweighed by the solar gain within sun-facing rooms on sunny summer days? We could perhaps use Planitherm in just the lounge windows, as one end is rear-facing anyway and the front-facing end (in the photo) is the least affected by summer sun. And do any of these products look tinted or reflective, not least because we regularly have birds fly into our windows and any additional reflection of the surroundings would presumably make this worse. We would be very grateful for any feedback.
 1 point
 -
I think the shape of the Fugi one with the chamfered back that is what makes it relatively easy to use.1 point
-
These are what I have. Even these in the hands of someone competent should do the job I'm sure. As soon as the grey is dry I'll rip it out and try again taking on board all the above.1 point
-
Giving up with worrying over what it looks like. Day hasn't been a complete waste of time and mastic. I now know I can't tile OR silicone!1 point
-
What type of gun have you got? Looks like you've been pumping a lot which would suggest a cheap one to me. Try moving faster ( I know it's easy for me to say) but it will leave you with less ripples amd generally give you less excess to deal with. Mastiking is a bitch at the best of times ( behind taps are the worst). You need to work quick and tool it as soon as possible. Try again but maybe start on a nice short straight run, not around a curved toilet ?1 point
-
im build one hes doing the other, yes two seperate vat reclaims we will be doing, and both building at the same time1 point
-
Hello all - update on this issue. I tried the no gun silicones and I was hopeless I got it everywhere and it still leaked. Found a local tradesperson to come and redo (cost of £80) they came they did, it leaked, they came back did again, leaked again, ditto for 3rd time. I have spent hours trying to scrape off all the many layers of silicone that have now built up so I can get it back to bare bones and start again. I have been using WD40 to soften it before scraping, its taken hours over last 2 days but I am on the home stretch now. Question is do I try again myself and risk making a big mess again and have to go through the cleaning off process again, get the £80 lot back for a 4th time or try and find someone new to come and start from the cleaned area. How something so small can cause such major headaches is a lesson.0 points


.jpg.c21f3ac78c9b7efd90cbdcb312744dc5.thumb.jpg.7adcad4c0e384f5ecd7d56b0618df6e5.jpg)