


GlanMenai
-
Posts
17 -
Joined
-
Last visited
GlanMenai's Achievements
Member (3/5)
0
Reputation
-
Hello, I'm just about to install the impey wetguard membrane over our impey linear shower tray, but I'm not sure how to install it over the little lip/shoulder that's on the side of the tray? I've watched countless installation videos on the subject but non of them installs the membrane over the linear dec (usually on the death star one). Has anyone got any advice on how to take into account that little lip/shoulder? Do I push the membrane onto the lip and form the two 90 degrees up from the shower tray and then 90 degrees out again to the floor level over a few mm to get it tight in there? Thanks!
-
Filling in 'gaps' where 'overlay panels' didn't fill?
GlanMenai replied to GlanMenai's topic in Underfloor Heating
Hey @PeterW Thanks for that, do you think expanding foam will be 'strong' enough? I know the engineered wood will clip into each other (t&g) to make the mass one, but I'd just be worried that the expanding foam will be like a sponge, and compress in on itself if there's weight on it? Thanks! -
Filling in 'gaps' where 'overlay panels' didn't fill?
GlanMenai posted a topic in Underfloor Heating
Hello! I'm looking for some advice; we've recently installed the 'Loflo Lite Overlay panels' on top of 22mm P5 chipboard throughout the house. Here and there, we couldn't get the boards to fill exactly the full width of the rooms, as it's an old house nothing is square, and so there's some slithers here and there that we can't get the panels onto. We plan on putting an overlay and then some engineered wood directly on top of these panels, but, I would love some advice on what we could use to fill in the gaps that the panels couldn't get to, as we don't want the floorboards to be sitting on top of 'nothing'. I read that we could use adhesive foam while laying the floor boards, or maybe some self levelling that would allow 20mm thickness - but, how can I get the self leveler onto the P5 chipboard? Would I have to prime the boards first if that was the best solution? Has anyone got any experience with this, and can offer any alternative advice on what we could maybe use to fill in these 'holes'? Many thanks! -
NEST for the bathroom (zone) to control UFH?
GlanMenai replied to GlanMenai's topic in Underfloor Heating
Hey! Sorry @PeterW I completely missed your reply! So, if the NEST is in 'zone 3' of the bathroom, completely the opposite wall of the shower/bath/basin, then it could be ok? I still haven't found a solution for this, and just started researching again. If you've got any further info on this, I'd love to hear more. Many thanks! -
UFH - Why is Plywood needed & Transition
GlanMenai replied to GlanMenai's topic in Underfloor Heating
Hey there @Temp! Thank you for your reply, that makes perfect sense, so it's just to make the floor under the tiles a bit more rigid, to avoid flexing & cracking on the grout/tiles. What would the cheaper board of the same thickness be in this case you think? I'll have a chat with the guys at the local merchant to see if there's something that I can use for the rest. We have 120mm insulation between the joists, so hopefully that'll be ok! Thanks Temp, appreciate the help. -
Hello! Can anyone with a bit more knowledge than me guide me on this? We have a room that will be half tiled, and half floating floor - we are planning on having (water) UFH installed by using those panels that have the pre-channeled grooves into them for the pipes (similar to LoFlo Lite) Currently we have 22mm P5 Chipboard down, across the whole floor. My understanding is that, as per the instructions, if anywhere is to have tiles on top of the UFH, then those boards need to be structurally secured to the ground - as the above .pdf states: The P5 Chipboard won't take any adhesive, and so I imagine that's why the plywood needs to be laid down, so we can glue and screw the UFH panels down. I have two questions: 1. What I don't fully understand is why do we need to secure the UFH Panels down for the tiled area? What difference does it make if we don't? Is it to stop movement/cracking in the tiles? 2. How do I deal with the step from plywood to non plywood area? This transition will be in the same room (it's on open kitchen to living room) and the other side of the room will be a floating floor. I'm just trying to save some money by not having the whole area needing plywood. So if anyone can explain to me why the need of the Ply is there, that would be ace, and if there is any way of doing this with a transition between the two areas? Many thanks!
-
'False ceiling' at roof apex/ridge for ventilation?
GlanMenai replied to GlanMenai's topic in Heat Insulation
Hello! Thanks everyone for the replies so far - and I'll just go into a bit more details onto what I'm dealing with. As @Redbeard commented, we do indeed have a ridge-board in a typical Victorian terrace roof (approx 125 x 25) with x2 Purlins either side of the roof - for a bit more clarity I've attached a photo looking down the length of the room. So it sound like I should put a small dropped ceiling in there, just to allow a little bit of air to go from one side to the other - and stop my insulation at the height of the false ceiling, to allow for air to travel from one side to the other freely - and not insulate all the way to the ridge board. Does anyone have any info on how much of a dropped ceiling to put in there? I plan on insulating under the rafters (as well as my current in-between) in here too. Any further help would be amazing. Thanks everyone.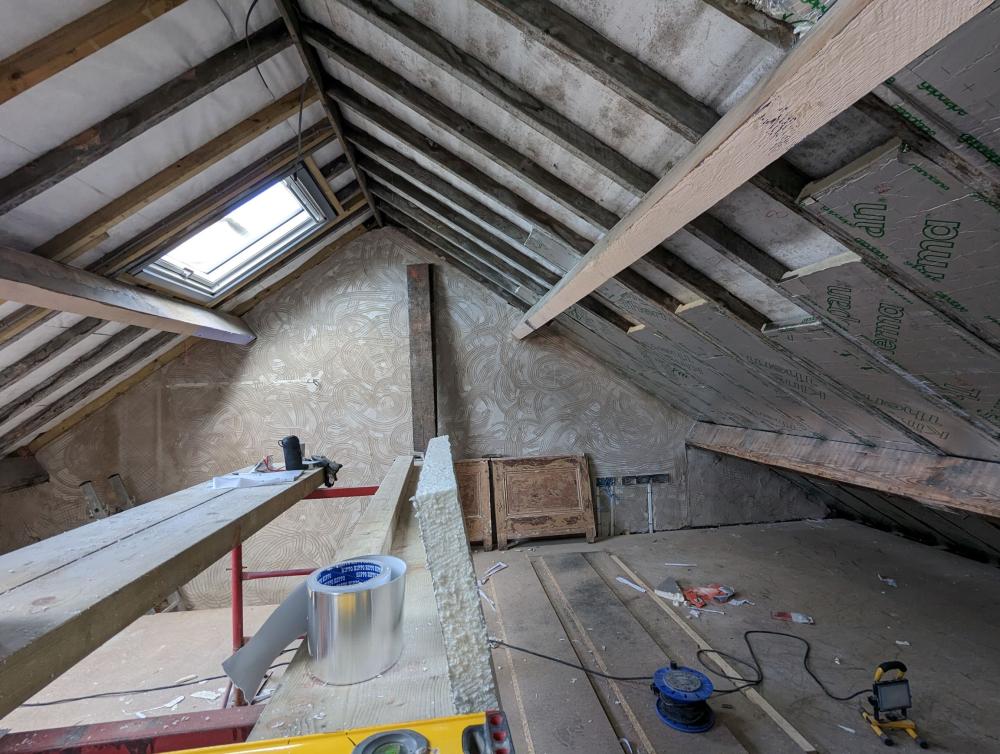
-
Hello everyone, Could someone guide me; I'm currently insulation our roof with a PIR, inbetween the rafters, and I'm just wondering what happens at the apex of the roof, or the ridge line? I've been searching it today, but haven't found much info. Our pitched roof has: - slates - counter batters - Tyvek breathable membrane - rafters when it comes to the ridge, we haven't got a 'false ceiling' or any horizontal rafters connecting one side of the roof to the other, everything just meets at the apex. My question is, should I add horizontal rafters to create that 'A' shape at the very top of the ridge so that one side of the roof ventilates over to the other side of the roof - or is it enough that it ventilates up through the Tyvek and the ridge tiles? I found a couple of links that shows the 'A' frame shape at the apex. Ours looks identical to the rood in the first link, but without that horizontal rafter. https://idostuff.co.uk/blogs/2013/attic-roof-insulation-and-plaster-boarding/ https://nottenergy.com/lets-go-eco/mini-guides/room-in-roof-insulation/ If I do need those horizontal beams, how much space do they need to down from the apex? I know I need to leave a 50mm gap under the Tyvek when I'm insulating, is it the same up there? Many thanks.
-
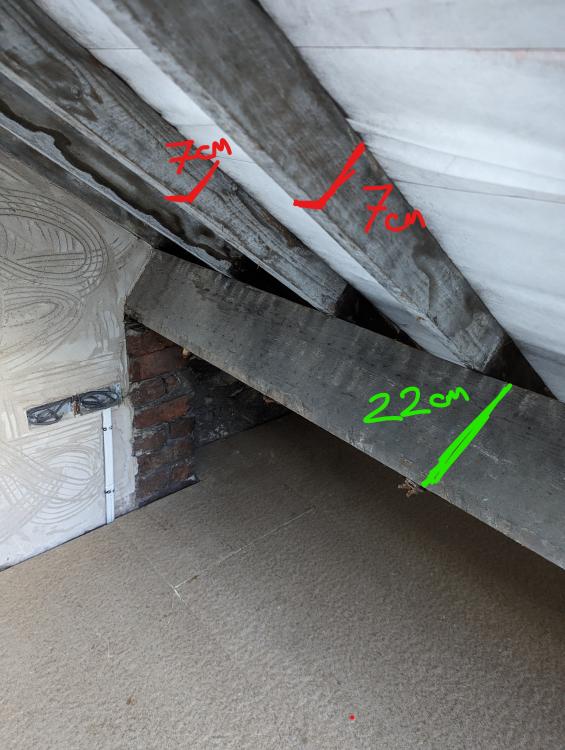
Hi everyone! Could I get some advise on our pitched roof, and how to effectively insulate it? The space under the roof will be an office that will have heating. My main concern is keeping the space as cool as it can in summer, while keeping the heat in, in Winter. It's a old Victorian house, that has currently has (listing from outside-in): slate, tile baton and then a Tyvek breather membrane that's nailed onto the rafters. The issue lies with the fact that my rafters are only 7cm deep, which then sit on the purlin, which is 22cm deep (see attached pic). What I'm thinking, is, from the Tyvek in; Tyvek breather membrane 50mm ventilating air gap Multifoil Insulation (SF19 or SF40) - stapled on to the INNER side of the rafters, going into the recess to let it expand, and installed in continuous layer Timber counter batten (air gap) 200mm PIR boards - installed as complete sheets, onto the counter battens Timber counter batten (air gap) Wood Wool board (25mm) (we're using lime for plastering so this is used throughout the house) Hemp lime render Does this sound ok? What I'm trying to deal with is the small rafters, and if I go about installing the multifoil in-between that space, then it leaves me free to install the PIR board as complete boards, and not having to cut anything down, which I imagine will help with insulating? The Multifoil I've read will help a lot with keeping the space cool in summer, as it will reflect the sun/heat from the slates, which sounds perfect to me. I'm no too bothered about keeping the purlin visible, is we desire 'that look' when we come to decorating, we could always put a fake plant-on or something to get that 'feel'. Does anyone have any advice on this? Many thanks!
-
Hello, I'm just starting to think about how to insulate between floors, inside the joists at our property we're renovating. The issue I have is that there's electricity cables running along the inner face of some joists, and at other spots there are electricity cables running through the center of the joists. As I understand, the cables need an air gap around them to perform without overheating - how do people go about insulating in-between the joists if there are cables running along them? In some places, as the cables are spread out and tacked onto the joists, they take about 3/4 of the height of the joist. For the cables that's going through the center of the joists, I imagine I can just put a conduit around these? Some plastic waste pipe of something? Do people build like a 'false wall' around the cables on the side of the joist, and then insulate from there to the next joist? Or does something like 'Therma Fleece' or 'Rockwool' work ok around cables as it's technically got air pockets in it? One option would of course to insulate with PIR or something underneath the joists, but that brings down the ceiling height, which I'm trying to avoid. Has anyone got any information on this? Thanks!
-
Hello! We are planning on using the NEST system for the entire house that we're currently renovating. Could I please get some advice on what people these days are using for bathrooms? We've just installed water based underfloor-heating into the bathroom (and including the whole floor level), so this bathroom will be its own 'zone', separate from the other rooms that's on this floor level. The hot-water cylinder isn't in the bathroom, it's in a separate 'utility' room at the other end of the house. As I understand that the NEST cannot be installed in the UK bathroom, do to our electrical laws etc. I also understand that the Nest Temperature Sensor isn't available for us here in the UK, so having an wireless sensor isn't an option either? The installers have created a 'channel' where an external thermostat/probe can be installed if needed, but I don't quite know what my options are here in the UK to install the NEST to control a bathroom from outside the room? Has anyone got any recommendations at all on how I can use a NEST to control a bathroom, and to be used from outside of the actual room? Many thanks!
-
Insulating between bay windows, behind stone mullions?
GlanMenai replied to GlanMenai's topic in Heat Insulation
Ahhh, I see what you mean - if kept compressed then it's not going to perform as it should. Fortunately, I think there will be plenty of space for it to expand to its final form - 'crammed' might have been the wrong word to use in my post, but I think it should be ok. And thanks again for the acoustic note, I'll try and get a combo of both foil and wool in there to dampen then outdoor noises. -
Insulating between bay windows, behind stone mullions?
GlanMenai replied to GlanMenai's topic in Heat Insulation
But doesn't the product already come like that? The Multi-layer Foil Insulation SF19+ by SuperFOIL for example? I've got a sample pack from them and it has multi-layers that has air pockets? -
Insulating between bay windows, behind stone mullions?
GlanMenai replied to GlanMenai's topic in Heat Insulation
Hey - thanks for that NSS - that's great, I can make sure that there's some air pocket between the SuperFoil and the stone mullions, and thanks for the heads up regarding the sound insulation. I can maybe combine the Foil with some Mineral Wool to stop that maybe? -
Insulating between bay windows, behind stone mullions?
GlanMenai replied to GlanMenai's topic in Heat Insulation
Just incase this is useful for anyone else, I decided to go with some SuperFOIL multifoil, as it seems I can do everything from; cutting it down, staple it to the window boxes, and stuff it into crevasses with ease - and I can even double it up if I've got leftovers.

