Search the Community
Showing results for tags 'damp'.
-
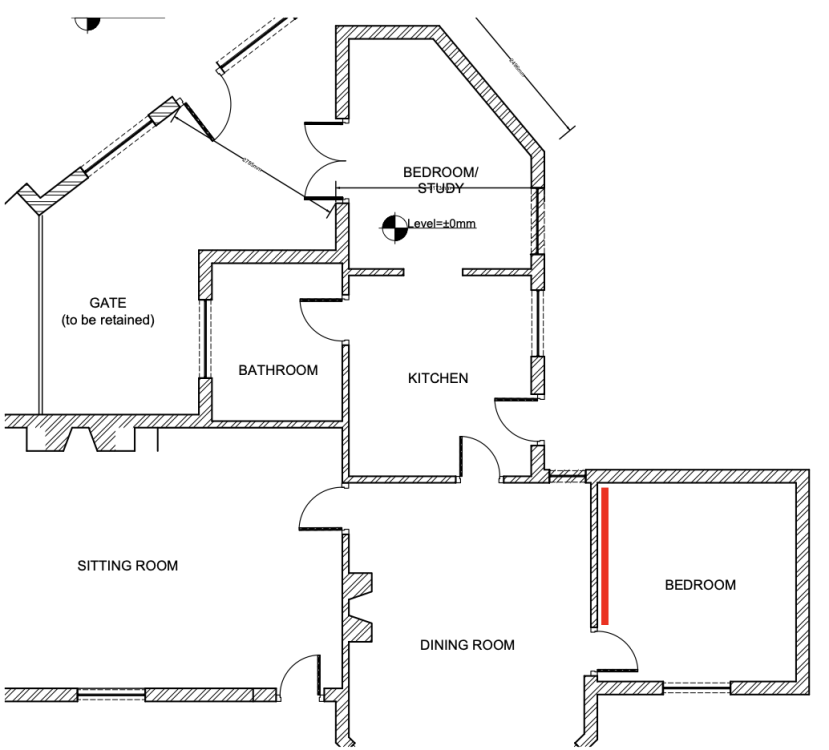
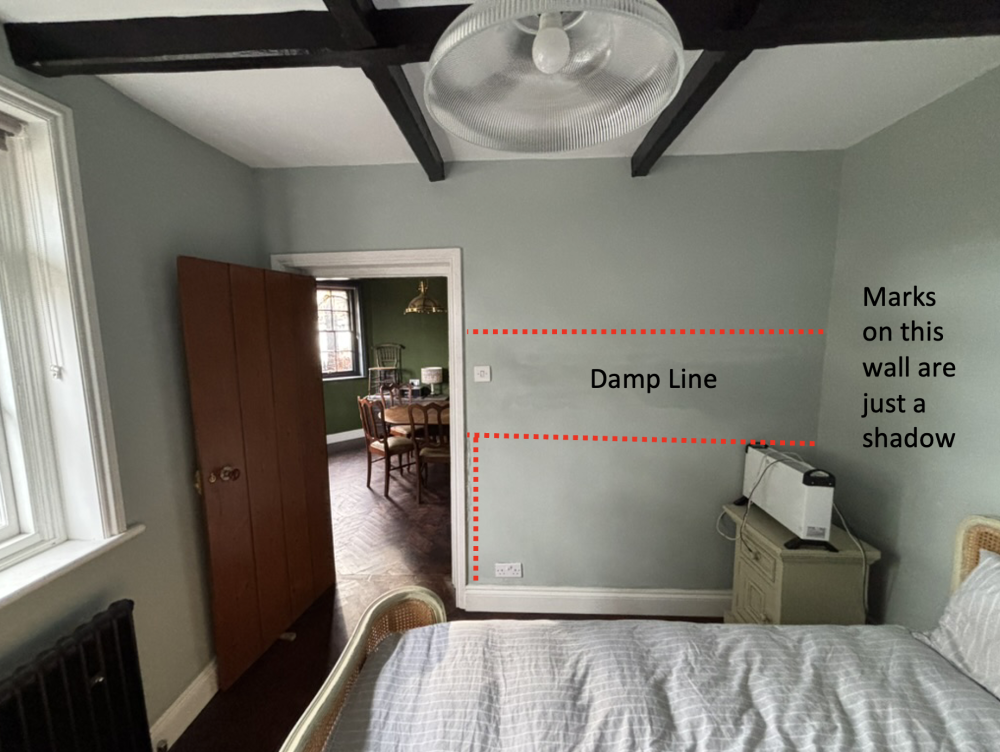
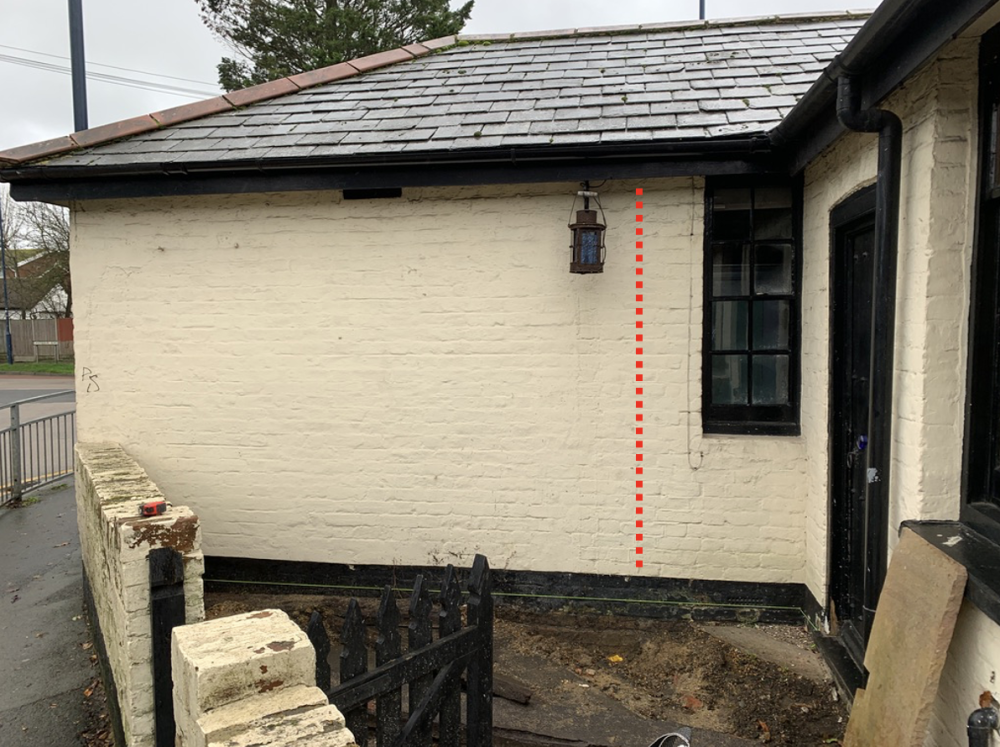
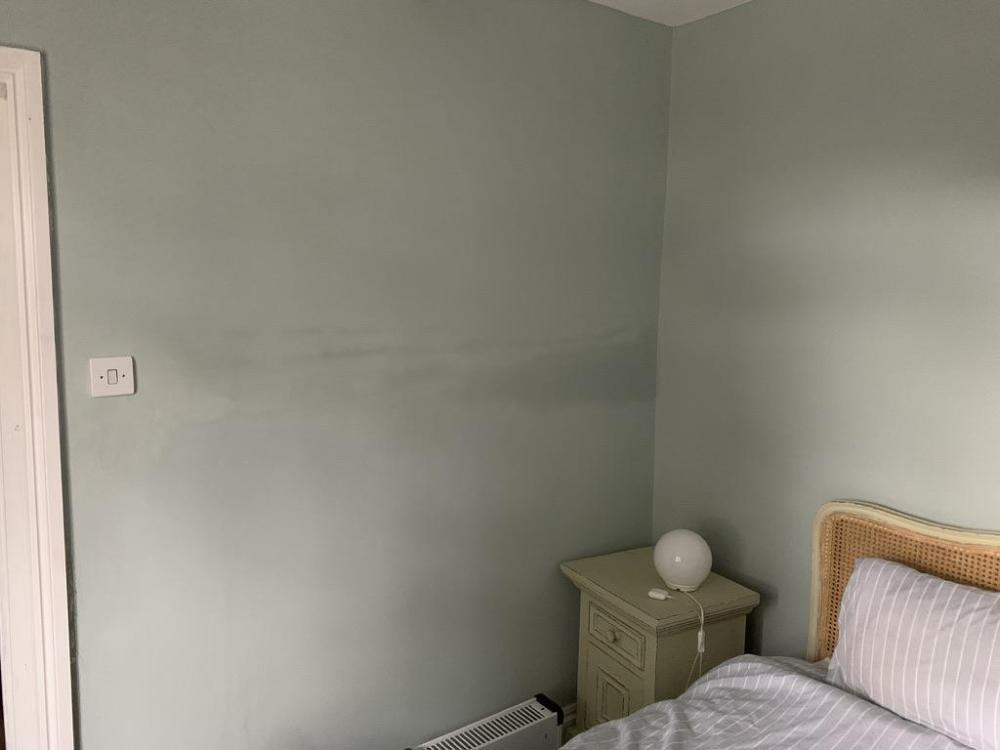
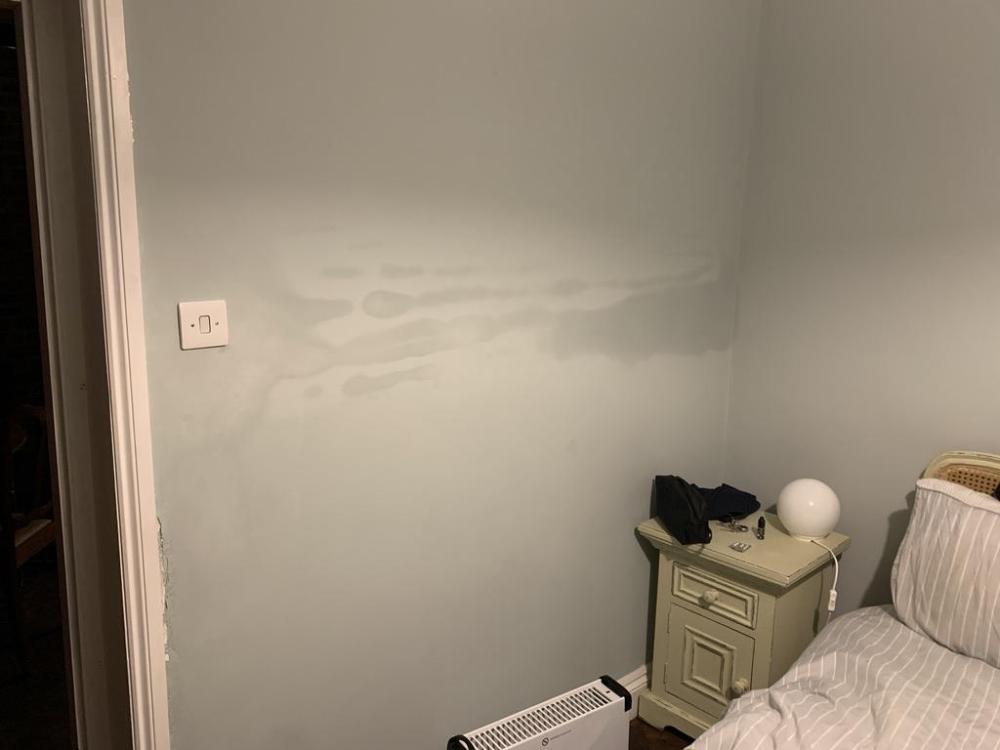
I've been slowly renovating an old 1800s listed building which was suffering from a lot of damp. I've managed to combat a lot of the damp in the house by installing French drains, fixing gutters, reverting to Lime plaster but there's one room which is completely throwing me and not sure how to move forward. There is a damp line running along the centre of the bedroom wall which is an internal wall running at right angles to the exterior wall. Floor plan of the house showing the damp wall And a picture of the exterior wall with the position of the internal wall It's not rising damp because it's in the middle of the wall and exterior ground levels are low. Gutters have been checked. Loft area above is dry with no leaks. Weather seems to make no difference. It's there when it's sunny and dry outside as well as when raining. Any ideas what investigation I should do next?
-
Hi Everyone, we are trying to resolve some damp/efflorescence issues with our 1860’s property. we are getting high damp readings and efflorescence on our external road facing wall, I think the problems stem from the fact that the council put in a small pathway abutting the external wall and laid asphalt between the house and kerb, this has raised the level against the wall and is causing water to sit in the gap between the asphalt and brickwork resulting in the wall being constantly wet. we also have an enclosed gulley that may be adding to the problems. What would be the best solution for this, I imagine cutting a drainage gulley in front of the brickwork? But guess this would have to be a gravel soakaway? As the air brick surrounds would block a dedicated drainage channel? I would also like to remove the enclosed gulley and replace it with an open one that is easier to check for blockages/clean, is this a viable idea? I also think that we have some concrete pointing in the brickwork, would it be worth the time/money to get this removed and repointed? Thanks a lot for any feedback/advice!
- 12 replies
-
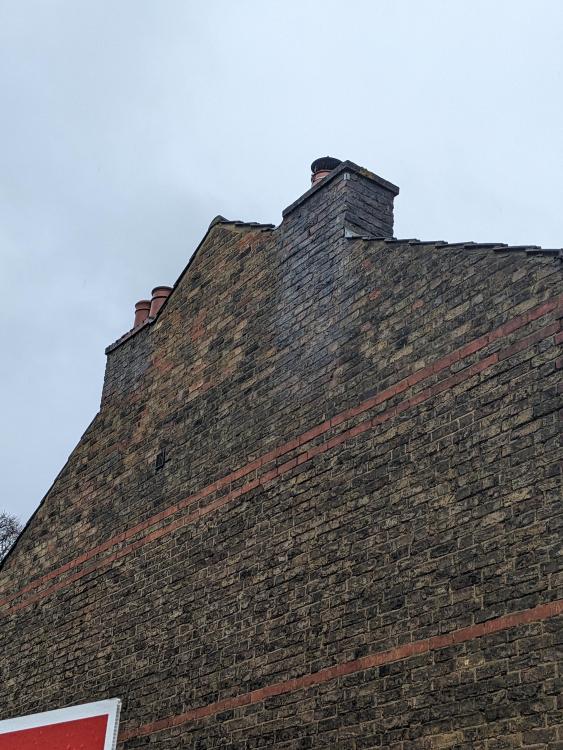
Hello, I am seeking advise regarding a house we just purchased. From the survey we knew that the chimney breasts in the loft have high damp readings and in the ground floor as well, but lower. Suggestions were that it may be caused by failed flashings or the lack of rain caps(although they only lack on one side but both are damp). I however took this picture in the rain and the chimneys look a lot damper than the rest of the wall. It looks like the pitch is draining into that side. I also think that at places the pointing has failed. Could it be penetrating damp because of the pointing? Can something be done so the water doesn't run that way? Thanks
-
- repointing wall
- damp
-
(and 1 more)
Tagged with:
-
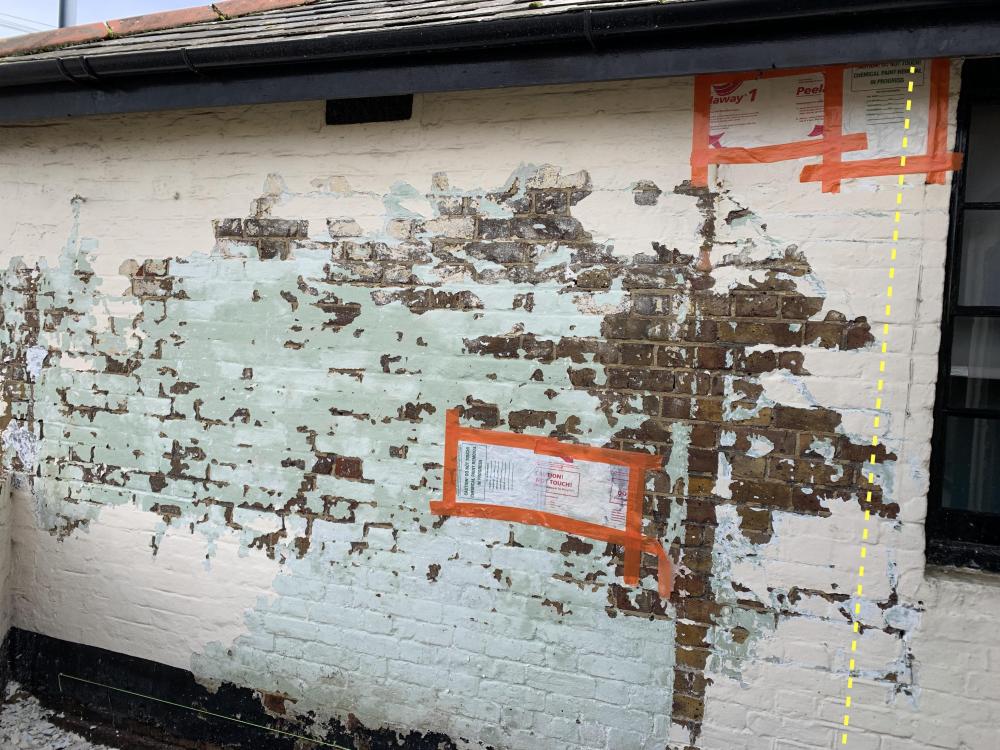
I have an internal wall with damp along the middle and I just can't figure out what is causing it. The wall is at right angles to this exterior wall where the dotted yellow line is. I'm 100% sure there are no pipes behind or within this wall. It had some thick plasticy wallpaper covering which has since been removed and has been replastered and decorated. I've checked in the loft and there is no sign of roof leaks and the top of the wall is dry. The opposite side of this wall is bone dry Things I have tried and the reasoning: Ground levels outside were too high and have now been excavated to well below DPC (If ground levels were too high I would expect the bottom of the wall to be damp, not this middle section) Removal of thick plasticy exterior masonry paint. This has been done over the last week or so in preperation for repainting the exterior (using hydrophobic yet breathable Emperor Masonry Paint). My thoughts are that water may have been penetrating the old masonry paint and getting stuck behind Gutters cleaned and checked for alignment ~2 months ago Is there anything else you think I should try or to investigate people can think of? This is an old building so tanking or "modern" techniques like injection are frowned upon by the conservation officer. They also seem to be concentrated on DPC issues which I don't think is the issue given the position of the damp
-
For reasons you can read about in the nightmare I reported here, the rear wall of our rear extension that went up 2.5 years ago is very damp and it's likely that the mineral wool fibre that was used to insulate the cavity is also wet. I am considering my options as to how to fix this aspect of the damage (after I have found a solution to fix the parapet wall issue described in the other thread). In an ideal world, the existing insulation just dries out and we can leave it there. But it's not clear to me that is very likely to happen very quickly / at all. It may therefore be the case that we have to open up the cavity by removing every other brick in a row or two, and then pull out the wool fibre. I will check with my main contractor, but from recollection, the wool fibre we used was amongst the cheaper products that pass building control, so it is not rigid and should come out easily. This would then allow us to either inject foam or bead insulation (in fact bead insulation can be injected through a small hole of only 22mm diameter). I'm thinking of something like the bead insulation described here. The majority of the wall is actually glazed, so the cavities are actually quite small: a triangle above our sliding doors which is about 5m wide by 1.3m high (at the apex of the triangle); and another triangle above our window which is about 3m wide by 1m high (at the highest part of the triangle). The problem is that the wall will be wet still. It is sealed from the outside (except at the parapet above, where the seal is crap and split/missing in various places) with a brick and mortar sealant and that is likely to impede its ability to dry quickly. So is there an injectable (or pourable) cavity insulation material that performs well in a damp wall and might even assist with drying it out? Sounds like wishful thinking, but I'm hoping some clever company has invented something. The only alternative I can think of is to remove the wet insulation, then try to run some dehumidifying ventilation into the cavity, or remove the wet insulation and live with no insulation until it is dry. Just wondering if anyone has any experience, albeit more likely upgrading a much older wall, not one that was built so recently.
- 44 replies
-
- damp
- cavity wall
-
(and 1 more)
Tagged with:
-
Hi all, the damp is on an exterior wall garage / extension. There was previous water damage from a leaking roof. The roof has been replaced, drainage sorted but 2 months after the plaster has been put on we are getting signs of water through again. The moisture meter says 75 but we are using a de-humidifer and that has reduced it to 62 within 4 hours. We had a damp report done back in March and that did not identify any signs of rising damp on the property but now are unsure about what to do next.
-
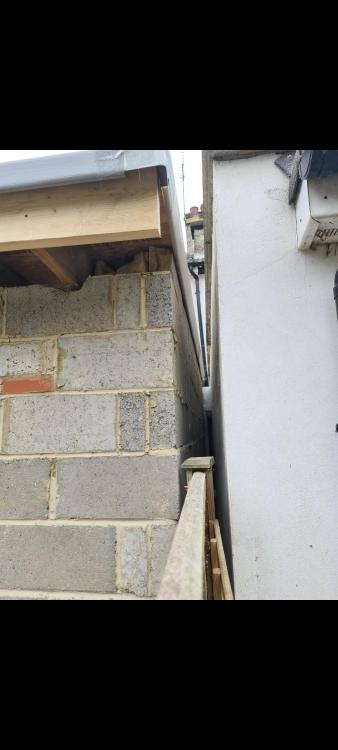
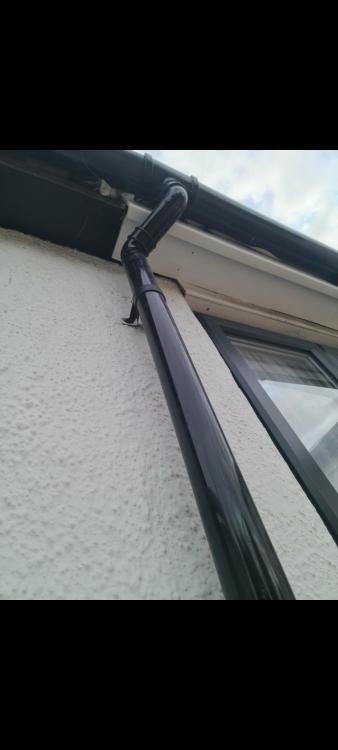
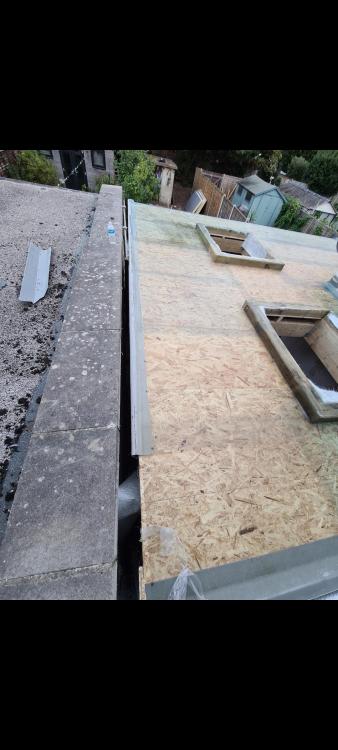
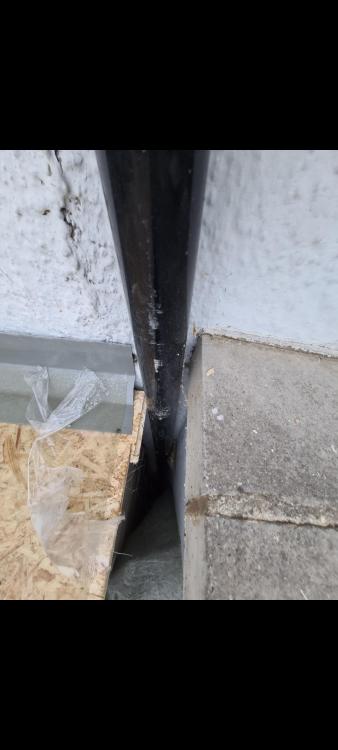
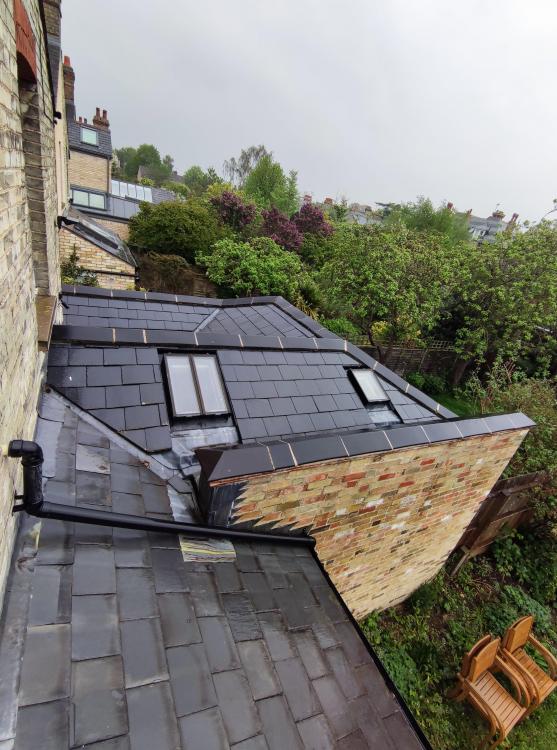
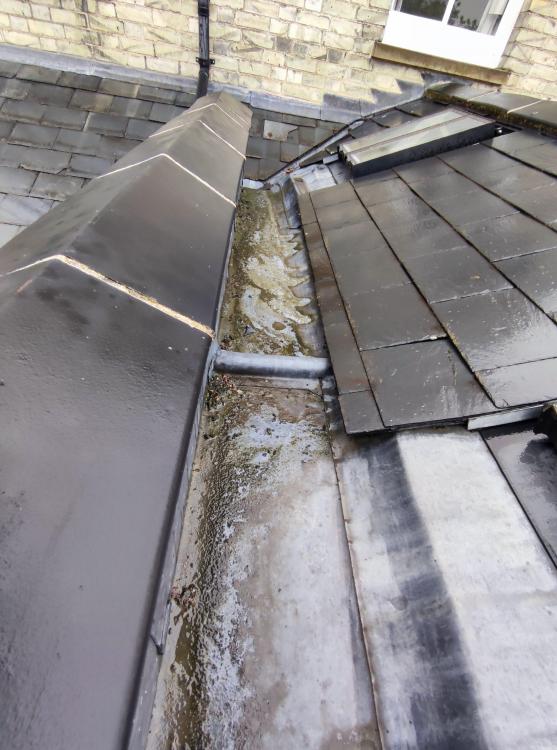
Hi Just wanted a few opinions on next doors building works. Our neighbours are having a ground floor rear extension built on their property. It is the same length and height as our existing extension. Their builders have built the walls and put the roof on quite quickly. They erected a wall 6 inches from our party wall but left the roof guttering down pipe in its original position, running down between the 2 walls, presumably into the original drain. See photos. This drain is now totally inaccessible so if it were to get blocked we couldn't get to it to unblock it. I'm hoping that they have thought of this and have a solution. I have asked them but they claim not to understand English. Can any experienced builders or roofers suggest what next doors plans for this trapped drainpipe and inaccessible drain might be? Many thanks David Field
- 6 replies
-
- extension
- drain pipe
- (and 10 more)
-
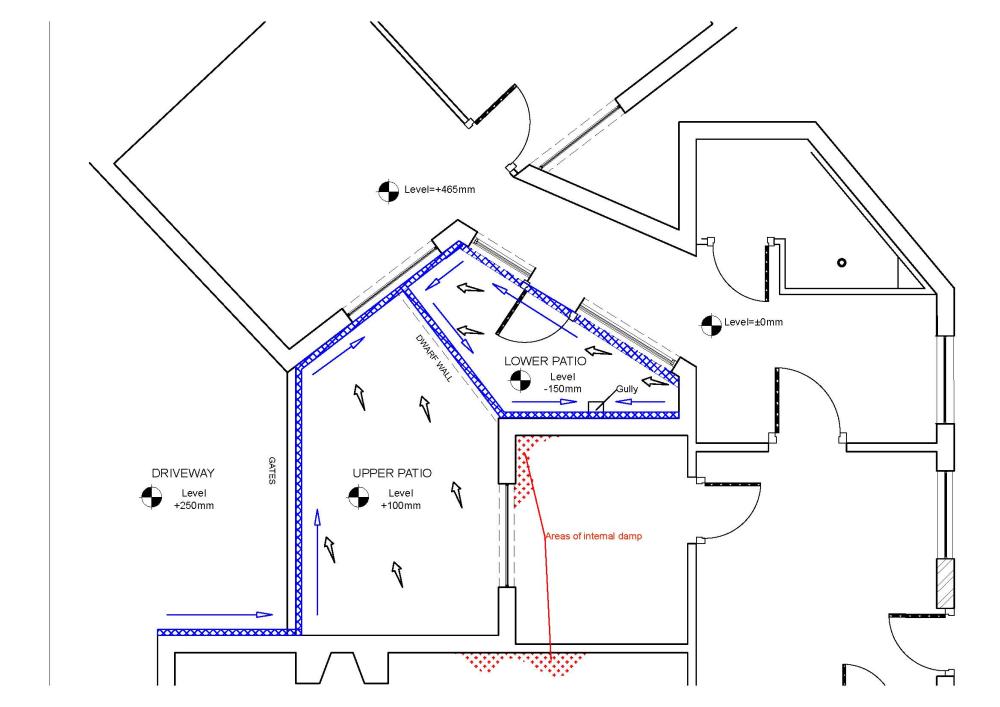
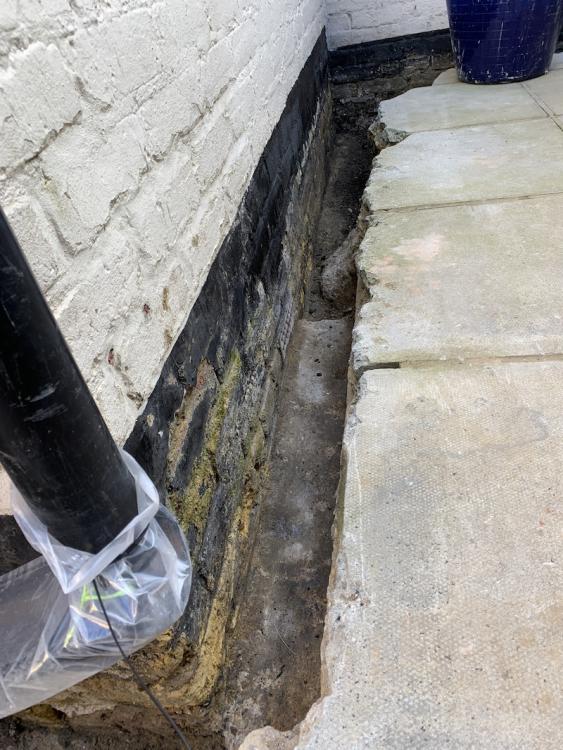
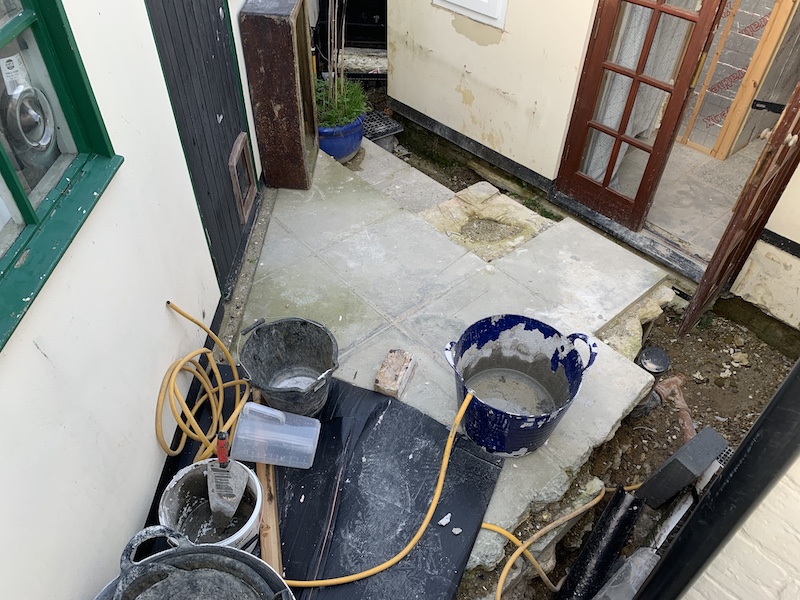
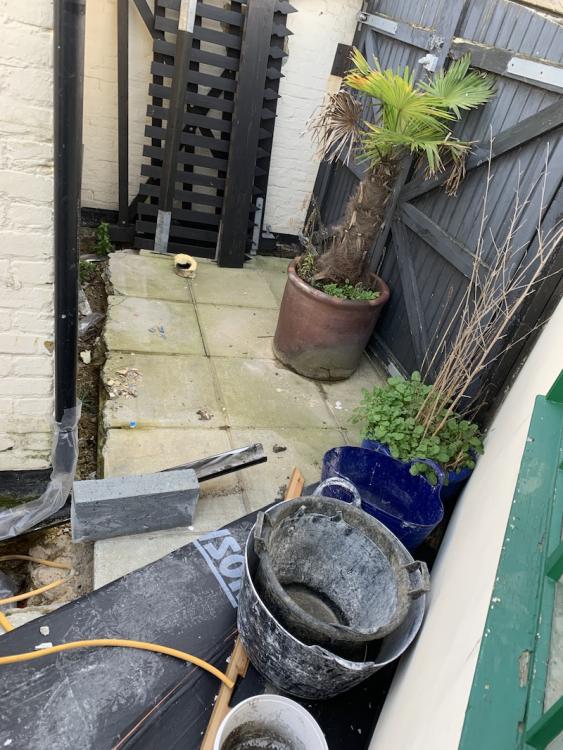
We're in the process of planning an extension and part of the building works will be to sort out some landscaping issues as well as some internal damp problems caused by high exterior ground levels. The site is complicated, overall it slopes quite a lot and the detached garage is 465mm above the house. We are trying to achieve: Lower the patio ground levels. I've dug a trial trench around the property and the internal damp now seems to be under control Have a multi level patio as the whole site slopes downwards but we want the areas to be usable for a seating area Finished surface to be yorkstone pavers which will finish a minimum of 150mm below DPC and floor levels All existing rainwater connects to combined waste and BCO has agreed that future rainwater can also join to this as there is no place for a soakaway or any other alternative The building is grade II listed and they are very fussy about changing anything in the existing structure but have agreed to allow channel or french drainage Drainage will most likely be ACO Hexdrain Current plan is the below which looks complicated but makes every effort to move the water away from the old damp house towards the garage which is much (465mm) higher so will be way below DPC. Some pictures to show the site Trial trench around property to reduce damp Looking towards where the new extention between the two buildings will be Upper Patio with gates Just looking for advice on whether this makes sense or if I am over-complicating it with my nerves over the damp issues?
- 3 replies
-
- land drain
- damp
-
(and 2 more)
Tagged with:
-
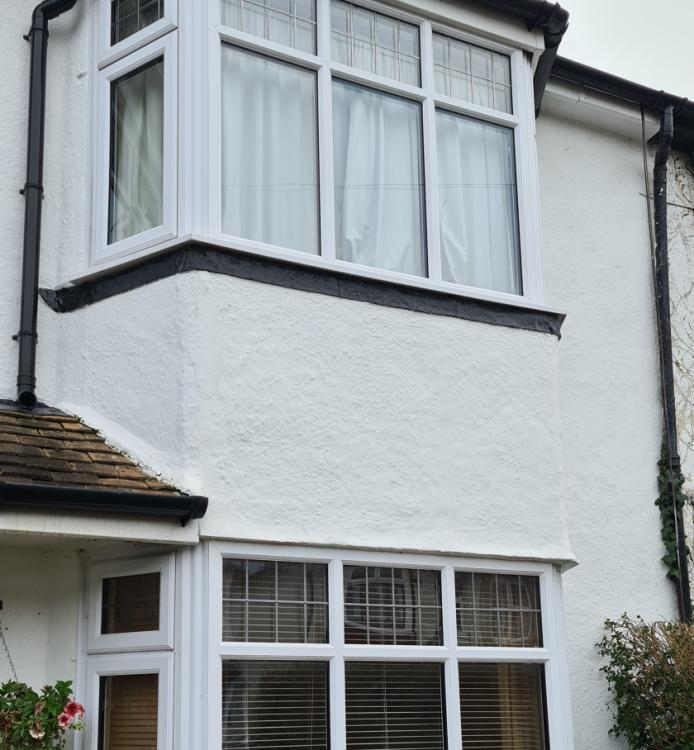
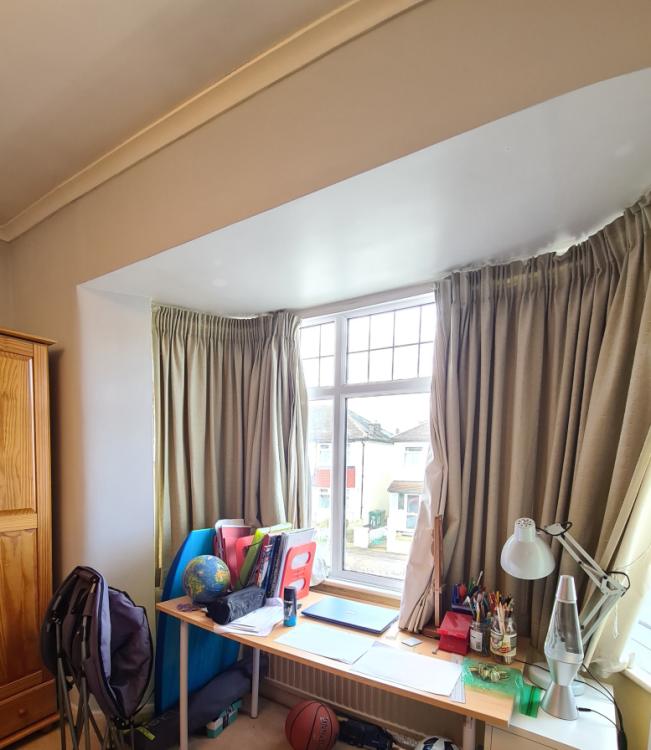
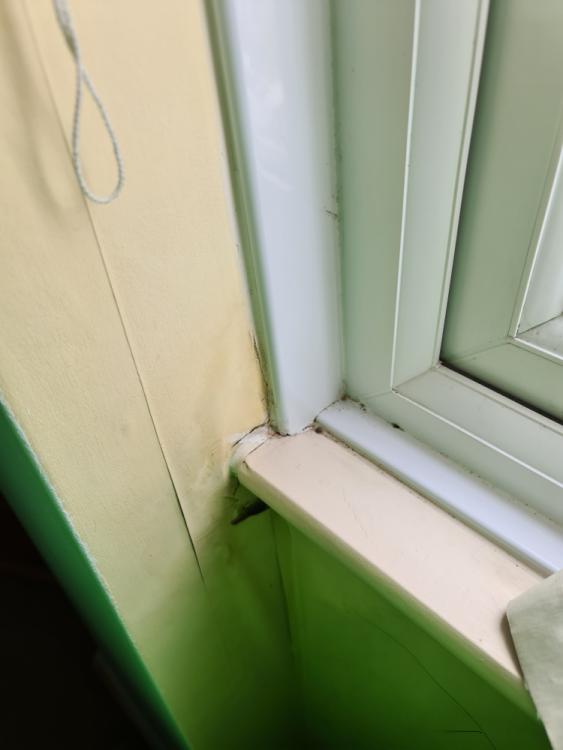
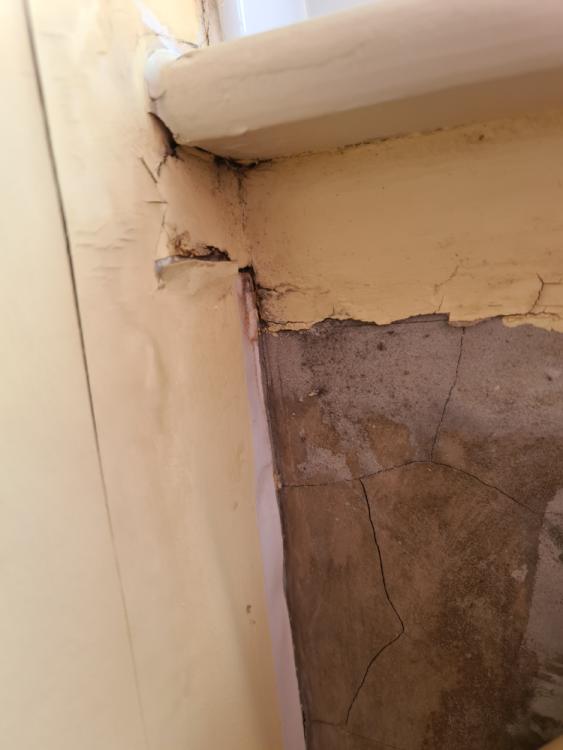
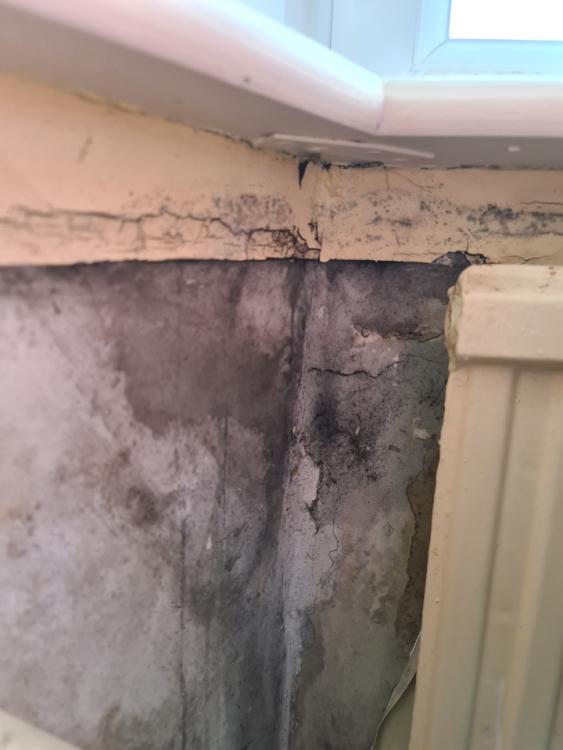
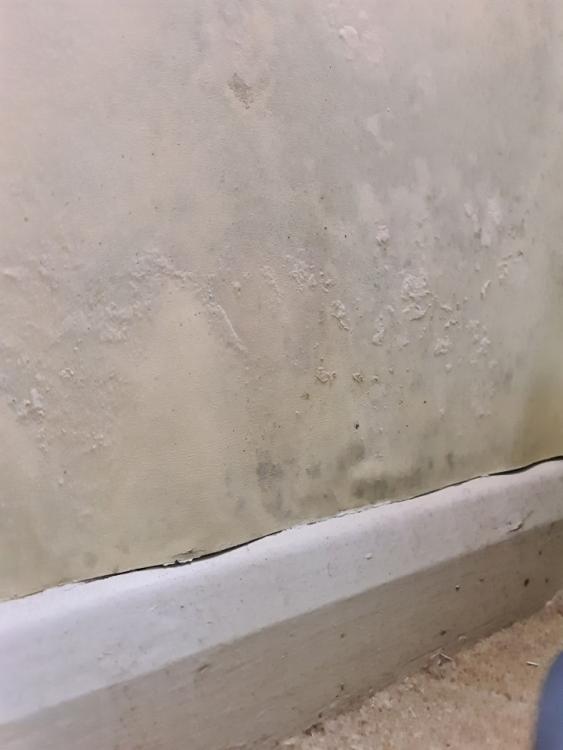
Hello. We have a first floor bay window that sits on a brick wall that is 1 brick deep with render on the outside. The render had a few vertical cracks which were repaired and the outside of the house was repainted a couple of years ago. Please see the photos. In the middle of the bay window is a long radiator. On the wall beneath the window cill there is damp on the left side where the cill touches the side wall and this damp continues across most of the bay under the cill. There is no dampness on the side walls above where the window cill touches them. There is also white mould on the wallpaper. Where wallpaper has been removed for photos the plaster is cracked and discoloured. Two questions - 1. Could this dampness be due to condensation? 2. Will replastering the wall then insulating it cure the problem? All thoughts welcome. David.
- 6 replies
-
- condensation
- wall
-
(and 6 more)
Tagged with:
-
Hello. 3 years ago we had 2 new upvc bay windows fitted by an established company in the London area. The ground floor window has sealant between the sill and the brickwork, the first floor window does not. We have damp on the first floor interior wall below the window but not on the ground floor wall below its bay window. There are large gaps between the first floor bay window sill and brickwork and 2 packing strips can be seen from street level on both sides of the bay window. (cant get photos to upload to site). I have several questions and will appreciate any thoughts. 1. Am I correct in thinking that this is how water is getting in? 2. Is it normal to seal gaps under a ground floor window sill but not a first floor sill? 3. Should I ask the installers to come back and seal the gaps? Regards DaveAF
- 23 replies
-
- upvc window
- window sill
- (and 18 more)
-
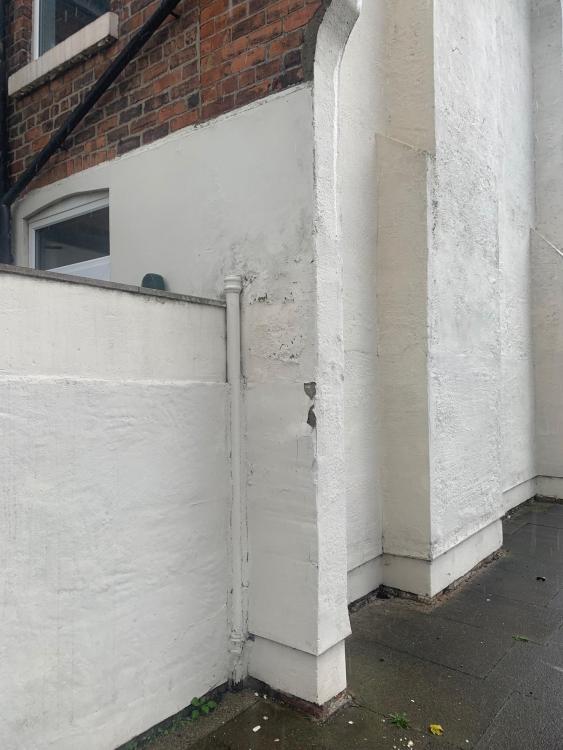
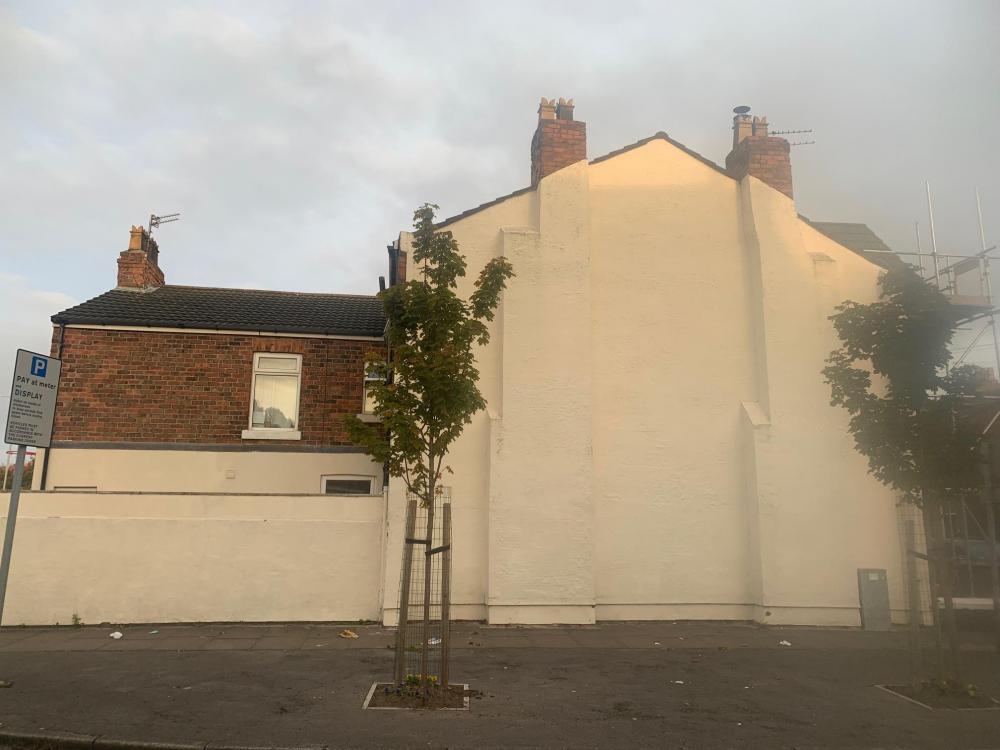
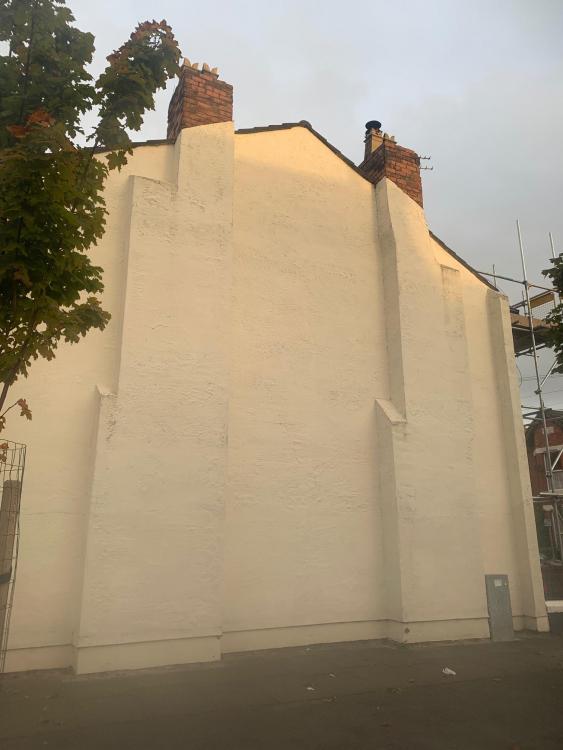
Hi all, I am new to the group and new to building work in general. I have just purchased a 1900 victorian end terrace with a large gable end - thought to be a result of neighbouring house being bombed in WW2 My concern is related to penetrating damp on the internal walls. I have had a variety of opinions from local damp proof specialists and builders. The damp proof course is 15 years old. They are solid walls not Cavity walls and the damp appears in wet patches on the lower walls after heavy rain. I am fairly certain this is related to the exterior gable end wall, which is rendered in sand/cement render. The rendering extends too low - potentially covering air bricks, it is uneven and there are cracks and some visable damp in the render itself. The chimney stacks also need pointing/flashing/ capping. A full replacement of the external render would be a BIG job - I've had quotes around £10,000 for silicone (K rend) but the exterior wall is HUGe and the render extends along the kitchen wall too which would all need replacement if I start. Ideally I would love to go back to the original brickwork. Questions would be - does anyone have experience of doing this? I wont know what the quality of the bricks is like until the render is removed - would restoring the brickwork beneath the render be just as expensive as new render and is render always the best protector for the brickwork anyway? Thanks in advance for any suggestions
-
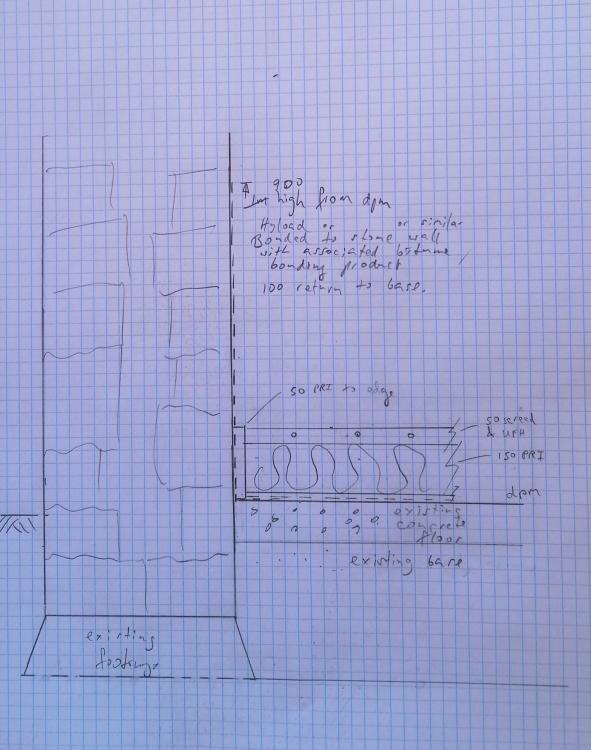
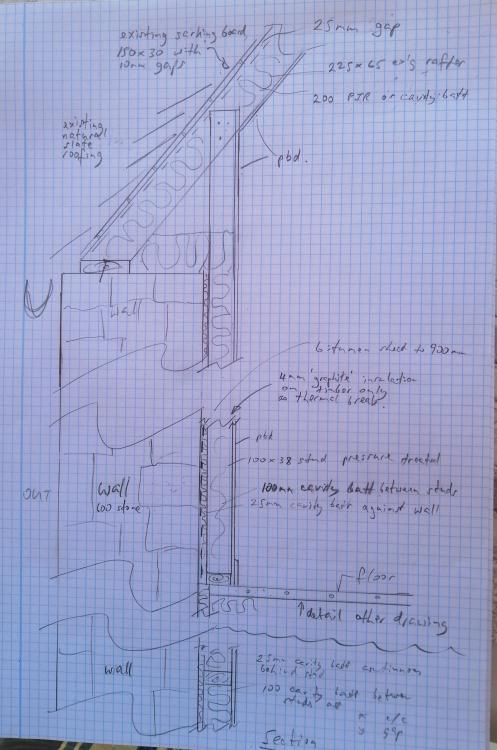
Would anyone care to crit this preliminary design please? 2 drawings below. Of course these will be submitted in cad form. The building is a Scottish farm steading. The walls and roof are substantially intact, and there is a concrete floor. The building regulations requirement is for 'reasonable effort' to be made re insulation, and that includes cost. As there is only 4.5m wall to wall, the wall lining has to be kept skinny. There is also a headroom issue in some locations, but I may increase the floor insulation where feasible, if steps can be avoided. Of course we want good insulation too, and I have come up with this compromise. The 1m of bitumen sheet lining shown at the bottom of the wall is cribbed from another steading's blog, and seems clever, but I don't know if it is expected or standard. The dpm may have to be radon spec. It is marginal and I will check. All existing timber will be sprayed. I am quite pleased with my idea of having a 25mm cavity batt between stone and stud, as it will provide a thermal break and also allow tolerance in verticality. As it is waterproof, I don't think we need vapour barrier. Which then makes me think, do we need that bitumen tanking barrier: it is there to keep the wettest part of the wall away from the inner materials, but the insulation can do that, as in any cavity wall. At £15/m this comes to a lot of money but may be worth it for peace of mind. I have shown a 25mm air gap between sarking and insulation, because it is required with PIR. Not quite sure why PIR needs it but Batts don't. Actually more is stated but it is guidance only, and we have sarking boards with gaps, which is much better for ventilation than whole OSB sheets would be. However, I think there will be much less waste in cutting PIR between the rafters, than batts. Adding a 4mm insulating strip to timbers before boarding is just a thought. I will calculate the effect on the U value and suspect it is trivial. theoretically it also provides a gap between insulation and board, and hence a surface, but i think that would be nonsense to allow unless cynically chasing a specific U value target. Cost-wise, I have to assume that availability and prices will settle down by the time of doing the work. What else might you want to know? Underfloor wet heating, air source. Mostly single storey with highish ceilings. Some existing upper floor, with very tight headroom below ties. Most of the roof soffit will be boarded over, perhaps exposing some ties. It is mostly in good condition but not pretty. Obviously we don't want to take off the roof and rebuild, so working underneath is the only option. All comments are welcome as are ideas, especially proven, but also wild, and do ask if anything is unclear.
- 2 replies
-
- insulation
- stud lining
-
(and 1 more)
Tagged with:
-
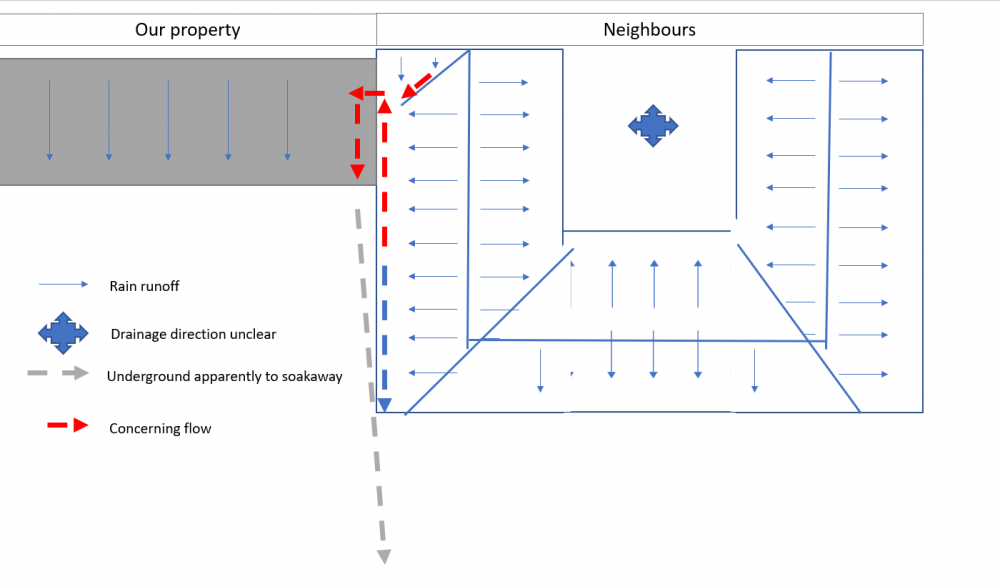
Hi All. We have recently bought a mid-terrace property and have plans to extend to the rear. We have a problem with the neighbours rainwater drainage, which uses our property and would be blocked by any extension we built. Our next door neighbours have already created a garden room, built less than 10 years ago with a parapet party wall and multi-pitch roof. We have a small, original, singe storey pitch roof. There is a gulley drainage on their side of the parapet. The rearmost half drains to the rear edge of their property but the closest edge has been intentionally built so that the drainage runs over our pitch roof. I have attached photos and a schematic. There is a party wall agreement the drainage from this pitch roof apparently runs around the party wall then into a soak away in their garden. The document we have relating to the party wall makes no mention of this drainage. It seems like a strange setup that no owner of our house would agree to, but the house was previously let by a disinterested/cheap landlord. If we build a matching extension, this water would have nowhere to go. We have a good relationship with the neighbours but before addressing this I want to know where we stand. With no written agreement for this setup, could we demand they fix this? We would reconfigure all our drainage whilst building an extension and would not need to make use of their soakaway any longer. Many thanks in advance.
- 14 replies
-
- party wall
- gutter
-
(and 6 more)
Tagged with:
-
Hello, We've had an offer accepted on an early 1970s era timber framed house. On our second viewing we noticed a crack running across the ground floor ceiling and into the top of the wall (photo attached). The same part of the ceiling also has a much larger but more localised crack which is sagging slightly (photo in next post) The ceiling has been recently painted but very faint waterstains are visible. The room above the ceiling is the WC, with no visible issues. The room next to that is the bathroom, again with no visible issues. One of the windows in the room with the damaged ceiling sticks - the one next to it doesn't and neither do any of the doors. Other issues - We also spotted a bit of damp where the plumbing for the washing machine is located, and some grey stuff sticking of out a hole which makes me think there's mineral wool insulation. I have photos of these and can post if helpful. Should we be worried about the ceiling cracks and other issues? What might be causing them? Would it be so difficult to fix that we should look for something else? We haven't commissioned a survey yet but will be doing a level 3, but first want to make sure that these issues don't scream "avoid"! Thanks very much for any advice!
- 5 replies
-
- timber frame
- damp
-
(and 3 more)
Tagged with:
-
Any Advice? Any Tips welcome. I'm about to embark on a cellar conversation. The basement is dug into the hillside, and is a 19th century listed building. So it's old. The cellar has an external door and 2 small windows to a small courtyard - so it's not entirely submerged. (Pictures attached). It does also get a nice amount of airflow. My plan is to build a stud wall, insulate and line the space will drywall, covering up some of the shoddy surfaces. I hope to keep the left brick wall for some character. The biggest concern is the far left corner (seen in pictures). At some point, it's clearly been very damp, but today and for the last few months, it seems quite dry. I'm no pro when it comes to fixing up spaces like this, so any advice is welcome. My worry is that by tanking this corner and then building a stud wall in front, it might cut off the airflow to that area and subsequently causes the damp to return. Would this be the case? Should I somehow integrate a vent for airflow to continue, or should I point all the damaged brick work and then stud wall? It's a hefty job, but I really want to turn the space around. If anyone has any advice, I'd really appreciate it. Thank you! Freddie.
-
Hi everyone, We've just refurbished our house with a builder who has done a great job on the house and interior. Unfortunately, he followed the wrong plans for a deck and instead of building pillars for a suspended deck, he built a brick and block wall laid on a concrete foundation. It's about 1m up from the ground and encloses a 50m2 area. The builder has filled it with rubble from the house. We've had a delay because of COVID and have not put the decking on top as yet, but are planning that now. However, the deck wall has got damp as you can see in the picture. The builder suggested putting pipes through the wall to let it drain, but don't think it should be getting damp to start with. Any thoughts about this? Thanks, Matthew
-
Hi, I'm hoping for some advice. What problems might I encounter if I build a conservatory on top of an existing dwarf wall that is soaking wet and full of rainwater inside it's cavity? Should I wait until spring when it's completely dry, or can I build upon it now? The dwarf wall consists of red brick on the outer, insulation in the centre (but it has a 2cm gap open to the weather all the way round) and thermal blocks on the inside. Will I get damp problems or some other problem I have not thought about if I put the conservatory on top of it now, rather than wait for warmer dry weather? Thanks.
- 7 replies
-
- conservatory
- dwarf wall
-
(and 1 more)
Tagged with:
-
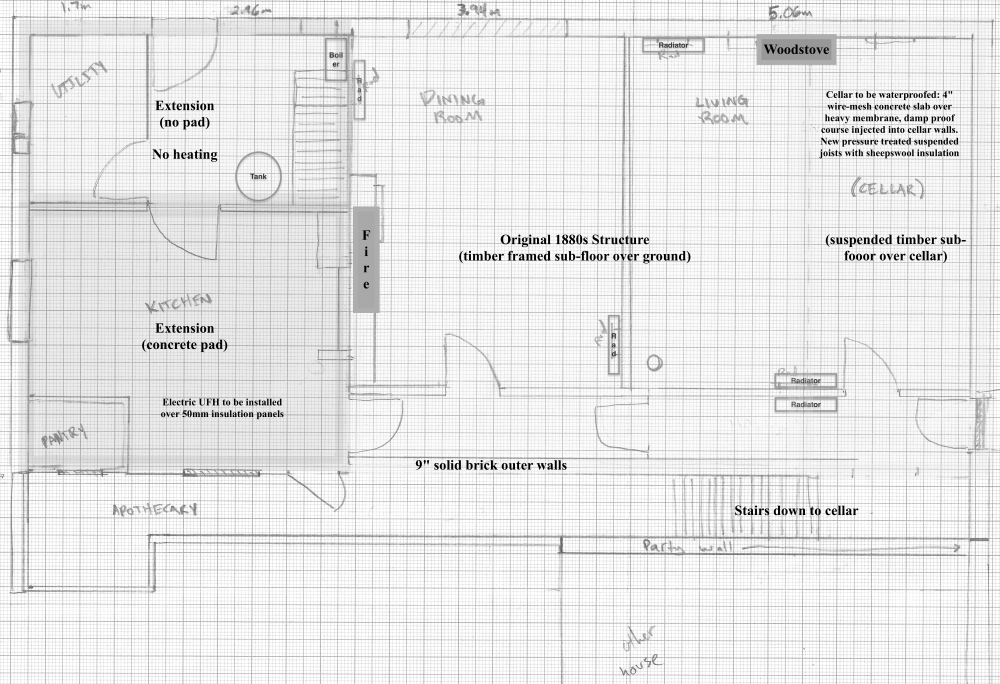
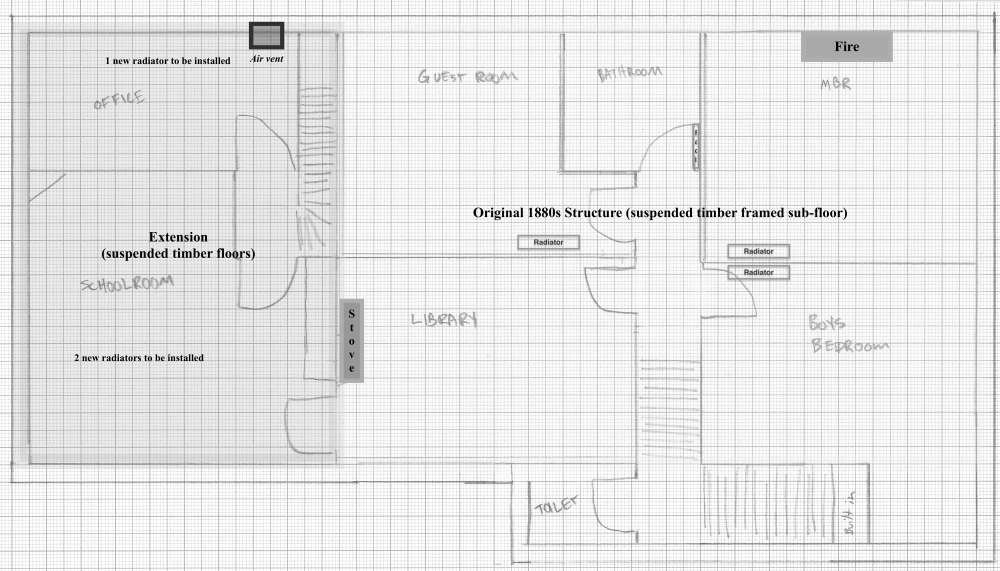
I'm renovating an 1880s Victorian semi-detached house. It's largely unmodernised, which means single-paned glass, damp cellar, damp walls, leaky chimney, vented hot water system with a cold water cistern in an overly large closet in the middle of a central first-floor room, unburied electrics etc. The upside is that it's a bit of a blank canvas and I'm looking forward to building up some self-building skills by doing a lot of the work myself. At this point I've browsed forums here and consulted with a few experts and have received some conflicting advice. I'm wondering if some experts on here with some simillar experience might be able to give my current plan a glance and poke holes as appropriate! Images incuded here are hand-drawn (I work on a screen all day, so working with pencil and paper has been therapeautic) but drawn to scale. I've tried to annotate with some indications of underlying structure and heating I have planned. It's a reasonably big 5BR house, about 2k square feet in total, and rather drafty, with as-porous-as-one-might-expect solid 9" brick outer walls. There's also a cellar underneath half the sitting room (indicated on the diagram) with some dry rot in joists and sub-floor I'll be replacing after I can get it properly waterproofed. There's also some damp coming down from chimney in the first-floor room marked library, on which I'll get brickwork repaired and walls replastered. There's a 24kw Worcester boiler feeding 7 radiators. Half the first-floor has no heating at all and seems to have been largely unoccupied for the past several decades. I'm planning to remove gas stoves from the five fireplaces, remove the current 1980s layers, restore the fireplaces to their former glory and install wood-burning stoves in several of them. I'm aware there are differing opinions about stoves, but I'm pretty set on installing at least 2-3 of these. It's worth noting that sustainability is a key concern for us, so I'm not tied to the idea of offsetting costs invested in the heating system with energy bill savings 1:1. I do want to balance outlays across the different elements of the house, so can't dump £10k into an exotic hot water system or GSHP, but getting off fossil fuel inputs as much as possible is a key concern, thus my plans to install solar thermal or an ASHP eventually alongside use of biomass in the woodstoves. My provisional plan for the (21x8') cellar is to excavate to get a flat floor (there's a good bit of rubble and the remnants of old brick flooring), put in a heavy membrane, 2" or so of sand and then a 4" wire-mesh reinforced concrete floor. I'll inject a damp-proof course into the walls, tank the whole thing, and to improve air flow put in a moisture extractor and probably also a humidifier to get moisture in there under control. I'll have zigbee / wifi humidity & temp sensors in all the rooms, so I will be able to monitor progress on this with some level of precision. I'm thinking we'll remove the radiator from the kitchen, which is the "indoor" part of an extension which has a concrete pad installed, and replace with electric UFH on top of 50mm insulation boards. Above the extension on the first floor are two rooms without heating installed. There I'm thinking I'll install a few radiators. Plan for bathroom upstairs is to completely gut and replace the bathroom upstairs, and install a thermostatic mixer shower and an electric towel heater style radiator. One key question is how to drive the heating in this overall design. On one hand, it seems like the most efficient choice would be to put in an unvented hot water cylinder (250l) and have a plumber replace the hot water plumbing to be a 22mm pressurised system. I've seen good advice on here to get extra insulation installed and it seems like I'll probably get a Telford cylinder and get an extra 50mm of insulation added to minimise thermal loss. I'm also thinking I'll get a cylinder with connections for thermal solar as I will probably add solar PV and thermal water heating when we replace the slate roof in 3-5 years. But I'm also wondering if it may be better to install a thermal store. They seem reasonable in cost, and also a bit easier to add in new inputs for heat. Ideally, I will add thermal solar and perhaps get boilers which feed in from the wood-burning stoves to store energy being generated while they are running. Hot water demand will be moderate - one bath a day for the kids and two showers for adults, which can be spaced out. There are five sinks in the house and the usual appliances. I don't need a million gallons per minute coming out of the shower, but do want to get away from the many years of combination boilers in the houses we've occupied which get cold every time someone turns on a sink. In terms of insulation overall, I've got insulation in the ground floors as a mix of insulation boards in kitchen and sheeps wool (probably in the main rooms). I'll add a bunch of mineral or sheeps wool to the roof to get that up to 330mm. And we'll replace all the windows with proper double paned. I am also wondering if, since we'll be renovating all the walls and floors and the house will be unoccupied while I do initial work, if it would be worthwhile to install internal wall insulation. This seems to be a bit expensive, and time consuming. It seems like the green home grants aren't coming any time soon to Wales either. I'm resigned to the fact that it is unwise to convert a Victorian solid wall home to a passivehaus, but also wondering if this might, conversely, be a good way to get away from that "cold drafty house feeling". If anyone on here has done internal wall insulation as part of a renovation, I'd love to hear more about how it worked for you, especially in terms of wall dampness and overall warmth improvement. Sorry for any rookie errors here - I'm still definitely learning how these systems all work together and thanks to anyone who has wisdom to share. I'm also happy to share photos of the house if that's useful.
- 25 replies
-
- damp
- waterproof
- (and 7 more)
-
I've had a concrete slab poored today and just found out from the contractor that he did the following. 100mm 40mm to dust compacted with a a dpm (visqueen thick guage) layed straight on top lapping up onto the inner skin of blockwork. HE DID NOT USE A BLINDING OF SAND instead he layed another layer of dmp on top of the insulation but not lapping the wall. Then he poored the 100mm concrete slab. In short Crusher run compacted Dpm lapping inner skin Insulation Dpm Concrete Am i likely to suffer damp issues? Fortunately its quite dry round with sandy conditions and great drainage. Sorry to be long winded in my description.
- 4 replies
-
- dpm
- concrete slab
-
(and 1 more)
Tagged with:
-
Good afternoon, This is my first time posting a question here so please forgive any mistakes? We bought our house about a year ago (UK) and the whole downstairs is tiled with ceramic floor tiles(poorly laid cracking around doorways). The walls are always extremely cold to touch and so is the floor, we have just moved the storage boxes from under the stairs to find the exterior wall covered in mould all along the skirting and on and in the storage boxes. We are wondering what is causing the mould? Is it a symptom of the heating being on and causing condensation on the cold walls and floor? We are going to replace the flooring with laminate next year, any things to look for and do to prevent the mould returning? Thanks for looking
-
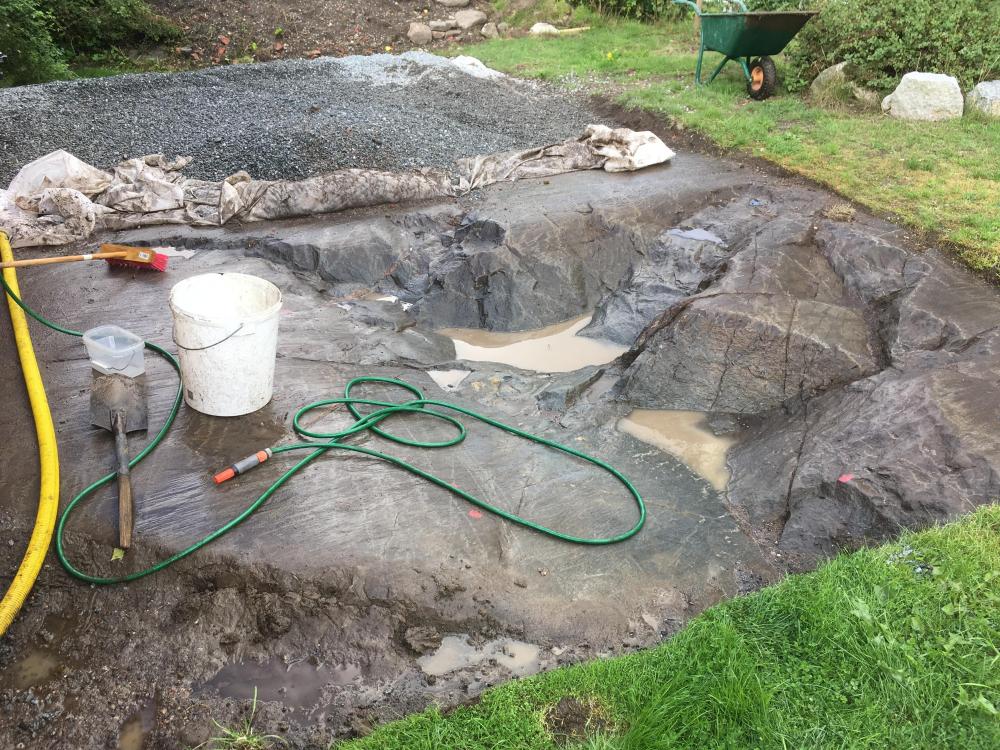
Hi all. New member here.. im extending my wood frame cottage in Sweden After removing the topsoil in the footprint of the extension we have found granite bedrock, the highest point of which is just manageable for the required floor height. However... there is a depression in the granite that appears to hold water and will only very slowly drain away through cracks in the bedrock. We plan to build over the top of this area. Other than blasting a trench, any ideas for the management of this problem? Being Sweden, this will freeze solid in the winter. Possible remedies....? backfill with concrete/substrate? build on higher footings and ignore? Photo shows the direction of the fall of the plot, high ground behind me with bedrock only just below the surface making an uperside drain or barrier another problem.... thanks in advance for any ideas...!
-
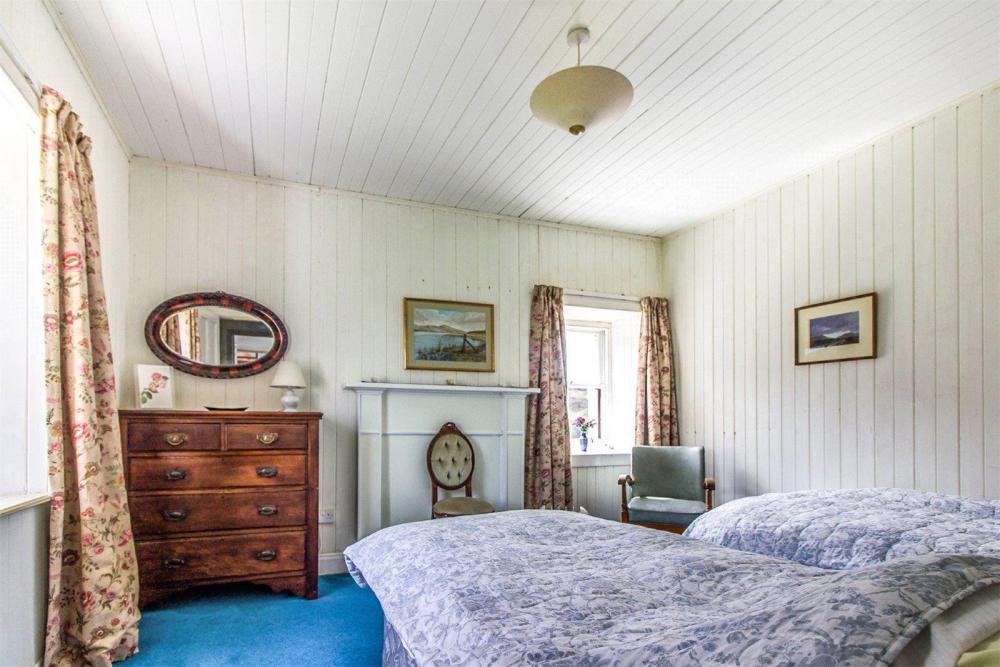
We've looked at quite a few old buildings in the last few months, "old" meaning build in the area of 1860 - 1920. All of these buildings have issues with damp. My understanding (but this is more speculation) is that these buildings were originally built with an open dirt floor, so the dampness just went into the entire house and ventilated out. Putting in a floor creates a sealed off space where dampness accumulates and then seeps into the floor and walls. We've seen plenty of statements to the like of "that wall just needs some repointing or similar". This doesn't seem to be fixing the problem, just the symptom. How is the dampness problem in these buildings fixed for good? (Attaching image of one room showing the wood paneling of the original outer wall, along with the typical signs of damp, esp. in the far top corner)
-
My partner and I recently bought a small cottage near Forres in Scotland. It has a concrete floor slab and thick masonry walls. I've been planning to add a layer of insulation to the inside of my house but have found guidance on this to be a bit vague. Some suggest that a permiable insularion should be used others a vapour barrier. There is a threat that if the wrong approach is taken damp / condensation could result. I'm hoping to hear from people who have insulated their walls successfully. What method of insulation was used? Any input or suggestions welcomed.
-
New kitchen has been installed so looking to protect as best as I can whilst other parts of the house are plastered and painted (late Jan). Last plastering was done 3wks ago (in hallway and a small area in the kitchen where a doorway had to be blocked up. Kitchen floor also had self levelling poured 2 weeks ago. Kitchen installer mentioned covering the units with cardboard to protect it from the 'damp'. Is this wise? I would think that would just attract/absorb the humidity and bugger up the mdf.... My thought was to just take the plinths off and allow the air to circulate around the units (there's a 50mm gap up the sides). House is sealed up but has no heating yet (Sunamps should get here in Jan/Feb). Any thoughts? TIA!
- 10 replies
-
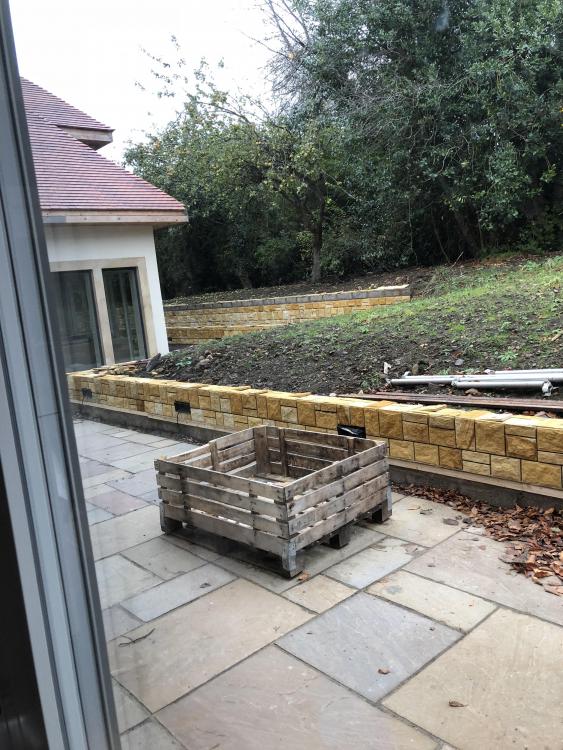
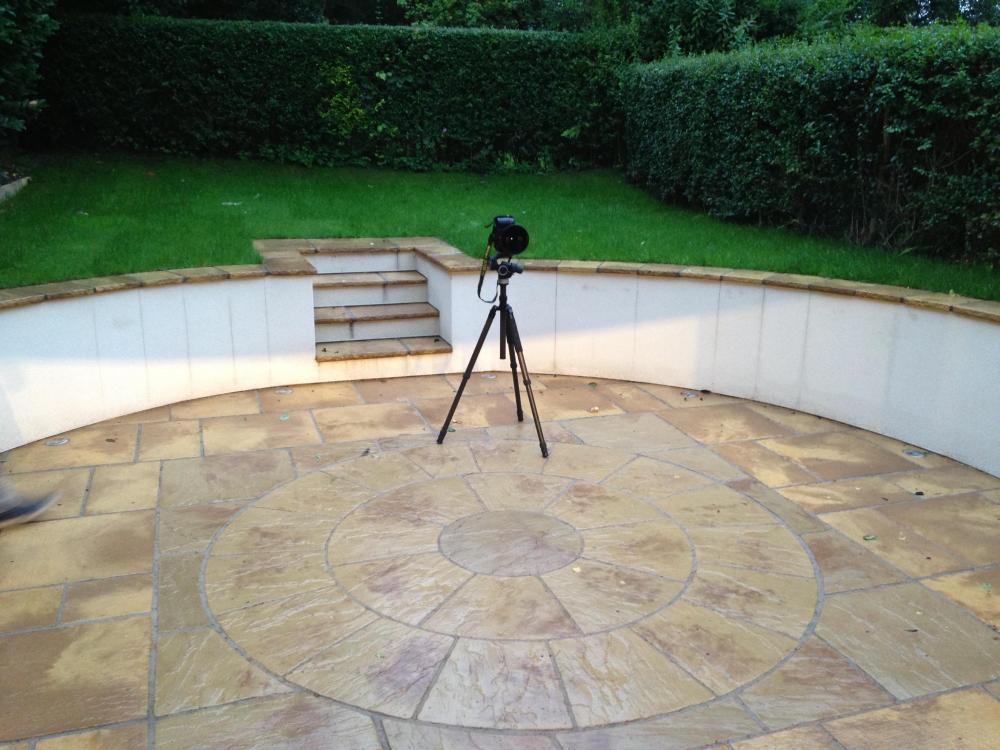
We have a long retaining wall in the garden which we wanted to clad in stone. The architect recommended a drystane effect but neither my wife nor I liked that idea and we wanted something less rustic. We ordered coursed sandstone and the builders have started to put it up, but the stone that came is just very very yellow. My wife has decided that she doesn't like it and I can see her point. She thinks the issue is that the sandstone pavers are not uniformly yellow. We thought they were going to be yellow when they were ordered but they ended up being mixed sandstone. For some reason getting proper samples out of people seems to be an ongoing issue. Last week we refused to let the driveway get done in resin bound stone until we had an actual sample that we liked and a full bag of it, not a 2 inch square sample in a box that bears no relation to the actual colour. Anyway, having looked at it I don't think the pavers are the problem, I think the problem is that the colour is too yellow and that it is too many different finishes. I suggested changing it to ashlar stone to match the house, however, having spoken to the architect he suggested rendering it with a sandstone cope to match the house. This I think would look the best but has issues with staining which is why we didn't do it to begin with. I have a picture of the part complete wall and a picture of a rendered wall with staining issues which we want to avoid. Thoughts would be appreciated.


.thumb.jpeg.03d941c553a0f0e11dc263dd4f229633.jpeg)
.thumb.jpeg.84f932c81ca5ae6e60ba2d227482d59c.jpeg)
.thumb.jpeg.064b34121c57ef1684b4874fa6c528eb.jpeg)
.thumb.jpeg.3c1b48d1b3a3c121be5d44f89f1149c6.jpeg)
.thumb.jpeg.07f57a5c70516ec32eae79534be50e44.jpeg)
.thumb.jpeg.66387199cdbee5075e8fc7b941c809b2.jpeg)
