


jfb
-
Posts
666 -
Joined
-
Last visited
Everything posted by jfb
-
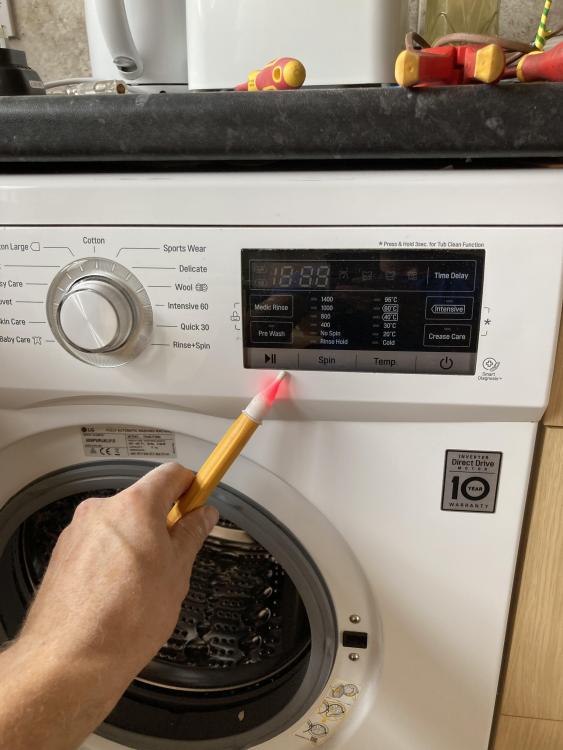
I have a washing machine that gave a mild shock recently on the leg when brushing against the main body of the machine (been fine for years). using a tester it lights up when and only when I point it at the (plastic) control panel (see pic). I have inspected the plug and it looks fine, the supply tests fine with a plug in tester (only thing it says on it is that it can’t detect earth neutral reverse). I have used a pat tester and it seems to pass when I connect the testing lead to the screws next to the door latch. But fails on the first test of continuity of earth when touching the main painted section (seems like metal to me whereas the top section with controls is plastic as is the bottom section with drain/filter). Should that not pass since it is painted? the unit passed a pat test that I had an electrician do in June this year for what that is worth. any ideas or next steps to isolate the problem?
-
No doubt it isn’t easy to upgrade floors and walls in some old buildings. but are you seriously saying that it is a good thing that the government is postponing forcing a landlord who has little incentive otherwise to put 300mm of loft insulation instead of the minimum shoddy 100mm that might be there in their rental properties?
-
Voids under stone wall (no foundations) - can I fill them and with what if so?
jfb replied to Oxbow16's topic in Foundations
I’d go with 3.5 make sure it’s a good sharp sand nothing too fine -
Anyone got any recommendations for a dimmer switch and gu10 bulbs to go with a JCC Fireguard Next Generation GU10 Fire Rated light? https://www.cef.co.uk/catalogue/products/4913592-fireguard-next-generation-gu10-fire-rated-tilt-downlight-white only 5 lights on the circuit.
-
Definitely don’t leave 3mm below plasterboard level, just cut it level or slightly recessed. Much easier to plaster and makes no difference to vent going in.
-
Presumably the grey bit pushes into the duct and then you screw the cowl on? check it and see. plasterers going to be happy if it is cut back so can plaster without restriction
-
Shared septic tank on land of house we want to purchase. Any advice?
jfb replied to flanagaj's topic in Waste & Sewerage
Can’t help you on the legal side though presumably a lot depends on what is written in the land documents. But don’t underestimate the impact on neighbour relations that any such request might cause, no matter how much the law is on your side. -
I don’t quite know the layout but isn’t it going to be easiest to put a door in and be done with it? not what you want to hear I suspect but going to be easier than a mist system and how much extra will it really cost?
-
Maybe - I presume all the damp has gone by now though (been a few months)
-
It might depend on how accurate you can be avoiding any existing wiring/pipes if they aren’t nicely in the middle of the void. I have the same conundrum for a ceiling ruined by a water leak and am worried about hitting something. Maybe I should just buy a joist finder and go for it! Definitely less mess.
-
This stuff is good.
-
Joining flexible ducting
jfb replied to richo106's topic in Mechanical Ventilation with Heat Recovery (MVHR)
I generally agree with the sentiment but I’m not sure in this instance there is any practical difference in results (assuming the air tightness tape is something decent like tescon vana). It might be the op has all I suggest to hand and it is a straightforward solution. but as always it is up to the op to weigh up the suggestions and go from there. -
Joining flexible ducting
jfb replied to richo106's topic in Mechanical Ventilation with Heat Recovery (MVHR)
Or if you have a bit of air tightness tape you could tape the 75mm together then have a bit of ducting just larger than 75mm internal and tape that over the join. -
I had 22mm instead of recommended 28mm on a 10m run. Extra pump was fitted at the hot water tank. Seems to work fine. Might even have worked fine without.
-
Just go for the cheapest! You will not notice any difference.
-
I’d take it down myself
-
Hydrated and Hydraulic Lime Renders, without cement
jfb replied to larry's topic in Plastering & Rendering
For OP - if going for hydraulic lime it is crucial to wet the wall properly first. In hot weather that means soaking the wall with a hose, get the mix on and probably wet the wall again prior to laying on. You will be amazed how quickly the wall will dry out after being soaked. -
Hydrated and Hydraulic Lime Renders, without cement
jfb replied to larry's topic in Plastering & Rendering
Please don’t use hydrated lime and sand - it won’t set. I would definitely use NHL 3.5 not hydrated/cement myself. ratio 3:1 sand:lime if your chap is fine to take a bit of time to do it should be fine. -
Hydrated and Hydraulic Lime Renders, without cement
jfb replied to larry's topic in Plastering & Rendering
By sand lime do you mean sand and NHL ? If so, it’s simply not true that it won’t set. If it’s cold and damp it can take a while to set but in conditions like this it will set much faster. to the OP. I would contend that the builder has never actually used a lime render and be worried about presenting him with hydraulic lime to get on with. It’s not actually much harder than sand/cement rendering but takes a bit more care as it needs to be kept damp after application (getting the hose out and spraying the walls every day for a few days). also unlike with cement render you don’t really want to apply the finish coat the day after the scratch coat so would have a to wait a few days (depending on how much it has gone of). Probably a reason why builders like using cement, they can move on to the next job quicker. can’t speak to putty as I haven’t really used it for rendering. But if you go for NHL I would use 3.5 not 2. what sand have you got? You say you have plastering sand - not all is the same. Is it very fine or does it have some sharpness to it? (I’d want it not to be too fine) -
How to hide manhole covers in garden
jfb replied to puntloos's topic in Landscaping, Decking & Patios
Well depends how low you go. I think mine are about 150mm below the surface -
How to hide manhole covers in garden
jfb replied to puntloos's topic in Landscaping, Decking & Patios
I set a couple below the surface of the lawn. I know where they are if I need to get to them even if it probably wouldn’t pass building control! -
How would I move this scaffolding?
jfb replied to CalvinHobbes's topic in General Self Build & DIY Discussion
It’s impressive what a load of (s)crap you talk sometimes -
Laying geotextile weed suppressant fabric
jfb replied to machtucker's topic in Landscaping, Decking & Patios
What is its purpose? To separate the sub base from what’s under? Ok but is that really needed. to stop weeds growing? Nothings coming up through a sub base, mortar layer and slabs? If anything it will be sown from above in cracks in the grout lines. -
Laying geotextile weed suppressant fabric
jfb replied to machtucker's topic in Landscaping, Decking & Patios
I wouldn’t bother. Not very helpful if you have already bought it! -
No idea. I’d just crack on


