
Leaderboard


Popular Content
Showing content with the highest reputation on 05/22/21 in all areas
-
Hard to tell, but usually it is a filled polyester resin used to cast these. So a polyester car body filler would work fine. Then CT1 @pocster's favourite, o the fittings.1 point
-
I would use a two part resin car bony type filler and fill all the air bubble holes under where the rubber washer goes and sand flat first, then rubber washer will do it’s job ok1 point
-
1 point
-
Many builders use option 1 due to time restraints I would always get all the drains and services (Ducting) in with the foundations Photographed and filled in If you do this after the scaffolding comes down You start again with all the mess and it all gets tramped into your new home1 point
-
We've got one with just a direct air supply to the stove. Also have mvhr. Mvhr commissioned to ensure a bit of positive pressurisation (essentially supply fan speed higher than extract). No obvious smoke leakage when the stove door opens. Thinking about this a bit more, I was wondering to what extent this is a problem just for mvhr, or if it's just related to ventilation generally? As others have said, no house is 100% airtight, the mvhr replaces ventilation from trickle vents and leaks. I've been in older houses with no mvhr and in certain weather conditions the leakage from the stove is really obvious when you open the door, presumably to do with internal/external pressure difference. It's not exclusive to mvhr so the idea the stove needs to be mvhr compatible is a bit questionable. A high rated stove such as dibt might be required for passivehaus certification, but only to meet airtightness criteria.1 point
-
I've been watching for sometime the discussions surrounding per m2 costs. I've always felt these comparisons on per m2 are flawed and not a fair reflection (even when comparing per m2 cost with one another and potentially from the same supplier). The quantity of fixed versus openable can be different and the amount of doors for example and type. So I thought I would put a quick excel calculation tool together to get m2 based on the entered info. Which can then be filtered through the relevant options. There is a couple of minor points to make. It's basic but does the job. Due to the sheet being locked (password supplied), it won't expand the table as new data is entered, so I extended the table to accommodate. This presents an issue when calculating subtotals as it includes zeros and in the average cost per m2 field, this presents an incorrect figure for "all items" as they aren't filtered. I have entered a cost per m2 field for all items to combat this. It doesn't take quantities into account, each item needs to be entered individually. When you filter, it will calculate only the visible cells in the "Average cost per m2" cell and displays the correct per m2 cost. So you can filter by style for example (tilt and turn, top hung etc.) and it will always calculate the per m2 cost on the selections made. Discount amount (if any) can be entered and it will advise the percentage of discount supplied and then the cost per m2 cells will adjust to the discounted rate. I have tried to cover all the bases, including uPVC, Timber, Timber Alu Clad, Aluminium, timber type, internal finish, glazing etc. I've also put linear meterage data in plus install costs, which will display install cost per m2/linear meterage as well for a further breakdown. If you find this useful and can use this for comparisons with other suppliers / Buildhub members or if anyone would like to expand on it, feel free to download and amend accordingly. cost_per_m2.xlsx
 1 point
 -
You must first support the road with a membrane as this will stop the stone punching through and disappearing endlessly into the clay. I prefer the non-woven kind as it doesn't puncture so much. It will cost you close to £1/m2 but will pay itself many times over. There are other, fancy geomembranes but probably not necessary for you. Then you lay cheapish hardcore, or whatever is the local stuff, complete with whatever muck and junk they leave in it, working up to better stuff at the top, The sales people at the suppliers will generally be delighted to advise the best make-up based on what they have. tell them what you want to achieve. I have had very good advice in similar circumstances. Re recycled tarmac, this is usually good value if from carriageways, but not if it is from footpaths. Warning re price £/ton. This is not like £/m2 and varies. Ask for the conversion to £/m3. Loose rubble with voids might be 1.6 t/m3, whereas compacted can be like rock, and 2.2t/m31 point
-
Oh my, I feel for you Jilly. What a frustrating situation. So are your plans now to draw a line under this builder chapter and take on the remaining works yourself or are you going to try and find replacement builders? When I was starting my work, I had no less than 4 neighbours come and talk to me and share their experiences with builders. All of them had firms either letting them down, 2 of them disappearing, one leaving incomplete work, delaying completion and claiming they had done to completion. One of the builders actually left one neighbour when they got to the roof structure and when chased just said he wasn't interested in the rest of the work anymore! I know it doesn't help solve your situation but hopefully illustrates that you're not alone in this.1 point
-
No point in treating water to flush your toilet etc. Someone I knew was a medic in darkest Africa and when asked about his house in England they could not believe we shit in drinking water!!!!!?1 point
-
I have 200mm of batts between rafters and 75 mm pir underneath all joined together with squirty foam and joins taped to form my air tight layer, foamed to walls and taped between walls and pir. Not as as good as some with u value, but airtight no gaps in insulation detailing absolutely spot on as I did it. So some may have a better u value but badly executed by the builder.1 point
-
You need the roof on as soon as the frame is up to load the structure, you will probably stick 3-4 tonne of materials on that roof. Then the rest as peter said. How can the plumbers and electricians come in without studwork up, where are they going to run pipes,cables. What are you fixing sockets to, you cannot hang them in thin air. Roof on. Insulation ufh screed studwork mvhr plumber- electrician same time. Mvhr before other services always as its bigger duct and needs the most space.1 point
-
Interesting thread this. Good technical points made by Peter,Craig et al. To add my thoughts, partly technical, but mainly to open up design options you can consider that are cost effective, that won't lead to problems with your mastic etc on the finishes, sticky door issues, glass that fails due to adverse unforseen loads etc and the subsequent arguments. Don't forget that these large glazed openings cost a lot, the glass, slim frames etc. A bit of technical stuff. The formula for deflection of a steel beam is 5* w* L^4 /384 EI. For the keen, often domestic steel beam design ignores what is called shear deflection but for timber beams this needs to be accounted for as it is significant. To explain the formula for typical domestic steel beams. E is Young's modulus.. a property of the steel which does not change with beam size. w is the load per metre run of the beam. I is what is called the second moment of area and L is the length. Now you can see that if E, I and w all stay the same then if you have a beam 3.0m long then L is to the power of four i.e. 3*3*3*3 = 81 units, if you have a four metre beam we have 4*4*4*4 = 256 Now 256 divided by 81 = 3.16. So you get over 300% more deflection on a four metre beam than one that is 3.0m long all other things being equal. The thing to draw from this is that beam deflections are very sensetive to length. Extrapolate this to an 6-8m opening and you get this exponential deflection which plays havoc with your doors. The next parameter you can vary is the second moment of area "I". To get your head around this the formula for a rectangular beam is I = b*d^3 / 12 where b is the width and d is the depth. You can see here that if you have a rectangular beam 200mm deep beam d^3 (cubed) is 200*200*200 = 8*10^6 mm^3 (mm cubed) but if you have a same width but 300mm deep it is 300*300*300 = 27*10^6mm^3. So buy increasing the depth of the beam by 100mm you reduce the deflection by 27/8 ~ 300%. The way a steel I beam works is that you cut out the sides and place more steel in the flanges. This give a much more efficient shape so by moving the material to the top and bottom flanges you get more "I" for your buck! Now for a big glazed opening design the starting point is how much deflection will be ok over the head of the doors. There are general structural recommendations in the codes that go along the lines of beam span / 360 but these are mainly to do with the other elements of the building. If you have an effective clear span of 8.0m that is 8000mm / 360 = 22mm. That is going to jamb your doors, break the mastic seal (at times you will notice the bend over the opening) on the outside and probably damage any wall paper inside. It's easy to fall into the trap where you see the deflection as being say 22 mm, so you put in 25mm of say compriband.. but if you compress compriband or similar down to 3.0mm it will start to extert load on your doors.. it's good (squashy) but not that good! You also need to make sure that when the load is not there that the compriband will recover and not leave a gap. The next thing (Craig, Peter etc have touched on this I think in the past) is that there is a difference in how you install bifold doors and true sliding doors. A sliding door head can be installed with a bit of a gap over the head as they now tend to be all bottom supported, but bifold door heads need tighter packing at the head. In other words bifolds are less forgiving in terms of beam deflection. If you think about it. When the bifolds are open there is a lot of glass weight hanging out from the building so the mechanism at the head of the doors needs to be held firmly in place so that over time they still perform, the tolerances are tighter and less compatible with the structure. As promised. If you have read this far then if you have a single storey extension with a large opening you may have a flat roof above. Here you may be able to use the upstand on the flat roof to accomodate a deeper beam thus reducing any downstand in the extension. If you have a two storey house with large bifolds etc below you can start to look at turning the upper floor external wall into a big truss. This in the right circumstances can allow you almost take the doors right up to the ceiling! The secret is that there comes a point where a big steel beam is no use / economic if you have some height above to do something. If you have a modern house, say with an "L" shaped roof" and go in the attic you may see lots of thin prefabricated trusses. But at the "L" bit you may see some sturdy looking trusses.. girder trusses. You can apply the same principle to creating a large glazed opening on the ground floor. If I was looking at designing a 3.5m plus opening for glazing I would use start by saying.. I want no more than 6 - 8mm deflection at concept design stage under say snow loading or roof access. I would then look at the type of construction.. masonry, timber frame. Timber creeps over time so that has to be accounted for. I would also look to see how much the founds may settle.. if there is uneven loading.. differential settlement. Once you get a handle on the "feel" of things you are on your way to getting a problem free solution. This all may sound expensive as you need an SE, experienced designer that can look holistically at this but it may only cost a little more for the extra design input. Ideally it may end up that you save money!1 point
-
I don't know about folly, but if I ever build another house, I won't bother with sliding doors, and not just because of the problem we've had here. I just don't see the point in having such a massive expanse of moveable glass in one place. Windows work perfectly well (I've no interest in seeing the ground right outside the house) while not getting in the way of furniture placement. I think I'd have preferred a pair of French doors in the middle of the wall, with windows either side.1 point
-
We went through this scenario, we could have had a 9m opening looking out onto a stunning view, but in reality we live in England where it is damp and miserable half the year, so how many times do you open that door fully. We we ended up with a 4.5m door and a 3m picture window, this is far more practical, reduced the cost of the supporting structure, was simpler to build. Win win.1 point
-
Pre-action protocol you linked to apply when you are planning to take someone to court. Therefore the pre-action protocol begins with the Section 7 requirement that the claimant sets out its claim including specified information. In litigation, this would reasonably happen after you have exhausted all other avenues of resolution, not before you've even tried to talk to the other party to sort it out. Even after you've already tried all other avenues, you are asked to meet and try to negotiate a settlement through mediation or something else according to the protocol before the claim proceeds to court. Here is a helpful link to writing a letter of claim: Contents of letter of claim. It details the basis of the claim. This is not where you start with dispute resolution, it's towards the end. Here is a brief outline by Which? of dealing with builder disputes to illustrate that the formal legal stuff comes as a last resort (see section 6 specifically for when the pre-action protocol applies): https://www.which.co.uk/consumer-rights/advice/how-to-complain-if-you-re-unhappy-with-building-work-aWG3g5O4RZCh1 point
-
And before you get to this point of pre-action protocol you still need to demonstrate that you have given the person you're claiming against the chance to rectify the problem/satisfy the contract. If you walk into court and say to the judge something like, I hadn't heard from the builder for a while so I sent a letter of claim and commenced legal action, without having tried to take every effort to resolve the problem, you're not going to get very far with your claim. The judge might very well sit there as say, 'oh so you just started with a threat to take legal action?' My view, which is also based on experience in the courts, is that you need to take every opportunity you can to avoid going down that route. Sometimes this may be painfully slow and frustrating. However, you need to show that you've no other option available to you for recourse other than legal proceedings. Hence why, right now, I suggested it was more sensible to try to re-engage with the builder without any mention of legal action. It's simply premature. I think @Jilly 's approach not to be confrontational is the best bet right now, although that doesn't mean she can't be firm and assertive ?1 point
-
In my experience, it’s only going to get harder and more challenging as the build progresses... if the builder is difficult now whilst doing the big easy stuff, it’s going to be a world of pain when it comes to all the finer details later. Also... in my experience... they don’t like customers with high standards. For example, in my area there are a lot of aerospace engineers - they expect builders to achieve the same level of tolerance as in aircraft.. so a lot of the builders round here won’t work for them ?1 point
-
From looking at your image from the inside of the roof it looks like the steel does sit inside the thermal envelope as the joists filled with pir rest on a ridge beam that rests on the steel. Re the vents - do you have the detail drawings produced by your architect/technician for the roof? Even before your change from sheepswool to pir insulation and bitumen felt, there would have been a 50mm ventilation gap specified for the structure?1 point
-
Here's an image of the roof as it went on. It seems to be a dry ridge. They are clay tiles. You can see one of the bat tiles on the left. They actually look like vents. From my research I think I need to insulate the steel and then decide if it's going to go in or out of the thermal envelope. I also need to chose suitable tile vents for each rafter bay as it the 50 mm gap doesn't seem to communicate with the ridge ventilation. I could also add lap vents in each layer of the bitumen, again within each bay. There are two places made for potential roof lights, and these should be notched to allow air flow. Does this sound right?
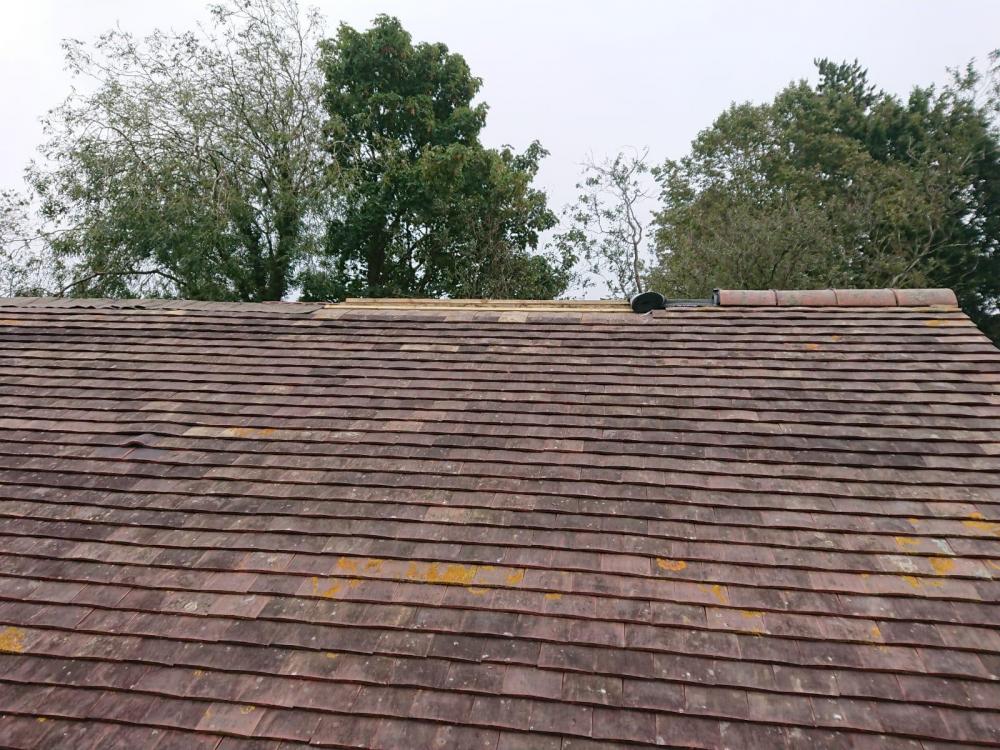 1 point
 -
Ok so you can get round this. What sort of tiles have you got @Jilly..? Prior to ridge venting the simplest way was to use tile vents - you’ll need to replace a tile every 3m or so in the top 3 rows of tiles. It’s easy done - they push up the tile above to allow access to any fixing and then swap the tile for a vent. They are made to match the tiles. Alternative if you have a planning issue or non standard tile is to use lead vents - lovely looking but eye watering expensive if they are non standard sizes. These are the vents - about 3 times the price of plastic but lovely to look at ..!! https://www.justlead.co.uk/product/roof-void-vent/1 point
-
So... my ridge beam seems to block the exit to the ridge tile ventilation. On the SE's diagram the steel is encased in the insulation, but that was for sheeps wool with and a breathable membrane. This issue with bats was overlooked when the BC drawings were submitted. My fault.1 point
-
This is common with PIR and other light weight insulations and is probably more down to it's lack of thermal mass and decrement delay rather than it's thickness.1 point
-
Yes, chimney effect with vents at the eaves and vents and the ridge. With low pitched roofs it is sometimes okay to use vents on both of the eaves and rely on pressure differences across the house to create to necessary air flow. In this instance you need to ensure continuous flow so need a 50mm gap at the ridge. Here's a good illustration:1 point
-
The modern breathable roofing membranes are polyester and it fluffs up and tangles in their feet so they can't escape from it. Bitumen roofing membrane is very common in old buildings, but before this PIR stuff came along. Ahh, battens makes sense. No sign of them. So there needs to be something to create a chimney effect to draw air up and out, which I'm guessing might be present in the roof tile ridge but isn't actually joined because of the ridge beam?1 point
-
Looks like the developer may have sold them some sort of land, design and build deal.0 points
-
Yes a novice can bead the corner with easi-Fil Just butter both edges of the corner with filler Then gently tap the bead on and clean off the excess0 points
-
Is that like a funny monkey but spelt differently0 points
-
After banging your head a few times you will get used to ducking, crack on ?0 points


.jpg.c21f3ac78c9b7efd90cbdcb312744dc5.thumb.jpg.7adcad4c0e384f5ecd7d56b0618df6e5.jpg)


This leaderboard is set to London/GMT+01:00