
Leaderboard


Popular Content
Showing content with the highest reputation on 11/12/17 in all areas
-
Woke up this morning in our new home! Now sat on the sofa watching tv in my new home, waiting for a full day of rugby TV to start so I can sit and sip cold beers in my new home! Can you tell I’m pleased?! Facts and Figures 1 year, 1 month, 14 days (Breaking Ground to Moving in) 4 Double Bedrooms 3 Ensuite 1 Family Bathroom 1 WC Open plan lounge kitchen diner Utility Room Double Garage Workshop Land: £120k Build Cost: £200k Size: 300m2 Cost per m2: £666/m2 (This figure is slightly off as a large part of my ground floor is garage / workshop space so can’t really be counted as fully costed m2. However I’ve also got a £30k retaining wall in the ground floor section that wouldn’t usually form part of the cost per m2. Either way I think I can happily say I’ve built for approximately £800/m2 which I’m very pleased with) Photos below of all the finished areas. Garage and outside space an ongoing project!7 points
-
@Ferdinand A little history on how we ended up here which may explain the outcome. I’m 31, this is only the 2nd property I’ve ever owned. The first being a shared ownership flat I bought 3 weeks before the recession hit and 8 years later I sold for less than I bought it for. I had a 5 year sharesave plan with work that was due to pay out in July 2016, I had made a good profit on it and the amount was enough to allow us to leap the property ladder a bit, looking around we couldn’t find anything we wanted to purchase should the money have been in our pocket. Anything we did like was way out of our price range £300k - £350k. We saw this plot of land with planning permission for sale, liked the house and saw enough potential to change things to make it a home we could love. So the brief was always to get my wife and I a house we simply couldn’t afford, in size and spec. The planning permission was originally submitted in 2000 and was reapplied for several times, so many things were not included that may have been part of it had the design stage actually started from 2010 onwards. 1 - Passive house or any particularly environmental facets were never really considered, MVHR wasn’t part of the design and I wasn’t even that aware of what it was until I was well in to the build. I had brickies on site 3 months after completing the purchase of the land, so there was no dwell time to consider things like that. Remember the brief above, we NEEDED a house! I did quickly look at solar panels, but the capital expenditure just wasn’t an option we had. Briefly read up on 3G, again was disregarded due to cost, although I can’t remember what that was now. 2 - yes traditional block built house, trussed roof. We did consider block ground floor due to retaining wall and then timber frame on top but due to access issues and overhead HV power cables a crane was unlikely. Plus the 3 little pigs came to mind and I wanted a house made of bricks! I got 3 quotes for the watertight shell and all came in around £75k - and the end my chosen builder did say to me he believes he underquoted by approx £10-13k, so it could be argued that this cost should be factored in. 3 - as above the build is on our absolute limit of affordability of capex, however we do have a reasonable monthly income between us - may sound daft but I can afford a monthly gas bill more easily than I could £10k for a heat pump (this may be an age related perspective ?). If we added in many of the features that people here like to include the house would simply not have been an option to us. Either make it smaller or go back to the drawing board and pick up associated architect and planning fees - none of this was an option. 4 - Doors were Travis Perkins, £90 for a FD30 and £70 for a standard door, this was well under budget and proved to be a big cost saving on what I had expected. Flooring was £42/m2, so a reasonable cost, I think the wide board again makes it look like more than it is, link posted in a previous comment. The grey floor tiles in small en suites are indeed Wickes, the grey wall tiles are from TileMountain.co.uk @ 9/m2 and look much better than that price. The large format 900x450 black tiles were also from tile mountain and were only £25/m2 they don’t photograph well but look great in real life, a kind of rusted iron look to them with a slight sheen/glimmer that really shows off when wet. The tiler thought they cost me £60m2 upwards and couldn’t believe what I paid for them. 5 - Labour. Electrician was £3500 labour only, he used my site as a “hospital job” doing a couple of hours on odd afternoons when other jobs ran shortness or cancelled, or on Fridays when he wanted to finish up close to his home. I pestered him to ensure he always stayed ahead of where I was and his slower progress never ever impacted anything I needed to be doing. He was an acquaintance already and we ended up with a good working relationship. For example it took him about 4 months to complete first fix 100% but as I say this never mattered as any room I needed to board or progress onwards was always completed. - Plumber - friend did boiler room and snagging of my work for £1000 all in, this figure came about as I told him I only had £1000 for plumbing labour, so that was that. I did all first and second fix myself. - Plasterer / Renderer - £6000 labour only for external render, internal scratch coat and skim. Cousin of mine so no other quotes were obtained because I know his work his top quality (he works on a lot of the ridiculous houses being build in Rock, Cornwall - Gordon Ramsay’s place included). I probably did get some mates rates here but I don’t actually know to what extent, 4 plasterers on site at one point who I didn’t know so they all had to be paid out of the total. Tiler - £160 a day, my advice is don’t be afraid to use day rate, if you trust the tradesman you could both end up with a better arrangement. When you ask someone to quote on price you are offloading the risk and paying a premium for this, my advice here would be to de-risk the job as much as possible yourself then get some one in on day rate who will be happy to do a good days work for a days pay. Joiner - £100 a day, this was a bit of luck on my part. Skilled joiner had some health issues and couldn’t drive at the time I met him, was getting himself back in to work after an extended sick period so was willing to work quite cheap. At first I was picking him up each day but he got his licence back during the build. I’ll agree this probably saved me a fair bit, I’ve had him here working for the final 4 weeks. Ah the jack and Jill bathroom - I think my first post here which I remember your good self replying to offering advice. Well we took it and now have 2 separate bedrooms with 1.8 x 1.5 en suites, 1 with 1500 Bath 1 with 1500 shower. It’s the ones with the light grey tiles. Much better than the jack & Jill so thank you. The drive retaining wall is just standard blockwork, only completed the day of the photo so still very green. Further down it will transition to Gabions to keep costs down. We we do have space for another property, actually several more but the guy I bought it off, who is now our neighbour placed a covenant on it that a I could only build 2. Ground is slightly made up at that end of the site so I don’t think footings would be easy. As I said before I think some sort of lodge garden room structure on a slab may be what happens there, and may look at the possibility of Airbnb’ing it. However I liked this plot as it’s private and I don’t think I have any sort of knack for customer service. I may still build the lodge but use it as a Cigar and Whisky lounge!3 points
-
It's very moving to read posts like these. When the phrase thats not today's problem as in is used , it puts my own insecurity and stress sharply into perspective. And maybe other peoples too. My experience tells me that it takes a high level of persistent stress and anguish to get to the point where just getting through that day is counted a success. Thanks for posting @lizzie and @Moira Niedzwiecka, I am sure you can count on our continuing support. Have an appropriately modest man-hug. (each) Ian2 points
-
Haha left of the black sofa, view out the window, side table for my pint! The middle section is an electronic recliner so it folds out and makes the whole thing one big living room bed, I plan to be found here snoozing quite regularly over the coming weeks! highly recommend self build to anyone reading this and not currently doing it, we could never have afforded to buy this house so sitting here now I’m feeling extremely chuffed. It’s only work, and it’s really not that hard, get on with it and get it over with. I wasnt one one who was in it for the enjoyment of the process, it was always a means to an end so I never found motivation an issue, the sooner I start the sooner I can finish ?2 points
-
At the moment I have done stress & am now advancing rapidly on to full nervous breakdown Having suffered nearly 2 years of hostility & harassment from some of our neighbours who we had previously counted among our friends, we commenced our build last January. Just as we had finished the ground works my husband was diagnosed with cancer, inoperable & incurable but he has had some really intensive treatment & we are waiting now to find out if it has been effective and what the next step is. This has meant that I have needed to continue working full time as it is our only income. Along with dealing with illness, financial pressures, a demanding full time job and trying to manage a self build, when I don't really know what I am doing half the time, I am spread pretty thin at the moment. Still, it has given us both something to focus on. However, we have had to adapt and changed our method of building to a closed panel timber frame system. The timber frame company PYC have been great. They pulled our project in really quickly and have been so supportive. My husband really wanted to see the house built & as we may be short of time & I cannot thank them enough. The roofing contractor has not been great & has caused me a lot of sleepless nights over the last couple of weeks. Also the neighbours reported us to planning enforcement saying we had not built to the permission & had built in the wrong place, extended the footprint & built too high. Enforcement were very surprised how accurate our measurements were & wrote back to them saying 'The development as constructed is in accordance with the plans as approved.' I think we are now back on track. The windows arrive on Monday & PYC are coming to fit them & finish the airtightness detailing & a few bits of insulation that could not be completed until watertight. I think I will then be able to breathe again. I think the camaraderie & support on build hub is so helpful. It is stressful & there are times when you just want it all to go away. But there is also excitement & sense of achievement and knowing that lots of you have said it is all worth it in the end. Good luck to everyone!2 points
-
I will write about the install of my MVHR system, as this is something I have done myself (with help). Theo house is being built by my contractor, supervised by my Architect and QS (who is the CDM). As I am remote from the location I can only watch what happens on CCTV. When I was last there the old house was standing and we had disconnected the services. 6 Months later, I have a new house, Weather tight shell, Windows and doors in, sarking and felt on, and tiles and PV being fitted. I am doing the MVHR as I couldn’t find a company to design and install what I wanted so I did it myself. Had a slot in the schedule for me to work and got on with it. Internally the team were completing first fix joinery (all the stud work). This was the two-man team who are always on site and are doing the majority of the work, the company bring in others when required, but the two in the house whilst I was there are my main team. My design: This is my layout as planned, 2 x Brink Renovent 400 Plus units, 4 x Ubbink AE 24 port distribution boxes, 180mm insulated duct and silencers for the main runs and 350m of AE48C duct, 50m of AE34C duct with all the associated connectors and fittings. A total of 36 outlets/terminals….. Suffice to say it is a lot of equipment. It arrived on 8 pallets at around 1100 on the Tuesday morning. I sourced all my equipment from CVC who were/are great, arranging delivery slots, supplying additional equipment quickly, and I still have an outstanding order for the vent terminals and some other bits still to complete. I arrived on the Monday lunchtime after 6 days of traveling (not all to get there) and had a meeting with the site manager and the first thing we agreed on was to board out the plant room with MDF (as a final finish) so that we could install the equipment and be done with it (rather than approximately place it and then remove awaiting final plastering) This turned out to be one of the best decisions as work could be finalized and other trades could also finish work in there (First fix electrical could fit the 24 way 3 phase CU)… We also got the loft boarded out at this point to enable the first floor runs to be completed. On Tuesday morning the building team started boarding the plant room, starting on the wall that the MVHR units were to be sited as a priority, this was completed by the end of the day and then started on the attic boards. Once the delivery had arrived and I had checked it I had some initial work to do. First to install the acoustic insulation into the distribution boxes and trim the spigots to the 180mm mark and move 2 of them to the top for the ground floor. I the attached the first 2 silencers to the top mounted distribution boxes (Large jubilee clips (44-217mm) work perfectly). These would then be mounted against the ceiling with the silencers running up into the plant room. (the first floor is 250mm concrete planks and I am having a suspended ceiling to put all the services in). This is where having a builder with all the equipment to hand come in handy. One of the team then worked with me, the manifolds were fixed to the ceiling, simple concrete screws direct into the planks and then we started on the ground floor ducting. (I had pre calculated what ducts from what rolls, but that got altered on the fly when we had longer lengths remaining) The duct was run through the stud work and fixed approximately every 2 meters either with wood screws to the stud work or concrete screws to the ceiling. Rather than buying the Ubbink fixings £15.42 for 10, I used builders band £10.00 for 10m and plumbers felt £10.00 for 20m (you can probably get it cheaper) as the fixings. The above shows the 2 ground floor manifolds and you can see how the builders band and felt was used. We got most of the ground floor ducting done in one afternoon. The terminals were left dangling with about 1m to the previous fixing to allow them to be positioned by the plasterers when the fit the suspended ceiling as they will be positioned either in the centre of a ceiling tile or plasterboard (room dependent). Wednesday started out installing the MVHR units as the main ducts needed to be installed before the attic runs could be done, this also allowed time to continue boarding out the attic. The first unit was positioned on the wall and to support it extra noggins were installed behind the wall, easy when the stud work is still open: We mounted the second MVHR unit then measured and marked out the penetrations for the ceiling. Then the builders simply took down the ceiling boards, cut them out and put them, back up. The ducts then had a perfectly snug fit through the ceiling. The two silencers going into the attic had to be slightly compressed oval to fit due to a double joist. Images of the plant room with the MVHR units fitted. (already painted) Fitting the attic manifolds was a little more complicated, the supply manifold went as planned Here you can see the 2 x 90-degree bends attached to the silencer going into the manifold and all the ducts coming off. The exhaust manifold wouldn’t go in as planned and had to be rotated 90-degrees to fit between the truss webs, fortunately I had plenty of 180mm 90-degree bends for the final connections. Exhaust from below and side (one duct moved between pictures). All the exhaust ducts were relatively easy to run (crawling through the webs). 7 of the supply runs had to cross the attic and not wanting ducts in the main storage area, these were turned down to run along the joist space. On the supply manifold you can see 5 of the 90-degree elbows turning then down and below the left 3 (2 from the side and one of the front ) look like this from below: This was the plan, but on the far side as the came up beyond the truss webs (non-boarded area) I didn’t use the 90-degree bends on the far end just curved them into place. You can see the runs under the attic boards (incomplete) and moving off to the respective locations. By Thursday we had installed all the ducts and terminals (so 3 days with a builder and all the tools). We then decided to fix the first-floor terminals into their final positions (just plasterboard for first floor) so either screwing/banding them to rafters, screwing to the attic boards where available, or inserting small offcuts to attach them to. The decision was made to paint out the plant room so we removed the MVHR units and ducts, bagged the ground floor ducts and the builders sanded and filled all the screws. It was painted on the Friday (advantages of a builder and his contacts). During the week I realised I needed to order some extra circlips (not easy to get large ones) so I ordered them via CVC and also my RH sensors which were quickly delivered. I installed these into the units (whilst dismounted) not an easy task, very fiddly and not to be recommended on a unit that is already installed. And the sensor heads into a short length of 180mm insulated duct. On the ground floor units we had a short length connecting the silencer to the MVHR unit, but one was not planned for the first floor ones, however as the silencers are flexible and compressible I inserted a short length on top of the House supply and exhaust connectors for this purpose and inserted the sensor there. Sensors installed in insulated ducting (simply tie wrapped into place) I then just had to wait for my final delivery. I am planning to plumb my cisterns into the MVHR (Se the previous blog entry) however since then @Auchlossen has done a similar utilising 75mm ducting so I decided to go down that route (hence the roll of 75mm (AE34C) ducting) I did use it for some runs. I ordered 3 x OsmaSoil 3S094G 82mm Reducer to 50mm Grey 860749 to fit over the 75mm ducting and convert it to 50mm plumbing push fit. The plumber will do the rest as detailed in the previous blog. These fit almost perfectly. The first picture shoes one pushed up to the seal, the second one shoes one pushed onto the seal. They are very tight with the seal but will push on and make a good airtight fit. As part of my initial plan I purchased a HB vent terminal for experimentation, just to prove that these systems are interchangeable I fitted an offcut of 92mm (AE48C) duct into the HB terminal, no problem. So, when the question comes up can you mix and match, yes (within reason). On issue I see with the HB equipment is I am not sure how easy it is to unclip the terminals once in place as there does not seem to be a way to easily und the locking lugs. On the Ubbink equipment you can unlick them by twisting the red click ring until it disengages and then remove the duct! The roofers are currently slating the roof and will fit my vent terminals in the appropriate positions with a 500mm length of duct to protrude through the roof insulation. These will then be connected up to the MVHR ducts when a come back to do the final commissioning, fit outlet terminals and balance the system. (next year).1 point
-
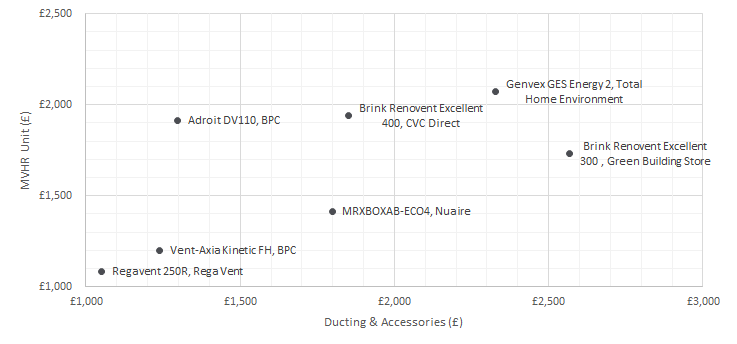
We've been quoting for MVHR's left right and center these past few weeks and have come to several conclusions: We're confident we can DIY the installation We think we can design the layout of the ducting (for a radial system with semi-rigid ducting) We have no idea why spec's (and therefore costs) being quoted to us vary so immensely (suppliers & units below) Calculations for Whole Dwelling Ventilation Rates (Table 5.1b) Calc 1 (# rooms) 4 bedrooms: 25 l/s = 90 m3/hr Calc 2 (internal floor area) 0.3 l/s/m2 * 184m2 = 55.2 l/s = 198.72 m3/hr Calc 3: (max # inhabitants) 14 * 4 l/s = 201.6 m3/hr (given our plans, we can sleep up to 14 people at peak times like Christmas and Easter) That leaves us with a unit requiring a flow rate of at least ~200m3/hr. Clearly we don't wish for the system to run at 100% due to noise and maintenance, so a unit with a capacity greater than this would be ideal. But is 50, 60 or 70% the best measure? And what pressure differential should be be considering? 50, 100, 150 or 200? There seems to be no standard way to compare these units! I'm an aerospace engineer by trade, so I'm certain that we can go ahead with the installation ourselves as well as the design. Then again, the same profession makes it difficult to select THE unit we should go for without thoroughly understanding that is it indeed the correct specification for us. Another compounding factor appears to be that Genvex is highly recommended in previous posts despite the units purchased by @PeterStarck and @JSHarris being almost double the cost of the units above (~£4k). Is this due to the inbuilt heat pump or combi boilers? or am I missing something? Edit: I should add that the total internal volume of the house is about 586m3, larger than the typical volume per m2 which makes the sizing even more tricky!
 1 point
 -
Usually not enough pipe to see the print as its repeated every metre, so just get a 15mm olive and see if it's snug or loose.1 point
-
Thanks @Grocey. What you have done in a year is impressive.1 point
-
Looks fabulous1 point
-
There are loads of ways of demonstrating compliance, but you often need to do a fair bit of work to track down enough information to keep BC happy. Bear in mind that, as mentioned above, what we loosely refer to as the "building regulations" are really the Approved Documents that suggest some ways that the building regulations may be complied with - the Approved Documents are not the regulations, just guidance, in effect. For example, for structures, then Approved Document Part A gives guidance based on standard details that are known to be OK, but equally you can use very non-standard details (like our passive slab, that sits on load-bearing expanded polystyrene) and show that this meets the regulations themselves. In that case demonstration of compliance with the regulations was by a structural engineer's report, plus the specifications for the EPS, concrete floor and steel reinforcement. When designing light aircraft (a hobby job I had for a time) I constantly had to battle a similar problem. The UK CAA has a set of regulations, and a set of guidance documents, that are exact parallels to the way the building regulation system works, but maybe a couple of orders of magnitude more comprehensive. I regularly had to show that materials and components imported from other countries, that did not have a recognised UK CAA or EASA (the European equivalent of the CAA) approval were OK. Sometimes this was easy - for example AISI material specifications ( the US standard) often had a near-enough direct read across to European or UK standards. An example would be that the common US structural light alloy, 6061-T6, was accepted as being equivalent to the far more common in the UK 6082-T6 alloy. Sometimes I had to go back to basics, and compare tests showing material properties undertaken in another country with tests that would be more normal in the UK. The most challenging job I did was convert all the data for a Hungarian aircraft design (before Hungary was in the EU) into the equivalent UK spec - it involved a fair few hours translating Hungarian to English and convincing a UK CAA surveyor that the materials used were equivalent to UK materials. I doubt that there will be any significant problem if you are importing building materials from anywhere within the EU, as they will almost certainly have some form of specification and certification that can be read across. There are a lot of agreements in place to accept certification from other countries as being equivalent to BBA. For example, the Irish certification scheme, NSAI is almost always accepted as being OK in place of BBA certification (just as well, as our entire house and garage only carries NSAI certification for all the structural materials!). You may need to provide evidence to show things like this, though - our building inspector wasn't aware of the read across from NSAI to BBA, for example, until I pointed it out.1 point
-
Bloody excellent job, and for a very impressive cost, too. I can appreciate the amount of effort you must have put in to achieve such a brilliant outcome at such an amazingly low cost, as even with all the work I've put in myself I struggled to get under £1400/m².1 point
-
Well done son looks cracking. ??1 point
-
Luverlly......A real home, and for £666/m2 your back ought to be sore for all the pats1 point
-
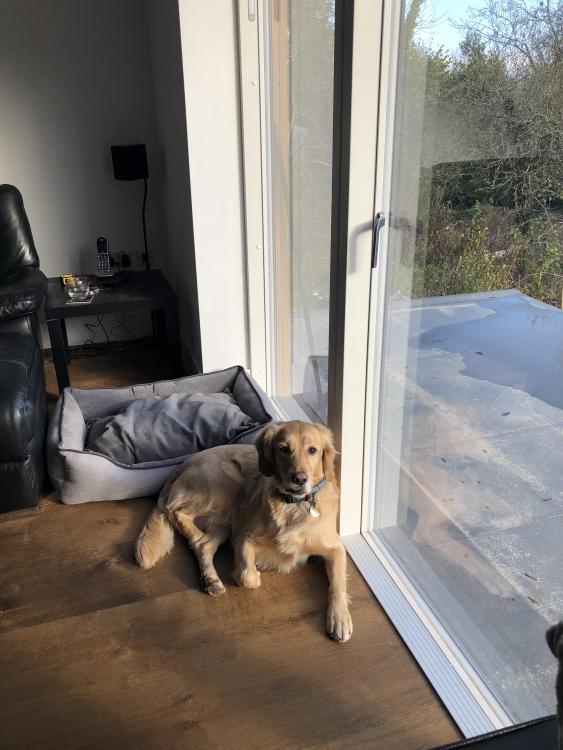
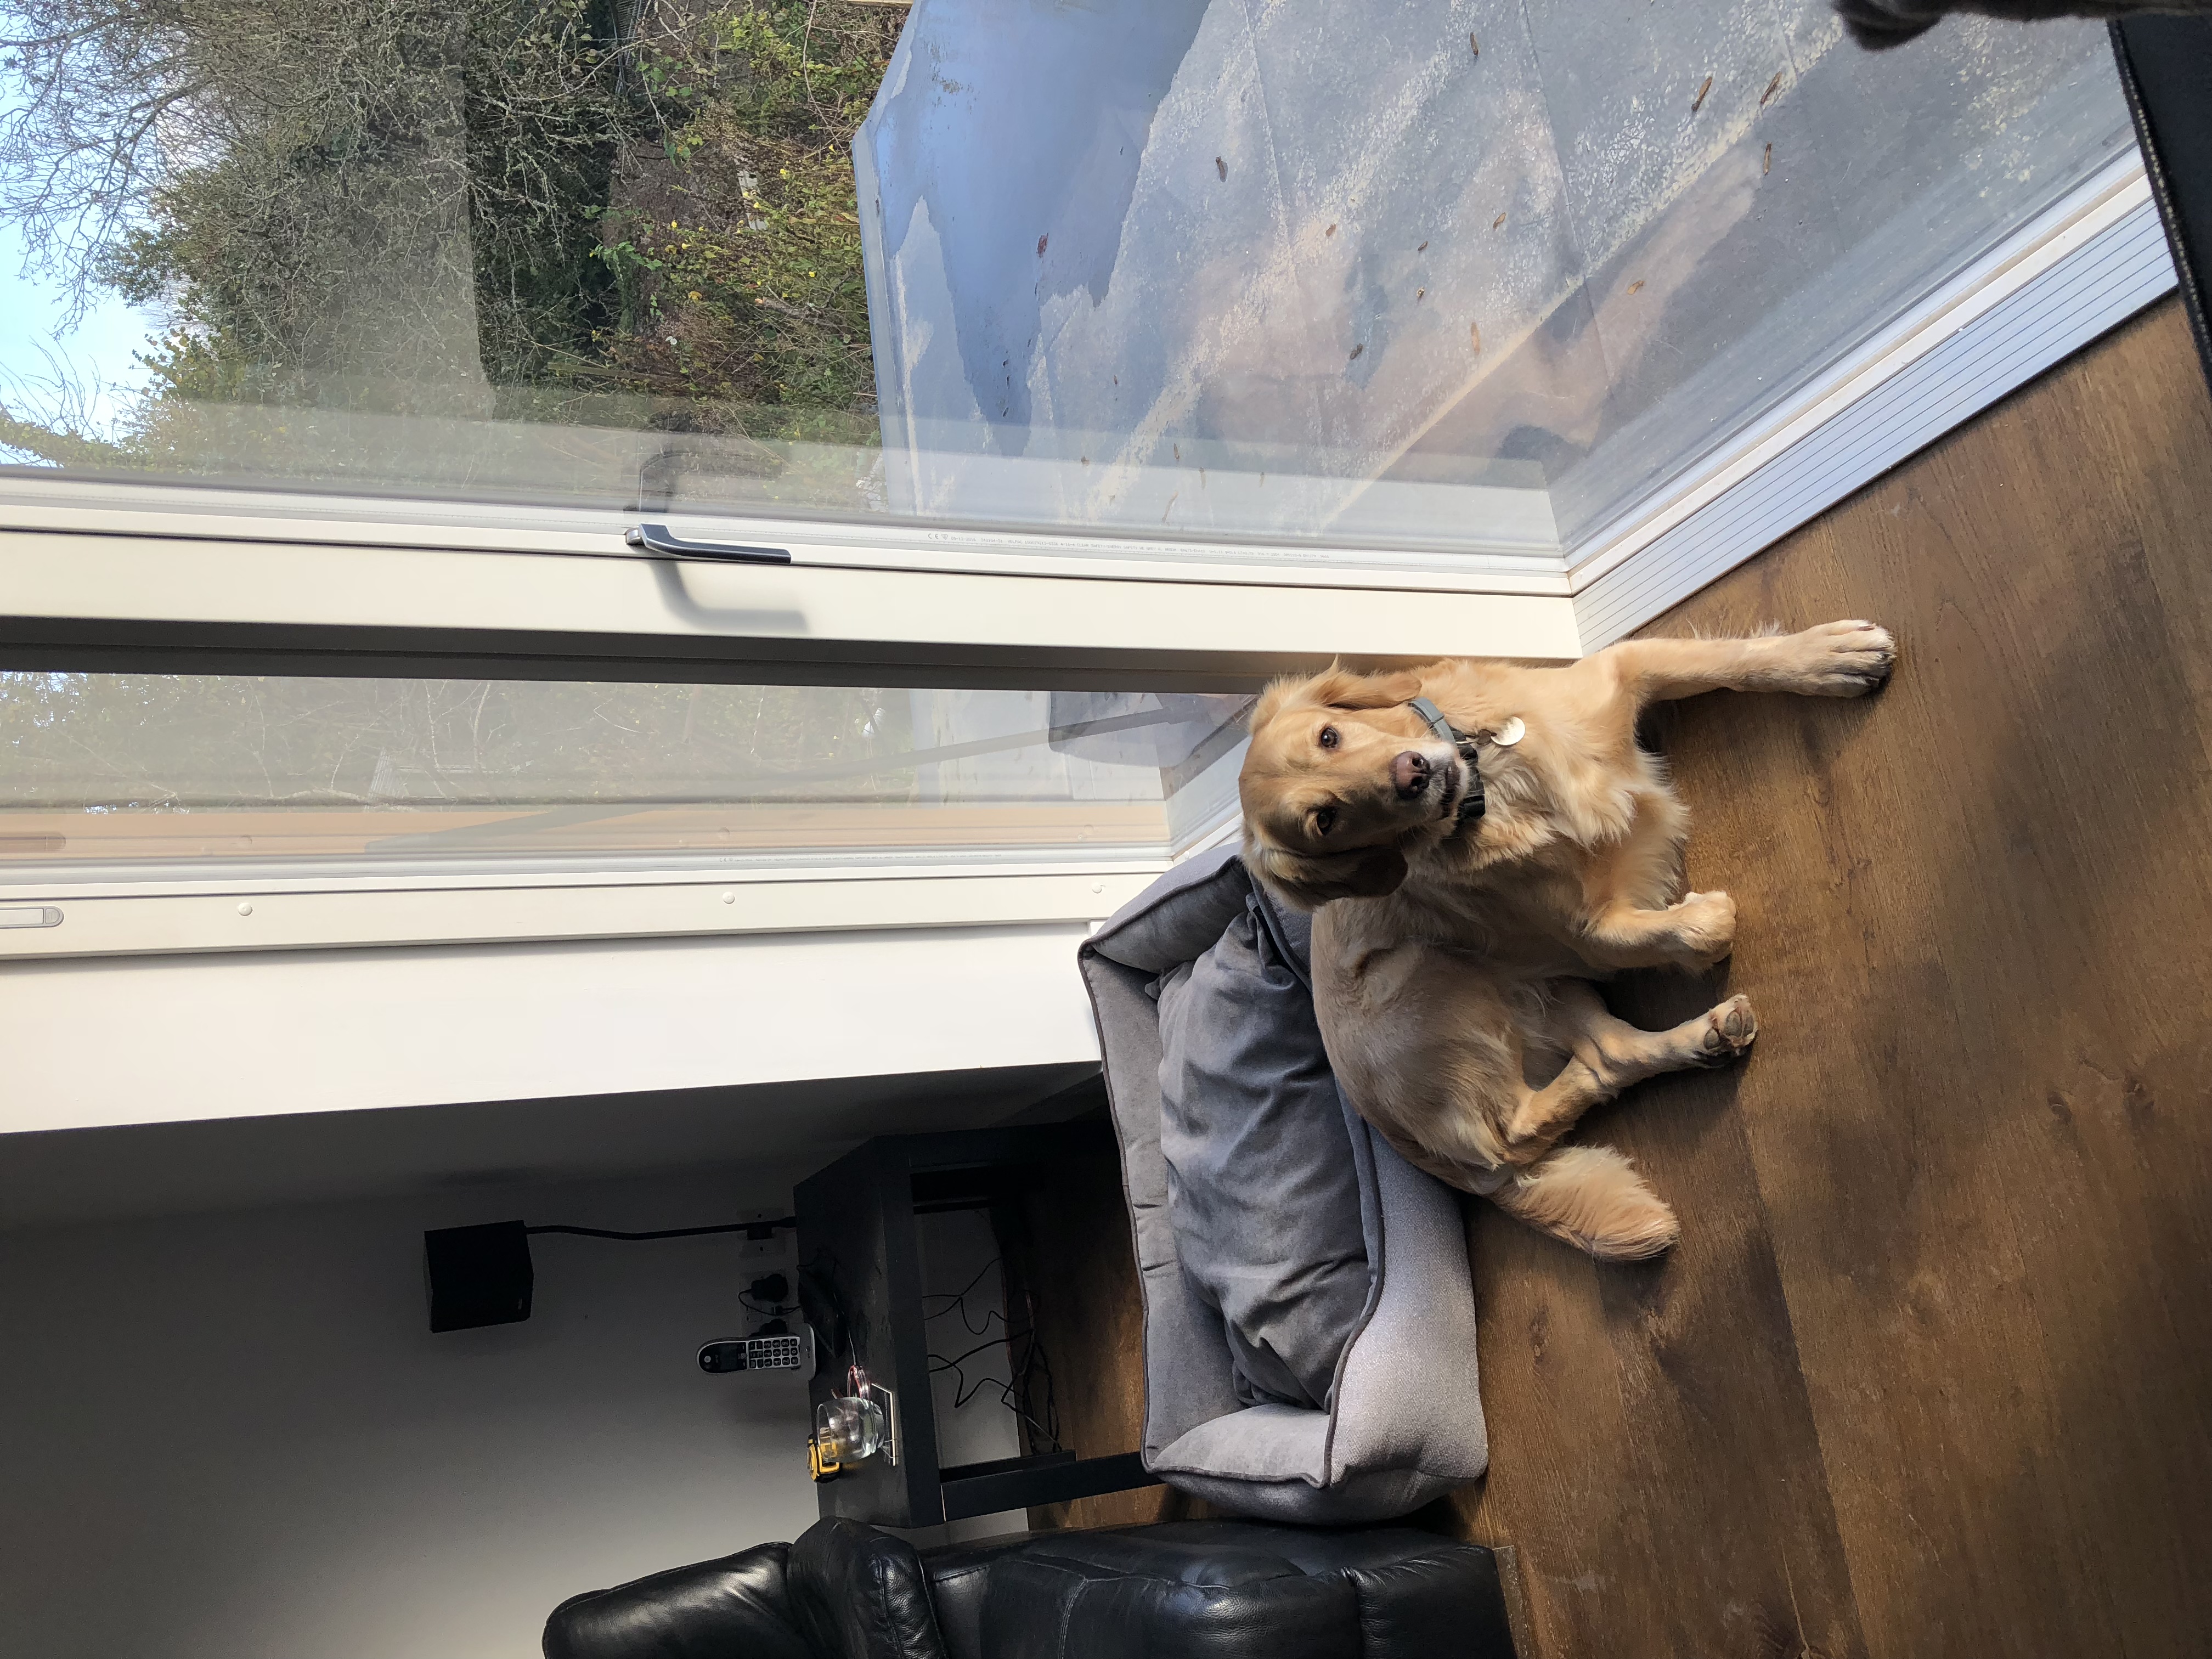
He is a beaut! Currently trotting from spot to spot trying to see where the best place to lay and snooze is. Basking in the sun from the balcony doors is currently winning...
 1 point
 -
Glad to hear you can have a nice night at the theatre for £80 and that you got a good win on the price match.1 point
-
Stunning work, looks really sharp. Still think your dog is the best thing though, so lovely1 point
-
Very very good - you seem to have hit a sweet spot with nearly everything (more detailed comment tomorrow). I love the anti-gravity dog and beer (last 2 pics click-thru) .1 point
-
Very impressive for the price, especially considering timescales. Well done.1 point
-
Hi Conor - like @ProDave I would suggest the best course of action would be to pressure test the loops. I would expect any damage would have been caused to the exposed pipework at the manifold so I would check that first. Removing the manifold will create you a few issues but I would want to test each loop to a minimum of 4 bar wet pressure and leave it for 24hrs to show any leakage. You may end up digging out some of the pipework near the manifold to extend the existing loops if they were damaged but that is par for the course in this sort of situation.1 point
-
Hi Conor I have split this post into a new thread as it was not really related to the existing thread you posted it in. My gut feeling is since most UFH uses plastic pipes, it is highly likely the pipes may have been heat damaged where they exit the floor slab into the manifold. A careful examination of that area, and if they look okay a pressure test will confirm their integrity.1 point
-
My parents in law have a number of wealthy friends - sold their businesses for £10-30 million type of well-off (after years of raking in hundreds of thousands of quid per annum from these businesses). All are retired with huge houses, expensive cars every couple of years, large holiday houses in France, trips all over the world. Yet to a person, all they seem to care about is foreigners, benefits cheats, regulations inconveniencing them ("health and safety gone mad!") and the amount of tax the government "steals" from them. I have a lot of difficulty sitting in the same room hearing them talk about how hard they worked to get where they are, as if every poor person just needed to a work a bit harder to get everything they've had. Oh, and it seems they all read the Daily Wail! I think the problem is that selfishness makes you unhappy. All the research shows that true happiness comes from giving, not getting. If these people spent a bit less time (and money) trying to fill the voids in their own lives with "stuff", and a bit more time trying to make the lives of others better, I'm sure they'd be happier. Not really a conversation you can have with them of course!1 point
-
I did look at getting a caravan but most I saw were pretty crap and certainly insecure if you wanted to part use them as storage. In the end I'm getting a 50/50 office/storage container for 25+vat/week - decent space for the guys and secure storage for some gear. Delivery is 125 each way1 point


.jpg.c21f3ac78c9b7efd90cbdcb312744dc5.thumb.jpg.7adcad4c0e384f5ecd7d56b0618df6e5.jpg)

This leaderboard is set to London/GMT+01:00