Leaderboard


Popular Content
Showing content with the highest reputation on 01/30/25 in Posts
-
Hello all, Matt & Hayley here. Last year we bought a sloping plot in Devon (the slope has caused more issues than anticipated), with a barn on (infested with bats and birds, cue further issues... and cost, obviously), this year we are hoping to finally start building! We have planning for a 4 bed detached house, made of Oak, with an ICF outer - it seems this hasn't been done much before, so this will be interesting. We've done a few renovations before, but never built the actual walls, so this part is all new to us! Thanks
 3 points
 -
When choosing a lock its worth checking what the Lock Picking Lawyer on YouTube thinks of it. Or your house might be as secure as this...2 points
-
Nice idea..... but you are building the house twice. Your building first with ICF. Then your building the same house with an oak frame. I've recently spoken to Oakwrights about doing oak detailing in a conventional brick and block build. That way your not paying for the build twice, but still getting the effect in chosen rooms. Oak frames can make room designs hard, as the frames get in the way of placing furniture and maximising available space. You only have to look on various Oak frame manufacturers websites to see some of the issues you face. If you do a full ICF build you can have oak engineered flooring,oak doors, oak kitchen etc, and your only paying for the build once.2 points
-
Here is the Oak design - not been 100% finalised yet. Oak design final.pdf2 points
-
2 points
-
That's the issue doing UFH, the floor can suck the heat away really quickly, this means return temp stays low, as heat pump wants to manage dT first, target temperature second. So if you try to run UFH for short periods, you never achieve a stable operating point. This means UFH can happily absorb most heat given to it, and big flows of return water keeping the return temperature low, never achieving target flow temperature. Run UFH long a long time the return temp increases, smaller quantities of hot water are taken into the mixer, more water is recycled within the mixer. Return temp increases because, more flow is routed to radiators and less to UFH. Heat pump achieves target.2 points
-
You’ve had it replaced properly, and now want to bodge it back up to look like the shite it did before. leave it alone. the large upstand is to allow for water bounce.2 points
-
Slightly askew to the thread but ref "trades". After some bad tenant experience I was going to sell a rental place, I'd just had enough. A neighbour said his mate was desperate for a place but had had a few "issues". Said not interested. This guy turned up out of the blue when I was repairing the front door after an altercation the previous tenant had had. He was bigger than me (I'm 6'5"), covered in tats etc but seemed pretty small and at a low ebb. This guy proceeded tell me he was recently divorced, ex had taken everything, CCJs against him, new girlfriend with baby on the way. No bank account. He was working as a builder but his money went to the MiL who paid his bills. Produced 6 (might have been 12) months advance rent in cash there and then. He was renting for 6/7 years and paid early every month. Kept the house maintained to a phenomenal standard, painting, fencing, repointing & decorating etc. I said one time it wasn't down to him but he was a proud guy and just very grateful I'd taken a chance and helped them out. Only moved out due to having another kid/space.2 points
-
My thoughts are, if you install “anti-crack” mesh into the slab, then it should be doing its job. I do make sure that the mesh passes through door openings, vs stops at the thresholds and then a new mesh starts again the other side with no crossover. That’s kind of in the idiots guide to tying mesh, but most guys I’ve been around who are installing mesh do this without being asked eg have at least one grid crossover at every sheet to sheet junction. With most good quality flexible tile adhesives you get a couple of mm of decoupling effect from the substrate, specialist adhesives such as BAL offer S1 which had between 2-5mm and S2 >5mm, so I guess getting 1-2mm with regular / popular flexible tile adhesives would be the assumption. Whilst the L shape slab cured a hairline crack appeared, completely expected, and then never changed state. It started prob 150mm inside the outside ring beam, spanned the living room of 5-6m, in the 100mm section, and then disappeared again at the opposite ring beam. I knew the tiles would be fine to traverse this without issue, as it was ‘microscopic’. Pipes are fine, there’s really just so very little movement, and the heating Durand go hot > cold > hot > cold every day, it just warns once and stays pretty constant throughout the winter heating season. Its all good, as long as the guys executing the slab are robust and give at least a slight feck about what they’re doing. All the steel / ground workers I’ve met to date have been spot on with this, including the MBC crew who do this in their sleep.1 point
-
What's the full list of parts you used? I've been faffing with various sensors for shed at bottom of garden - wifi coverage is great there, but sucks for battery life. I've now bit bullet and pulled Loxone tree down there. But Lora always seemed an interesting one1 point
-
Absolutely, it’s partly for their benefit. Ask for a full quote showing how much for each component of the works, that can sometimes beat them into submission when they have to prove what the money is going towards1 point
-
The guidance I previously linked to says this (emphasis added): 5.7.4 Mixing of PV DC connectors from different manufacturers should be avoided, and all panel connections should use the connector(s) recommended by the panel manufacturer. System operators should hold spare PV DC connectors compatible with the PV installation for future maintenance, to avoid the potential use of incorrect PV DC connectors. Internationally documented PV fire loss data identifies faults with DC connectors and DC isolators as primary causes of fire. Therefore, it is essential to use the correct PV DC connector, assembled according to the manufacturer’s guidelines, with the correct length and thickness of exposed DC cable, the correct crimping tool for the connector pins, and the correct torquing of the connector cable glands. IEC 62548:2016 and IEC 60364-7-712:2017 explicitly do not allow the connection of DC connectors from different manufacturers. So the concern could be demonstrating that you connectors and extension leads are up to the job.1 point
-
PMFJI but the DNO (WPD now NGED) accepted my application for a self-install after a bit of to and fro. So it can be done. Since then they have waived their original restrictions on inverter power and export power as well. And subsequently given permission for an EVCP and a 12kW heat pump. All on an 80A supply, quite a voyage of discovery, the 16 sq mm meter tails do get a bit warm at times.1 point
-
Screwed into 9mm hardwood ply
 1 point
 -
And once they do fail, as a customer of the failed company you get migrated to whatever company that is prepared to pick you up (or get told to accept you) and potentially that could be Scottish Power and I have no bloody wish to be back with them again so I'll stick with Octopuss1 point
-
well if they're just normally_open, a resistor might be used to control any stray voltages that could be induced in the wiring1 point
-
During my 8 years over in sausage side we used to get this problem on a weekly basis. Why oh why do they not remedy the problem at the design stage so it can be built as per the design ? A bit like imperial window sizes in metric builds. 🤯1 point
-
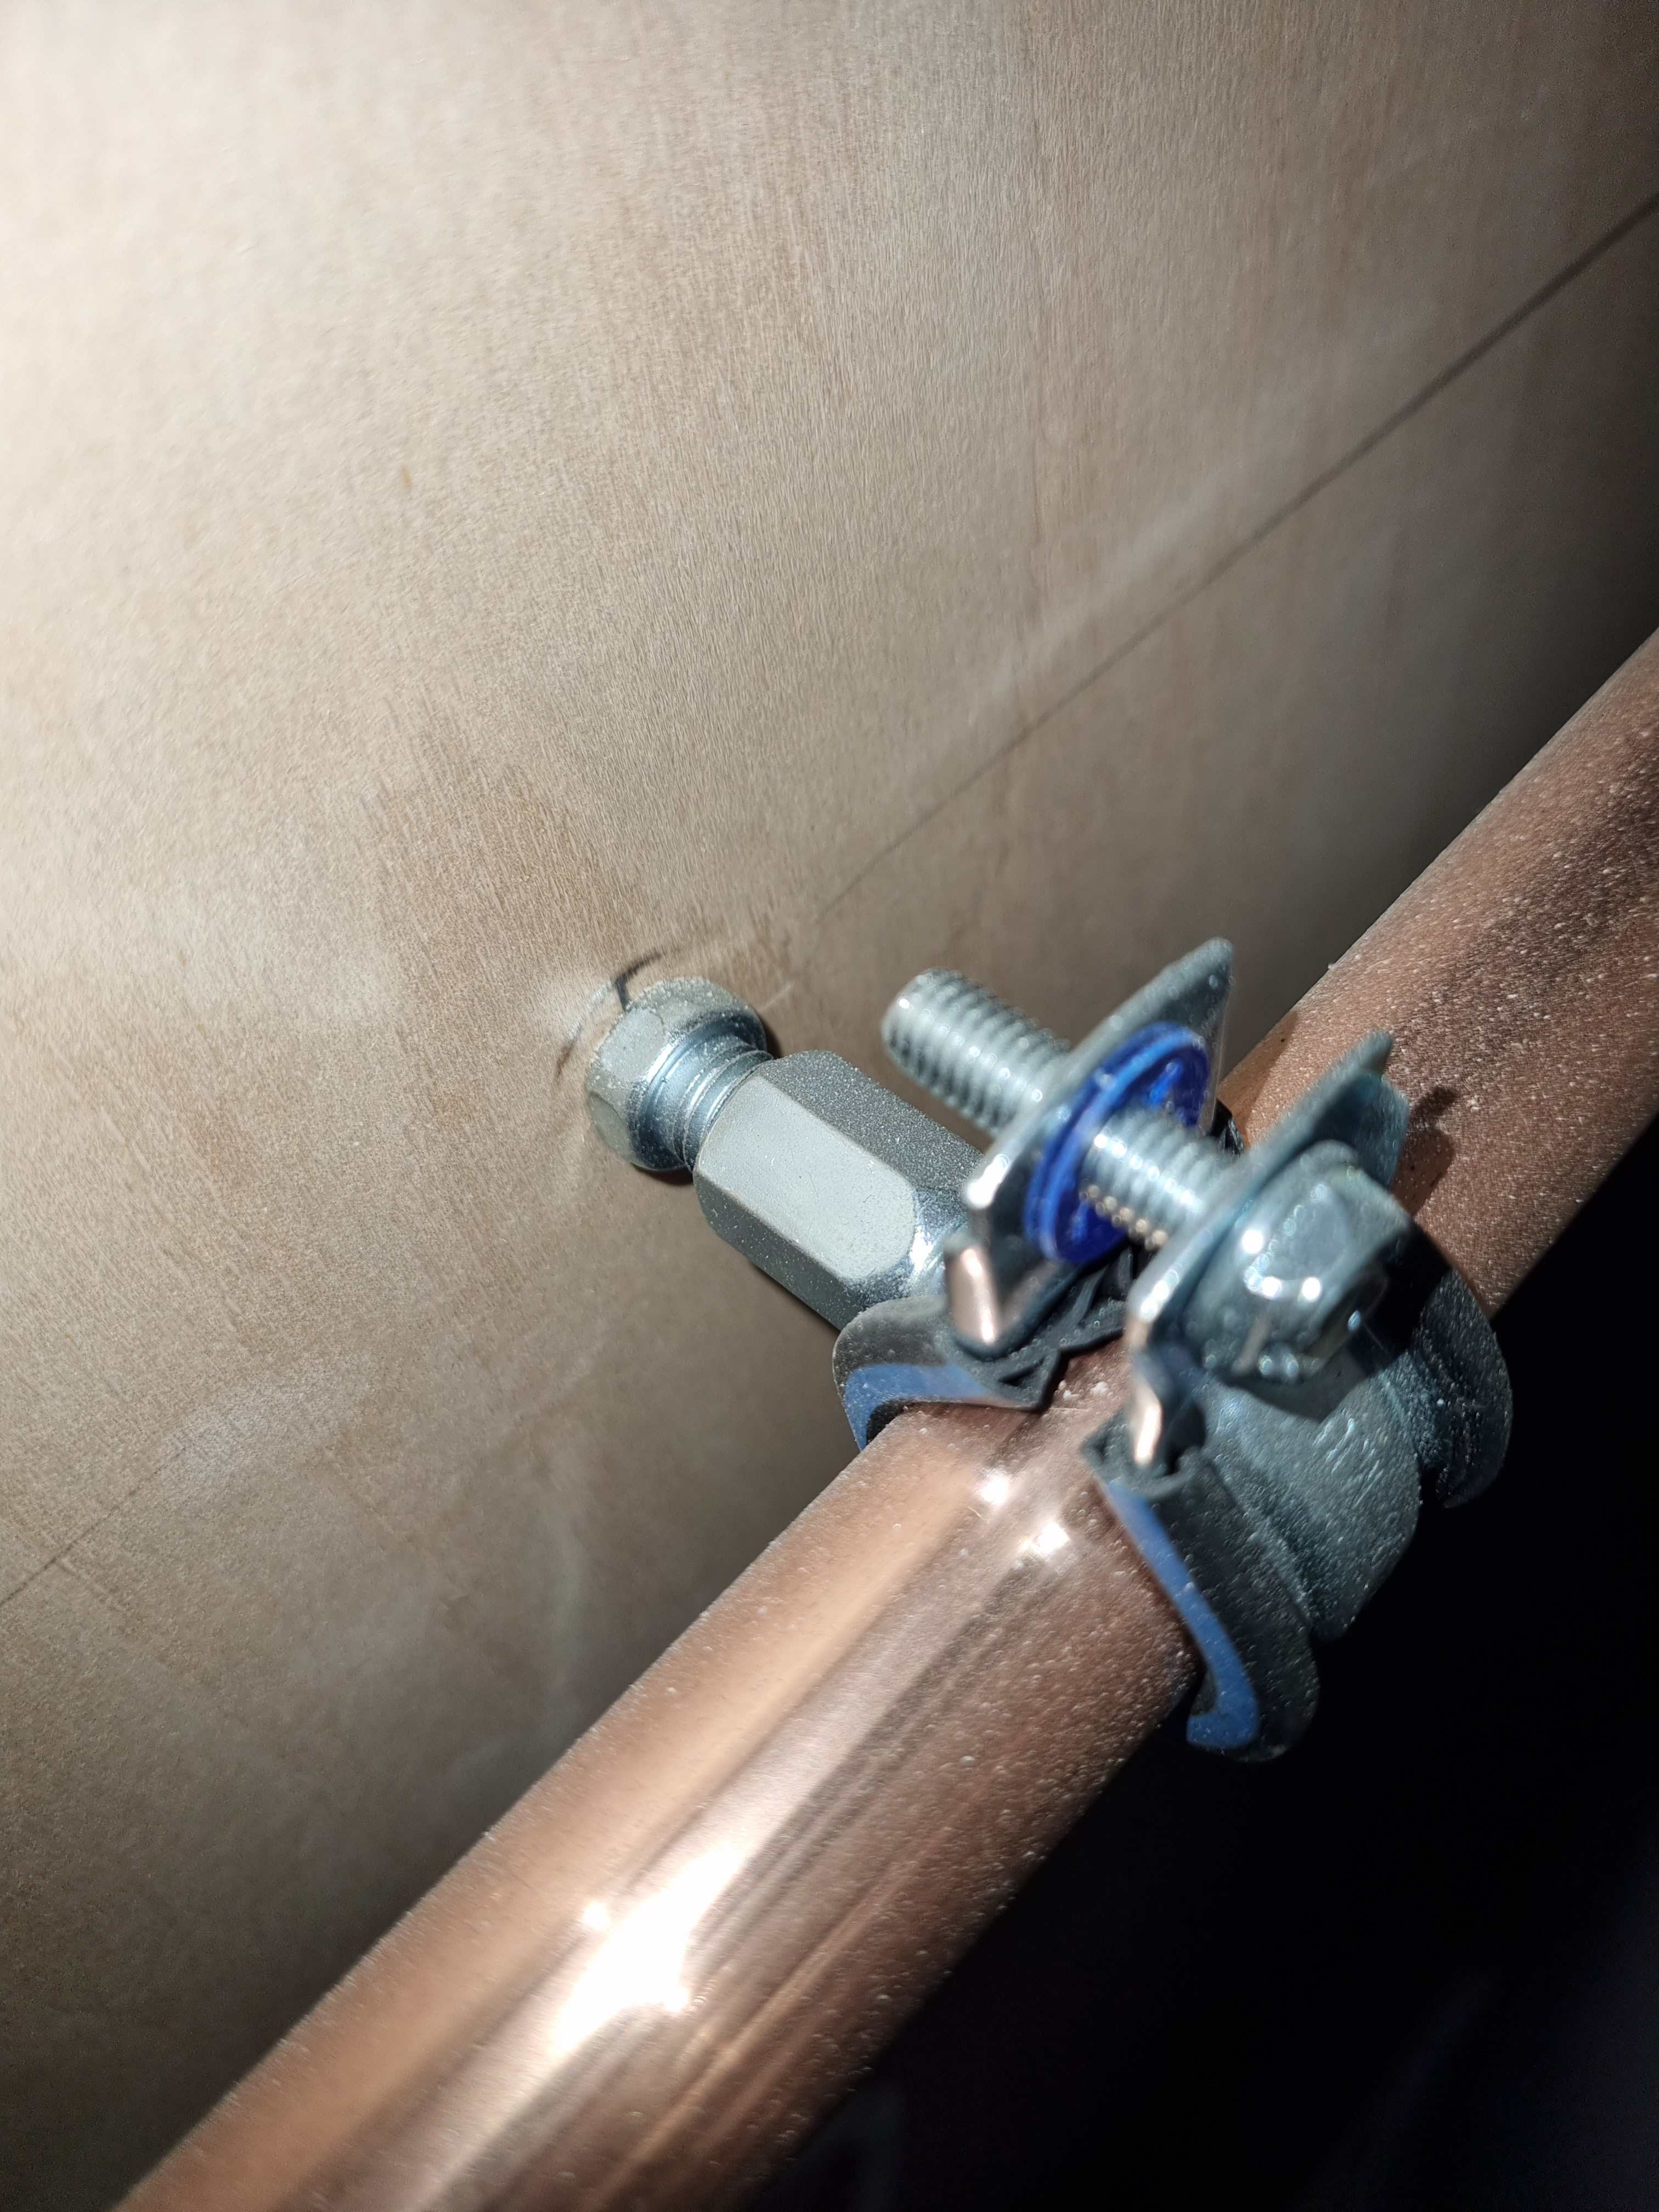
That is what I thought but zooming in you can see that it is not - looks like either nutserts, see below, or a bolt with the head on the wall side of the board, which is why I asked.
 1 point
 -
OMG! LoRa WORKS! Went to the end of the street still a strong signal!. Amazing!!!1 point
-
The roofer will lightly have had to tuck the lead in between two courses in the brickwork so maybe have come a little higher than you expected. It's probable they did a proper job on it though. It looks completely normal to me, and if you hadn't highlighted it, I doubt most of us picky self builders would even have noticed. To miss quote Shawshank Redemption. "I mean, seriously, how often do you look at a man's roof?" Live with it for 6 months. Then you can either change it or paint it. I guarantee you won't, you'll have forgotten all about it.1 point
-
I'd trim the ends of the block sides so you can sit then fully in the steel and then tie into the web. We fixed wall starter kits into our web (using self tapping screws) and then the ties just slot into that at each course. Hasn't your SE provided any detail for this?1 point
-
It looks 'right' to me, not wrong - but what goes on at the LHS? 'Residual flashband' or just some more patinated lead?1 point
-
That is probably because not many are made, and none of them are for RWH as they are usually modified swimming pool filters.1 point
-
I meant to visit. 34 years ago I knew I’d leave this house in a box. Now I realise that isn’t true. Our new pad will be the forever home, but I’m more worldly now, so I won’t say I’ll leave there in a box, it might be in a care home’s van. 😉1 point
-
I did one that had a massively over-engineered slab (I think I talked the buffoon in charge down from nearly 300mm with a screed for the UFH down to 230 with the heating pipes inboard of the raft). Bonkers. This was a 1.5 storey ICF build, timber floors. The client has a 7kW heat-pump running UFH with 120mm c's; the idea of the tighter laid pipe loops is so that they can use the additional water volume and additional cross sectional area of pipe > concrete (surface contact area) to quickly chunk heat into the slab during pockets of cheap electricity, but more importantly to allow cooling to be done at a higher temp (to stay WELL away from the dewpoint). Is in and working well, but it's a huge thing to get to a set temp. Once it's there, it's very comfortable, just needs the stat to have the aforementioned tight hysteresis to prevent unwanted under / over shoot. Seriously consider the extra volume of pipe & water as it can reduce or negate the buffer tank1 point
-
Unlikely as an ASHP normally will supply a minimum of 25 Deg in heating mode. Then at deltaT 4, plus restart hysterisis for the heat pump, you need the floor temp to drop below 20. If that's the case your floor would provide zero heat to the house. Tried that with mine (25 Deg flow) it ran fine, but never restarted, floor just never cooled enough to allow ASHP to restart. Thermostat you need a hysterisis of 0.1 or less if you can one. It has to be on/off not TPI. I have 100mm concrete with UFH pipes at the bottom - I am also 300mm pipe centres, response is slow. But if you are prepared it's something you can use to an advantage. But don't expect setbacks to work, they won't. WC works fine. If you use a tou tariff, get a bigger heat pump and batch charge the floor storage heater mode. I am at a out 3kW at -9 and have a 6kW ASHP, will run without stopping buffering into the floor if I want it to. If your heat loss is 2kW, you need 48kWh of heat, if you only have 7 hours to heat you need 7kW of heat input, plus it may need defrost or modulate down to manage dT, so even 8kW would be fine.1 point
-
Very quick reply as it is past bedtime. It sounds like you have it all covered and well understood. The ASHP with weather compensation handles the temp variance. It will take awhile to dial in the best compensation curve. So in the early days the house might not be at quite the right temp. The heat changes are very gradual, but that is actually its strength. A well insulated, air tight house is nothing like traditional houses. In my build you don’t even think the heating is on, the floor is cool to touch. But somehow the house at 20° does not feel cold, whereas the 90’s built rental house feels freezing even when the room temp is 24°. Remember, even though you have MVHR you can still just open windows to quickly change the room temp. It will have very little impact on the floor or ASHP in the short term. You are not losing control of the heating, you don’t need to worry about the response time. Just one extra thought, 250mm raft sounds very thick, my ring beam is 250mm but the main raft is 150mm. I have a very heavy ICF house, concrete stairs and concrete first floor, I would have thought you only needed 100mm raft for a timber frame house.1 point
-
@Nick Laslett HAS got this, and it's doing great, is what he's saying. Not sure if you're confused there, sorry. FYI @zzPaulzz, I have done a number of MBC PH TF M&E installations, (I got recommended directly by MBC or otherwise got awarded the project after MBC engaged), and there has been UFH in a 100mm constructional slab on EVERY SINGLE ONE . I have worked with many SE's to date, and found Hilliard Tanners to be the most approachable and pragmatic by far (including myself designing foundations for ICF builds with insulated rafts + UFH etc) and they accommodated my methodology; only once they had suitably scrutinised everything I had sent them and they were then 100% satisfied to produce a design that we could then use on site to instruct the groundworkers to build the foundation from. I've NEVER fitted expansion gaps on a 'passsive raft', NEVER cut expansion gaps in anything other than much thinner and non-constructional screeds, and most were tiled over. Zero cracks / other evidence of cracking etc whatsoever. I always leave it a full 6-9 months to allow the slab to cure before applying the tiles, other floor coverings can go down much sooner, but the builds normally progress sympathetically to that timeframe being acceptable / possible. The running temps of the UFH in the raft are just so low the damn things don't move much at all, if anything! The MBC PH TF I have just moved clients into has a flow temp into the raft of 26oC, and I'll bet that gets dropped back 1-2oC by next winter, once they've got the house bone dry and properly acclimatised. 140m2 L-shape slab.1 point
-
Hope this helps a bit. The following is general but this is the way I do it... the following is simplistic and I mess about later on technically..to value Engineer where I can.. but roughly.. If you want to cast your UF into the structural slab (think of a structural slab like a wide reinforced concrete beam.. you don't put movement joints in a beam). By definition this would be a continuous slab with no crack /movement joints. To design a structural slab for strength, shear and deflection etc I would take the effective structural depth as being to the underside of the UF pipes. The bit above that is neglected... just like a screed. But in this case you just cast the slab to the full depth. If you have say a ground bearing slab with movement joints then each bay gets it's own UF loop that does not cross the joints. UFH design is much based on common sense and past experience. To my mind there are too many folk that are trying to make wet UF seem like an exact science. This I can tell you from forty years experience.. it is NOT!.. well it may be for the first year or on a calculation sheet (if you get really lucky) but after that when the controls start playing up and no one has a clue about the design philosophy / how to operate and maintain it. Then you actually need to look at how the stuff gets installed on site which can blow any theory out the water any way! In the heat of battle on site I would challenge most folk to stick to drawings! Cut yourself some slack. There is no point in paying for a UF design you can't deliver practically on site. I see this all the time... folk just waste their money. I'm a massive fan of UFH and have put these systems into my own self builds and renovations. But I always go for the simple stupid.. like they do often in Nordic Countries. Now simple stupid does not mean the system is uncontrollable. But it needs the home owner to be aware of how their house warms and cools,that is you weather compensation! @zzPaulzz Go back and have another chat with your SE. It seems like you are working at cross purposes.1 point
-
@zzPaulzz I went down a rabbit hole on the different types of UFH pipe, because I wanted the pipe embedded in the concrete, but it was hard to find details from suppliers if they endorsed this use case for their product. Optimum underfloor were one of the few at the time that had a technical drawing showing their pipe embedded in concrete slab. https://www.optimumunderfloor.co.uk/s/Optimum-Installation-Guide.pdf @garrymartin provided details of the Warmup specification for UFH pipe embedded in concrete in this post. I have the generic Kore Technical Drawings from my foundation design that show the UFH in the raft. In the NSAI certificate for their system it states tha UFH can be in the raft. They have a recent blog post that elaborates; “When fitting underfloor heating pipes, the pipes can be clipped to the steel mesh or to the KORE Floor Insulation.”


 1 point
 -
Good to see you being innovative. With my SE hat on when making alterations to flats I always ask to see the flat below not least and if mid floor the ones above. That means gaining approved access. Two main reasons are: 1/ I want to get some record photos of the condition and any cracks. This helps protects you not least. 2/ I want to check if any in unrecorded (illegal) alterations have been made that the council etc may hold not record of. This happens a lot! In summary you need to know what has been going on down below and in cases flats above if a mid floor flat. To explain a bit.. often "non" load bearing walls can be taken out on the floors below and your higher up flat may be serving to provide sideways and wind restraint restraint to the external walls say. If you remove another floor's worth of sideways / wind restraint that can be very dangerous. My advice is don't buy a flat hoping you'll make money by knocking out walls. If you really want to do it then you should stump up the cash for an SE BEFORE you buy.1 point
-
That is a real shame. I was determined to have an insulated raft with embedded UFH. I could not be happier with the outcome, even though the engineered timber flooring is covered with underlay and correx the ASHP is running on weather compensation with a max flow temp of 27°. The temperatures of the house is 19-20°, the floor feels cold to touch and it doesn’t feel like there is any heating. It is a bit like magic. MVHR still to be commissioned, so windows are open to provide some ventilation. So far very happy. I think the house might actually be exceeding the heat loss from Jeremy’s spreadsheet.1 point
-
If you are using MBC, why aren't you using their insulated slab? They know what they are doing. Ours has the UFH pipes installed as part of the slab before the concrete pour. Never heard anything from an SE about having to cut expansion slots or whatever. Not sure what our ground floor is but it's got to be 175m2. Our flow temperature is probably just above 25C. Given you are using the MBC PH build, you must be aiming for PH-ish energy requirements. Why would you run flow at 35C Anyway, the great thing about these slabs are that they are like having a thousand of the old storage heaters which you can batch charge on cheap electricity - probably your plan - but it makes for a v comfortable house. I'd sack off your SE and get MBC to do the slab.1 point
-
As far as saving and storing reclaimed timber - yes it's not always easy or convenient and you do need to consider what the end use will be. Mine has been denailed and is stored outside and uncovered; they are nearly 7 metres long so I didn't have much choice! They do look grotty, but when I cut through the moisture has only penetrated a few mm and the heartwood is perfectly sound. I roughly cut them to size when needed and leave them to dry out indoors for a while, then a quick run-over with a heavy-duty sander or, (old expendable) planer makes them like new. These were all saved for internal stud work so don't need to be 100% die straight or dimensionally accurate, (still better than the typical wavy wet matchsticks you can pick up at your local DIY store). Getting them ready for use takes slightly longer and requires a bit more care in selection but is very satisfying if you can do it on a DIY basis at your own pace. If I intended them for structural purposes, (which they would be ideally suited too - well above C24 grade) then my storage requirements would change.1 point
-
Yes. Its right there on your doorstep so to speak. The LPA's own website. Search for every similar application in the last two years or so. Read them carefully. List the surveys required. Look at the local maps. Compare. There's yer answer.1 point
-
A change of use in planning terms will still require a "full" planning application. Your council may well require various reports etc to support the application. If you look on their planning website under "validation" many Councils list what they require to be submitted against the type of application being made. You'll also need a Building Regulation full plans application.1 point
-
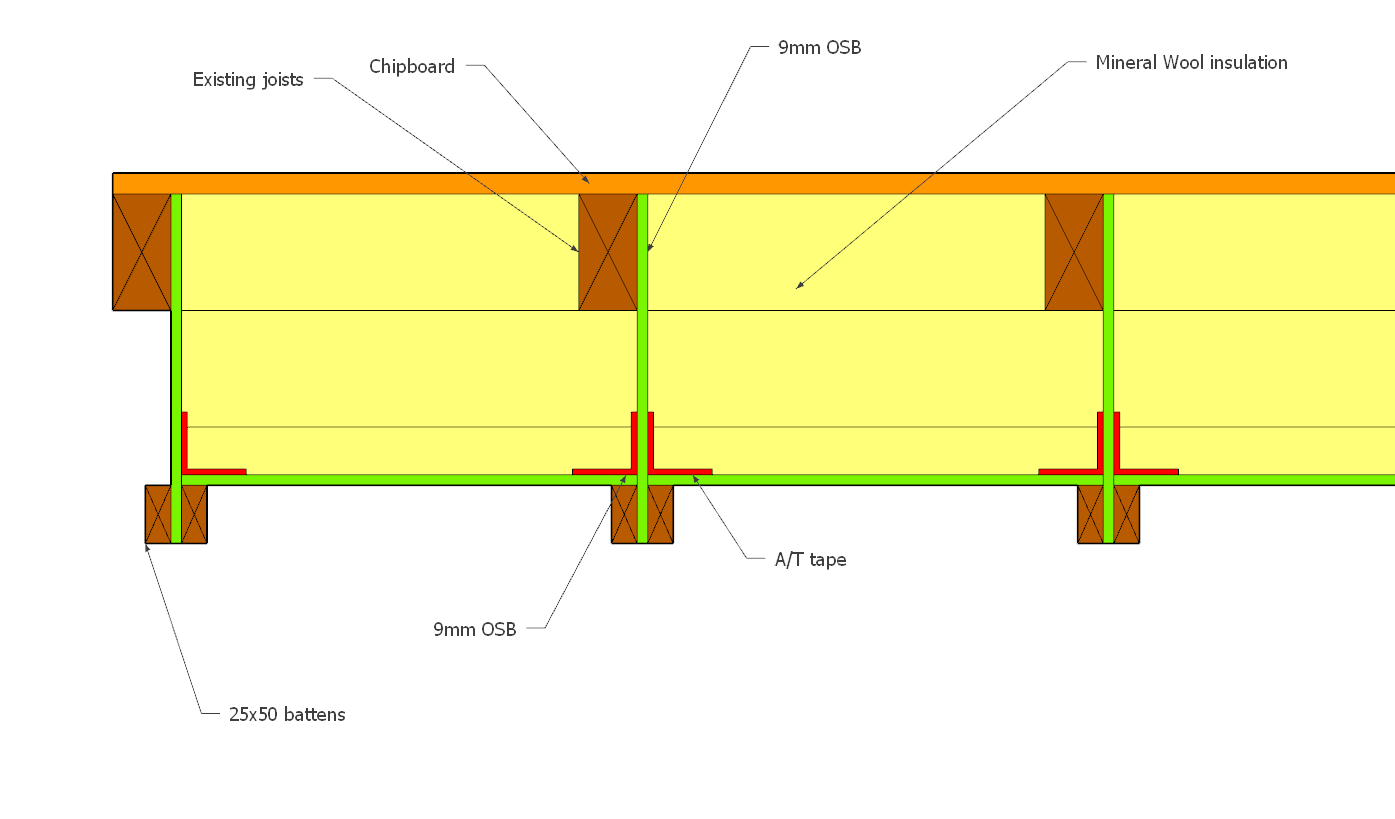
My suggestion. U Value about 0.16. Rip some 9mm OSB, nail 2 x battens to either side of the bottom to create a flange. Nail it to the sides of the existing joists. Drop in a bottom piece of OSB to create a box. A/T tape the corners to make it completely wind proof. This is very important the performance as your insulation will get wind washed if it is not sealed. Drop in the mineral wool/woodfiber insulation. Lay the Chipboard on top and fastidiously foam glue all the joints. This will be your internal airtight layer. This proposed arrangement can all be done without the bother of getting into the crawl space at all. If you add some glue to the OSB and the battens you would effectively be creating an I beam which would massively strengthen the floor too. I never like PIR between joists. Too many reports of it shrinking and coming loose over time.
 1 point
 -
If you need any advice we used a good planning consultant in Cirencester pm me if you need them.1 point
-
If you want a better u value then you need to buy a better quality door, if you want more height then get a door with a disabled access threshold so it’s only 15mm high. you will still need 2100 high roughly from floor to underside of lintel. why French doors, they will look strange at the front, are not very secure and tend to drop if you buy cheap ones. window and a good quality solid core door would be my choice.1 point
-
Kind words Jack Thank you I’m often asked can I recommend a good roofer plumber etc I don’t like to recommend anyone that won’t do a good job at a reasonable rate and is reliable You tend to find that with most tradesmen So my massive list of contacts is quite small Bits of advise If you are using a main contractor or getting the trades in yourself Expect delays between trades Or your just going to get who’s available Be patient A few weeks delay in the grand scheme of things won’t make that much difference This is why mass produced houses are so bad Know what you want before you visit your Architect Don’t let fees rack up Get a good SE onboard We spent 800 -1500 on the SE Plus 500 for a Topo Familiarize yourselves with the drawings Then you can spot mistakes easily LA building control won’t be swayed by the builder that’s brought them in and are readily available and on anyone’s clock Most builders will tell you that LA BC are a pain in the arse and they are But at least there inspections don’t rely on Photos of YOUR house More so this time round Do all the buying in yourself Quotes for the same items can be double when going in to negotiate on tiles bathrooms etc Go in your scruffs and boots It’s common knowledge that all self builders have money to burn 🔥😁 The biggy Do as much as you can There’s lots of jobs that we have tackled that neither of us had any experience of So many things are a learning curve Oh Remember when you go into the merchants The chap selling the stuff probably only knows slightly more than you 😁 When dealing with trades There working for you not the other way round They are definitely not your mates Plenty will take advantage of your kindness The best way to earn respect is to have everything ready in front of them DON'T LET ANYONE OVERDRAW OR DRAW IN ADVANCE No exceptions Im sure there’s lots more feel free to ask1 point
-
Becky, In a cold space like that it is best to insulate everything you can to reduce the possibility of condensation on the outside of the pipes/ducts. The condensate drain pipe MUST be insulated. Well done for ignoring the installer. Do try to get the condensate drain pipe to an internal drain, and not to the external guttering. I fear that what happened is during the freezing conditions, the condensate pipe froze from the outside as in your picture and blocked that pipe completely. The condensate that was being collected inside the unit now had nowhere to go and so "overflowed" inside the unit to place/s where it could go, and then came out in all the wrong places. There is one good piece of news in all that - freezing conditions do not seem to be affecting the inside of your MVHR unit 🙂 I think that re-routing that condensate drain pipe will solve your problems1 point
-
I wouldn't put the condensate out the roof it really needs to be down a drain, it also needs a drin trap. Otherwise it will suck outside air in also, adding to the issues. I can spiral wound duct without insulation, not good. If the supply and extract flows are poorly balanced the flow temperature gets messed up, these figures should be within a degree.1 point
-
OK, fair point. I should have said 'my personal preference is for AT tape' and then backed it up with anecdotal 'evidence' (over quite a lot of years) of some quite good, quite strong and very sticky foil tape and some very weak, not-very-sticky, frankly very awful foil tape which was particularly weak in tension and would split when returned round 90 degree returns. A few bad experiences led to a 'once bitten, twice shy' attitude which I retain for my own work. I'm just off to comb my torso now...0 points
-
As a special treat, just for you, it’s when Just Eat delivers whatever you order lol (and that’s another novelty I’m looking forward to - being in town so we can have take away deliveries!)0 points
-
Eureka!! I've come up with the perfect solution to my needing brick slips that I can’t buy to match our chosen plinth bricks without subjecting our neighbours to hours of deafening brick cutting or choking them and myself on the dust. Please would everyone on build hub order some brick samples. Each sample card comes with some lovely little brick slips to save postage costs! Perfect! What could possibly go wrong? 😕0 points