Leaderboard
Popular Content
Showing content with the highest reputation on 10/12/24 in all areas
-
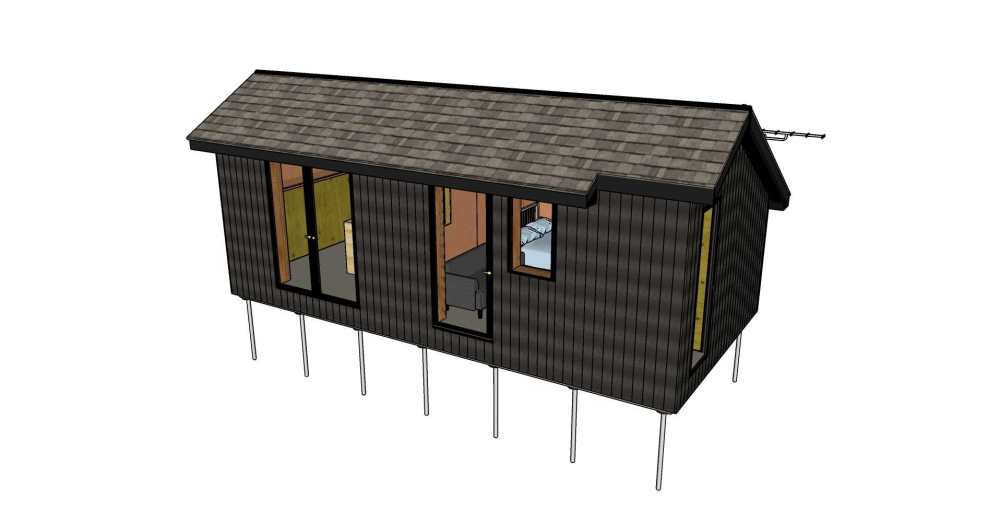
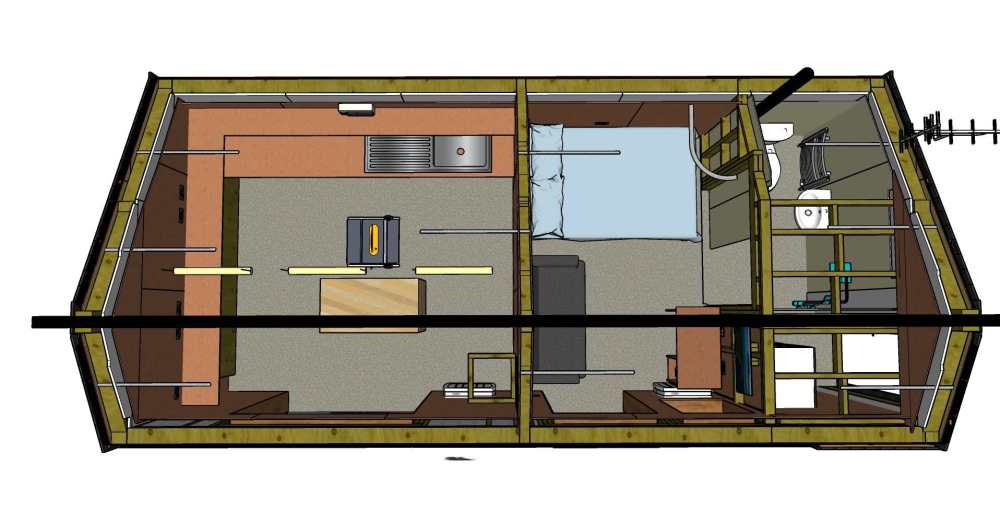
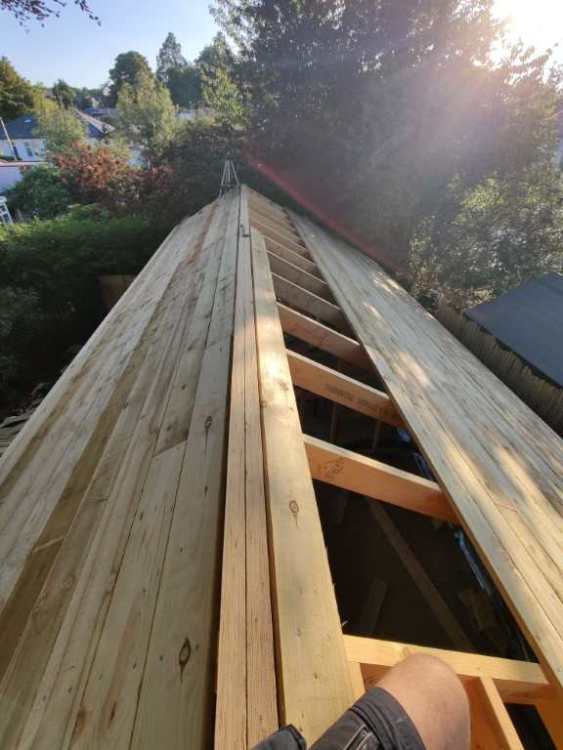
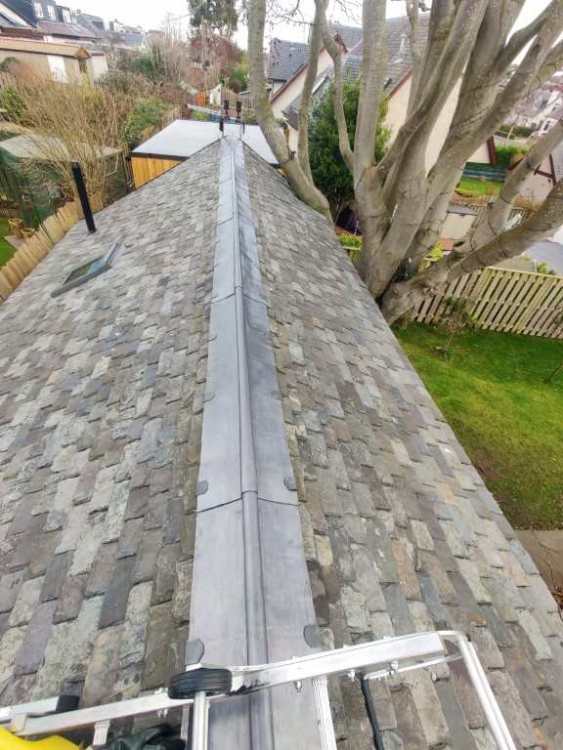
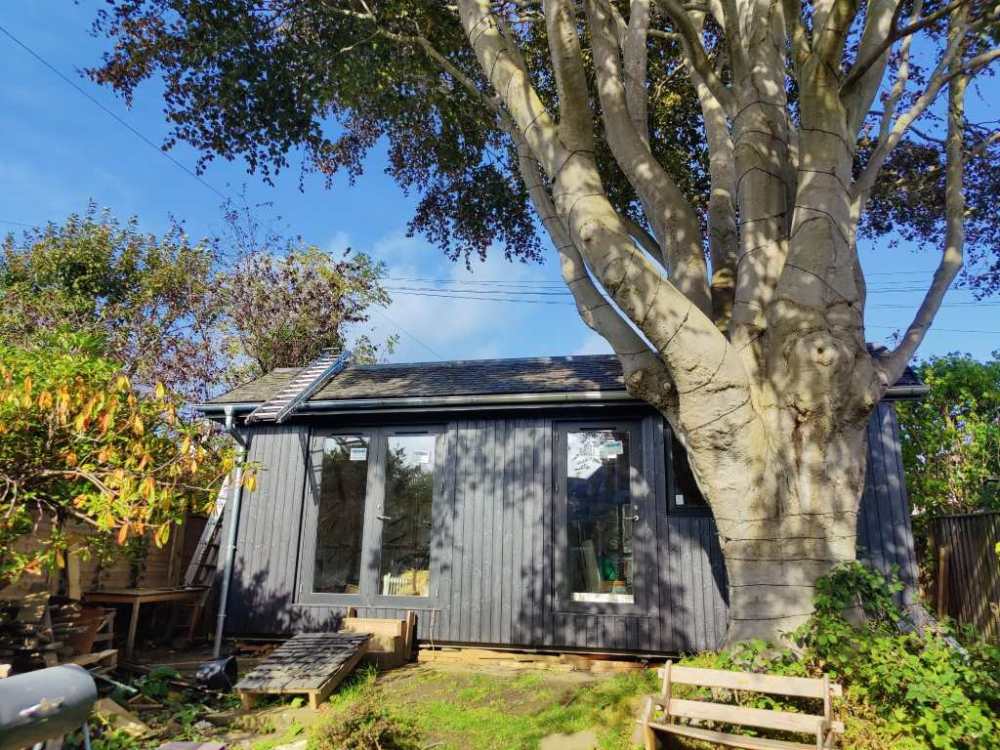
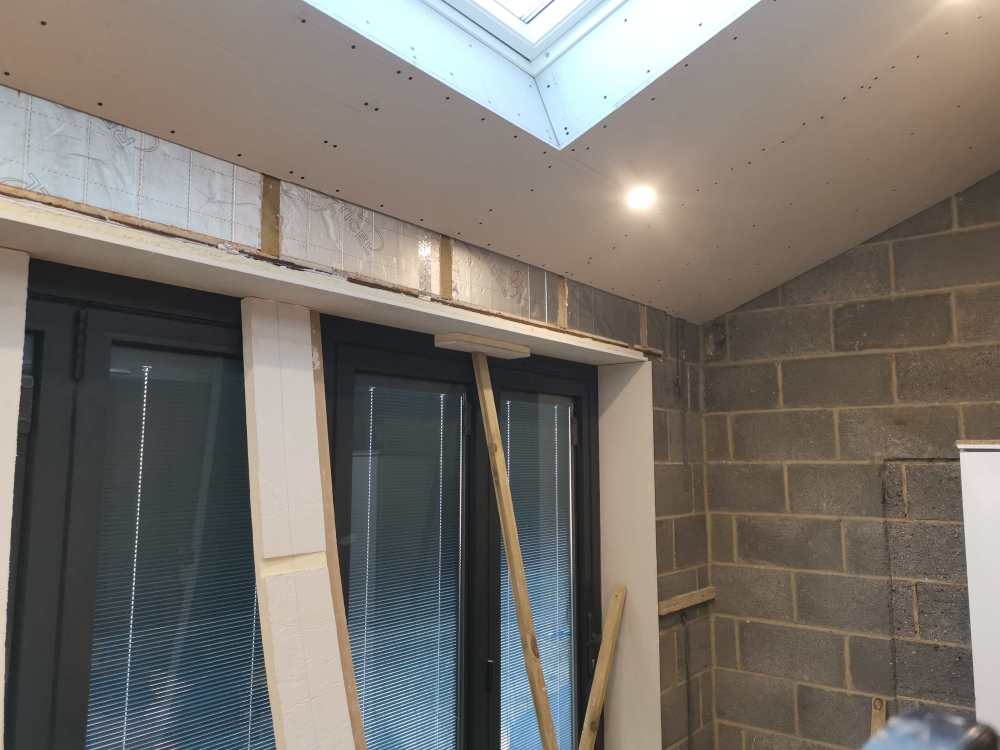
Hello all! Just found this forum yesterday, and already found a lot of useful discussions! For the last 3 years I've been building a wee annexe/enormously overbuilt shed in my garden that I call the 'micro house'. I'm a DIYer and this is my first build. I've built 100% of it myself with no professional help so far, aside from architect and structural engineer for the pre-build warrant paperwork. Some features about it: Full regulation / Scottish Building Standards / warrant build Built on ground anchors / screw piles to protect a ~300 year old copper beech I built right next to Reclaimed Scotch slate roof on traditional sarking boards Lead ridge Burnt timber cladding Zinc gutter Highly insulated and air tight, close to passivhaus, but this is as yet unconfirmed (hoping I can find advice on that here) dMVHR Wet room bathroom (about to build this out) It's taking me a billion years for a few reasons, but I've been posting my incredibly slow progress on instagram and tiktok if anyone is interested to take a look. Aside from building, I work abroad as a scientist and engineer for a chemical company that supplies the oil industry. Nice to meet you all! Look forward to contributing to some of the discussions where I can. Let me know if anyone has any questions about my build, lots of pics attached. :)4 points
-
You can fit PIR into a cavity, but it is a pain to do properly, you end up with too many air paths that are impossible to seal.2 points
-
you mention storage why not build the garage bigger where it is seems the simplest way to me and yes looks like a lot of window area cutting that down will save you big bucks2 points
-
I can't remember what I said about them, but we haven't experienced any issues in the 9 years since they were installed. Zero drafts to speak of, but that's at least partly because they're all in remote parts of the bedrooms (all of our bedrooms have them).2 points
-
I kind of agree but the timing is important. I would be inclined to nuance it a bit. There is probably a bit of history to this and that needs to be understood first. Without having all the facts my inclination is, as I said earlier, to take heat out the situation. Unfortunately I do get involved in dispute work from time to time, I don't do ambulance chasing but will put my heart and sole into helping folk where I can when they get stuck through not fault of their own. In terms of stategy @farang I suspect this may have been cooking up for a while? Let them send their guy / doll etc to have a look and see what they say.. strangely you may hear nothing more or suddenly find they want to make friends with you. Their representative may find something badly wrong with that they have done on their side of the boundary and advise them not to throw stones at you! I have seen this before were neighbours think they have a rub.. they get themselves worked up into a fankle (a Scottish term for a state of frenzy where we don't think clearly) and don't realise how the real world works until it is too late.. then it is hard for them to back down. Often to sort this out you need someone experienced in resolving things rather than a pile of letters after their name. Ideally you want someone who is street wise, has life experience, who has the ability to be hard nosed that will fight your corner with a soft personable outer shell. Often in cases like this I like to see just what the opposition has in the tank first, look for they don't say rather than what they do say. No point in getting your own SE at the moment until you see what they are complaining about and the technical argument they are putting forward to support their case.2 points
-
It"s a fair point - we still get the slightly disingenuous "3 or more time more efficient" line, which is true but for people on gas that still isn't enough to make it cheaper. There are a growing number of "typical" homes out there achieving cost parity or better with gas boilers. The insulation and air tightness aren't actually the issues, all they affect are the size (and hence cost) of the HP and emitters. But the difference between gas and (typical) electric unit costs is the issue. Currently it's 3.5-4.0 meaning your SCOP needs to be 3.5+ to break even. Possible but not a given. If the differential dropped to 2.5 ie 10p a gas unit and 25p electric, then the break even performance would be 2.5 and people would be rushing to fit HPs. I seem to remember doing a fag packet calculation that if we moved the Green taxes from electricity onto gas it would push the ratio below 3.1 point
-
1 point
-
I've never fitted grommets to that type. Just knock out and file down any sharp edges.1 point
-
I have seen our electrician boss personally use a Tirfor winch to get a a cable through a perfectly good duct, but it stuck. He was afraid it would stretch or snap so we had to dig intermediate points. The cable was dragging in the duct. That is the issue I think with a big cable. It is stiff and unforgiving. And the blue rope......It isn't strong and only for pulling a special cable through first. The supplied drawstring pulls through blue cord pulls through some special cable, pulls the electric cable. I have just been advised that we are now supposed to use a specialist winching team for it.....that decides it if it wasn't already.1 point
-
Fair enough. We ran ducts and pulled cables through later. Only issue we had is I forgot to remove the draw string that came with the duct and that made it tricky to pull through. I won’t make that mistake again!1 point
-
There was a similar discussion last week if you want to look for it. google Buildhub PIR screed or similar. The screed is quite heavy, and plenty to bend down any wobbles. Plus when you are walking on it to fix the ufh pipe, use a board to spread your load enough to protect it but it will also press down any wobbles.1 point
-
Thank you :)))) They're from Spirafix. They're hammered in as opposed to screwed. Then there's a big steel beam figure-of-eight structure on top tying them all together.1 point
-
Filling up nicely with beech nuts about now I guess? 😂 Did you char the cladding yourself, looks lovely. Folk here will be able to advise on DIY air tests ref the passivhaus bit.1 point
-
Welcome It is great that someone with limited experience of building just 'has a go'. I wish more people would do it. What are the dimensions of it?1 point
-
What a great project and well done you, I have never seen those ground screws before.1 point
-
I wanted the loft to be within the heated envelope (but not any heat source) it meant no, or little insulation on the MVHR input pipes. No membrane at bedroom ceiling level which wiring, pipes etc have to breach. The loft hatch then does not need to be air tight (tho mine had a rubber seal) and no insulation on the hatch itself.1 point
-
Many variables to take into account. Start at 25 flow at 20 outside, then look at your heat loss report and design report, set the other end of the curve to your design outside temp and design flow temp. If house is too warm after 24 hrs reduce the cold end of curve, if to cold increase. Do 1 Deg at a time to see how it changes things.1 point
-
In my last build I had a warm roof (insulation at tile level), a good quality wooden fold down loft ladder and hatch. MVHR and storage in the loft, was very usable.1 point
-
But nothing has been found that you have done wrong yet, let the inspector do his job and see what the outcome is, if the OP is right the damage has been caused by the neighbours plants etc so let’s not assume the worst.1 point
-
Don’t forget to drop a baton in the face to take a curtain rail1 point
-
1 point
-
1 point
-
Our guys just used a single board to span our steel heads entirely. Nothing done apart from some wool insulation.1 point
-
I had the same thought about my utility room after hearing of a few friends who'd sprung leaks on their water heaters. I've fitted one of these Mcalpine waterless waste in to the floor, I've not tanked the room as it was a bit of a late decision but I figured anything would be better than nothing. You can buy replacement seal units that slot and lock in if there ever was a problem.1 point
-
Thought I'd do a short blog on the Polycarbonate tunnel we built. Our big field suffered with no storage, and location meant containers were very expensive to transport. so one option was to build a polytunnel, which we have planning permission for. again due to location, 500m from the coast 73M AMSL I wanted something sturdy. so looked at off the shelf packages. in the Highlands and Islands the PolyCrub is seen as the mecca. Designed in the Shetland isles, guaranteed to withstand 100MPH winds etc etc. due to the ability to get CROFT grant assistance on these, the price is, IMHO, artificially high CIRC 6K for 4M *6M.. this wasn't going to happen, so after looking at many photos I designed my own.. Basic principle is hoops of MDPE pipe secured to posts in the ground, then 3*2 timber used as horizontal support, with Polycarbonate sheets secured to this timber. the bottom sides are then clad. My design was to use 65mm Black MDPE pipe, and secure the timber with coach bolts and penny washers through the pipe. this way I get a guaranteed fixing that won't pull out , and it still allows for flex in the whole structure. 4m wide x 6M long, but this can be extended. My ground has bed rock close to the surface, 300-500mm below ground, so just knocking in post wasn't going to be secure enough to withstand the winds, also where I was sighting the tunnel its on sloping ground, so I couldn't get it level. I cleared the area to removed the top vegetation and a bit of the top soil. and dug 14 holes. then due to rock levels I then core drilled the rock to allow for the post to be deeper. We then set these in concrete, (at the same time as doing the slabs for the cabins.) The next day we had a look and I wasn't too happy with the security of the posts, so slight change of plan, we created a plinth. basically I used some 6x2 either side of the posts, with a slight angle, then filled this with concrete (again we used ready mix at the same time as back filling the treatment plant) this added about 300kg of concrete to each side, and joined all the posts together, and gave us a solid plinth at the side. No Photos of the next stage but we cut 7M lengths of 63mm pipe, this when placed over the posts gives approx. 500mm dwarf walls and a 6M polycarbonate sheet, giving a head height of around 2.3M. we used a plumb bob to get the centre line on each hoop and drilled an 8mm hole through the pipe and secured the top 3x2 treated timber to al the hoops. One thing we found was that the MDPE did not bend uniformly, this may have been due to slight errors with the posts being plumb. The resultant timber (which was not very straight), snaked from hoop to hoop. after head scratching and re thinking. I decided it was a poly tunnel and to get on with it. we used 7 lengths of timber jointed with half lap joints to extend the length to 6.5M. if using a clock analogy the timber was placed at 9,10,11,12,1,2,3 positions, with the 9 & 3 o'clock being 500mm off the ground, also ensuring the 9 & 3 o'clock timbers were approx. 5.8M apart circumferentially. Then it was a case of securing the polycarbonate sheets to the timber. each sheet is joined with some soffit H joint strip. (you can buy a clear joining strip for the sheets but for a 6M length it was around £65. the H strips proved extremely difficult to connect the two sheets together, or should I say impossible. so I cut off the back edge on one side and used some glazing sealant. this way we could attach the strip to the polycarbonate prior to bending over the tunnel. and each sheet 'H' strip basically lapped over the previously installed sheet. day 2 we had the basic structure. It was noticeable that the curve was not symmetrical, so putting the door frame header in by securing to timbers at 11 and 1 o'clock was not level. I overcome this by using a ratchet strap attached to the 11, and 3 o'clock timbers and tightening until timbers at 11&1 o'clock were level. I then put the two door jambs in (concreted at the base) and cut to the length required and secured to the header. This worked and the tunnel was now more cylindrical. I framed the rear by baring 3x2's off the horizontal timbers. Last steps were to clad the base, I used 4*1 treated timbers that were screwed into the MDPE pipe and wooden posts. then used strips of visqueen to create a more sealed dwarf wall, this will help prevent driven rain from the winds getting inside. over this I used Larch timber backs* to create a vertical cladding All in with hardware, polycarbonate, timber, concrete the project cost £1200. not cheap, but its solid as a rock. It withstood the first Autumnal storms this week with winds hitting 50MPH. Its also very warm inside, even now as the temperature is falling. Larch timber backs are the offcuts from the saw mills and are reasonably priced as scrap. we purchased a pack of timber backs, approx.40 lengths of larch timber with bark in 4.8M lengths for £100. these are not uniform and taper etc, but as i only needed 500mm lengths it was straight forward to make it work.1 point
-
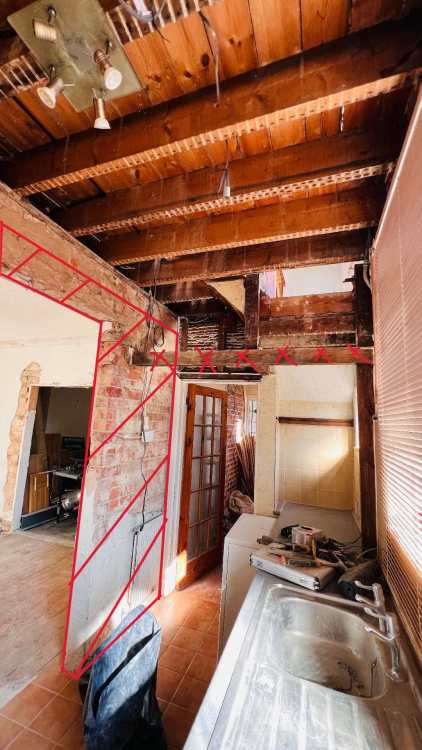
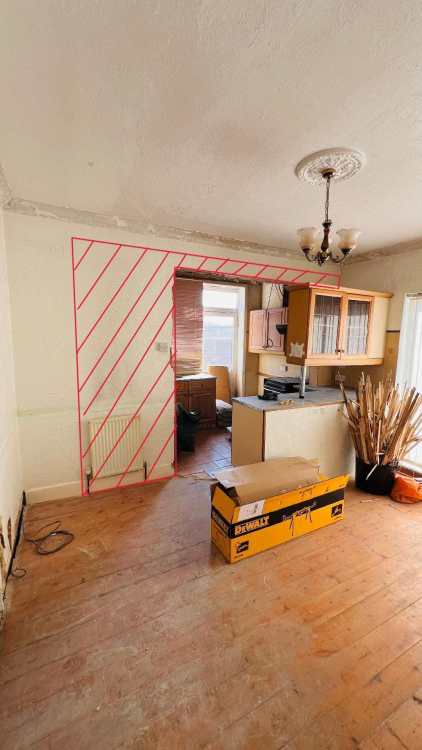
Hi guys, thanks for the replies. I agree that would be better structurally ProDave and make the job a lot easier however to give you a bit more context I want the downstand to line through with the current wall return in the dining room and not in the middle of the room as that part of the wall will remain. Also I will be removing the beam supporting the stair quarter landing and replacing with a cranked PFC connecting into the new beam so don't want the span to be to big for that. And finally the steel has already been designed and procured for the current spans so I am stuck with what I have. Please see images below for a better idea of what I mean. Ignore the messy kitchen cabinets I'm still working on all of that haha.1 point
-
Hi Adam. Can you post a few photos as that would help a lot. In the attic.. so we can see how the roof is constructed, the external elevations all round and how the house sits in the garden, the garden size and where the boundaries are. Maybe you kept the selling agents floor plan when you bought the house? At the moment it's so open ended that its hard to make meaningful comment that might help you. You should have a title plan.. the deeds.. sanitize that so you can't be identified and post it. That is a helpful comment. For attic conversions the design fees tend to be heafty. It may seem like a small job but some of the attic conversions I do require a huge amount of my Architectural, SE design and detailing time . I wear two hats.. I'm an SE primarily but also do the Architectural design side of things. In terms of Architectural and SE design fees these can amount to 15 -25% of the project value to get all the design work and detailing done and the LA / BC approvals. On a good day you may get this down to 10- 12% if what you are doing is simple. That said, a good experienced designer can save you a pile of cash. One week of labour for a good joiner (chippie) comes in at £1.0 to 1.2K a week! so please bear that in mind. Also a good design will have access to Contractors that they work with on a regular basis that they can trust not to rip you off. Now it may be that you want to go back and see if it is more economic to extend at ground floor level.. this gives you raw extra square footage that will also increase the value of the house.. often more than an attic conversion on a pro rata basis.. remember you often need a stair so you take a step back before you can go forward.1 point
-
Vendor finance is quite common in the US, I'm not sure why not here. The risks are mainly on the vendor's side - after all they're giving you a loan. Have you got as far as discussing terms - see if they're reasonable? Potential for a good deal, of course, if they want to sell quickly.1 point
-
Well I am really going to have to disagree with everyone else on this @thefoxesmaltings it was rubbish.... Nah, not really - 😁 - really great effort and ended up with a lovely looking building. It shows what can be achieved with personal effort and I would echo the sentiments of others that the chap that you got to help was amazing, such a nice guy. I am sure you are much more relaxed now that the build is finished (yes, I know, it never really finishes) and you can move on with your really quiet lives!!! Congrats and well done. We are just at the start of our process, currently waiting for planning, and just looking forward to when we can really get going. Loved the Cor-Ten by the way.1 point
-
Speak to the party wall surveyor and raise your concerns. Any damage caused to your property is the responsibility of your neighbour and the surveyors job is ensure any damage is recorded and rectified.1 point
-
Just chipping with my own experience. We have 60 m2 of window area. 7 doors and 21 windows. We were getting quotes in mid to end of 2020, for tripled glazed, Alu-Clad windows from the usual suspects, Internorm, Velvac, Rational and Idealcombi to name a few. I prepared a window schedule with dimensions, so they all had the same specification. They all priced at a similar point, e.g. £35-40K. Then the fun began. My neighbour who had Internorm fitted, showed me his quote, from the same person at the company, going to our (same) post code. He was given 43% discount on the list price, we got 18%. A difference of around £10k. We spoke to Idealcombi to update our quote and they said they could give us an additional discount of 35%. A difference of £13K. We then spoke to some of the other companies and told them the situation. They then replied “oh, we can match that”. We went with Idealcombi since they were the first to offer the discount without being asked. They have also been very good with a warranty claim. Ultimately we paid around £430 per square metre – not fitted. It was also incredibly convoluted. We skipped the £800+Vat measurement fee and did it ourselves. We would ask (using the schedule) please make W1, 100mm wider and W5, 200mm taller. They actually, made W1, 200mm wider and W5, 100mm taller and so on. We had 17 quotes before they got it spot on. I’m from an engineering background, so specifying everything and checking that the supplier conforms is second nature. It’s laborious but don’t leave anything to chance. We also installed them ourselves. Me, with no building experience and a bricklayer/stonemason who was with us for the build. We made our own mounting brackets out of 5mm galvanised bar, because the manufacturers 3mm brackets looked a bit frail. We know a Velvac installer and we were looking at our kitchen windows, he said to me “we would put four brackets on those, two either side, how many did you use?”. “Ten” I replied. I think they will be strong enough! So in my humble opinion, the whole thing is a bit of game. All the quotes we had (every one) had a margin of at least 35-40% that could be sacrificed if necessary, to get the order, on which they were presumably making an acceptable margin. At least use a per square metre baseline price, so you can evaluate the true cost. There’s such a massive variation. I’ve seen doors at the NSBRC centre in Swindon that were £5k+VAT. Ours were around £900 and passive house rated. Good luck.1 point
-
Stop pushing heat pumps or face major backlash, green energy magnate tells Labour Party donor Dale Vince warns that urging homeowners to switch to clean-power technology risks political storm bigger than Ulez Dale Vince, a major Labour donor and renewable energy advocate, called on Keir Starmer to rethink national programmes, championed by Boris Johnson, pushing the technology. “It’s a Johnson-era policy, and like most Johnson ideas, it wasn’t thought through,” Vince said. “It wasn’t meant for the real world, if you look at the amount of money committed. Electricity energy bills overall in our households will go up unless you assume heroic levels of performance.... " And now we come to the kicker..... " Vince claimed that he was speaking in the “national interest” in criticising heat pumps. He proposes an alternative – green gas, or biomethane, made from organic material, which his company Ecotricity develops." Isn't it convenient that the thing that is in the national interest just happens to be the thing his company is pushing..... Astonishing coincidence. https://www.theguardian.com/environment/2024/oct/12/stop-pushing-heat-pumps-backlash-green-energy-magnate-labour-ulez0 points
-
0 points



.jpg.c21f3ac78c9b7efd90cbdcb312744dc5.thumb.jpg.7adcad4c0e384f5ecd7d56b0618df6e5.jpg)




.thumb.jpeg.d4aebc4bd0a7fcb73aaae23fccadc6f9.jpeg)
