Leaderboard


Popular Content
Showing content with the highest reputation on 08/16/23 in all areas
-
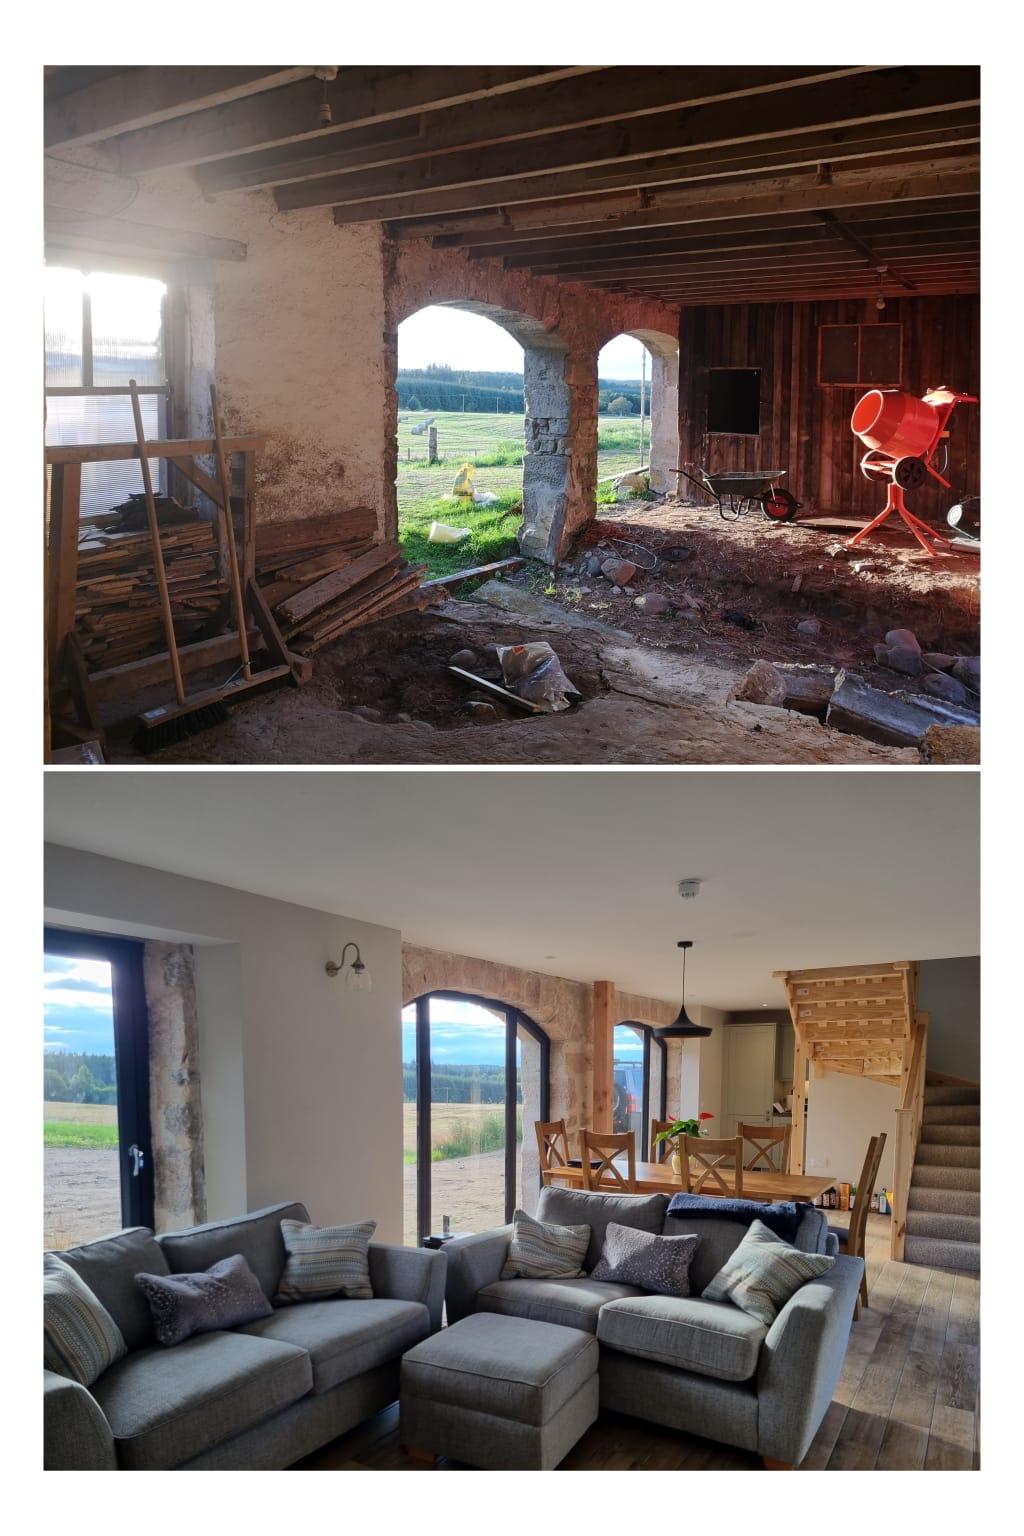
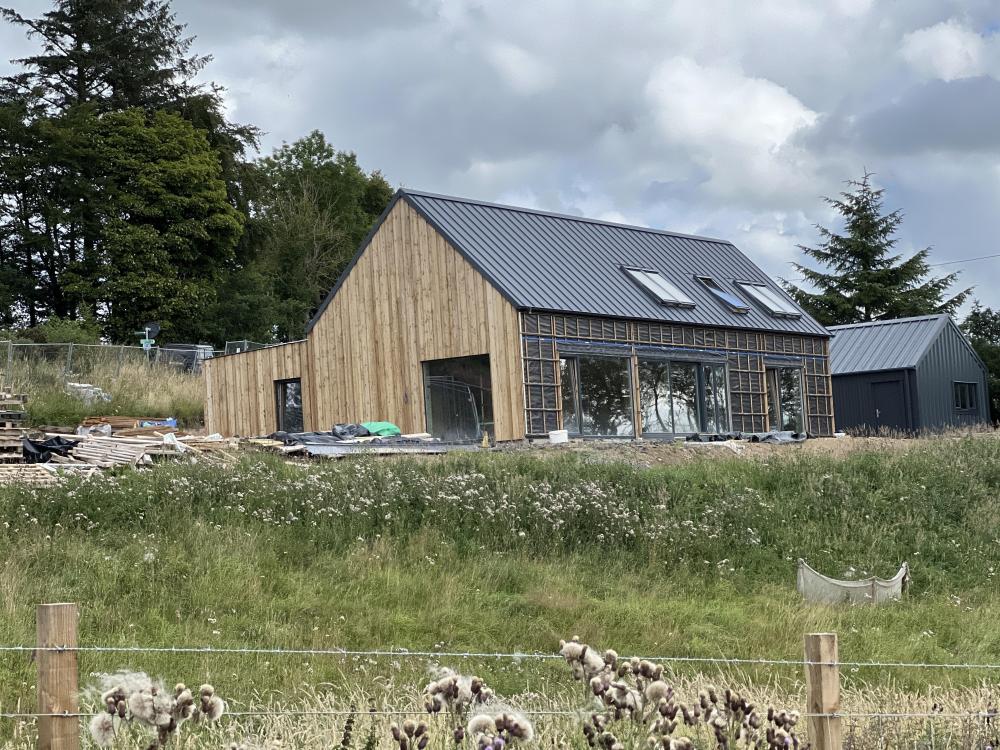
Perhaps this can inspire anyone in the process of renovation/ transformation. This has taken 2 years from purchase, and the rest of the building is still a shell being fitted out. But, yes it's a liveable space, and the caravan is almost redundant.
 4 points
 -
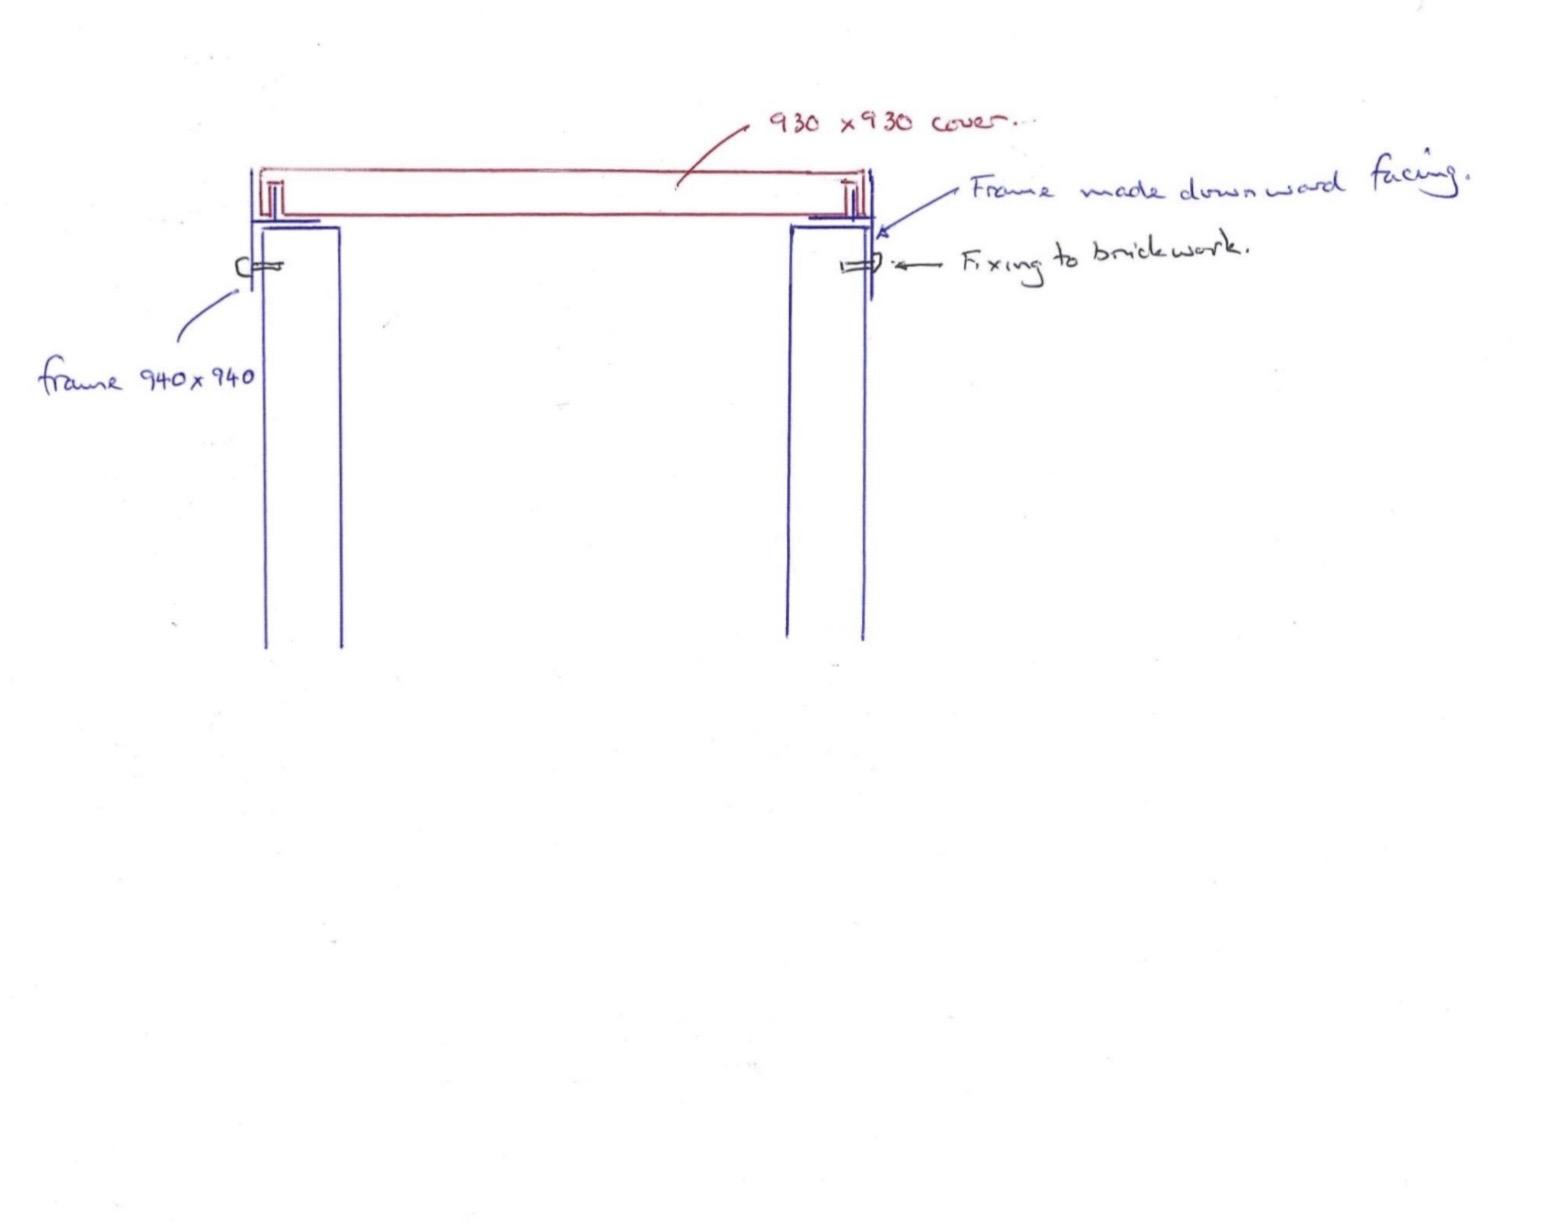
A little result today. After building the borehole headworks I’ve struggled to find a suitable lid and frame for it. I bought a Clark Drain lid but it’s crap as the frame is too flimsy and the lid is poorly made so started the search again. The internal headworks space is 750mm x 750mm which turns out to be a slightly unusual size. I ideally wanted a plastic lid as they are lighter as the metal lids are pretty heavy. I found a company that did suitable plastic lids and frames but they were too expensive at £800 plus delivery. Long story short I came up with a design and got a company to make it for me. It arrived today and it fits perfectly and I finally have a weatherproof frame and lid that I can actually lift! £300 inc VAT and delivery.

 2 points
 -
I would just build it at 500mm external dimensions. The batts will have plenty of flexibility anyway .2 points
-
I have tried in the past to explain this but not everyone accepts it. TS's only work when heated by something that van heat them very much hotter than an ASHP can.1 point
-
PS to the above - perhaps you mean 'not currently cost effective' as opposed to 'not suitable'. That then becomes a temporary and political problem to solve not a permanent and technical one, given that the price of energy is politically determined.1 point
-
One has to start somewhere. Not so much with a borehole. As earlier, have to start somewhere. Borehole systems work very well, quite a lot of places down here have them, may be b cause Kensa are local.1 point
-
Oi, @joe90 I said it first you tart.1 point
-
Mostly the family there. I just sit in the SE and answer questions or we send money. I did design then physically do the drains, and redesign the foundations. Going up next week though.1 point
-
@Big Jimbo ‘s ‘Be Nice To Your Neigbour’ is a very important message. So many projects start with arguments and confrontations and it goes down hill from there. Involve your neigbour, confirm the boundary and as above, make sure you stay on your side, your Archi or SE or BCO can all disappear and leave you sorting a mess out. plus your builders will need access on their land, stuff will fall into their garden, something will get damaged, dust will be annoying etc etc. get the neighbours on your side and keep them there.1 point
-
I found plenty of supplies didn't actually insist on MCS. When it came to PV I always thought MCS was a complete money making scam. I installed my own PV system, therefore not MCS accredited, if I do say so myself, my install is better than the other 2 around me. Why? Time, patience and care.1 point
-
https://www.lighthouseaudiovisual.co.uk/alustage--decotruss-quad-truss-straight-sections-128670-p.asp?_=&variantid=128860&gclid=CjwKCAjw5_GmBhBIEiwA5QSMxKV6vL-sDFllRQ4ihhcRtq3Tq_vdAa_dQFscuii-7RgTTHgZvapFohoCc2cQAvD_BwE Something like these? Search for lattice beam1 point
-
Ok. Reginox R27646 New York. 50x40 £168.03 from sinks and taps. I have used these in the past. Very good quality sinks.1 point
-
Not sure the statistics can be believed, there is no way mine will ever show up as it was self installed. Nor would any other self installed ASHP.1 point
-
Define what you mean by "heat pump installers" I have fitted 4 of them now, (one being my own) and If I were not so much set on retiring, I could no doubt do a lot more. But I can guarantee I don't appear on any list of "heat pump installers" anywhere. The vast majority of plumbers and electricians, those that can read an installation manual, could fit heat pumps if there were incentives or even the will to do it. but at the moment all they see is "reasons not to get involved"1 point
-
I don't think there is a lack of skill to install them, lack of incentive, on the part of the installers maybe i.e. uncertainty. Here are the ONS numbers, since 2010, for below 4 kWp systems. March this year was around 38.5 MW installed. If we say that the average installed capacity was 3 kW, that is 12,800 systems installed.
 1 point
 -
BUT just when you thought we might be on the way to easier and cheaper ASHP installs, THIS comes along https://www.homebuilding.co.uk/news/heat-pump-defra-review A different part of the same government now complaining they are too noisy for most urban settings with high density housing. You can just see it in a few years "My boiler has broken down, I can't buy a new one, but neither can I fit an ASHP. Just what am i supposed to do?"1 point
-
@Iceverge Just found them and watching now. cheers1 point
-
Something like this I'm guessing but larger? That 10m span is going to be tricky with a flat roof. You're lightly to end up with a very thick roof section. You could put a hollow core concrete plank up there at 250mm thick if you like the brutalist look. It would require crane access and substantial support and foundations however but it'd probably be cheap. More elegant perhaps might be a tensioned fabric sun sail.
 1 point
 -
Is the roof going to be open or covered? This is bread and butter stuff for an engineer. The main issue you'll have isn't the beam, which is trivial to calculate, but how to achieve lateral stability. If you need a completely open vista then steel moment frame is pretty much the only viable option. Oak timber would not work at that span - it would need to be trussed to work and knee braces would be unlikely to provide adequate lateral stability.1 point
-
Im not a lighting engineer but my guide/sanity check for kitchens goes like this... lighting experts look away now :-)... Google recommends about 500 lux for a food preparation area. 500 Lux = 500 Lumens/sqm. Our kitchen is about 4x3.5 = 14sqm so my rule of thumb says we needed 14*500= 7,000 Lumens in total. We fitted 15 led rated at abut 400-450 Lumens each. That works out at about 6500 lumens. We're happy with the result but its just a simple grid of LED down lights. I choose wide beam angle bulbs to eliminate shadows and "spotty" lighting but at the expense of a bit of glare. LED Lighting tapes/strips typically quote "Lumens per meter" in the specification so you can get a rough idea how many meters of linear lighting you would need in that central rectangle. Experts will tell you this is all wrong and that beam angles, ceiling heights and the emissivity of walls matter.. but if your lighting designer says you need a very different figure for the total Lumens you can at least ask him to explain how he arrived at his figure. If he can justify it then he's probably right. You might find a company that will do you a lighting design "free" if you buy their lights?1 point
-
Alexa is a hormonal b1tch .. or at least the ones I have are1 point
-
Yes is my view in the long run. Octopus are going to some length to try and get the install cost down to a more reasonable realistic amount. The problem is that they are just one company with a limited install capacity.1 point
-
Hiya not sure if this is still open or relevant, however I have taken on a bungalow to house renovation myself. I am an engineer by trade never done building work and I am currently battening the outside ready for render boards. I put timber frame in stick form straight on top of the bungalow walls and then trusses on top to give us a 11.2 m long by 4.2 m wide, 2.4 m high room in the loft. It’s more than doable. I’m quite the celeb on my main road now lol. I’ve done it all on my own other than standing the trusses up where I had my fiancées grandad help as they were fooking huge ! the hardest bit was working out the connection between the old and new, I chemical fixed studding deep into the bungalow brick walls and fixed the timber sole plate down via the studs plus wall restraints etc as per normal standards. I’m self taught from YouTube mainly I would say the tricky bit is the render transition from timber to original bungalow brick, especially as we are insulting externally on the downstairs so I had to build the timber frame above with an adequate overhang so it finishes somewhat flush with the downstairs EWI. my bungalow is a wonky rectangle, so I had to build a nice true new structure on a wonky substructure. Which will need to be made up and hidden within the battening and render board. I basically have 4 steels running across the bungalow which meant I was free to knock all internal walls down if I desired so gave us huge scope to redesign. There as no point starting a new with our build as the size and shape already made best use of the plot. it’s all going on YouTube too1 point
-
This thread wasn't about zones. You might be better starting a new thread as people who have already read this one might not pay attention to a comment tacked on.1 point
-
Have you considered a free standing oil heater controlled via a smart plug?1 point
-
Periphery insulation and extending cavity insulation down to the foundation. Windows sat in cavity as much as possible, tape joins. Two separate lintels in each leaf (brick and block only) Warm roof and insulation continues from cavity into roof . Few or None, unless down through an insulated slab and if unavoidable insulated to death.1 point
-
Is it a SIP roof? If so I don't think it needs any ventilation and no void to ventilate. If not a SIP is it being done under permitted development (roof less than 2.5m) or under planning permission which might allow a bit more - possibly enough for a warm roof construction. If all else fails build this version.. Run rafters front to back and put vents behind front fasia and a small rear overhang. Only needs about 25mm slot for vents.
 1 point
 -
To me, the obvious thing is cut a hole in the OSB, remove insulation from below and see if you can see a sign of a leak? Less disruptive and easier to put back than cutting a hole in the GRP from above.1 point
-
Thought you wanted something contemporary, not a pastiche of a 1920 cast iron radiator. For similar money you can get an A2AHP. Even more 'Ultra Efficient' than a 'ceramic core'. My 1980s storage heaters have ceramic cores, called bricks.1 point
-
This is not what you want to hear, so feel free to ignore >>> no roof overhang around the building Looks cool, but buildings have had overhangs for centuries for a reason - to keep the weather off the walls, so they're not regularly saturated. Similarly with the bottom of the wall, where upsplashes often rot the cladding eventually. >>> Is the EPDM roof covering that I'm using breathable. No, not at all. >>> 3. Do I need to lap the EPDM over the cladding and then drill vent holes in the cladding near the top (not preferred) I would definitely lap the EPDM over, preferably with some kind of overhang and/or kick to keep the water off the cladding. It also looks dead cool without gutters, but...1 point
-
Big day today, scaffolding down and gone! Glad to see the back of it.
 1 point
 -
My advice to anybody embarking on a self-build is as follows: 1) Be very clear on your requirements. The following post may be of help on this topic: 2) If your requirements are not achievable for the budget you have available, then focus on what is the most important to you. Eg: If a comfortable house that is cheap to heat is your priority, then you could focus your budget on the fabric of the building and compromise on the size and / or the internals. This will to some extent drive what build method you choose. There is no one build method that is the best but each build method has its own strengths. My overriding objective was to build to a passivhaus standard, so I built using a timber frame as recommended by an architect, passivhaus consultant and builder who were experienced in passivhaus design and build. They knew how to design the frame to ensure it was cost effective, watertight and airtight. 3) Understand what your strengths are and how you can best contribute to the project. There are some very gifted people on this forum. Some have designed their own houses and others can turn their hands to many different trades. I can't do this but I have good planning and research skills which helped choosing the right people with the right skillsets to do the work and working out the cheapest place to source materials. 4) Professional Services are an added expense but if you choose well, they will reduce the chances of errors and can save you money. Finally, plan, plan and plan again. Make sure you know exactly what you want before you start the build. You may not be able to achieve everything on you wish list but it should be a lot better than what you can obtain on the open market. My build was started after a lot of research, but what I did may not be right for you, so it is best for you to carry out the research and come to your own conclusions. Best of luck and most of all, enjoy the self build journey !1 point
-
We are just commencing our second self-build (started onsite last week). In both cases we have used Architects and in both cases have been very happy with the results. We have outlined how in both case we selected and worked with our architect which we hope will assist other people starting out on their self build journey. 1) Start thinking about which architect you are going to use when you start looking for land and not when you have found land. 2) Draw out a requirements list. My approach is to provide a brief / framework for the architect to interpret rather than prescriptively dictating to the last detail. Requirements should be no more than 2 pages. By making the requirements generic, you can apply them to most plots of land. Include in the requirements why you are building as well (develop and sell, house for life etc) 3) Checkout your architects previous designs. There is likely to be a common design pattern and if that is way off what you want then maybe the architect isn't for you. Also go and see a couple of houses - just viewing from the outside can tell you a lot. 4) If you see a plot that is a potential candidate, email architects on your shortlist for feedback. Most architects will provide feedback for free within reason and the reply will help you to decide if the architect is thinking along the same lines as you. Also, meet with your architect before you engage formally to check that they are a person that you can work with. 5) Be completely upfront with the architect about your budget, put it in your requirements list and be very clear what that budget includes and doesn't include. 6) Be completely upfront with your architect about their fees. Fees based on a %age of the build cost are OK as long as the build cost used is your budget for the build at the outset (fixed) rather than the actual build cost (variable). 7) Good architects are in high demand and don't need to advertise so you will need to research (a lot) and do your legwork. Be prepared for the fact that you might need to wait for the architect you want to become available. 8. Check whether the architect has any experience in the build method you want to adopt and the energy standards that you want to achieve. Find out what the build costs have been on recent build projects and how these compared to budgeted costs . 9) Check with the relevant boards that any claimed registrations are correct. 10) Fees may seem expensive, but for the amount of work that goes into a design I have always felt I got good value for money. In the context of the cost of the project it is a small percentage much of which can be quite easily recouped with a little restraint on the fixtures and fittings. 11) If you use an architect local to the build, it is more likely that he will be able to advise on securing good contractors based on experience of previous builds. My architect has more than recouped his fee by drawing up an attractive house that is straightforward to build. Insulation is what we need to get to passivhaus but no more and the size of the house is what we can build to meet our budget (based on his previous build costs) and requirements. Listed below are the requirements we drew up which may assist others going through a similar exercise: Build Budget: £325K (House, Garage) excludes landscaping, external works and professional fees. The Plot There were a large number of objections to the development from residents but planning permission was granted on appeal. Plot width is around 16.7m. Plot length is 44m. Electricity, Water and mains sewerage (but not gas) available at the plot boundary. Functions of the Building Home for ourselves and the dog. Enough room for friends, grown-up children to stay and family get-togethers. Building a house for life as we can’t get what we like on the open market. We love cooking and the outdoors, so it should support that. Combine open plan living combined with a segregated quiet room downstairs Provide a comfortable and healthy interior environment with a stable temperature and no drafts. Design Direction and Requirements Good natural light to rooms is really important with dual aspect windows in as many rooms as possible but not too keen on huge oversized windows that require complex and expensive shading solutions Designed to Passivhaus standards in a cost-effective manner but don’t over-rely on technology that has high cost to install and maintain. Downstairs Open plan kitchen, dining room and seating area Utility room (able to dry clothes in using pulley) Lounge Small Study if possible WC / Washbasin Good Storage – larder cupboard, cloakroom and cupboard for cleaning utensils Somewhere to sort out a muddy dog and muddy boots (A covered porch with a stone floor and bench maybe). Sliding doors or similar out to the garden from the sitting area. Bottom of kitchen window to be level with the kitchen worktop. Back door into the utility room No large step into front or back door WC away from front door if possible Upstairs 3 to 4 double bedrooms. Small study if not room downstairs (or 4th bedroom) Built in wardrobes Cathedral ceiling. Master bedroom should be able to comfortably take a king size be. En-suite in master. Separate shower in bathroom. General Heating / DHW – no mains gas. Solar PV with a diverter? ASHP (noise?) Consideration given to some acoustic insulation between rooms and between downstairs / upstairs. Doesn’t need to be completely soundproof however. LED lighting throughout and up the staircase Point for charging electric car. Ability to use battery storage in the future should it become more cost-effective. No requirement for chimney or wood burning stove. Agnostic about whether the garage is attached or detached, but should have storage for bikes and a little workshop area. Could be modified for easy access upstairs in the future (Straight staircase maybe). Point for charging electric car. Low maintenance exterior for windows and wall facings. House to have a more contemporary feel inside. Outside to tie in with planning / design code. Window frames recessed into the openings. Other Stuff Recess in shower wall for soap etc. Built in bookcases Lots of sockets Sockets in cupboards for charging hoover etc. Room in utility room for dog crate Built in water filter Water softener Lighting on dimmers with switches that gradually turn LED lights on so they don’t blow. Good outdoor lighting (pathways) Outdoor power point / tap Phone point in every room1 point
-
Something tells me it would respond “ I don’t know how to do that “0 points