Leaderboard


Popular Content
Showing content with the highest reputation on 06/15/19 in all areas
-
Yes, it's copyright, but there is a fair dealing provision, and that provision allows for sections to be copied where such copying may inform and educate, amongst other reasons. I see no problem with this, it should be actively encouraged, as the very last thing we need is more secrecy and control around safe practice. We have enough of that from the dubious Part P cartels trying to profit from giving an illusion of safety. If anyone wants chapter and verse on what is allowable under fair dealing, then this is from the government website: https://www.gov.uk/guidance/exceptions-to-copyright And, just to be 100% clear, as an IET member I have paid for copies of 7671, the OSG etc, so whenever I've quoted excerpts from those documents I've done so from documents I have purchased, not "ripped off from dodgy PDF" stuff.2 points
-
The search is correct. OK subject to ground conditions. No good on clay. My brother had an orangery add-on with a raft. The rest of the house was piled 25m. Clay soil. None of the 3 pairs of doors now open properly and he will probably have to demolish it if he want to sell the house.1 point
-
Yep. Price is about right but you can get tubes for around a fiver. I use it for everything. I dip wire ends in before I put crimps on if something is going in an external enclosure. I then dip the crimp in, say a 1/4" blade type. Loads of mates now use on their motorbike connections. Good on car battery terminals for stopping crud building up. Dip your coax cable ends in before fitting F connectors onto satellite dish LNBs etc. I found it suggested here first: http://www.satcure.co.uk/tech/silicone.htm1 point
-
Other option would have been an IP6X junction box. Fed from loft is it? A neat option is feed through the back of a wall mount jb then bottom entry to the light fitting. Silicon the back of the jb where it meets the wall. I like the IP6X Amphenol / Bucaneer style connectors like those, good for 16A some of those. What I do is go belt and braces & pack the inside of the connector with silicone grease at work. They last indefinitely. How does the white cable come out of "wherever"? Watch for chaffing. I'd have used black too. I'd have added some nylon P clips and used stainless screws tidy things up / stop things flapping in the wind.1 point
-
Apart from the fact that there are some people that will just bodge anything together, I believe that another reason is that it's just so damned hard for a lot of people to find out how to DIY something safely. There's loads of information around on stuff like plumbing, but there's a really strange attitude amongst some when it comes to electrical installation work. Sure the best answer is always to get a competent and suitably qualified electrician to do the work, but if someone can't afford that, then the next best thing is to make sure that all the information needed to be able to do a safe DIY job is readily available. Yes, this means that often an installation won't be 100% tested as it should be, as the test gear needed is beyond the means of many DIY'ers on a budget, but it's really not hard to just do a fairly straightforward job, like running power to a shed, safely, if the information on how to do it is made readily available. I know this probably pisses off some in the trade, but my view has always been that if someone can't afford an electrician then they are probably just going to DIY the job anyway. Better that someone intent on DIY has access to information to do a reasonable job, than have the situation we have now where some people do crap work out of ignorance. It also seems that it's not just DIY'ers that are doing some really dodgy electrical installation work. YouTube is littered with videos by competent electricians highlighting really dodgy stuff that has been done by incompetent members of one or other of the Part P cartels. What really gets my goat is that after getting a degree I had to sit CEI Part 2 in order to join the IEE (as it was back in 1975). Now someone that's done a 5 week Part P course can be a "competent" person and IET member, yet they may well not know their arse from their elbow. How any short course can produce someone of equal competence to someone that's served their time I just don't know.1 point
-
@PeterW that’s a very nice combination, thanks for your help and @JSHarris for getting me on the right track. All the other bits are straight forward...... will report back when it all goes wrong ! Thanks.1 point
-
That's actually a proper IP6X one. Undoubtedly let down by a bad gland install. Top entry is the work of the Devil. Bottom or rear entry every time if you can. Appreciate difficult against a fence post.1 point
-
Check the MIs carefully but unless you have some strange sadistic tendency I would leave the Egger alone and bed onto a decent cement based tile adhesive. Once you’ve added 5-6mm for UFH in self levelling compound and then tiles and adhesive, you’ll have a 7-8mm upstand at most and it will be virtually flush from tray to floor.1 point
-
Ahh ..!! All is ok as it’s a commando socket wrapped in black tape ..... why do people think this sort of stuff is ok ..??!1 point
-
WDepending on the depth you have, it may be “shorter” to use a 2” threaded socket with a 2” to 1” reducing bush in one side, then use a 1” - 32mm MDPE connector.1 point
-
You will need to step the 2" BSPM outlet down to within the range of MDPE connectors. The biggest female 32mm MDPE fitting is 1" BSPF, so one way to do it would be to use a 2" to 1 1/2" BSPF reducing socket, then a 1 1/2" to 1" BSPM reducing nipple, then a 32mm MDPE to 1" BSPF female adapter. The polyprop adapters are here: https://www.pipestock.com/mdpe/pp-threaded-fittings1 point
-
I cant agree with you there. I think it is a case of lack of understanding and the architect just doing what they have always one. Understanding and importance of thermal bridging has moved on and perhaps the continued proffessional development hasnt kept up.If you go to the effort of drawing a section you don't do it wrong because you are busy, it is because you don't know the right way to do it. It shouldnt be your job as a lay person to check an architects details, that is the whole point of employing one. I have been told by a number of architects that my house looks German because the windows are set back deep from the face of the cladding. It isn't German it is just detailed properly for a well insulated house with no thermal bridging.1 point
-
No ply needed but full compo bed recommended by manufacturers. Seen plenty of plumbers bed on foam. Would strongly recommend against hacking sections of egger deck up, its a complete system. Better option would be to overboard all bathroom around tray if you want it 'lower'.1 point
-
I've long felt that the wiring regs should be freely available, in the same way as the building regs are. We have the incredibly daft situation (in England and Wales) where Part P is freely available (here: https://www.gov.uk/government/uploads/system/uploads/attachment_data/file/441872/BR_PDF_AD_P_2013.pdf ) and yet BS7671 is not, it costs an arm and a leg to buy. This is plainly ludicrous, as Part P is pretty meaningless in places unless the reader has a copy of BS7671 to hand.1 point
-
I know these are not arguments you are defending ? a) somehow the government are publishing laws online and nobody is worried about the integrity b) is of course a good point and the main point. I personally think that if I must obey by certain rules than these rules must be out there in the open. I am not a competent person but I want to be able to check that something done or suggested by someone else (however competent) is reasonably safe, very difficult without being able to even read the rules.1 point
-
Haha yes I have seen that done on a few projects. These guys have a really good method statement -1 point
-
Yes, not an RDC to be seen.1 point
-
Fit internal studwork after screeding1 point
-
Branch is fine - what they normally suggest as best practice is to put it on a spur and put a tee with a screwed access cap on the top. Arm of the tee then goes to the WC but that is belt and braces. And only one vent required - its for pressure relief on the system and you could just put anti syphon bottle valves on the hand basin in there to stop any sink gurgles.1 point
-
Ok, So the BCO officer came out - Builders were not on site. I asked about the soil pipe - he gave two options as follows. 1 - Wrap the pipe with 100mm insulation and then pour foundations - but to add mesh to the area above the pipe to strengthen the foundations 2 - Shutter the area, pour foundations and use lintels above - fill around pipe with pea shingle I then suggested option 3 as suggested above from Joe90 to sleeve the pipe with a bigger pipe, he said hmmm you could do that, but that he would prefer us to shutter the area and fill with pea shingle as the pipe would be close to the top of the foundations. So we went with option 2 - we poured the foundations to about 30mm under the pipe - used cut sections of a 3 x 2 concrete paving slab to shutter off either side of the pipe then filled the foundations - the slabs have remained in place - once set we filled around the pipe with pea shingle and used a lintel above. Thanks all for your advice. Wozza.1 point
-
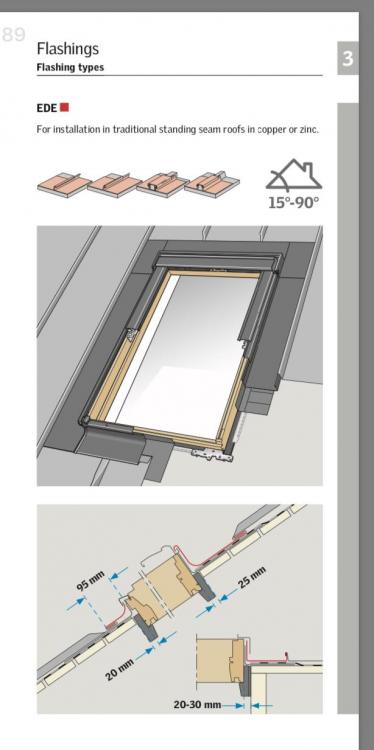
Who specced the install ..? According to the installers guide, a velux window should be red line flush with the roof surface with an EDE flashing. What was the purpose of the kerb..?? Handbook is here if you want a copy.
 1 point
 -
It's truly self-clean. At our old house I had to attack the shower screen every week with de-scaling stuff, squeegees, etc, and even then it looked pretty cloudy a day or two later, ever when running a squeegee over it after every shower. Here in the new house the self-cleaning glass just stays clean. All we ever do is occasionally point the hand-held shower head over it to wash off any soap or shampoo splashes. We have a squeegee to hand in the shower, but haven't yet felt the need to use it.1 point
-
what about a couple of clamp-on hinges?1 point
-
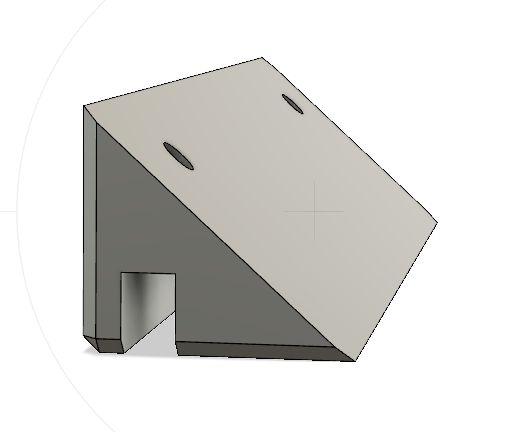
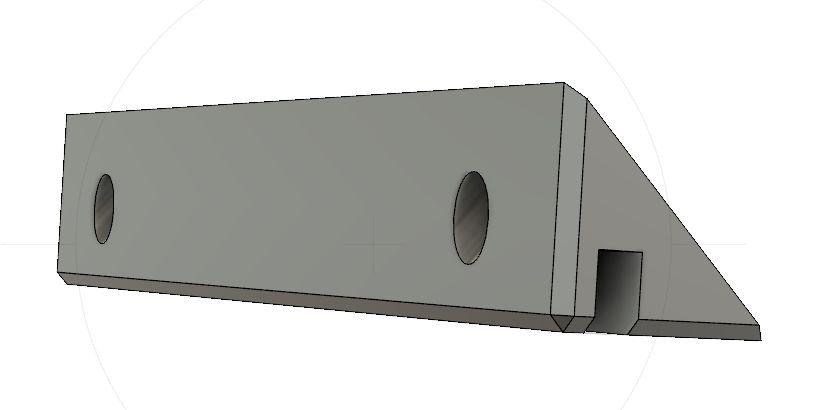
Just had a quick 15min play around with Fusion 360 over a cup of tea. At 150mm long and 25% infill Cura says it needs about 12m of filament which isn't much but more than a 10m sample. Holes might be better going up from underneath. Anyway have a think. I'm painting the church hall next door most of tomorrow.
 1 point
 -
Happy to. One day (when/if I finish it!) I'll do a proper write-up as I think some aspects of my system could be of interest to other retro-fitters that don't the have the luxury of open ceilings, webbed joists etc of a new build (okay, we don't the stresses either! ) As brief background, my system was born out of the desire not to spend loads of money and effort on insulting our new open-plan extension only to have (at extra cost) trickle vents added to the already-expensive lift-and-slide doors. As with many of my ideas and musings next thing I'm doing is looking to ventilate the whole house with MVHR... I could see strengths and weaknesses with different components from different manufacturers/suppliers and so, taking advantage of the cross-compatibility of the 75/63mm radial duct systems hand-picked different parts for different reasons: - MVHR Unit - Titon HRV 1.25 Q Plus Eco - Had all the features I desired (e.g. right size, summer bypass, generic filter baskets etc) but most importantly was available cheap (£350 I think?) from a seller on eBay who was involved in ripping out hundreds(?) of them from a development to replace them with the next size up as per the contracted spec. They'd only been commissioned and the properties yet to be handed over to residents. I visited the guy at his house to collect it and am convinced by this back story. Came fully boxed with all the extras (from the new units), and seem good quality with ebm-papst EC fans and Recair heat exchangers. Happy to pass on the contact details to him if others are interested as I think he's still got some left. - Control System - My brother keeps reminding me that he never touches his MVHR unit (other than filter changes) however the engineer in me still wants to monitor/control it. Rather than spend hundreds on the proprietary Titon control units I will eventually be building a Pi-based controller to monitor/graph performance and operating states, as well as to provide more configurable automatic controls (holiday mode, humidity-based switching, summer bypass/purging, PWM motor control etc). In the meantime I will leave the unit to do its stuff but I am fitting momentary boost switches in place of the existing extractor fan isolators just to give some manual control should it be required (and also in case we ever move on - I don't think the new owners will appreciate being left a hand-written user guide and downlink link to my bespoke Android app!). - Ducting - Airflow Airflex Pro - Whilst all 75/63mm ducting is seemingly interchangeable that is not to say they are all made the same. I've handled some that has been far less flexible than the Airflex Pro stuff and so went for this as I knew it was really good quality. - Distribution Manifolds - Blauberg 8-Port - I was going to make my own out of ply but at only £35 each I couldn't resist. They were easy to line with acoustic foam and I will be combining them with their own ducting adapters and (expensive - might DIY) restrictors to adjust the flow at this end rather then the ceiling terminals (reduces room noise and avoids unauthorised fiddling!). - Silencer - Blauberg 600mm - Again, another cheap offering from Blauberg at less than £30. Opted just to fit one on the supply side, but have designed the extract pipework to allow an easy swap-in if need be. - Ceiling Terminals - HB+ Conus Airvalve - Chosen after I saw @JSHarris's setup and liked them both for their aesthetics (slightly less 'office toilet' than some as my wife put it!) but also that they are designed to work with manifold-mounted restrictors (i.e. they can't be screwed in/out). I bought them from a supplier in the Netherlands as even with shipping there was still quite a saving over UK suppliers. - Terminal Adapters - Domus - I went for these for those locations that I could easily access (kitchen, lounge, dining room due to ceilings being down; top bedroom, en suite and dressing room due to loft access) as they were a bit cheaper than some others, are nice and compact etc. Not much to choose between really, although some seem very expensive for what they are. For other locations where I only had through-the-ceiling access I've gone for a bit of a Heath Robinson lash up that I could install through a 125mm hole from below consisting of a 125mm 90 degree elbow combined with a 125mm to 75mm reducer. I think that's pretty much it, aside from all the ancillaries, fixed piping etc. In total I think I've spent £1200 in total which I don't think is too bad for a 100m 11-port (12 duct) system. Yes, more than the trickle vents in the doors that kicked this adventure off but hopefully of more functional value. Edit: Apologies to @j_s; I wansn't intending to deviate the thread with all this!1 point
-
I'd mill that in aluminium. Not difficult, a small independent machine shop or a hobbiest with a mill would do that for a few beer tokens and the price of the ali. It would look good anodised but painted would work.1 point
-
I'm happy to have a go for a donation to BH. Currently I've only got Orange and Black PLA but have an idea... Does it need to be 150mm long? If it could be say 100mm long I think I could make one from a 10m sample of white PETG which would be stronger and possibly longer life. As drawn corners/edges would be quite sharp. I can easily add small bevel? Likewise could add fixing hole if you wanted to screw it to the ceiling. Just off to pick up my kids.1 point
-
Early in my career I spent several years modelling the underwater plunge behaviour of air launched torpedoes, to try and predict the 3D underwater trajectory for the short time between water entry and motor start up, so the range of attitudes, depth and velocities in all axes could be predicted (the aim was to inform the guidance control people of the sort of start up conditions they would have to deal with). Back then we were coding in Fortran 77, using an ICL located 200 miles away, that compiled our code (transmitted via a 300 baud teleprinter link) overnight. Each day started by going through the errors flagged in the printouts that had piled up overnight, before trying to fix the code and move on to the next section. The best bit was validating the model, as that meant designing and building a pretty robust sensor and data logger (using 1/2" magnetic tape and missile data recorders) that we fitted inside dummy torpedoes that were released over as wide a range of drop conditions as we could manage. It did mean I got to fly a lot, though, which led to a shift to a career in flight test. To get the highest release speeds, we had to chuck the things out of a Canberra, doing around 400kts at maybe 150ft ASL. Lots of fun...
 1 point
 -
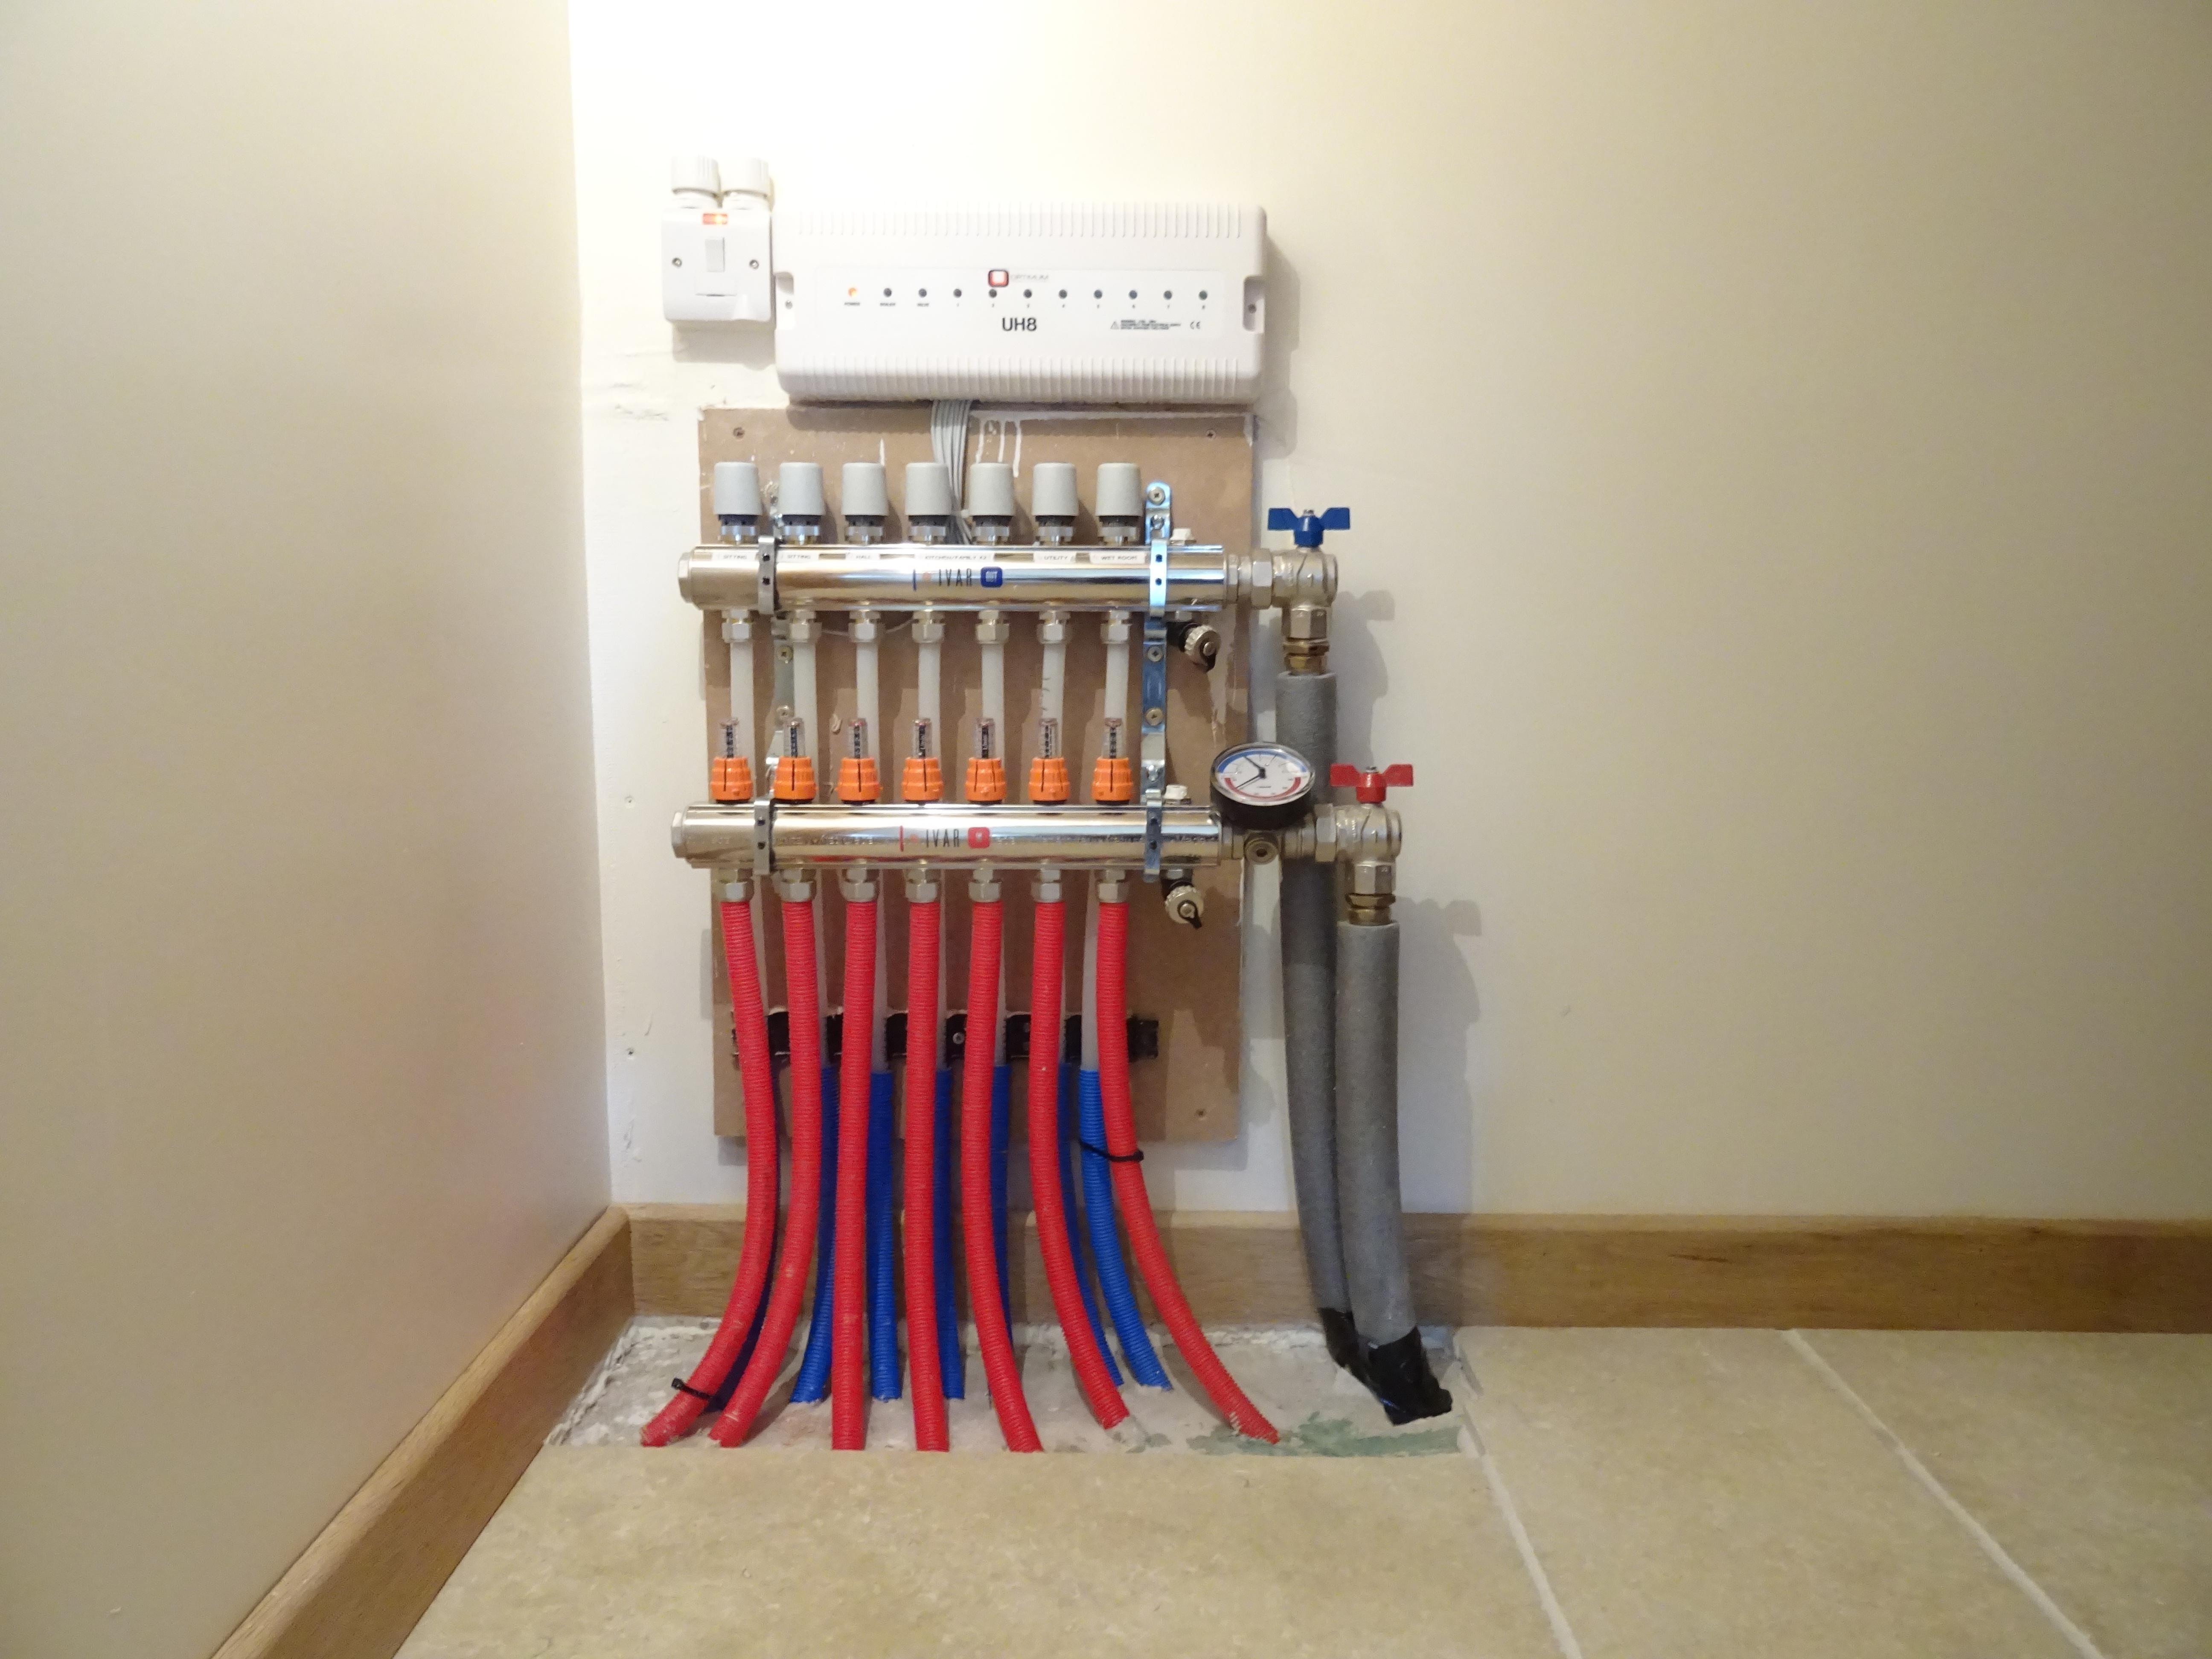
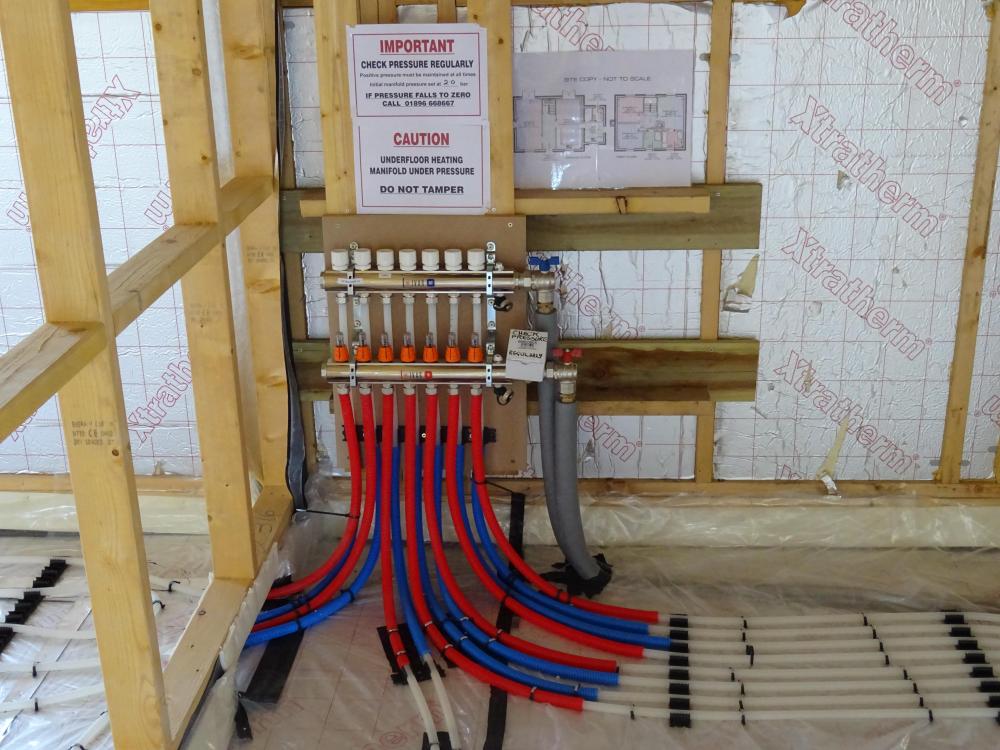
@Wagas - Like @ragg987 We put the screed down over the UFH first as to allow plenty of time for it to dry out prior to the tiles going down. Sometimes an image or two helps. The two images show how the manifold was fixed to a wall, in the under stairs cupboard, prior to the walls being plastered and how it ended up afterwards.
 1 point
 -
Floors first as plasterboard should end 10-20mm above the floor.1 point
-
Here's a time-lapse video of my timber frame going up this week. Team of 3 from PYC arrived on Monday and did the sole plates. Started erecting the frame on Tuesday, which is when the video starts. Lorry arrived each morning between Tuesday and Thursday with the panels and was unloaded and offsite in less than an hour, so minimum disruption to neighbours. Three and a half days to complete and I now have a fully insulated timber frame, with all internal stud walls and intermediate floors, up all bar a couple of small dormers. They'll be back next week to finish off and install the windows and doors. Very pleased with what PYC have done so far. Apologies for the wavy branch in front of the camera - didn't notice it when I was halfway up a tree setting this up ? Camera was a Brinno TLC200 Pro. PYC Timber Frame.mp41 point