Leaderboard
Popular Content
Showing content with the highest reputation on 08/28/17 in all areas
-
Designer? Some of the rooms looks like the waiting Area in a 1970's Mental Hospital (not from experience) and that lounge is pretentious and Uber-Drab-Olo (yes I have made that up so I can sound WITH IT TOO) I mean anyone can pour dulux once over lining paper, cast iron fireplace et al ! and look at all those books ..I BET the spine has never been cracked on any of them ... 3rd century pottery of the Phoenicians 7th editon !?! ....As Jim Royle would say "me ar*e" I mean these guys have lost the concept of value for money ...I couldn't believe what they paid ...I mean its no wonder they cant afford a new razor blade between them, and one of them appears to be wearing a pair of jeans he was bought by his mum when he was 10 I mean this is tragic ...I sense a "JustGiving" page in the making2 points
-
2 points
-
Here's what we used, we got ours through the Barn Owl Project run by the Essex Wildlife Trust. It then gets monitored by them and then, as happened this year when we had 4 chicks born, they all get ringed and registered. We had a roost in a barn adjacent to the one we developed, so knowing we'd disturb them we put up a couple of boxes in an adjacent hedge row. The Owls used one of the boxes as a breeding site in the second year it was up.2 points
-
After 6 years of planning battles, redesigns, engineer wrangling and evenings spent softly weeping .... Brendan and the crew are coming tomorrow morning. We met two of the lads this afternoon, Sean and Sean (easy to remember..), can't wait to get started tomorrow No point to this post really, we're just so happy! Any top tips for what we should keep an eye on during the slab install? Does anyone want/need detailed info or pics as we go along? Cheers, dj1 point
-
@Tennentslager If the marks are not shifting with normal cleaning, and they are not deep scratches, try ceramic hob cleaner. Worked a treat on some marked sanitary ware (transit/packaging marks) we had.1 point
-
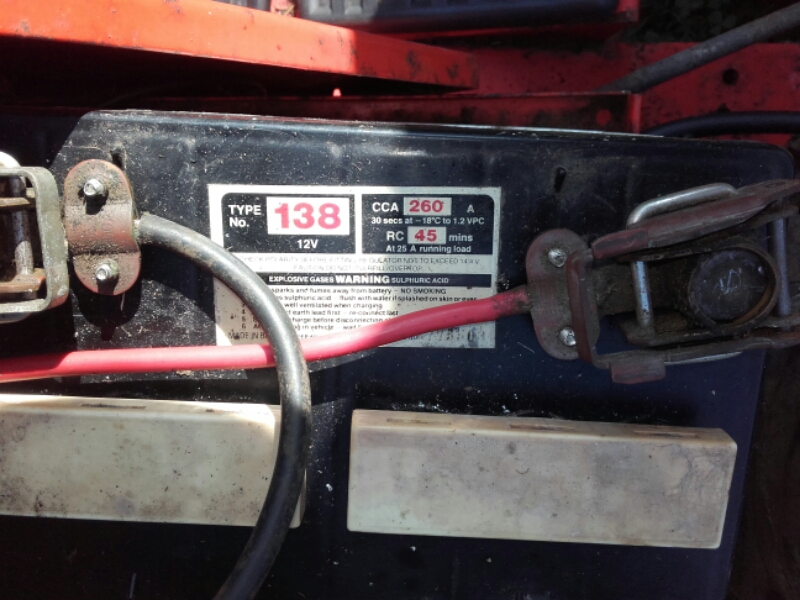
Yep but the 138 that's on it is only about 19Ah - the size is number of minutes at 25 amps so 45 mins at 25 amps is about 19Ah....1 point
-
The issue with both of them is running costs. Life has moved on since they were 'normal' (Posy Simmonds, Tresodit , jus' douun 'n road from @SteamyTea) But man, for your place (palace) it suits the image. You can slow roast a Gremlin in one: indeed my mum once forgot she had put the best part if one of our billy goat kids in the slow bit for a complete day and night: nowt much happened as a result. It was delicious. And there'd be no need in your place for any other heat source.1 point
-
A had a quick look at County Battery, but that one is only 26Ah, The one OnOff linked to was 45Ah and at that rating County could not come close the the price he linked to.1 point
-
@Onoff County Battery are always good - £38 inc delivery https://www.countybattery.co.uk/lawnmower-/895-powercut-lawnmower-battery-12v-260ah-12n24-3/1 point
-
Yeah! The refurbed mower pcb works, good lad! All LEDs seem to do what they should in response to ignition, charge, cutter engage, lights and brake. Stuck a Capri battery on it just to test (but physically too big). Best price I've found is £45 delivered for a new battery. Had to cut off a cranked M8 bolt in order to fit the new drive belt so I'll make a new one tomorrow out of some 9mm bar I've here. I just couldn't get any purchase on the inaccessible, original, rounded, rusted nut.1 point
-
As I scrolled down this page a picture suddenly appeared of a mower at a funny angle amid a trashed lawn. For a few seconds I thought there had been a horrible accident.1 point
-
1 point
-
Hey @Onoff, I'd never heard of Gruffalo Board before. That's some stuff innit? Price to match too. Well, @Thilo, if you're a good enough welder ('Shume shay I'm a Welding God' not bragging or anything) you could weld a bit of chequer plate in the right places..... maybe?1 point
-
Hi everyone as you you will guess I am new to this forum and any replies will be appreciated. My query is this. We have a semi-detached house with rosemary tiles that we are replacing with slate. We have an abutment to the left hand side made of stone (sits on bricks just below the surface of the roof so the only part that I can abut anything to is stone I planned on using one of the grp secret gutters then lay a lead alternative flashing on the edge of the stone over and into the grp gutter what do people think? From looking around it would seem that most other similar roofs the stones have been lifted off then rebedded onto the tiles/slates however the neighbours wont let us lift the stones have seen plans that state they own the stones so we're a bit stuck any suggestions!1 point
-
1 point
-
1 point
-
Good luck from me to............pics and blog would be very nice to see and read. I'm very interested as after reading so much good stuff about MBC I am now undecided between SIPS and TF. Still going to be at least another year before I get started.1 point
-
Sean and Sean are top guys. Just watch out for Sean P's jokes, he's pulled far too many Xmas crackers in his time! If you've got Brendan, Darren, Sean and Sean all together then frankly sit back and watch!! Of course we want pictures!!1 point
-
Hi all, @recoveringacademic has kindly granted me blog rights, so I'm off to make a start Pics later!1 point
-
Comments and pics as you progress would be much appreciated. We need to keep building the library here and major events such as these are self-build gold dust, warts and all please . Oh, and don't get in the way, Brendan doesn't hang about .1 point
-
Pics are interesting of the MBC stuff. If we had only known about them......... Good luck and enjoy the experience.1 point
-
1 point
-
1 point
-
1 point
-
1 point
-
You've done well there. The re-bar should be off the deck but I'll let you off. Mix the concrete a little wetter to let it get right around the mesh and pipes, and don't forget the fibres to make the mix flexible . Luckily your on a forum populated with experts so NOBODY here would forget something like adding fibres to the mix1 point
-
1 point
-
1 point
-
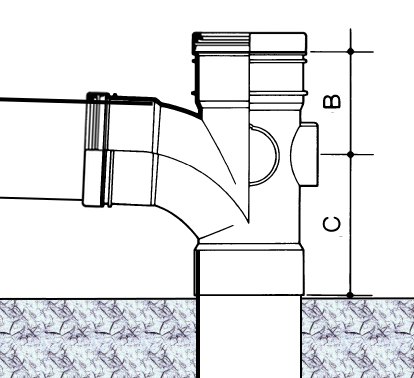
@Barney12 the coupler that you mention wont give me the depth to include a branch @warby I am using one of these on the first floor for the two toilets but I only need a single branch on the ground floor. @NickfromwalesNick, if I have 2½° fall-away from my pan that about 5cm so the branch centre should be around as far as I can see the pipe centre at the branch needs to be around 12cm above FFL or 13½cm above the slab. However I have a Gerberit with wall hung pan so I can play around with the connection height a little as well as the gradient, so I could get away with around 15½cm or so. That's enough to fit a D/SW Single Branch such as the one below, which requires 152mm. OK I still need an expansion gap on the pipe but I 've got a rodding access immediately above this which I could make push fit at the top or I could use the converter kits which convert a solder fit socket to a push fit one. As Jeremy points out I will need to be anal about getting the cut accurately square which is going to pain in the arse given the position of the pipe but I can make a jig and use a tenon saw and finish off with the old woodworkers trick with a sharpie. And this is still dependent on being able to solder the PVC-U 110 drain to a PVC-U 110 stack branch. Anyway having done a bit of cut and paste from the OSMA catalogue this is what I am looking at (C=152mm):1 point


