Jenki
-
Posts
830 -
Joined
-
Last visited
-
Days Won
7
Everything posted by Jenki
-
+1 must be insulated, temperature of pipes will be hotter than room, so thus would lose heat.
-
Its difficult to see from the photos, but you can get dry ridge kits that just have the membrane and clips, and some with support trays. These are the same product but with the addition of plastic support trays that sit under the tiles, on flat concrete tiles you can get away without the trays, but on tiles like yours it is difficult / nearly impossible to get them to line up. The photos look reasonably straight. as this is just a re-ridge / hip, as @nod says there is little you can do with the shape of the existing roof. and the ridge tiles will follow the tiles underneath. The mention of bedding up was referring to when you use sand and cement.
-
Agree with the crap plug, but its part of the warranty. The other end is hard wired to the control board. - else I would have removed. The outdoor unit is connected via 4 core (well actually 5 core as I had some external 5 core), cable from the indoor unit control panel to the outside unit. I've checked that the socket I have used is part of the ring and not a spur- IMHO a FCU is not required. Its accepted practice to install ovens and hobs / tumble dryers etc all heating appliances up to 3KW on plug tops, so don't see the issue using the socket. The socket is rated at 13A, and as long as I don't plug anything into the spare socket no problems. the fuse in the plug top protects the cable to the appliance and the breaker in CU protects the ring cables. So all is acceptable and conforms to BS7671.
-
its a single glazed static caravan, near the Highlands coast in August, I don't need cooling 🤣, in all serious, it has been getting very warm due to solar gain in the afternoon, so I will try it out then, although this goes against the grain as I try to keep as much heat in as possible. Initial thoughts on the heat is it it works well, takes about 5/8 mins from calling for heat until the inside units fires up and starts emitting warm air. its fairly quiet, but caravans are small so your never very far away from the indoor unit. similar noise to a cooling fan. Its made me think I might run some insulated pipes and power to future proof the house build.
-
A short blog to show my Mini spilt Air2Air install, in the Windy Roost Static. I looked at installing a wood burning stove, but we have zero trees on site, so when I looked at the costs of twin wall flue, terminals, flashing, creating a heat shield and making the caravan tidy plus the hassle of getting wood / coal, the costs were adding up. A quick question on here - Build hub, some options were suggested and I decided to go with the a cheap Air 2 Air heat pump from Appliances direct. The unit is a Telefunken 12K BTU split unit. cost around £375 but did not included the pipe to connect from indoor to outdoor unit. I got 5M twin insulated copper pipe with the flair nuts from ebay for £56. Our Static has a gas fire - useless, and a chimney breast made from chipboard, the side panel just screws off to access the flue. This was the perfect place for the indoor unit, as it would be a neat install and the rear will allow for the pipes to be hidden, also I could use the hole in the floor to route the pipes/ drain and power for the remote unit. I removed the light fitting, screwed the bracket on the timber, and drilled a 80mm hole, for the pipes / drain and power. Then its a case of posting all the pipes/ drain and power cables through the hole, really straight forward, the indoor unit then just clips into place. The indoor unit comes pre wired with a 13A plug top, and you need to run a 3core and earth cable from the indoor unit to the outdoor unit. this is Live, Neutral and a control / switch cable. Next to the chimney is a double plug socket, so I wasn't messing around running new cables, I just drilled an 8mm hole in the side of the chimney breast and used 2M extension lead to plug the unit in. I used some zip ties to secure the extension lead and plug to the pipes (these were put on after the photo below). and that was the internal work complete. zero mess, and no rework / decoration required. The outdoor unit was going to sit directly outside, behind the chimney breast, the ground outside was not level but it is bedrock, so a made a simple frame and made level concrete pad, and cast some hook bolts into the concrete. For initial research I spoke with a Local (ish) refrigeration engineer, and he said he would connect for £120. but was telling me there is nothing to it, and if I was doing everything else then maybe I do it all??? I found an American You tube guide which was helpful on the pipework side. (linked below) Basically, the unit comes pre charged with gas, so you are not filling with gas etc. the main issue is removing the air from the two pipes you install. This is done with a vacuum pump. (some more expensive units come with pipes and they are pre-vacuumed with quick connectors) I found a vacuum pump and gauge set for sale on Vevor for £79 so £41 cheaper than the refrigeration engineer. I bought one, and an adaptor. I'm not suggesting anyone does this without an F - Gas Engineer, but the main issues are leaks, if when you connect the pipes up and they leak you are going to loose the gas, and the unit wont work. To Purge the pipes Step 1 connect your pump to the centre of the two gauges with a hose Step 2 connect a second hose to one of the gauges and the other end to the one way valve on the outdoor unit Step 3 Open the valve on the corresponding gauge from step 2. Step 4 Run the vacuum pump for 15mins to remove the air, and you check the gauge is reading negative. (-30 blue gauge in pic below) Step 5 turn off the pump and wait 15mins, and check the gauge is still negative. (-30) - this proves there is no leaks Step 6 close the valve you opened in step 3. Step 7 Open the 5mm Allen screws on both valves to the gas fill the internal unit. That is disconnect the pump plug the indoor unit in and you ready to go. Notes: I used expanding foam in the hole at the rear of the fire. We have no intentions of using the fire as it is /was rubbish. Also the indoor unit should not be near a source of heat. The total install time was around 4 hours. and total cost £530 More importantly my caravan has warm air. lets see what its like in winter.🤞
-
The grub screw one on both sides grips the spindle that actuates the latch. The idea is that it prevents the handles becoming loose. Some spindles are spit and the grub screw expands the shaft thus locking it in place. If not do as @Onoff suggests.
-
Personally never seen it like this, (I'm not a structural Eng.) usually its a square / rectangle ring beam tied to the mesh, can't see the angled portion offering anything that a square section wouldn't. I'd be gong back the SE to ask for it to be square. EDIT: you can pick up square 'rings' pretty much of the shelf and make the ring beams by adding rebar lengths. no reason for as simple design to have bespoke rebar IMHO,
-
I've used FUSEBOX for RCBO's lots of room, and cheap as chips. Had an issue with some RCBO'S on initial test a while back, they are now different, so assume was a manufacture / design error. no problems with the new design.
-
There is a Building regulations requirement for insulated plasterboard to be mechanically fixed, this is to prevent the boards from becoming detached from the walls in a fire. I've read of firemen being trapped. not sure of the regulation but this is one of the products to use; https://www.twistfix.co.uk/insulation-fixing-anchors-zp?uilang&povList=3215&gclid=Cj0KCQjwof6WBhD4ARIsAOi65ahOQRSASTVja7vFFopdtpOgn4eYADz8P4nsnvRt0xGuSIJIfH2npDcaAgokEALw_wcB EDIT: Seem to remember two fixing at the top of a board. not required at the bottom. ?
-

Heatrae Sadia Megaflo 300L Unvented indirect solar cylinder
Jenki replied to Jenki's topic in Boilers & Hot Water Tanks
@PeterW. Any comments to assist on the above? TIA. -
Heatrae Sadia Megaflo 300L Unvented indirect solar cylinder
Jenki replied to Jenki's topic in Boilers & Hot Water Tanks
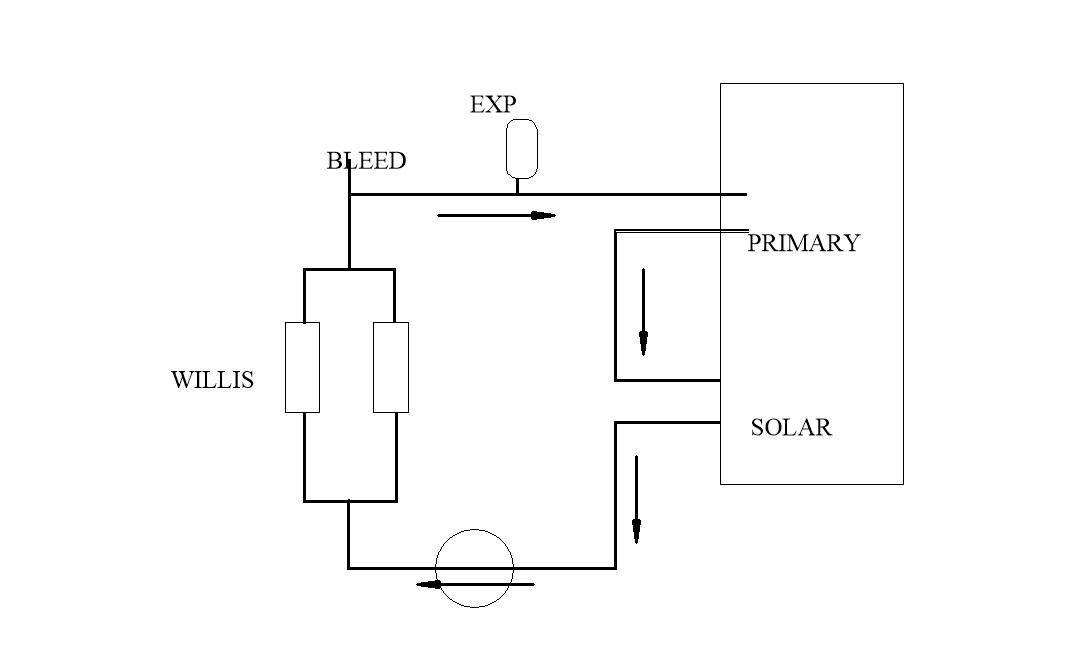
Resurrecting this thread, as I'm getting closer to installing. The Cylinder I have as above CL300 Solar. I notice that one of the elements seems to have discolouration (heat), and the cylinder has been outside. So my thought was to bypass the cylinder elements and use Willis heaters, as this will make moving to an ASHP later an easier job (if required). I'm also thinking that I may use a 12V DC immersion powered from a "renewable source"** as a dump load. The diagram below gives my thoughts on pipe layout. Electrically it will be a timer, that will switch on the element and pump, using the tank stat. Would appreciate any thoughts / suggestions for this solution. This is for DHW only, Q: with this set up, does the pumped heater loop need a PRV? ** possibly a cheap Wind turbine - but don't want to mention / discuss that for fear of flagellation.
-
outer hebrides it seemed like a good idea at the time…
Jenki replied to Chris HB's topic in Introduce Yourself
respect.. Good luck... -
The 4 phases from Rainwater to flushing the loo
Jenki commented on Marvin's blog entry in Rainwater Harvesting
What was the reason for using soakaway crates and liner instead of a tank? And any details for the fine filter you are using / where is this located? -
My suggestion is ask them. But I would also say, that usually as long as they can see what is done, they usually fine. They are not bothered with the order of jobs carried out, just that it conforms to regulations. I always have a kick off meeting with BC to get a feel for them and them a feel for me, this usually allows for some discretion / photos as proof in these situations.
-
To finish my 22 days on site. I started timber framing, decided to start on the amenity block, as this will initially be for our washing machine and dryer, plus some storage. My aim was to get water tight -ish. before I had to get home for the weekend. The poly tunnel (constructed this visit) - is my cutting shed, I set up my chop saw and worked to my cut list. This was proof of concept on my build plans, and it needed tweaking, the roof to wall junction has been modified and will work, but I want a better / neater solution for the cabins. here's my first attempt with the Binno camera. amenity.mp4 The wind picked up (20mph with 35mph gusts, so I needed to get some structure and racking boards in place, so the camera set up didn't happen day 2. I left site with it wrapped, and with the vapor barrier on the OSB roof. (with some 6x2 to reduce the wind uplift. I'll need BC to have a look before I put the insulation on the roof, as I want the insulations and rubber to go on on the same day. This block and the cabins will be clad in Scottish Larch. There's a gap above the door, that needs the final framing to be finished, but generally happy with the result. so far.
-
the windy roost Cabin Foundations and the Amenity block.
Jenki commented on Jenki's blog entry in The Windy Roost
I had a rotary laser level, so similar to your method but used the digital receiver instead of my eye....😁. For the house I'm planning a DIY insulated raft with UFH. The finish could be our finished floor for some time. But will look at the vid and run some calculations. -
Have you done a blog for the DIY install?
-
the windy roost Cabin Foundations and the Amenity block.
Jenki posted a blog entry in The Windy Roost
My dual roles for the first 10 days of the June / July trip was to get ready for concreting. This breaks down into two slab / raft foundations for the Cabins, 1 slab for the amenity block, and some backfilling of the treatment plant, and while I'm at it, concrete for the Polycarbonate Polly tunnel. another blog to follow. In my opinion, the structural calculations for the slab rafts were well over engineered. the slabs will be ground bearing (rock) foundation and thinner slab, all poured at the same time. The Radon barrier and timber frame will sit on this, with an insulated floating chipboard floor. I know this will give some thermal bridge on the timber frame, but these are camping cabins not the house. Costs said this was the way forward. I'd already exposed the rock for the cabins, so BC could see this, and was happy for me to crack on. I framed the the cabins with 6x2 timber, and levelled this formwork. Then used crush and run to raise the central slab area up, to leave me a 100mm thick slab with thickened foundation perimeter. This perimeter varied due to the level of the rock. I used around 6 ton of MOT in each cabin., then A252 around the base of the foundation and A142 across the slab. At the corners of each slab I ran the WC waste, and also a feed for H&C water, power and internet supplied for the amenity block. The amenity block was a simple 150mm Slab on compacted hardcore. With this prep done, my wife, (the now only breadwinner for the next 8 weeks), was due on site, for a baptism of fire..... To be fair Saturday and Sunday consisted of me and Mandy getting the mesh in place and getting the post support for the extended roof of the cabins dug, tying the mesh, getting the post support brackets ready. and some land clearing/ hole digging for the Poly tunnel. Monday is concrete day..... The plan was simple. the truck would reverse up to each cabin, drop around 5 Cube in the cabin, whilst I'm levelling, then the remainder would go into the amenity block. we would float this, and then when the truck came back pour the second cabin, finish the amenity block, and whilst waiting for the truck to come back get this floated off. the last load would be the treatment plant (this would be using the loader bucket) and leave a little for the poly tunnel.. easy 15cube, no problem.. It didn't work this way, Mandy, who is game for anything, but being an engineer needs to know what she is doing. She has never laid a slab.. didn't matter, because I was going to do it, no problem. she was there as a go for, and edge trowel-er (I must point out, I knew that the surface finish wasn't important, as its being covered with insulation and membrane - but) The wagon turned up around 10, after a 30 min trip to site, the day was damp, with slight rain, not overly hot, the driver would not drive on to the earth next to the cabins. So I had to use the loader. (an old Ford 550) the first half bucket was solid, I could tell by the colour, there was a lot of cement in the mix, I told him to add water, lots of water, but he didn't have "loads" so the best we got as a stiff slump, I loaded as fast as I could, and Mandy was trying her best to rake / shovel this level, and she was doing a great job, but she didn't know what she was doing, and it was hard work. I thought the concrete was wetter than it was. after about and hour we had the concrete out and some in the amenity block, but it was far from level, and starting to go off. I had to use the loader to level some more, than then used my beams to get it flat. This was hard, and the bull float wasn't bringing up a lot of cream..... I asked for a wetter mix for the second drop and asked for 2 hours to get set. I got the slab flat and fairly good, but not great. Whilst Mandy was teaching herself to drive the digger, (she wasn't having round 2 with the rake). Round two was worse, the mix although a little wetter, was setting faster. Mandy put the first few loads into the amenity block and I levelled this, then started on cabin 2, it was a real graft. Again the loader was used to move the setting concrete, there was some concrete left, so this went into the treatment plant pit. With the running around the site, cabin 2 slab was far from finished and I had to resort to putting water on top to help. Not my best day. I get the slab level., but floating was not producing a smooth mirror like finish. We also had to set in the post support into the 4 shuttered blocks. and had around 3/4 of a bucket left in the loader. We rounded the day off with setting the posts in the poly tunnel. We got cleaned up around 18.00. The amenity block and 2 cabins were flat and floated, but not fantastic (hence no photos). the treatment plant had around 1 cube of concrete and the 14 posts were set. 13Cube of concrete, and Mandy politely informed me, she was never concreting again.... Tuesday, we needed to finish off the treatment plant. but couldn't get concrete until late afternoon. The morning we started on the poly tunnel, but decided that we needed more concrete, so created a shutter to link all the posts with a plinth. The 3rd Batch of concrete was the worse, we did about 9 loads with the bucket and it was setting again. we left a full bucket for the poly tunnel, levelled the concrete around the treatment plant. (the driver informed me, that I probably had got more than 2 cube, as there was some in the mixer when he loaded mine, so that explains it going off real quick then. Anyway. we persevered, were still married and talking to each other, and we achieved the goals..... The future house slab pour will need more people, a different concrete company, and a solution that doesn't need my digger, PUMPS are not common this far north, thinking cap on. thanks for reading. -
Wednesday 26th June, I spent most of this day travelling, in my van and my two helpers for the next few weeks. The trip is 433 miles door to door, the goal before the boss arrives for 9 days was to get the caravan (home) connected to the treatment plant. plus get ready for concrete. other blogs to follow. To connect the Static I needed to install the treatment plant, install some of the drainage for the pods, confirm with BC he is happy and basically crack on with the long days that far north. Previous work had the pit dug out of the rock, so the basic plan was to sit the plant onto compacted, level, stone and backfill with gravel. Then put a top of concrete to hold the whole thing down. In the 8 weeks the pit was open there was no filling of the pit, so I was quite happy the rock was porous, but couldn't be convinced in heavy rain it wouldn't fill with water. The rock at the bottom wasn't going anywhere, so didn't see the point of fully filling with concrete. I backfilled with stone up to around 350mm from the central rib of the TANK (a Tricel Nova 12P) then put 3 cube of concrete over this. this concrete is now bonded to the rock sides to the pit and if my tank floats its going to have to bring the bed rock with it. The observant of you will note it sits a little higher than the ground. This was for two reasons. - to assist with the outflow depth for the rubble drain, and secondly I am going to raise the level of the ground in this and the rubble drain area, to soften the impact of the house, that will sit further East on slightly elevated ground. (I also buried a 5 ft earth rod in the concrete for the future) I got my levels from the pods to the tank a distance of approx. 46.5M, and worked out my fall, the levels of the land assisted this, i..e the pods to the West and the House to the East of the treatment plant are both elevated, with the treatment plant in the lower part, and near the existing rubble field drain. (our initial survey and plans worked. Phew) The trench for the waste pipe was also used for services (Water, telecoms, electricity, Ethernet) , backfilled with stone and fill from site. I then laid the pipe, with a fall, and supported this on flat rocks. Connecting lengths of pipe together on your own is not easy, (I asked the dogs to help, but the lack of thumbs became an issue. ) Top tip, long ratchet straps make this an easy process. the picture below shows this, I broke the length of the run up with branches for rodding points, not required at these distances, but makes sense and easier rodding if required. The ratchet strap is 15 m long, at one point I had two connected together. simply loop the hook around the chamber, or branch and the other end around the pipe you are connecting and a few ratchets later the pipe slides into place. Once all in place and re checking the levels I used stone (lots of stone) to fill the voids under the pipe, re-checking the levels (falls) and compacting as I went. I tested this run of drainage with bungs and water manometer. Building control were happy not to inspect before backfill, as long as I was happy that if it failed the pressure test later that was my issue... My initial meeting with building control, laid the ground for our relationship, I asked what he wanted, showed him my proposals, chatted about this and that and hopefully from this he could see I wasn't a muppet, so we agreed to move forward with a few photo's here and there and he might pop in at anytime if he was passing. works for me. One of the branches that will be a rodding point is doubling up as my caravan connection. For now the Treatment plant is running by being plugged in. I Will run the SWA cable but this will be powered from a house yet to be built, so for now, comes from a Caravan hook up point, with RCBO protection. Part two will be the rubble drain this is still work in progress..
-
- 2
-

-
- occumster.
- highlands
- (and 2 more)
-
Use of Portable Air Conditioners / Heat Pumps?
Jenki replied to Ferdinand's topic in General Self Build & DIY Discussion
Trivia fact (might be fiction) I was informed that the original owner of Screwfix expanded and expanded until he needed bigger warehousing altogether, so found a new site, at this point the kingfisher group came along and offered him good money so he sold, he then set up Toolstation on his new site.... -
Use of Portable Air Conditioners / Heat Pumps?
Jenki replied to Ferdinand's topic in General Self Build & DIY Discussion
Good shout, gutted I missed that, I'm usually aware of these and check, goes to show that the name of the site can help deceive. -
My view, and my plan on this was / is to board all walls. That way no arguments and you will have great easy fixing available.
-
I'm after some thoughts on my cabin roof / wall junction. I want a clean line i.e. not a roof overhang with facia and soffit. Question is would a gap at the top be sufficient for air to flow and allow the wall to breathe. This way I can rid myself of the Need for expensive trim and keep the look clean. Build. 6" stud with warm roof. Clad in larch. Rubber roof on 120 fibre coat insulation.

-
Use of Portable Air Conditioners / Heat Pumps?
Jenki replied to Ferdinand's topic in General Self Build & DIY Discussion
Looks similar to a product I was looking at today. I opted for a split unit and fingers crossed it keeps us warm.... Heres the link drastically reduced .. https://reyfurniture.com/product/electriq-14000-btu-portable-air-conditioning-unit-mobile-air-conditioner-and-heat-pump-energy-a-plus-pus/ -
Wood. Burning stove for the Windy Roost Static
Jenki replied to Jenki's topic in Stoves, Fires & Fireplaces
@SteamyTea I Think you've done your bit to save the planet, quick call and a local refrigeration guy will connect for £120. If I do the install work... cheaper than buying the twin wall and heat deflectors.. and I can sleep easy at night knowing that my heating is green. ( gas fired / nuclear / coal electricity🙈)- 14 replies
-
- 1
-
-
- the windy roost
- occumster
- (and 1 more)