Jenki
-
Posts
832 -
Joined
-
Last visited
-
Days Won
7
Everything posted by Jenki
-
I'd recommend AC50, not as cheap as veg oil. But amazing stuff.
-
In parts of West Cumbria skip companies will not take plasterboard. So I've seen the above l method adopted frequently. I suppose it adds to the thermal mass.
-
Hi, Did you contact the tech help via the website https://gbr.sika.com/en/construction/concrete/contact-us/send-us-an-enquiry.html ? or did you have a contact? My SE, although not dismissing this, is coming back with vague, short answers, (the invoice has been paid🤣). He's questioning the volume of fibres for the mix, so I think it might be better to get some technical from SIKA and go back with that for him to confirm yes or no.
-
@Gus Potter / @saveasteading Thanks, the mesh is for 2 jobs, the foundations of our pods and the insulated raft for the house. all foundations are laid on bedrock. A252 is for a 600mm strip around the perimeter of the foundations with 50mm cover, this is a thicker section of the the footing, then A142 is used centrally over the whole slab. So I assume this is more crack control. Will look into fibres as an alternative and run this by the SE.
-
Does anyone have any suppliers in or around Inverness for Reinforcement mesh? lots online but they wont deliver to KW3 postcodes, and if they do my best delivery quote had been £1200🤣 which I take as we don't want the order.
-
The delay, or should I say one of the delays in getting the Building warrant was a difference in opinion of the wind loadings between the designer and certifier, these appeared after that meeting, so I take it this is a result of this conversation. We are fairly exposed, 500m from the coast sat on 75M cliffs. So no issues in making it stay put, just want a solution that can save some money. My only issue is that I'm not sure on what flexibility I have regarding changes due to the certificate of Design in Scotland. If I used a similar idea to the strong wall and had an engineer design the fabrication, I'm sure that would be acceptable. few hundred for the calculations, cant see them costing more than £400 each to fabricate.
-
49501GSA02rev02.pdf The engineer is asking for double OSB and these in the Gables. plus the other racking walls internally. I don't wasn't the place to fall down, but at £600 + vat each I'm after alternatives.
-
My Structural calculations for stick built TF came back as expected but with the addition of 3 no SSW600 Simpson Strong wall, 2 in 1 gable and 1 in the other. Looking at the costs of these I definitely need a more cost effective alternative. Anybody got any suggestions? They look like they will be around £600 ea., and I'm thinking there has to be a non production alternative? i.e. get something fabricated en-ssw-19-steel-strong-wall-for-timber-frame-racking-resistance-1067.pdf
-
It is from the quarry, they call it type 1, I call it ankle breaker, I think there is a bit of poor grading on the size, but this is all I could get. I'd prefer type 2 as it's easier to level, but at least this will drain well. I have used a little of the spoil stone at the house end as this will need building up. It's a woven geo-Tec "Lotrack", I considered Teram but due to the majority of the track being over stone I went for the economics of this.
-
The next stage of the setup of the site took place over the last 3 weeks. with some good progress. The trip up North, 433mile from our current rental in the NW of England. I set off on Wednesday morning in the 7.5T truck, and the 2 dogs for company. I took some materials with me, and had a gut feeling I was overloaded. I had worked out the approx. weight of what I was taking, but was unsure of the TARE weight of the truck. so I didn't take all I was planning. Luckily the nice guys from VOSA, At Carlisle (Todhills check site), confirmed my suspicions when the invited me in for a check. I was over weight, but the truck and my paperwork were all in good order, and they give the truck a thorough looking at. The upshot of this was me renting another 7.5T truck for storage, offloading the excess weight, driving the remaining 333 miles, unloading, returning the next day with the empty truck, re loading and driving back to site. 1100 miles in 38 hours. not what was planned, but you live and learn.... I arrived back on site on early Friday morning, 02.30am. and slept in the cab of the truck, until I was woke up at 05.10, by the guy delivering the Static, he was at the end of the road... Here's a screen grab of our new home arriving to site, this was 05.25 am... I hired a contractor to carry out the highway works for the site entrance, basically as he had the correct insurance and RAMS it was easier to get this stage subbed out. The idea was he would open up the site, with a 5 T digger, start the initial road and stone this up with around 60T of type 1. I would then meet on site and hire his man for a few days to assist with the pecking of the treatment plant. This didn't go to plan, they had to use a 13T machine, as it was available, so when I eventually get to site on the Thursday, due to the size of machine, the operator has completed the initial works, then pulled out approx. 60M of the road, and pecked the treatment plant hole, and I got this for free... 😁 Having a 13t machine on site, with operator for the Friday, I needed to make the most of it, as I was only paying for the rental of a 5T machine. Mikey the operator, made short work of pulling out the remainder of the road up to the location of the house, in total this road is around 90M. Next I had him strip the area for the house. The house is around 13M x 7M, so I wanted to strip back a working area around the house, my thought was we would hit the bed rock so this was the plan, we marked out a 16M x 11M rectangle, and he set to it, it took him about 2 hours to strip the land and scrape it clean. The above is the bedrock where the house will be, and the road coming up the side of the house. (I used a geotextile as a separation layer for the road, although in sections the road is on bedrock anyway,) You can make out that there is a fall from the top left falling to bottom right, this will be made up with type 1 stone, raising SW corner of the house around 700mm, I will raise the road in this section and use some of the top soil to level this out a bit and soften the impact. The last Job for Mikey was to dig me the trench for the services, he dug a 600mm wide trench about 8M short of the Treatment plant (to allow me access to move the spoil, and a similar distance short at the other end for me to connect to the water. just shy of 60M. Friday was a busy day on 3 hrs sleep. The treatment plant also arrived as can be seen above, I went for a Tricel unit, this was based on cost, treatment, dimensions and availability. Last job for the day was to move the caravan, Mikey helped me with this and we stripped a bit more land and located here temporarily for the night North / South. Saturday I decided to get the water connected to the caravan, for this I needed to complete the trench from the standpipe to the large service trench. I never dug this on the first trip as I was concerned about the electrical supply to my neighbours property. Cables seemed to run across my field at around 300/ 400 mm depth. I used my contact at SSE and he arrange to get the cable moved / deepened. This was carried out a few weeks prior and we discussed the position of the new road, and he made a site visit and we talked about me extending the water pipe trench in both directions so that I could also lay a utilities duct to the road for broadband. So to say I was a bit surprised, and p***ed off when I cut through the neighbours supply cable. The cable was as I was worried about 400mm deep, and the marker tape was next to the cable.... How to upset your new neighbours by having their electricity supply stopped two times (1 for the initial connection, 1 for the remedial works), only for me to cut the cable for a third time.... At least they were very prompt, they arrived after about 40mins, and it took him around an hour to re-joint the cable. I then removed the water standpipe and ran my new water main up to the caravan. It will tee off for the pods at some point, and then continue up to the house. SO now I had running water in the van, and gas for the water heater and hob / oven. Sunday was glorious, so I caught up on my sleep, and had a restful day. Scottish Power were due to fit the meter on the Wednesday, so I needed to get my service cables from the meter box into the service trench and up to the caravan and to the pods. I dug a trench across the road and through to the service trench. I used a 125mm Duct, and inside here I ran some 6mm SWA to supply the pods and some 50mm Duct to run a service cable to the caravan and ultimately up to the house. I pulled the cables through, and I have put a caravan hook up point next to the static. Tuesday / Wednesday, I had 80T of Type 1 MOT delivered in stages, I spread this out using the Back hoe, and vibrating roller. so by the end of Wednesday I have the base in for the road. which will give me good access for deliveries. Scottish power were a no show..... Discussing the caravan with the neighbour they advised turning the caravan 90deg, so it was end on East / West as the stronger winter winds tend to blow from the West, and being side on would ultimately be unstable. I dug out another section of land next to the caravan with the idea of swinging the van around at weekend when Mandy Joined me for the last week. It took me and Mandy all Saturday to move the van, using the backhoe to pull it around. and most of Sunday to get it jacked up off the ground and levelled. We dug 4 pits later on in the week and concreted some anchors in to chain the van down. The van in position with Mandy getting the best job of the week to squeeze under the van and start to insulate the water pipes... Scottish Power let us down again with a missed appointment on the Tuesday with a promise of Friday.... They actually turned up late Thursday and fitted the meter, so we had power on the Thursday night. We spent a couple of days moving spoil around the site to create a mound of earth to shelter and soften the impact of the pods, this was also a planning requirement for the neighbours amenity. Still work in progress and there's 10's of tonnes more to move. Last job before packing up on the Friday was to level the base of the treatment tank pit. At this point we were still waiting for the building warrant. so couldn't actually install the plant. We end the week by getting the Building warrant approved, and the certificate for discharge for the treatment plant both on Friday. Thanks for reading..
- 3 comments
-
- 8
-

-
- the windy roost
- occumster
- (and 2 more)
-
Hi, I can confirm now, that owning and running this is perfectly legal, without an operators licence. However, overloading it was a painful experience. On my recent trip, I was escorted off the M6 @ Carlisle, to find I was over weight. All my documentation checked out, as this was looked at by two police officers and the truck was rigorously inspected by VOSA..# The Truck got a clean bill of health, even after he kept hitting her with a hammer to find rust etc... , and they had no issues with me driving it, and not using the Tacho etc. The weight got me a prohibition order to remove excess weight before leaving site, so I had to hire another 7.5T truck move the load across until they were happy both vehicles were under weight and they then let me go. 😥
-

Treatment plant -> to Field Drain -> To Watercourse - Scotland.
Jenki replied to Jenki's topic in Waste & Sewerage
Just to Update this thread, and close it off. Site investigations prove that this proposed drain is an original Rubble (field Drain) drain. that runs to the coastal cliffs It was explained to me that before these fields were farmed and flatter, this would have been a natural watercourse for run off water, over many years farmers would plough the fields and fill these watercourses with stones from the ploughing, and eventually over many many years flatten the field with the run off water now running through the rubble underground. My site has bed rock at varying levels from 250mm to 500mm from the surface, in general the ground falls North to south to the sea - 500m approx. My proposal to SEPA was to run my Waste Treatment outlet through a 50M smooth perforated pipe Rubble drain , then discharge to this rubble drain. I have given them my best estimate off discharge to the sea, this came from talking with the locals / and some walking around the cliff edge.. Ultimately SEPA have accepted my proposal, and I now have a certificate to discharge. -
Treatment plant -> to Field Drain -> To Watercourse - Scotland.
Jenki replied to Jenki's topic in Waste & Sewerage
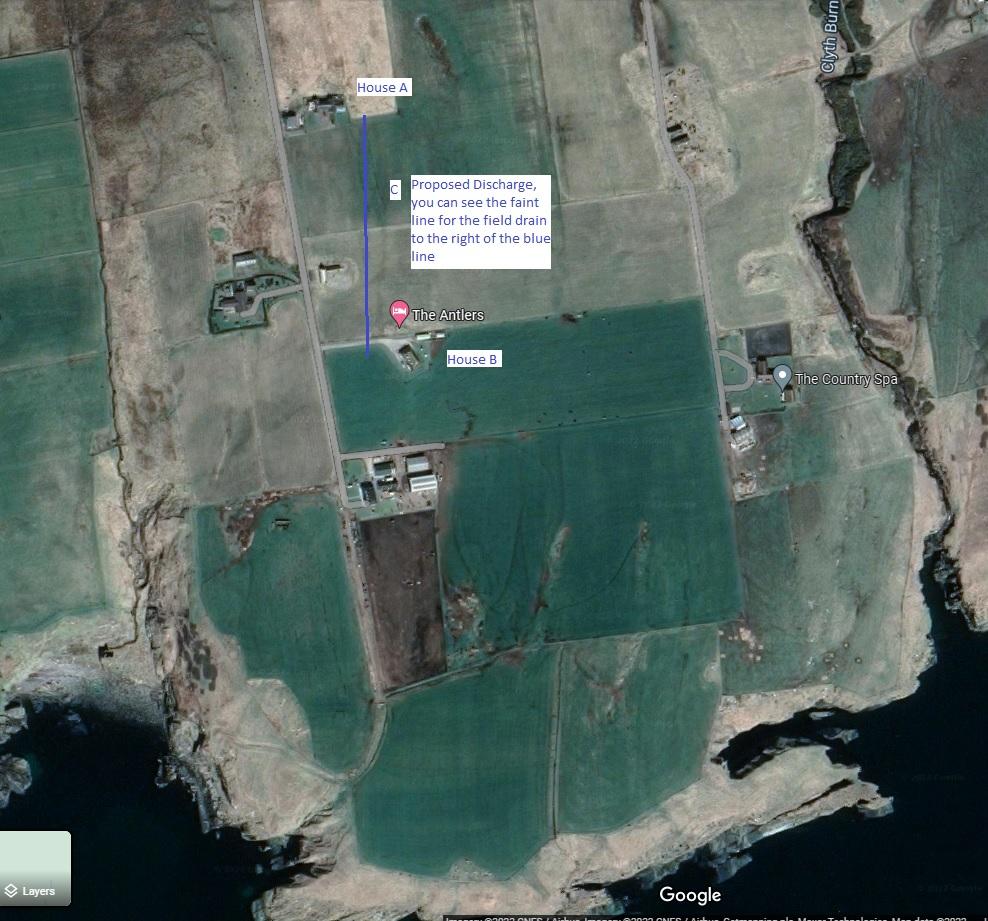
has to flow South - to the coast due to the levels. Clay pipe - I also understand their issue, more digging later this week- was after assistance locating the end of this pipe? other than dye and looking for it, A Sonde seems unlikely due to possible lengths. If I can see Dye from Treatment plant A, at point C, then Dye At point B at least I'm shortening the distance? -
Treatment plant -> to Field Drain -> To Watercourse - Scotland.
Jenki replied to Jenki's topic in Waste & Sewerage
No, Its an underground pipe / field drain. the two Burns can be seen on the Far east and West of the image, but these are over roads and other peoples field - over 300M to the nearest. Not Sure - they didn't like my grid ref of the field drain, they wanted a grid ref output to a water course. -
Hi All, I'm after a bit of brainstorming. I've applied for a certificate for my (to be installed) treatment plant, the plan is the treatment plan will output to a 50M Rumbling drain, then into an existing Underground Field drain (POINT C) - which ultimately goes to a burn or the sea(500M), Background There is a house (A) further away from me and the sea to the North , and at this point I'm assuming they may well use this same field drain, and a house to the South (B), closer to the sea. The underground field drain seems to run past all properties North / South. There are two Burns 1 to the East and 1 to the West but both of these are over single track roads and at least 300M from the drain. It seems far fetched that this drain connects to either of these as the sea and cliffs are closer SEPA are happy in principle with my discharge plan, but want a grid reference for the drain entering a suitable watercourse. I've asked SEPA where A & B discharge, but the don't know because they got Hacked... I'm off to site this week, and my plan is obviously to Ask new neighbours A & B, if they have any details, but my thought is they wont, so brainstorming what should I do. I was thinking of putting DYE at house A discharge point and see if this does indeed pass through this field drain past my proposed connection point. but then what? Follow this down towards the cliff and see if I can see the pipes? Any feedback would be great. Cheers.

-
As you are on Sand and cement, I would go for glue.
-
French drain, roof water combined
Jenki replied to Barryscotland's topic in Rainwater, Guttering & SuDS
Was this pressure tested? Bungs and manometer? or a more informal flow test? - As I've just ordered 200M of 4" pipe, and the inspection chambers etc, I was wondering what their stance will be. Building in and around Bolton for the last 20 years, I've never 'had' to pressure test my drainage- poor really -
Where to put the electricity meter
Jenki replied to MortarThePoint's topic in Consumer Units, RCDs, MCBOs
This Is why I checked with NAPIT, and they were more than happy for me to use this supply as a PEN conductor, as long as this formed no part of final circuits. They understood this was after the meter.. We discussed the termination of the straight concentric cable into an additional service head cut out to make it a neat install, and then connect std tails to this to the consumer unit.... I was surprised.. Yep understand ESQCR prohibit the connection of PME to caravan pitches. 👍 -
Where to put the electricity meter
Jenki replied to MortarThePoint's topic in Consumer Units, RCDs, MCBOs
Just to resurrect this and add some context. After having my install(35M of straight concentric cable from pole to cabinet). I need to plan the connection to temp caravan and pods, with an eye on the house. General details are: Around 35m from cabinet to pods (6mm SWA). And 75M to house, caravan in-between so say 50m. To cable this in 25mm SWA it's around £900. I look at the DNO straight concentric and think surely I can use this?. Then I find someone selling 100M of 35 straight concentric ( 1 core plus Neutral/ CPC combined- or PEN conductor) for £120🤗. So I'm thinking from cabinet to house :- Switch Fuse 35mm str con - cutout to terminate Cable and 25mm Tails to CU. Several blogs/forums say no no no. but I'm thinking that's a huge saving just do it 🤔. To get to the point I contact NAPIT technical and they say .. do it.. as long as it's ducted and doesn't form part of a final circuit then it's fine. Result.🤩 Just need to get the cable from Kent to the Highlands 😂😂 -
In Scotland, (not sure about rest of UK, if you have a high airtightness, below 3ACPH (IIRC) you do need to monitor Carbon 'Di'oxide.
-
I'm looking at getting my supply cables to get power from my Cabinet to a temp supply for a static and house / Pods. The cabinet is staying. So meter will be in there. I got to thinking about the meter. Can some one please confirm, that the meter will only need 1 supply (L&N) for both tariffs, and that the new dual tariff meters takes care of the different times. From the cut out / Isolator I will have a Switch Fuse, then planning on running a 6mm SWA to power the pods, and a 25mm SWA to the House. just want to make sure I don't need to run 2 L conductors (4 core cable)
-
No Ridge height, so yes I can vary slightly, where the house is the land rises around 600mm, So I see myself digging into this to get levels, but not averse to raising one end to deuce the amount of dig.
-
Height restraints on the build. planning wanted levels across the site.
-
Its not granite 😀. its a layered stone, (Flagstone) so breaks into sheets, similar to slate. Where the pods are the rock is only 250mm - 300mm below the surface. Which will work well , as I will use some MOT to build the centre up to reduce the slab thickness and then mass fill the lot. With the Radon Barrier on top of this and a floating floor with insulation underneath. The Septic tank I managed to dig to around 800mm Deep, again better than I thought, but this will need pecking now to get to the required 1500mm. And ill probably have to peck the trench for the rumbling drain I've not started on the house yet, but the ground rises there, so I suspect I will have to do some pecking at the higher ground to get the area somewhere near level for the insulated raft. But I'm a little happier now I know what I've got to deal with. I had to break a bit of the water trench with a 110V SDS Max, and it broke fairly easily, so I'm quite happy an 8T 360 machine with pecker will sort out all I need fairly quickly.
-
I've read and re read the blurb, and now printed it off and its in the cab, but its exempt from operators licence, and CPC, if its for personal use. If I was using it for work, I would need an operators licence but still not the CPC. The difficult part was getting someone to insure me, ended up with Adrian Flux, they were the only ones willing to insure me. The crazy part is if I bought a 7.5T Horse box insurance was no problem, but any that I looked at were rotten, and already very heavy. I used my new address to reduce the premium by £350.00 but they are still asking me questions relating to where it stays etc... we will see where this goes.