


Gus Potter
-
Posts
2340 -
Joined
-
Last visited
-
Days Won
29
Everything posted by Gus Potter
-
Hope all well at your end George. The thermal mass thing seems to out of favour on BH at the moment. But yes I think you are hinting at how a Trombe wall works.. and that will play havoc with standard software! Spot on George.
-
How does your garden grow?
Gus Potter replied to recoveringbuilder's topic in Landscaping, Decking & Patios
They look like they are functional but actually not. Each year they paint the sheep a different colour in aid of the cause they are supporting. The thing they miss is that millions of folk drive by each year and think it's some farmer playing with paint but they always look for the sheep, often without thinking. It should have a sign up saying / spelling it out that " the sheep are this colour this year in support of this cause". Past years have been breast cancer, epilepsy, autism. -
What about this bloody monstrosity!
Gus Potter replied to SuperJohnG's topic in Rainwater, Guttering & SuDS
True enough.. but we can't see the whole elevation and the context in which the building sits in the landscape. It may be that the apparent lack of symmetry is intended? -
What about this bloody monstrosity!
Gus Potter replied to SuperJohnG's topic in Rainwater, Guttering & SuDS
Suggest you rough something up for now to get the completion certificate. Finish the rest. Make a list of the things that bug you, prioritise and tackle in order.. or do the first few.. then go on holiday.. plant a blackthorn hedge and make slow gin, get a pig.. and roast it when fat.. or just relax in the knowledge that you did a pretty good job. A land owner once said to me.. don't worry Gus.. you won't see it from a galloping horse. You are a land owner! -
Don't forget Dave Allen. Nod.. your neighbours are miles away.. will you be lonely. On the plus side the soil looks fairly uniform.. good ground?
-
A wayleave question: Underground HV power cable
Gus Potter replied to ProDave's topic in Party Wall & Property Legal Issues
Dave.. it's almost blasphemy but have you checked out the farming forum... you may be already a closet member? They have a lot of good stuff on this, you need to rake about but it is there. They have a good few Scottish members that talk about wayleaves, money etc and the law in Scotland. I know your heart lies with BH. -
What about this bloody monstrosity!
Gus Potter replied to SuperJohnG's topic in Rainwater, Guttering & SuDS
I bet the poor designer is kicking themselves for missing it at maybe even at the planning stage. As a designer you can get really wrapped up in it, deliver a cracking design that really fits all the requirements .. .and to your horror you miss a thing like that.. or worse.. it does not happen often.. but we are all human. -
A wayleave question: Underground HV power cable
Gus Potter replied to ProDave's topic in Party Wall & Property Legal Issues
Dave.. Am I right in concluding that the cable may be routed through your old place? If so then is the reason for holding onto the old place a means of generating income / investment or does it hold sentimental value? Either way often everything has a price. If sentimental, say it was left to you by a relative, then they would have maybe done so in the hope that you would derive maximum benefit from it. It can be reconciled this way? You almost have a responsibilty to make the best of it to pass on / preserve the family wealth for future generations? To start with you may want to discuss with an open mind, make sure you say that everthing is without predudice. Open a friendly dialogue with them, get to know them and the project manager. They may well let things slip about their other options and costs. Use your local knowledge / grapevine. Ask them questions.. safe distances, maintenance zones and so on.. often they open up.. they are not being unprofessional just talking about their job at a technical level.. it will come out in the wash eventually anyway. Best to learn now for free. Having seen the early development of the wind farms in the Borders I would take a leaf out the farmers hand book. You will find very few farmers that go in hard at the beginning. They listen first, nod in friendly way, engage and find out as much as they can for free..they then think it over and absolutely extract the last pound of flesh just at end..or.. they just say NO and get off my farm. -
What about this bloody monstrosity!
Gus Potter replied to SuperJohnG's topic in Rainwater, Guttering & SuDS
If you take the pipe internally there is always the worry that it will block and flood internally. One way of gaining reassurance for rain water is to use say 110m solvent weld pipe inside and through the wall. On the outside do the pipes with your 63mm rain water pipe and introduce an air break so if you get a blockage then the water remains outside. Screen shot below is for boiler condensate pipes but it conveys the idea. Have seen one condensate pipe locally that was connected into the rainwater pipe with no air break or no non return valve. The pipe blocked at the bottom and the water flooded the boiler, exited the boiler and flooded everything else.. consumer unit the lot! @SuperJohnG Looking good. Do what you can in time you have and maybe one day come back to if it really bugs you. Could just be one of these jobs that gets done just before you sell.. one day.. if ever.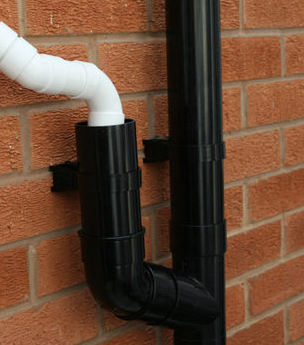
-
Quick question to all. Can you still edit your posts, where do I look for the edit up to an hour after posting tool?
-
Hi jayc89 Often you'll gently ask if folk they have a budget, but only after asking a good few questions first and carefully listening your Client's response. Some Client's are quite happy to state their budget early on, some not. An easy way of broaching this is to say.. well something that size based on current prices may cost £ x amount, is that the sort of figure you could work into your budget? 5% is a low figure to take this up to technical drawing stage. You could almost call these construction drawings. If the 5% includes planning and BC (building warrant in Scotland) and a SE input then I would question this as being too low. They may be loading the job elsewhere? On say a 40k simple extension with a knock through to the existing house if you can get your professional fees in the range of some 10 - 15% that is often a good deal. The main thing here is while an extension may seem small it often involves the same scope of design as small house. Small things can sometimes be harder to design than larger spaces. In technical terms you still need to design the insulation, drains, maybe heating, fire regs, get light in, keep the place from over heating.. it's a long list and each element takes time to design / draw and it still needs to function practically / meet your soft requirements and look great!
-
They should be as they are based in NI, part of the UK and marketed as complying with the current standards. The main thing here is to look at the price in the round. Although the tiles may be cheeper, the verge closer, ridge system, clips and other accessories may/ may not be. You need to get a price for all the things you need then compare. It may get even better!
-
How does your garden grow?
Gus Potter replied to recoveringbuilder's topic in Landscaping, Decking & Patios
Would it grow on these? Almost a tourist attraction between Edinburgh and Glasgow. Part of the M8 public art project intended to raise awareness of types of cancer and other conditions.
-
Good sketch. Can you drop the duct so you get some insulation over the top of it to mitigate the cold bridge? In parts of Scotland it regularly gets down to minus 15 -18 deg C. We have a 5.0kW stove with a bottom intake that can be ducted. I do have a duct from the solum space to hearth level and it pops up just under the intake but is not actually connected to it. When the stove is on you can really feel the air flow if you put your hand under the stove, but the cold air is drawn directly into the stove rather than over your feet / under the door. The rest of the room is reasonably sealed so when the stove is not on the room is ventilated.. it's not a passive house. One day I may connect the duct to the stove intake and see what happens.
-
ICF or Sips for new house in Scotland
Gus Potter replied to Meabh's topic in General Construction Issues
Looks good and exciting to be moving to the warrant stage. From an SE point of view it looks like you have a fair bit glass there, big openings thus building stability is an issue? Your SE may have already expained? This could be complex / costly to achieve with ICF. Also you have the weight of the building on sand with some probably hefty localised loads. @saveasteadingmay be along to give some pointers here about building on this type of material. SIPS maybe good but check for availability of contractors to install and your preferred method of build / cost curve etc. Also, again, bear in mind that you may want to make some changes as you go. I would price up the twin wall TF as others suggest and compare. Lastly don't rule out a standard TF with brandered out walls for example to get the insulation thickness required. It may not be quite perfect but it gives you more scope to adapt as you go and it's something that local contractors are maybe more familiar with, so savings could be made here. -
Surprisingly yes. Once you change the loads and the stiffness / positions of the beams framing in then you need to review the whole thing. If you move the steel supports you need to go back and check the bearings and so on. It can be quite involved. Then sometimes you need to redraw a lot of it, change the detailed specification and so on. Before you know it the clock runs up. @saveasteadingmakes good points.. good flavour of how things add up. I think your SE is probably doing you a favour here. In the grand scheme of things if you want to open it up more then pay the SE and enjoy the result. If you like the open feel then others will often too. When you come to sell you'll get your money back anyway?
-
Well done to you. Have you decided on a traditional weighted window with the ropes and pulleys or ones with what are called spiral balances. These are visible but a modern way of creating a nearly traditional sash and case window. If you are going for the ropes, pulleys and weights you need a good rebate to fit all the wieghts in, usually about 100mm rebate to be safe. Next is the glass and the type and shape of the window, astragals etc. I would make a sketch of what you want and send it out to some bespoke manufactures for a ball park figure as they will vary widely.
-
Timber frame construction, Scotland
Gus Potter replied to saveasteading's topic in General Self Build & DIY Discussion
Remarkable response from an Engineer to dismiss a Client in this manner with no apparent explanation. If a reasoned explanation was given the there would be no need to "scoff" However here lies the rub and maybe "scoffing" was not the appropriate response. Yes the small buildings guide is under review. I know that @saveasteading has a particular interest in this so have included a link at the end of this text to download the latest guide available online. I also attach the document I have down loaded using same link. Page 3 of this document contains the critcal text that deals with the withdrawn aspect of "SBSG" In my view paragraph 2 is misleading. Many of the BS Standards have not been withdrawn as suggested. Some have, in particular the wind / snow code but much of the timber design codes are still valid but with a few nuances. It is for example perfectly acceptable by BC all over the UK to design to BS 5950 for hot rolled steel provided you take into account the latest available information in the euro codes. A specific example here is that the Eurocodes require a haunch sharp end stiffener check/ design in a portal frame when in the BS left this open to the designer to check. Paragraph two then introduces uncertainty and contradiction. It says that the designer should take care when using this guidance.. it does not say that you can't use it. BC say that this guidance has been removed from the technical hand book. So what! Provided you can produce a reasoned, valid and safe design based on the latest available information it is ok Just because BC have removed this from their guidance does not invalidate understood Science and Engineering skill. Paragraph 3 is pretty much a rant but finishes by saying that as Designer you can do what you want provided you can prove it is safe. In my view it is still ok to use the SBSG as a basis for design provided you recognise where the changes in wind load / snow loading may impact on the guidance. It still is a good document for preliminary design. In actual fact unless you live at a high altitude for example in the UK the Eurocode changes will have little impact on the guidance. The wind may have a slight differance but generally it is the dead weight of the roof covering and the access load / deflection under normal loading that will goven the design anyway. For any Enginner not to discuss and offer reasoned explanation to a Client when specifically asked is a disgrace to the SE profession. Gus Potter. https://www.google.com/url?sa=t&rct=j&q=&esrc=s&source=web&cd=&ved=2ahUKEwjD6Z7ftcn2AhWVQkEAHfBJARwQFnoECAcQAQ&url=https%3A%2F%2Fwww.gov.scot%2Fbinaries%2Fcontent%2Fdocuments%2Fgovscot%2Fpublications%2Fadvice-and-guidance%2F2020%2F02%2Fthe-small-buildings-structural-guidance%2Fdocuments%2Fsmall-buildings-structural-guidance%2Fsmall-buildings-structural-guidance%2Fgovscot%3Adocument%2FSmall%2BBuildings%2BStructural%2BGuidance%2B%2B.pdf&usg=AOvVaw2nnn0liJPfV762mn9NosnA 1226535124_SmallBuildingsStructuralGuidance(3).pdf -
Maximum demand greater than 100amp single phase ukpn
Gus Potter replied to Newbuildnewbie's topic in Electrics - Other
Hilarious. Was talking to the spark about the upcoming IEE 19 regs and said I fancied arc fault protection.. until he said you have two fuse boards and.. then pointed out that I have been at doing my own house for longer than I "predicted"... and I may be best spending the money on other things. I'l stick with diversity for now.. and upskill to selectivity next year. On my office wall hangs a hand line drawing of Bradwell Nuclear Power Station which is a work of technical art, a Hemingway hat and my Teady bear from when I was about 4, one Teddy suffices as not of Royal descent. I'm not sure what will be banned next! -
Maximum demand greater than 100amp single phase ukpn
Gus Potter replied to Newbuildnewbie's topic in Electrics - Other
Delightfull.. thanks for the heads up Onoff. Sparkies use a term called diversity. @Carrerahillmay pop up and explain in detail how this works from the IEE regs point of view and the theory. But in summary I understand (I may just know enough to be dangerous!) that although the sum of all your appliances may exceed 100 amps they are less likely to all need maximum demand at the same time. Also, the fuse (100A) in the cable head is apparently called a sand fuse and does not blow with a short surge. Then often at the local sub station there is a 600 amp fuse. But if you have say one of these electric Ferarris that do ultra rapid charging at some 400 amps? you may be on a loser and need separate phases for example. -
Keith..Welcome then.. lot's of interesting stuff here. Don't panic! Draw what you have on a bit of A4 paper and what you had originally . External ground levels, the brick / block coursing, the kit, the floor, suspended or ground bearing slab etc. Take a photo or scan and post. Don't worry about scale as just draw the blocks and say their size. Lastly it's not a drawing test, just convey the info as best you can. Gus
-
Hiya @Amateur bob Have raked back through you posts and made random comments for your digestion and general discussion. Reach for the Rennies if need be all. Your posts, generally copied, are in italic. “I’m looking at a different house design” Good.. different does not mean expensive. I would go back and really write down you requirements. For example I built a house for us that had three large bedrooms near Biggar. Other houses locally on the same footprint had 5 bedrooms but we always designed for there being just two of us living in it most of the time. We knew that potentially it could reduce the value as it was not really a large family house. When sold we got a substantial premium over and above a similar 5 bed as the folk that bought it were retired and wanted this type of house. Why does everyone not do stick build if its cheaper? A number of reasons. One is speed and speed often translates into the release of funds by a lender and valuation. Speed.. well roughly two joiners will build three accurate panels a day give and take. Some panels can be long, some short but I would price on 3 a day. You also need a good working platform and space to store the panels you have build on site. Take your average external panel as being about 3.0m in length to be safe. Internal non load bearing panels are just erected later on, often once the ceilings are up. The non load bearing panels need very little drawing effort. Internal racking panels are the same as external panels but with no vapour barrier. Two good joiners who know how to build kits on site £ 250 -275 each per day. That will get folks attention in the Central belt, my Mum lives in Dunning. To build a kit on site you need the panel drawings. I do panel drawings for Contractors I work with that do stick building as I’m often doing the whole design so all the cad / model files and so on are already set up with grids, levels and so on.. you need a bit of practice to do this well and most importantly you need to know what kind of joiner / contractor you are design for as one part of the job is to play to their strengths. It can be difficult initially to find joiners who will take the job on. That said I recently did a 250 sq metre + single storey house with complex roof where the Client specified stick build as this suited his preferred contractor. Cost to do the walls panel drawings about £1750.00 with a bit of prefabicated roof truss specification /detailing chucked in. Once you have the panels up you can then shop about for insulation and so on, you can change your mind! Stick building gives you more flexibility and choice. “Thanks for the reply so this design is fairly cheap to do if i dont open any of the downstsirs rooms up? Could you give me a rough cost for a house like this, average/basic spec” Would love to but prices are all over the place. The main thing is not to get to hung up on the timber kit. PeterW and plenty others on BH I think (and I agree) suggest that the super structural frame is only 10 – 15% of the cost of the job so even if you pay more for the kit in the round it’s not a disaster. “yes he budget is tight but would i not need joinery skills and time myself to do a stick build?” To build a kit for the first time DIY you’ll need to be fit! You’ll also need some joinery skills and an understanding of wood.. post for another day. “so a standard joiner can built these stick frame houses up to the spec of the kit providers?” No they need to be familiar with TF construction, know their way around the types of metal fixings and how to fix. Etc. “Our original design was 2 storey box shape as it was an easy design but refused, the next application needs to be materially different so i thought lowering ridge height would help planning and roofs in roof would be cost efficient, are those designs I’ve shown quite expensive? Dive back and review for example the Scot Gov permitted development rules, then see where you don’t comply and address as you can. It may seem like basic stuff but in doing so it will increase your confidence and allow you to get the best out of this. “They basically commented on the size and visual impact so i thought lowering ridge height would be a good place to start? no real limitations to plot size” Have a day out walking about the area, see what else is out there. Imagine you are a planner! Good you have plenty land as this is a real bonus. Also, when you walk round and about your land you can get a better feel for the shape, contours and so on from a distance rather than just standing in the middle looking outwards. ”This would be a cheap design as no dormer windows and use of roof for upstairs? “ Old rule of thumb.. allow 3- 5K per standard 1200 – 1350 wide dormer if new build. If attic conversion folks.. the price can be a good bit more. “Thanks for the feedback, is there any way to avoid these big steels for the vaulted ceiling? steel is not cheap just now” Don’t get too hung up on this for now unless you are going for daft / pretentious vaulting and huge spans. Concentrate on the layout that suits you. Your big construction savings often come from setting the building at the right height with respect to the existing ground, foundation design, drainage design, access, services and so on. The immediate value comes from getting the house to meet your dreams... just a great home to live in and.. in doing so you make it energy efficient, sit well in the environment for example. If you do this then the house will also maintain its long term value. All the best.
-
Hiya @notreadyforthis I don't want to cause you undue concern but I would again urge you to get your SE round for a look in the interests of safety and to set your mind at rest. Diplomacy is probably at the top of the list as you seem to be getting on ok with your builder? Interestingy the steel packer plates are probably not a major issue in themselves, but they provide a slip plane that your SE may not have designed for. What it suggests to me though is a possible lack of skill / dilligence in setting out / your builder not reading the drawings. It looks like you are taking a chunk out the corner of the building. When you do this it introduces a lot of overall building stability issues and it is really important to follow the SE's drawings to the letter. If the builder wants to make even what appears a minor alteration it can have a major impact on jobs like this. The builder should always ask the structural designer first if it is ok to deviate from the drawings. "Thanks for taking the time to comment. It gives me things to ask the builder about. I'm sure he'll have a good response but I can usually get a good read on whether he's trying to wing it. The beam where there appears to have been a cut is interesting as it didn't get delivered like that. i also note that the bolt holes aren't centred as they are in the drawings. These steels should have been ordered according to the structural engineering specification. I've got the docs which have all the calculations - none of it makes any sense to me though. The building regs guy has also been around to check it out - would he have raised any of the same concerns as you have or do they not check those sorts of things?" Don't rely on BC to be a Clerk of works.. it's not their job. Also the points I make re the connections and stability are of a more specialist nature that are more in the "wee world" of SE / steel fabricator / steel contractor types rather than BC. Cut BC a bit of slack as they can't know it all, just as SE's say don't know it all. Hope this helps.
-
I would urge you to get this reviewed by an SE say before you go any further. I can't see quite enough from the photos but.. That connection in picture two where one beam is framing into the web of the beam that seems to extend outside is highly questionable. It looks like someone has made a mistake and been cutting, altering the connections on site. The bolts look like M12 diameter, possibly undersized.. not just to carry the vertical loads but also to prevent other things from twisting. The beam has an unexpectedly large notch. You have some top plates on the steels but the spacing of the welds looks quite large. Also, you seem to have a couple of beams in the depth of the floor above. This coupled with the steel section sizes suggests you are holding up a fair bit of load and that the load is not always centred over the beams. In picture three the beam seems to extend outside so can't see how it is all supported. I know it's not finished yet but it looks like the works are quite extensive. I would at some point expect to see much more tying together of the steels, timbers and masonry so that the overall assembly is stable and safe globally. The padstone supporting the steels seem to be cast in place. This is often acceptable and can be advantageous at times, have done this on my own house for example as it can really help tie the brickwork below together. However I would also want to have a look at these in closer detail. Sorry about the above but I would get this checked out professionally by an SE for example.
-
Hiya. Yes I think your SE has put a bit of thought into it. Can it be changed? On the face of it you would move beam 9 to line up with beam 12 and that would open up the stair well. But the load from beams 9 & 10 would move from roughly the 1/3 point of beam 8 to its mid span so the bending forces not least in beam 8 may increase, I'm not sure though how much they may increase if that much as you will have to support less floor area. I can't give you a definitive answer as I don't have all the info.. but ask your SE the question as it may be simple to change. They may be a bit peeved as I think they will have put a good bit of effort into this.. so you may need to part with some cash. But if you don't need the floor space the extra light may offset any aditional SE fee. But perversly if you are going to sell the house on the every sq metre of floor could count.

