


Declan52
-
Posts
4449 -
Joined
-
Last visited
-
Days Won
10
Everything posted by Declan52
-

Garden wall design (blockwork)
Declan52 replied to bissoejosh's topic in Landscaping, Decking & Patios
Can you not just do the first 2 course a block on it flat long ways so the wall is 450mm wide. Next 2 courses a block on it's flat side ways with one on it's edge so the wall is now 315mm wide then stepped in again to a block on it's flat when it's out of the ground. Six inch blocks like you have chosen are for pig houses!!! As far as piers go you will have one on each end then you can either do them every 3m or 5m so the spacing looks right. The important bit is how you back fill it and how you intend to get rid of the water that will collect behind the wall. -
Do you need an anchor in every hole??
-
Realistically there is no skill you will learn in 3 months. Don't under estimate keeping the site clean and tidy and having everything that's needed arrive on time and in full. It's all about organising every step of the build and making sure you think 3 steps ahead.
-
Per m2 cost discrepancies, enthusiasts v. national figures.
Declan52 replied to epsilonGreedy's topic in Costing & Estimating
It is possible to build cheaper than £1000 per sqm but you have to do a lot of work yourself and I mean a lot. I built a 220sqm bungalow and my bill came in at £490 per sqm. But bar plastering, electrics and plumbing I done the rest. Took 2 long hard years where I never really had a day of between my own job and the build. Having worked on sites for over 15 years I was able to get lots of help from family and friends which kept the bill down. If I included a wage for myself for 2 years it would have took the bill up to £770 per sqm. The only issue with that was I was restricted by the bank by how much they would lend me so paying for trades wasn't really an option. Once the build was done I was totally exhausted and probably closer than I would like to admit to a physical and mental breakdown. Was near 6-9 months before I as much lifted a hammer or spade. As well as your actual site the main factor in cost is your location. Prices for materials and trades vary widely across the UK with Northern Ireland being probably the cheapest region, lucky me!! Also the likes of eBay are great for hunting out deals for all your fixtures and fittings. And never ever ever accept the first price that anyone gives you. -
I got the rough neck version as well and it comes with every attachment under the sun. As Peter says it's the mix that is the important bit, to watery and you will just end up with water coming out and hard sand cement in the gun. Too tight and nothing comes out and you burst the spring. Would expanding foam not do your job. With all the concrete and steel that is in the walls its not really a structural issue having pockets so using foam will be quicker and ensure its fully sealed up.
-
Scrape all the snots and bad looking bits of the blocks with a trowel/ scraper then give it hose down then paint it whatever colour you like. Simple and cheap is always a winner.
-
Just let it sit for about 18 months and let it move and crack and finally settle. Then go round and fill and sand. It will happen on every build no matter what you do as it dries out. If you fill as every crack appears then you will go mad in no time and end up doing the same crack a few times.
-
Slating a simple, small roof. Planning 1
Declan52 replied to ToughButterCup's topic in Roofing, Tiling & Slating
Include the gaps. I did say put the 6 slates on the roof as they would normally sit. Using this method works with all types of tile. Once you have the first 3 rows in you will be able to see if you need to open or close the gap to get your bond right across the roof. -
Slating a simple, small roof. Planning 1
Declan52 replied to ToughButterCup's topic in Roofing, Tiling & Slating
Get a bit of lath and put a nail in one side so it sticks out the other side. Set up 6 slates on your roof as they would normally sit and then put the lath with the nail through it up against one side. Put a nail through the other end where the 6 tiles end. You can then go along the bottom and top lath and score with the nail where each 6 tiles should be. If you can get someone to give you a hand then a chalk line pinged from top to bottom will be an even better mark to tile to. This will keep your joins nice and straight when you look up. Def go a dry ridge system, lasts forever and so much easier than carrying buckets of motar onto the roof. Don't go to the expense of slate then put the plastic edges on for the verge. Looks horrible. -
Can you not use the aluminium strips but use hex roof screws to give a stronger fixing. Sticky flash aint an option, just doesn't last. Can you get up into the roof to remove the loose tiles before the panels get scratched???
-
Pot noodle lids and magnets stop it spinning as well!!!
-
Floor bounce - PosiJoist Floor Vibration checks
Declan52 replied to readiescards's topic in Floor Structures
The hangers that hold the trimmer have very few fixings in them due to where they are placed. Only a few on top and maybe on the bottom of the clip if has been bent up as it's not showing on the bottom of the next joist. Could it be just the actual hangers are flexing instead of the joists. I think your going to have to lift the floor and figure out is the joists flexing, the trimmer piece or the hangers. Once you know this then it should be easier fixed. -
Passivhaus training course
Declan52 replied to graeme m's topic in General Self Build & DIY Discussion
I looked at this one back in the day but it seemed like it was just stating the obvious. Think they are more for some one who intends to be a consultant who can talk the talk but as usual didn't really have a clue. http://www.passivehouseacademy.com/index.php/our-services/training/europe-training-events/tradesperson-building-envelope -
Plug point on edge of hood chimney safe?
Declan52 replied to DundeeDancer's topic in Electrics - Kitchen & Bathroom
If that is not a duct for the extractor what is it for, tumble dryer??? Why did he not put the plug over to the left to hide the hole the wires come out of the wall. -
If you could play YouTube via a Sonos it would make it unreal.
-
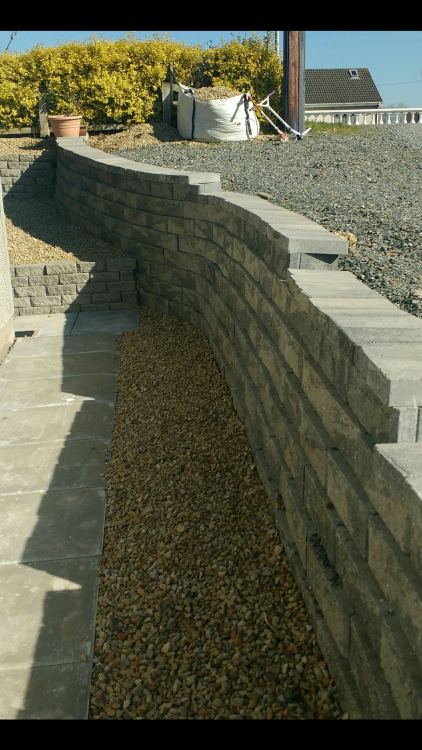
I used one of the dry stone systems to hold back my driveway. It doesn't need a concrete base but you can put one in if you want. It's very simple to build, the blocks have a lip at the back edge so you can really go wrong. My wall at its highest is 1.6m so I had to use the larger blocks. The other smaller walls in the pic are made with a much smaller block but you can't go higher than 1.2m so as Jeremy suggests I used two walls with decorative some in between to get me the height I needed. There is near 30m of wall and it cost approx £2000 over 3 years ago. This is where I got it from. https://professional.ag.uk.com/products/retaining-walls/anchor-diamond It goes to a max height of 3m with the use of a geo grid.
-
Garage door reveals blockwork
Declan52 replied to vfrdave's topic in Bricklaying, Blockwork & Mortar
Will the metal tracks that the garage door sections run up and down not cover the insulation easily??? Don't cut the dpc!!! -
Brickwork damp patch after prolonged heavy rain
Declan52 replied to readiescards's topic in General Construction Issues
Has the lead not been bent up to form a lip around 3 sides so you make any water fall out onto the roof and into the downspouts. Looks like all yours is running down the gable wall. The base for the pots should have been totally smoothed over with a concrete/motar mix and the pots filled the same so there could be nowhere for any rain to pool and work it's way down. Could the pots have moved slightly from wind or maybe not been seated properly and you have a gap between the pots and the motar/concrete and rain is getting in here. The longer the bricks are left wet then the more salt will come out and no matter how much you clean them it takes years to weather out. Will be a case of scaffolding back up and have a look at what's there and redoing. Has the other chimney the same issue??? -
Can you not just get the build priced up first without going for planning. Then you will have a better idea of costs before you start down the planning route.
-
It's good news that there is nothing in the water table. As made ground is quite shallow you will be excavating the majority of this out to put in the founds of the house including the basement, roads in and everything else that needs done. When this is all being dug out depending on how much more asbestos you find will determine how you dispose of the spoil. Check with who ever done your report if this is suitable for them. If you find anything you can bag a few samples up and if you come across something major then you will get them out again. As you say its probably just from the old garage wall.
- 16 replies
-
- 1
-

-
- soil survey
- asbestos
- (and 1 more)
-
I used to do site investigations. How many areas where contaminated??? How much of the lead/ asbestos was found??? Are they looking a gas monitoring standpipe put in to see if any other nasty things have leeched into the water table?? Are you are to find out what the site was used for in the past, was it a factory, garage repair place, shops etc?? What depth of made ground is there on the site and did they probe any where to see what the water table is??
- 16 replies
-
- 1
-
-
- soil survey
- asbestos
- (and 1 more)
-
Chocolate on a mouse trap has never failed me. I spent days in my last house trying to find a cable that some mouse had chewed through. He was found fried beside where he had chewed through.
-
Your best bet would be to do as above and try and use social media to more or less embarrass them into helping you out. The various Twitter pages that contain pics of new builds that have turned out to be a disaster definitely work. If this method is unsuccessful and you don't want to open the massive can of worms that a court case might entail then it's going to be up to you to come up with a make do remedy. Wash it down and treat it for mould resistance and then use one of the paint/stain type products mentioned above to hopefully get you near enough the consistent colour you want. You clearly have been misled so aleast by posting here anyone doing a Google search should be alerted to this post and should hopefully reconsider buying from them.
-
Where the battens treated with anything that could be leeching into the cladding.
-
Mvhr or not
Declan52 replied to jpinthehouse's topic in Mechanical Ventilation with Heat Recovery (MVHR)
I have pipes that go through a cold area in my loft and all I did was sandwich them between some loft insulation. They sit on 200mm with another 200mm on top.

