Iceverge
-
Posts
4462 -
Joined
-
Last visited
-
Days Won
32
Everything posted by Iceverge
-

Passive house plumbing first fix - any tips
Iceverge replied to markharro's topic in General Plumbing
Here's what I did. 25mm MDPE to the stopcock 22mm Hep to the control block and teed out to a cold water manifold. Hep push fit manifold. 15mm for all cold requirements in a radial fashion. Pipe is cheap, joints are dear. 22mm to a shutoff valve (to isolate the cold side if needed) and then 22mm UVC and then a very short run of 22mm to a hot water manifold that is vertically above the UVC allowing it to preheat via convention. 10mm Hep to the basins and the kitchen tap as it's too far away. 15mm to everything else. No joints in the pipes other than at the start and the end. I wish we had put a wetroom style floor drain in every room with a pipe joint in it. It would have ment that had we any serious leak the house wouldn't flood. -
Laurels are the spawn of the devil when they get away from you as they are so vivacious. How about planting a nice slow growing hedge alongside them so you can remove the laurel totally in a few years?
-
I've been playing with the Ubakus U-Value calculator again. Adding 3mm of EPS to a solid brick 215mm wall takes the U-Value from 2.54 to 2.05W/m2K and increases the internal surface temperature by about 2⁰. This is about a 20% reduction in conductive heat loss. The elephant in the room however is a very thin 22mm EPS backed plasterboard (12.5+9.5mm) would have reduced the U value to 1.3W/m2K or almost 50% reduction of heat loss. I suspect there is actually a notable improvement in the performance of the wall with this product but it is only because of the very poor starting point. Just goes to show, the first mm of insulation is the most important.
-
How much do drywall screws impact insulation value of a wall?
Iceverge replied to nostos156's topic in Heat Insulation
The screws will have a very small cross sectional area. About 9mm2. You have about 70 screws per 1.2*2.4m board so about 0.02% or 1mm2 per 4,500mm2. To take your 50mm thick PIR layer the calcs look like.. (99.98% X 0.022W/mK)+(0.02% X 45W/mK) = an average thermal conductivity of 0.031W/mK so it does make a small difference. However in the real work you need to hold the wall together somehow. Your 50mm layer of PIR between battens at 10% wood will have an average thermal conductivity of about 0.034W/m2K. So your wall as built will have a U value of about 0.32W/m²K Vs about 0.27W/m²K without the effect of the screws. Assuming 20m2 of wall heated for 8hrs a day at 100days per year at a delta T of 12deg is 9.6kWh/year. At 15p/kWh that is £1.44 cost of extra gas per year. Feel free to loose sleep about that but frankly I think you did the bang on right thing by building securely. -
As this is applied with a healthy dose of adhesive I wouldn't be surprised if it contributed significantly to the airtightness of the wall which would materially affect heat loss and thermal comfort. There's probably easier ways mind you.
-
Log burner review if any one has one.
Iceverge replied to fiaraziqbal's topic in Stoves, Fires & Fireplaces
@fiaraziqbal What are your heating requirements for? -
It's in the Hep manual so I assume it's ok. Our resident Parish Priest of Piping does advocate hep- hep push fitting-copper-compression though.
-
Plastic bags and tape. I still got some scratches though so I just pulled through enough pipe until I got to a place that wasn't scratched and discarded the excess. It still sealed pretty well to be fair despite non perfect pipe in places. I've don't a dozen or so compression joints with brass and the SS inserts despite @Nickfromwales best advice. No issues so far..................
-
This is what I use. It's the only protection I have ever had that properly seals around your eyes but doesn't fog up. 5 mins is plenty though. The thought of wearing it whilst insulating as attic fills me with dread.

-
Has anyone tried one of the fan assisted ones. I like the idea as they might actually be comfortable and shouldn't fog up. a bit Dear Mind you at £336

-
I would use mineral wool between the studs. (As a second to blown cellulose) Almost zero waste,all offcuts can be tucked in somewhere. It can move with the timber as it expands and contracts. Better for fire protection, sound protection, decrement delay. Easy and fast to fit well. Get a bread knife and cut it slightly large and it tucks in perfectly. For a 140mm stud wall with a continuous internal of PIR like @Thorfun just bump that layer by 10mm and you are at the same U value. @saveasteading did you consider Using something like a mineral wool full fill batt and a 22mm insulated plasterboard for less labour overall?
-
I suspect you are thinking of Tapco or similar. I would say the planners wouldn't notice the difference having seen them in the flesh.
-
Yup! Have a look at the way these guys do roofs. Nowhere for a leaf to get caught and the walls are super protected from the rain. https://www.makar.co.uk/portfolio Also I think you're missing a trick by not having carport access to the house under cover. We didn't and it's a regular sprint thought the rain with the kids to the car.
-
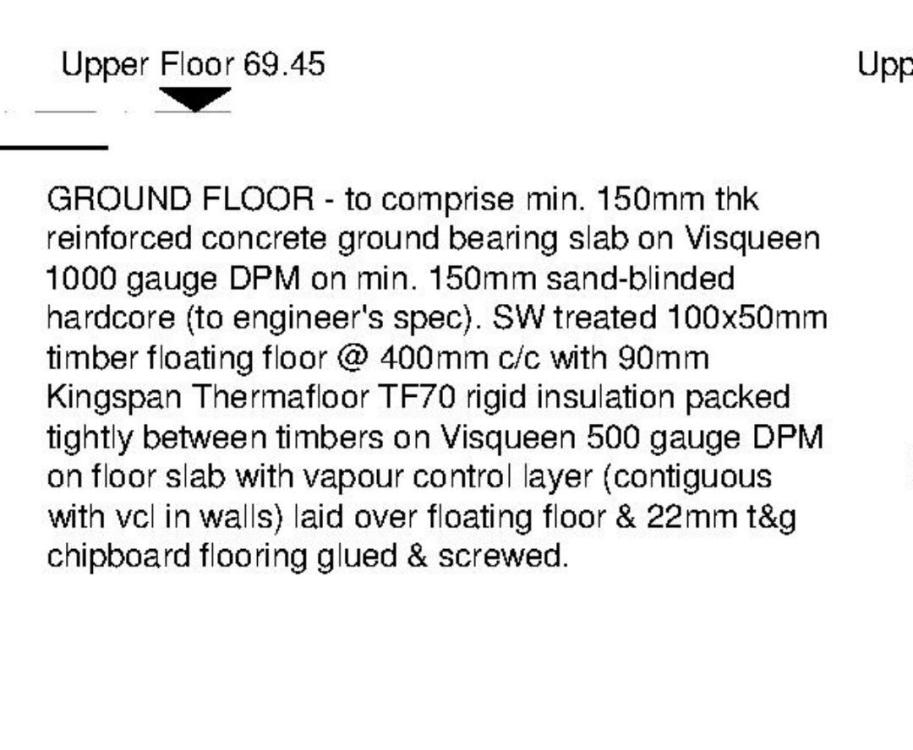
I would say it is a variation of the long house but with some sticky out bits that have parapets and flat roofs. Fine in the Santorini with 340mm of precipitation but in western Scotland with 1500mm of rain annually I think it's asking for trouble. Here is the ground floor suggested build up. The U value at a guesstimate is 0.4W/m2K.
-
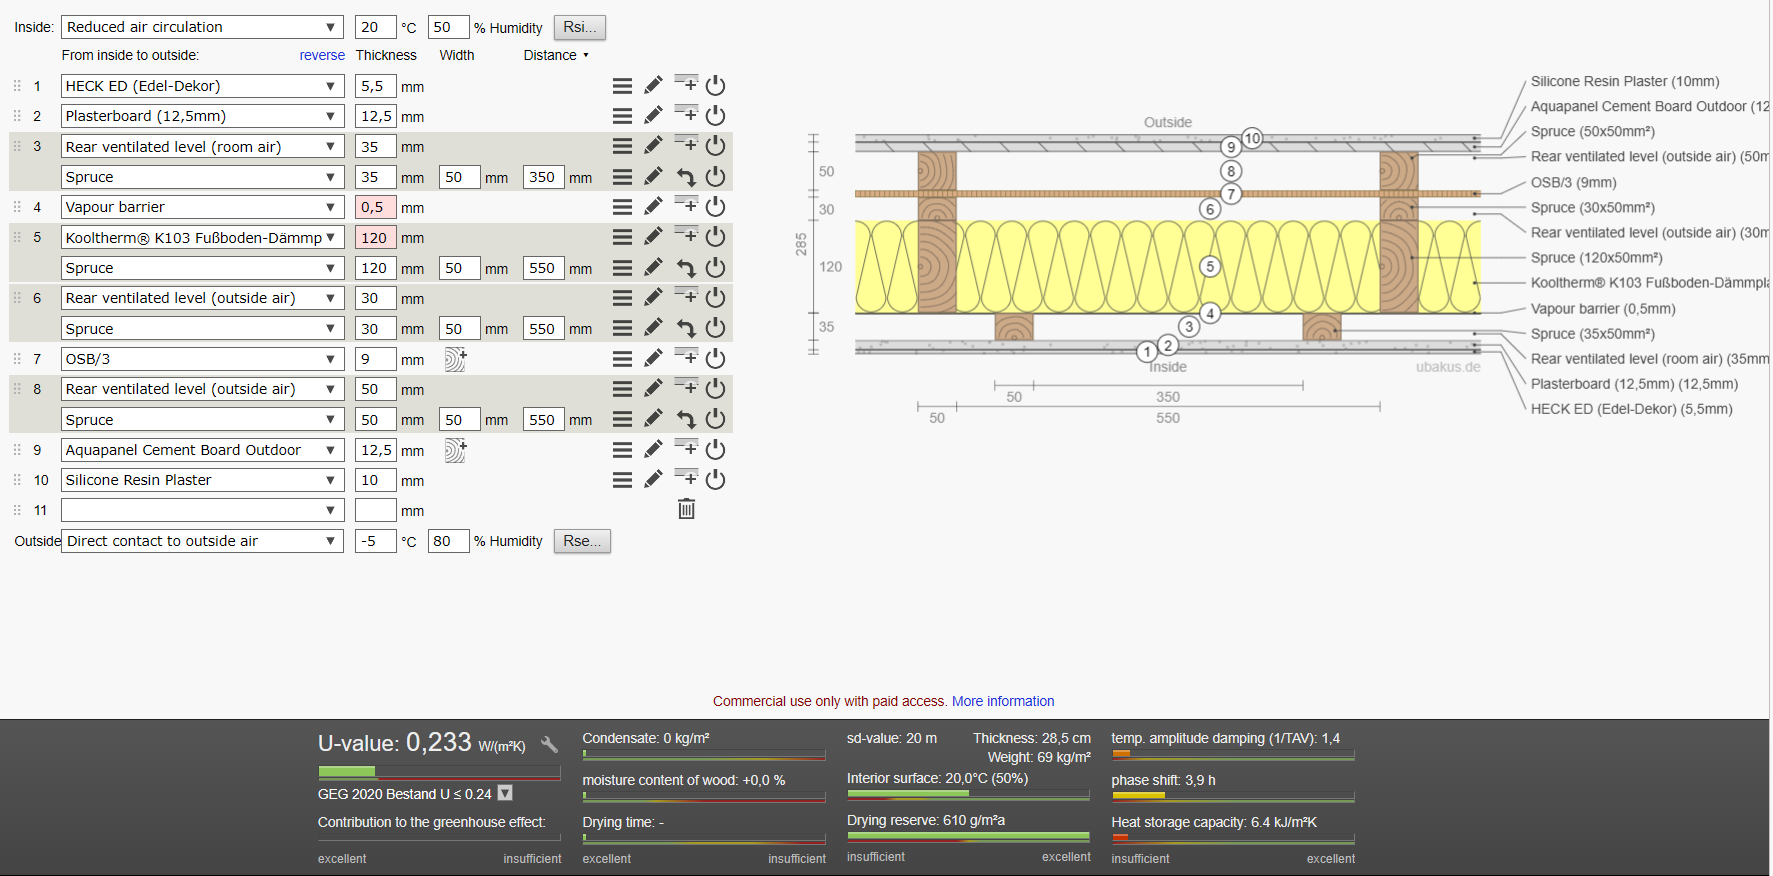
Ah bugger..................... Another Architect who has been taken out for lunch by the Kingspan salesman, shoved a little book with nice copy and paste details and told " this will solve all your problems". They've left you with an expensive option and a non compliant U value ( unless you magically stop all air infiltration and convection inside the unventilated layers of air in the wall build-up). I've written another post on this. Here's a quick calculation of the wall as proposed. It'll be worse in reality as the Kooltherm boards will certainly not be sealed 100% to the timbers and you'll get thermal looping (moving air inside the wall). They're very thin also at 285mm. Architects tend to be very good at concept, usability and balance of designs but alas many fall down on the practicalities of actually building a house. I know this isn't what you want to hear but I'd be tempted to fix the design into something better on paper now before going any further down the building route. Go for thicker walls and make sure all the structure is covered by a pitched roof, balcony included. Get rid of the parapet walls and the bay window. They're going to leak water and air and heat long term. Ensure that no element of the house cannot be easily brought in on a flatbed trailer and can be lifted into place without any large equipment. Sorry if I'm being a killjoy but it annoys me to see professionals being so careless with their customers money. Do you have planning permission yet?

-
I've had a quick scan of your plans. Your architect has made the walls very thin. Maybe 300mm? You might struggle to get to BRegs with this. Have you robust details for the parapet walls and flat roof. These need to be bomb proof. Especially with timberframe.
-
Small ASHPs / Units primarily for DHW
Iceverge replied to Conor's topic in Air Source Heat Pumps (ASHP)
Also what is your predicted electric price for 10 years? If you have an option of cheap overnight electricity it may be better not to install any heat pump but just enjoy the low capital outlay and trouble free operation of an immersion and a few storage heaters. For info 186m2 in the south of Ireland we use about 3200kWh for space heating and 3650kWh for a family of 4. Passive insulation levels. -
Small ASHPs / Units primarily for DHW
Iceverge replied to Conor's topic in Air Source Heat Pumps (ASHP)
I think your professional has wildly over estimated the heat loss. That is almost 6 times passivhaus levels and you have near passivhaus insulation. Have you tried consulting the heat loss spreadsheet on here to see if your predicted losses are that high? -
SIP strip foundation detail
Iceverge replied to Cormac Foley's topic in Structural Insulated Panels (SIPs)
I wouldn't over think it. Your buildings loadings will be minimal. Go for a 100mm+ slab with some reinforcing mesh and pour it all as one. Any slight movements of the building will all go together then at least after construction. You could get a structural engineer to design it properly but would cost far more than a bit of extra concrete if you're apprehensive about the strength. -
Maximum safe cut angle for existing made ground
Iceverge replied to jon-lee's topic in General Structural Issues
Have you considered soil nailing? https://www.designingbuildings.co.uk/wiki/Soil_nailing -
Have a look at this video from 9:50. I wish we'd done it in our house.
-
Ask who ever is signing off your house what paperwork they normally require from the plumber. I suspect they'll be confused by the question. So long as your place complies with the building regs it's unlightly anyone will ask for anything beyond that. The one thing I would get a plumber for is the gas connections for a split unit ASHP. Everything else I would be happy to DIY. I redid all our DHW after the plumber made a mess of it. As for insurance I would far prefer to put my money into a good install and a really redundant design. Ensure that every room where a pipe is jointed has a floor drain. You're half way there with wet room showers. That way if a fitting fails when you're away for the weekend you'll just have to turn off the stopcock, mop slightly wet floor and replace a tap or T joint. Far easier than chasing an insurance company for months to remodel the whole house.
-
SIP strip foundation detail
Iceverge replied to Cormac Foley's topic in Structural Insulated Panels (SIPs)
EPS. As much insulation as you can. >150mm Concrete strength >30N at a guess. Mesh for a raft yes. Yes. It's a french drain. -
You could slightly curved sheets to do the whole span from a metal supplier. Fix some roofing membrane underneath to catch any drips and tec-screw them together. Simple job.
-
An introduction... Renovation + 1950s + subsidence = a challenge!
Iceverge replied to alfaTom's topic in Introduce Yourself
Demo and rebuild! Its the only way😬.