Iceverge
-
Posts
4462 -
Joined
-
Last visited
-
Days Won
32
Everything posted by Iceverge
-

Shutters *other* than roller shutters for sound and heat insulation?
Iceverge replied to Garald's topic in Sound Insulation
Might internal shutters be an option? -
That's an excellent COP. For a small project if one wanted a heat pump without a heated slab or DHW an A2A HP would be a simpler proposal I guess.
-
I would use... Hardy cladding Battons Breather membrane 25mm marine ply 2 x 4 framing with 100mm Rockwool full fill between ( much easier than PIR to fit) and you still have a very good Uvalue. 100mm of PIR over the framing. Tape all joints for airtightness. 70*20mm battens over the top of the PIR. Plasterboard and skim. U value about 0.145
-
Shutters *other* than roller shutters for sound and heat insulation?
Iceverge replied to Garald's topic in Sound Insulation
Could you add secondary glazing instead? -
Shutters *other* than roller shutters for sound and heat insulation?
Iceverge replied to Garald's topic in Sound Insulation
Not massively. It's full of louvres and would just let the sound through. Are internal shutters an option? Good roller shutters have tounge and groove joints and the slide inside brushed guard rails. They also have some internal foam so your contractor is right on this one. -
Floor paint look smart. Do you have any issues with rainwater blowing into the garage?
-
Start with an ACH of 7. Probably realistic if you haven't undertaken any remedial work.
-
You seem to have the house dialled in nicely. Shame about the summer house. I like the idea of the OSB over foam from a low carbon, dry install and soft floor perspective. Perhaps coupled to a super large radiator it may be a runner rather than UFH? What COP do you reckon you'll average for the ASHP and how thick is your screed/slab?
-
What are you using as a flow temp? Is the floating floor of OSB to insulative for UFH do you think?
-
Congrats on the new arrival. You've plenty on your plate for sure so sorry to hear about the house. It sounds unfortunately like poor airtightness. There's one route of chasing the builders etc but it won't to make you any warmer in the short term. There's two things I can suggest to make an immediate difference. 1. Make sure that the humidity is under control in the house. If it's damp it'll feel much colder. This means not drying cloths inside, making sure pots are covered and extractor fans used and bathroom extractors are all working and drawing the air out. If you are seeing any condensation on windows/mirrors etc regularly it's a telltale sign. Ventilate appropriately prevent this. ( Use trickle vents or windows if a room becomes stuffy/humid) 2. Try to start by making at least one room comfortable for you and the baby. Preferably a small one with fewer external walls. Pull the furniture away from the wall and start sealing any gaps that you can feel a draft through. Consider using a door snake. Use child safety blanking plugs for the socket outlets if you feel any drafts etc. Then turn the radiator in there up and the others down. You won't be spending a fortune as it's only one room and though not ideal at least you'll have a warm "base" from which to tackle the problem further. Remember that if the air becomes too stuffy/humid at any time you should ventilate properly. Trickle vents. Open a window for 30 seconds to allow for an air change etc. Good luck.
-
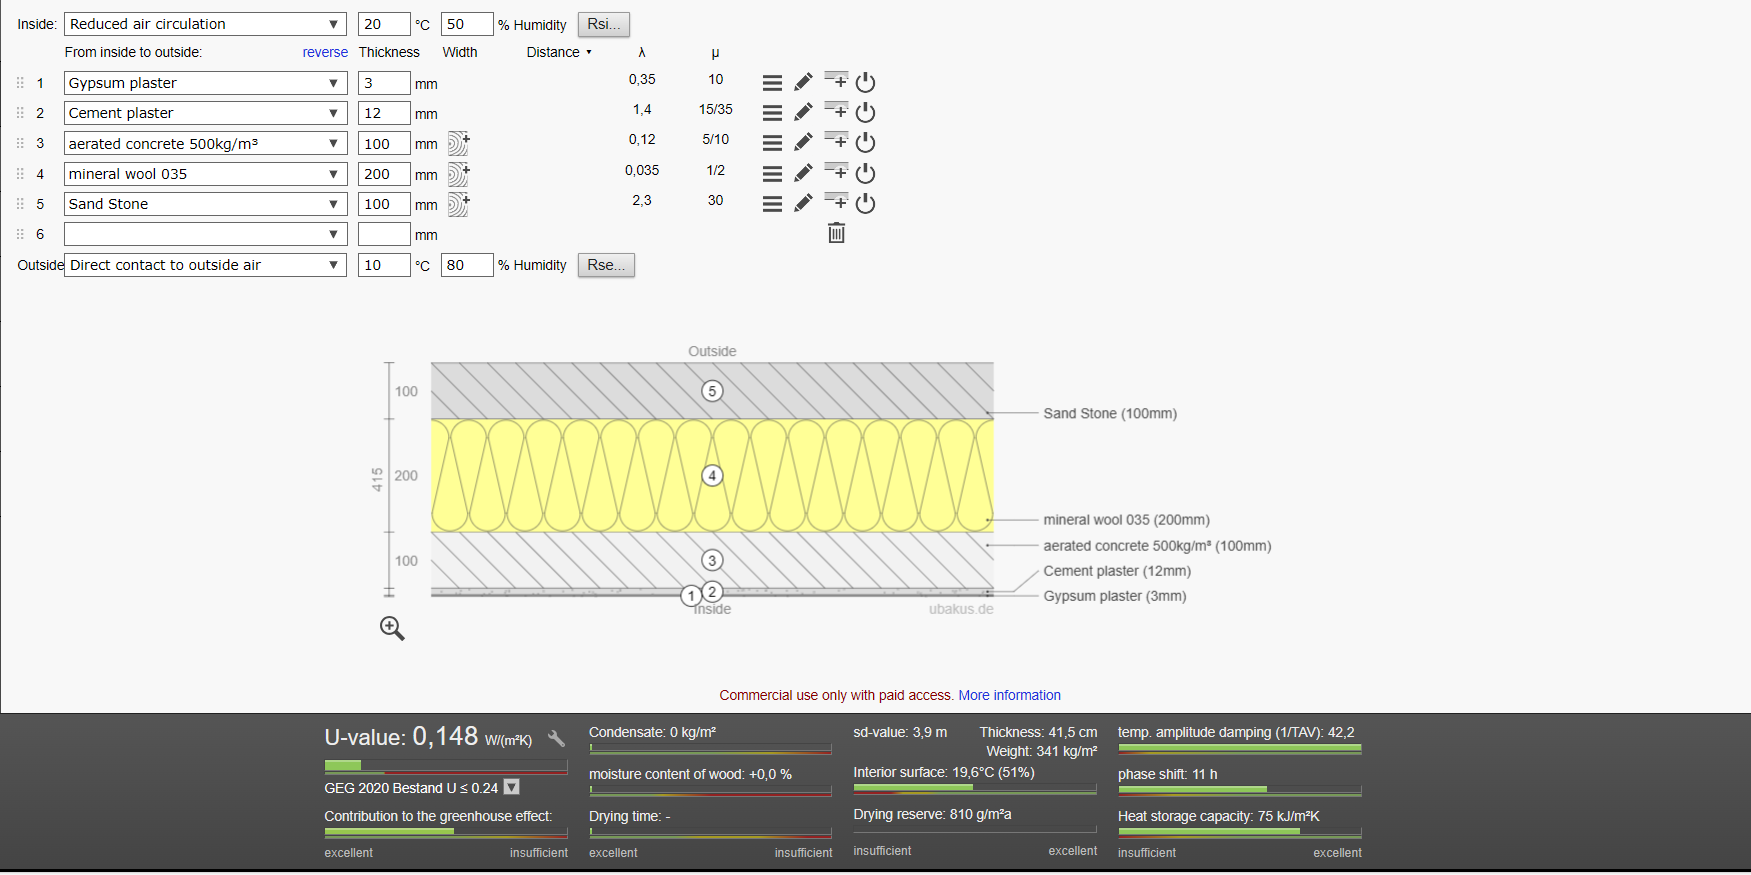
3 bed self build dwelling - wall section design
Iceverge replied to Ganderlayout1's topic in New House & Self Build Design
If it's this I would suggest it's equivalent to engineered stone. I am against PIR boards in cavity walls. Preferable in my opinion to use a wider cavity with 2 x layers of mineral wool batts or EPS blown beads. AHA Denby Dale Passivhaus. I would just use standard blocks internally too. Less cracking and cheaper. They add almost nothing to the thermal performance compared to including slightly more insulation. What I'd suggest. Plenty of free U-Value calculators online or you can do it by hand. No need to feel compelled to use a manufacturers detail.
-
Roof buildup for 1 3/4 storey house.
Iceverge replied to LiamJones's topic in Lofts, Dormers & Loft Conversions
Or use a glulam. You could leave it exposed. -
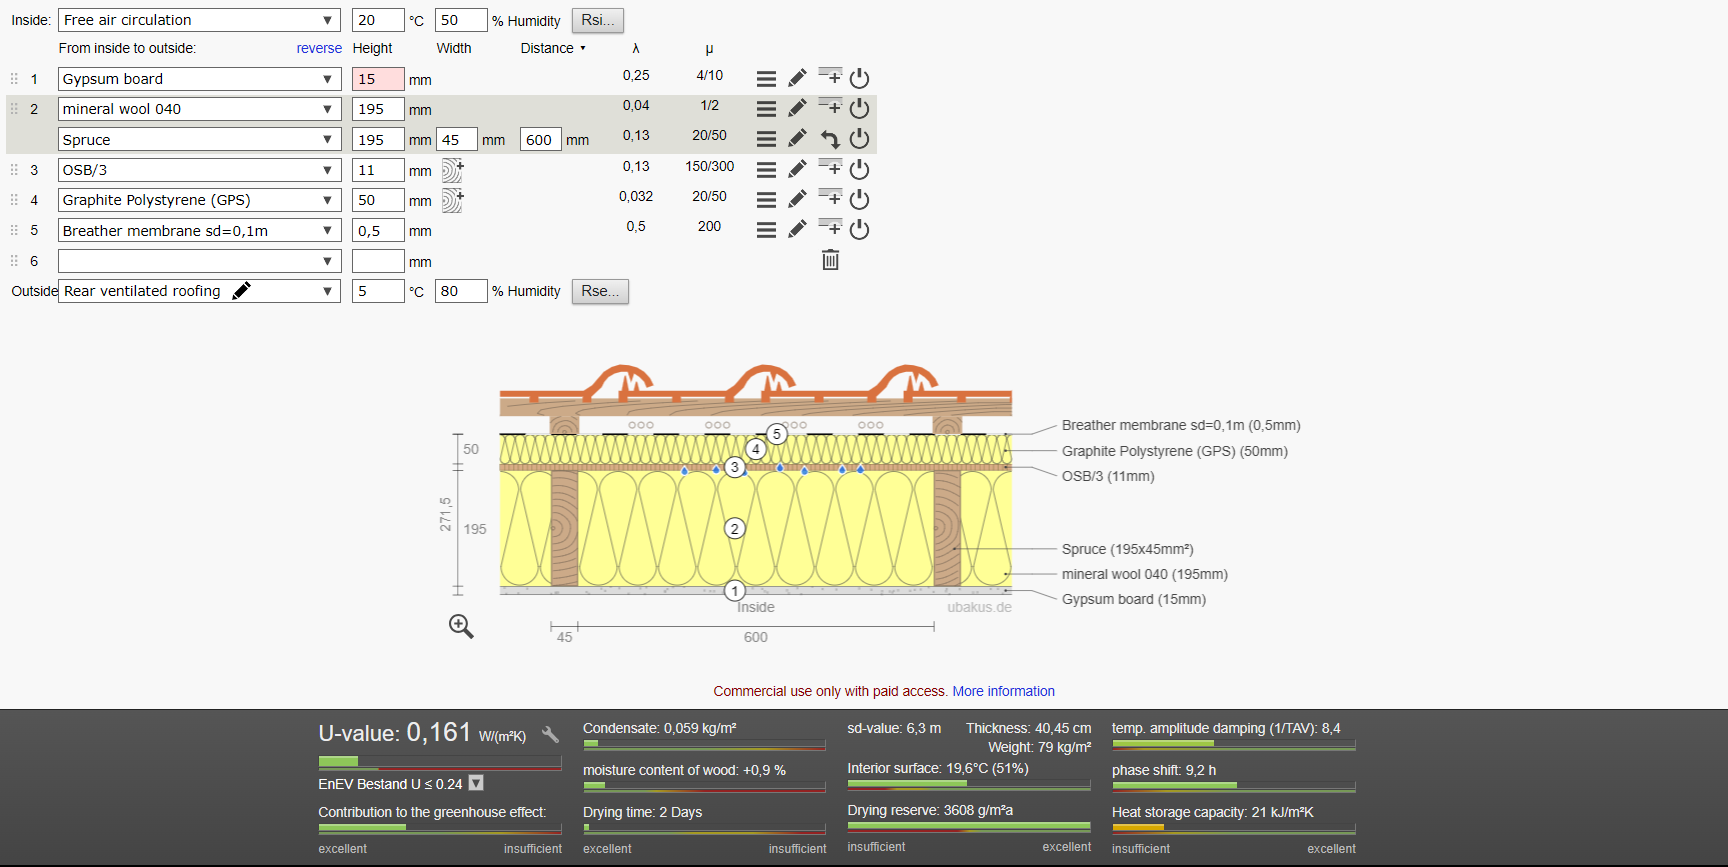
Roof buildup for 1 3/4 storey house.
Iceverge replied to LiamJones's topic in Lofts, Dormers & Loft Conversions
Correct but it's readily available and would substitute nicely in there for your PIR. Decrement delay is a function of density and thermal conductivity. It is how long the heat takes to "soak" through a roof initially before it reaches a steady state of heat loss/gain. This would be more ideal in terms of decrement delay. The densepack cellulose really helps with airtightness too. Tiles. Tile Battens Counterbattens Membrane OSB 220mm cellulose between 220*45mm rafters @600cc Vapour membrane 50mm Hemp batts between 47*45mm battens at 90deg to the rafters @ 600cc for service cavity. 15mm plasterboard. Skim.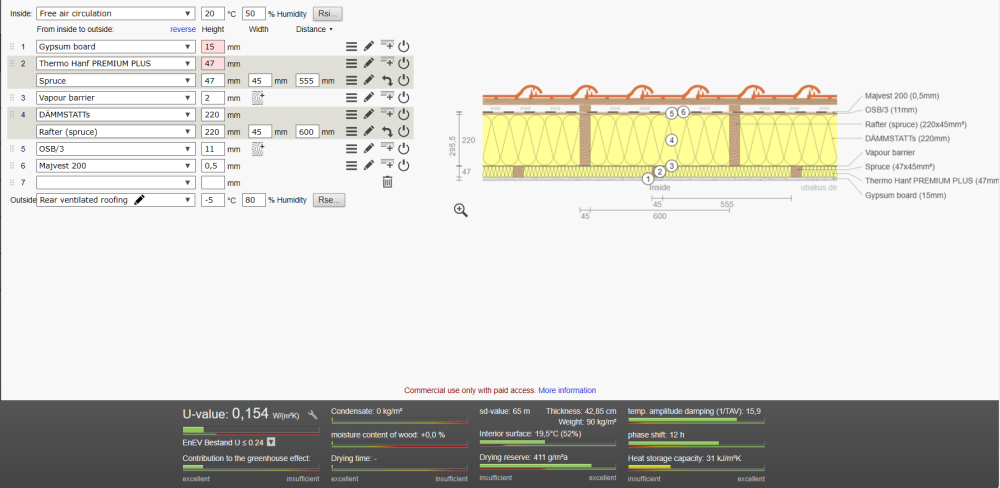
-
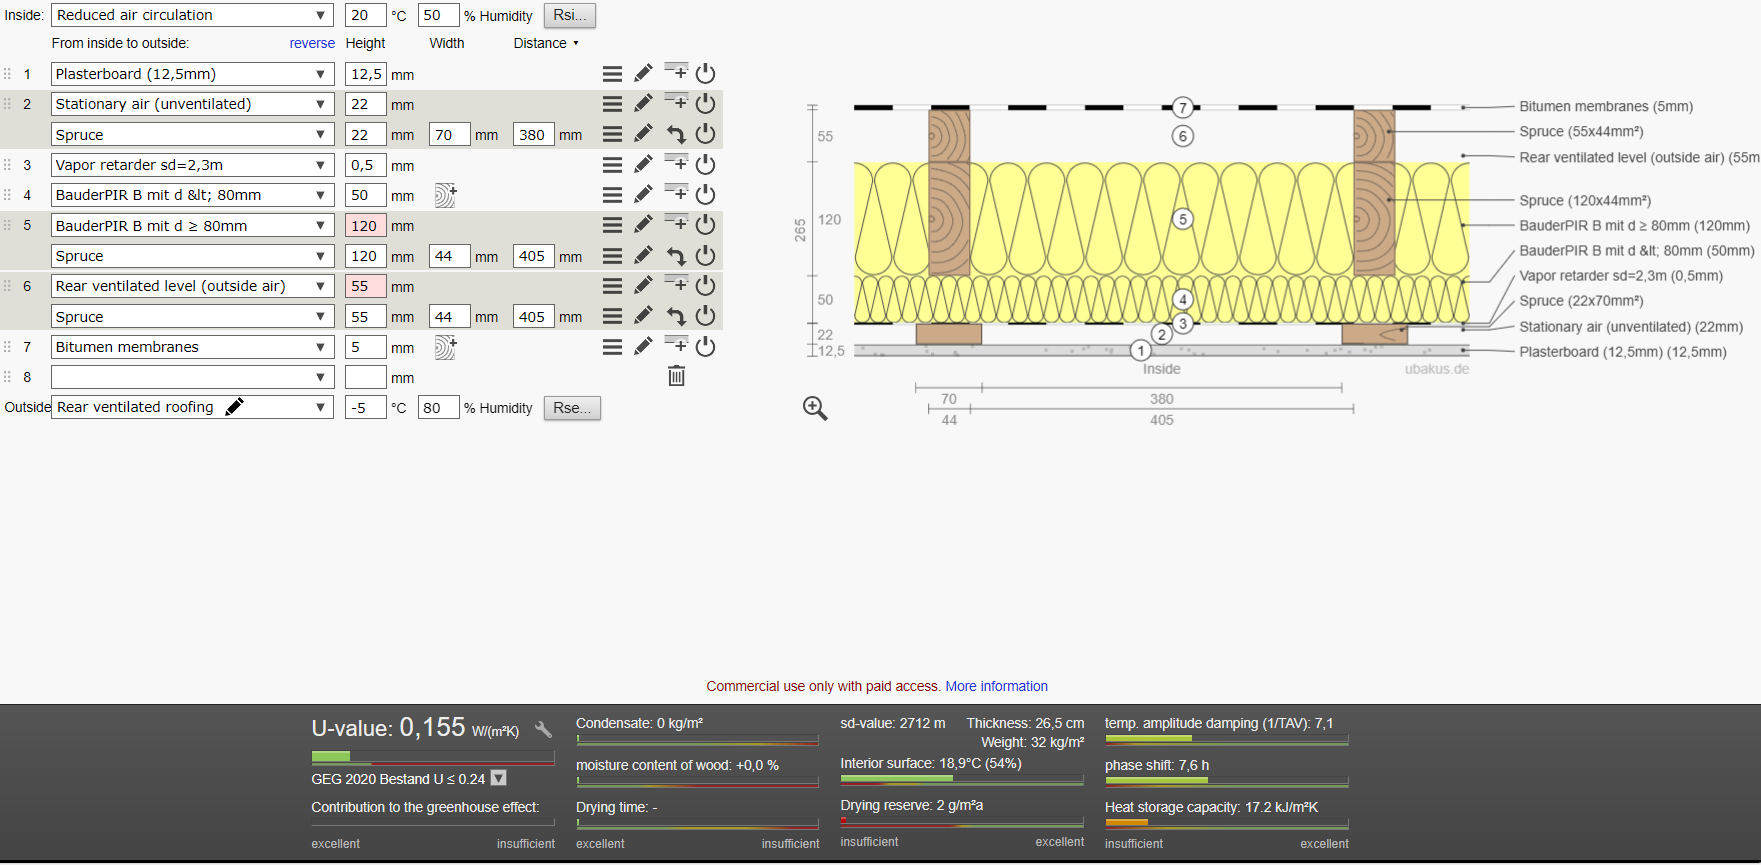
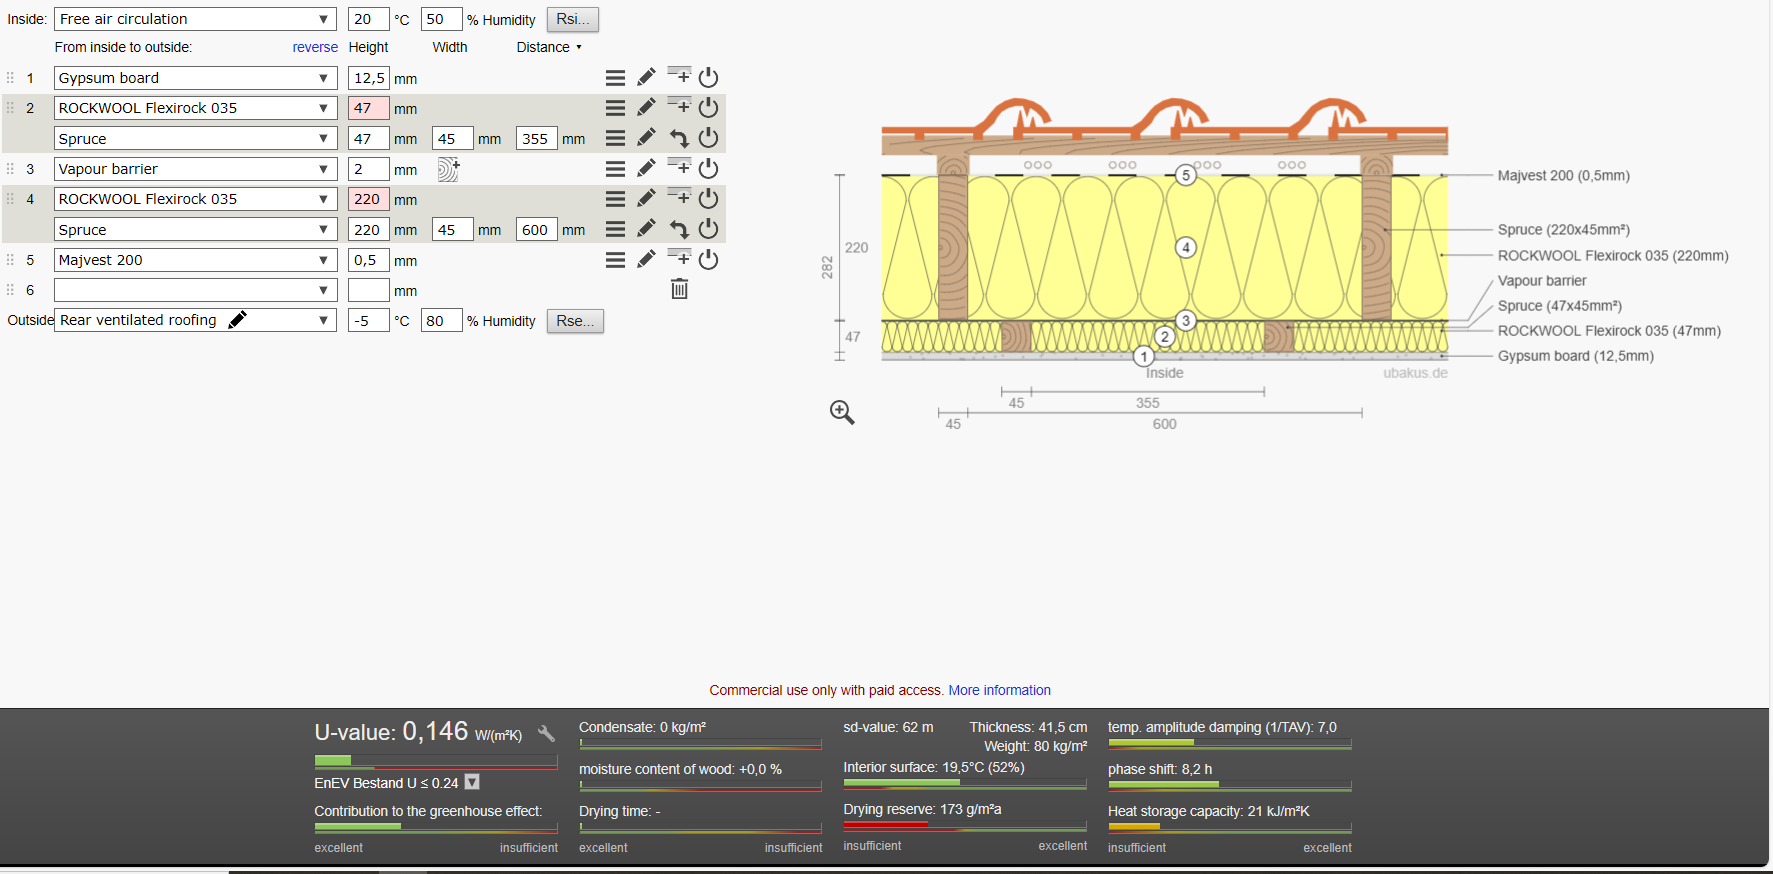
Roof buildup for 1 3/4 storey house.
Iceverge replied to LiamJones's topic in Lofts, Dormers & Loft Conversions
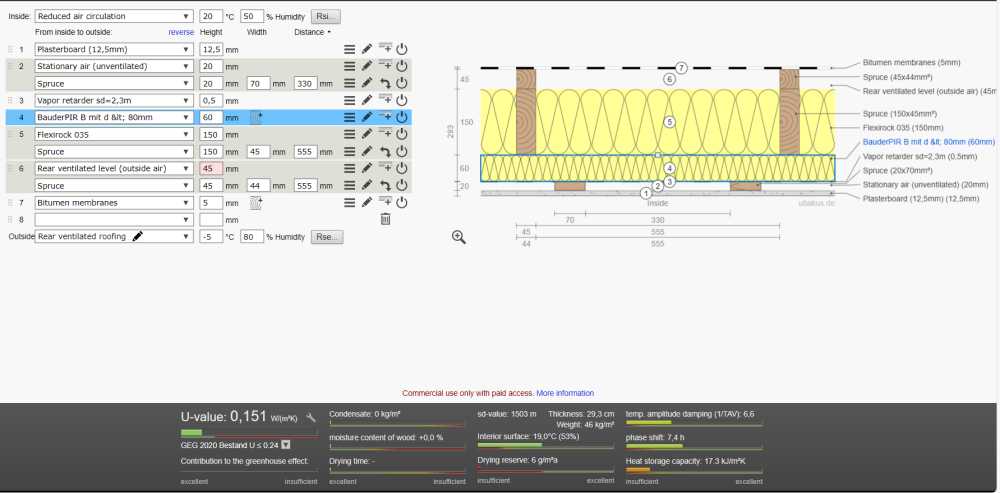
Here's a drawing of what you have. I've added a 20mm service cavity. I like Robin Clevett apart from his instance on using PIR between rafters and stud walls. It has a poor decrement delay (phase shift), requires fantastic attention to detail to get a tight fit, doesn't perform particularly well in fire or noise situations. Returning to 195mm rafters at 600mm centres would be far easier + cheaper. Buy Rockwool flexirock ( or similar) batts and just shove them between the rafters. You'll get a tight fit easily and they can flex with the roof timbers as they contract and expand. No wastage either as there's always a corner that the offcuts can be stuffed into. At the moment I'm doing my garage. Note the ventilation gap above the membrane via batten and counter batten. I was going to use blown cellulose between the rafters but I got a good deal on the rockwool. I'm beginning to regret this TBH as my rafter spacing isn't suited to the batts and I'm doing too much cutting. I'm coming around to the idea of using as external layer sheeting as the airtight barrier like the Americans. I did my garden office/pumphouse recently and taped all the joints in the OSB externally. It was super tight and much easier and robust than taping an internal airtight membrane. That coupled with a layer of external foam would be super easy to apply and eliminate all thermal bridging.


-
Well spotted @ProDave, I don't think I've every had an original thought! It would be an adaptation of a "heat bank " rather than a thermal store. For an equal volume of primary water they typically produce more DHW than a coil in tank thermal store at the difficulty of having to pump the primary water through a PHE. I have never seen one with an ASHP but I don't see why it couldn't work.
-
As a slightly left field idea..... How about 2 * lower capacity direct horizontal cylinders. Run the primary water through them from the ASHP. Then use a flow switch on the DHW draw off to trigger a pump to pump the primary water through a plate heat exchanger to heat the DHW.
-
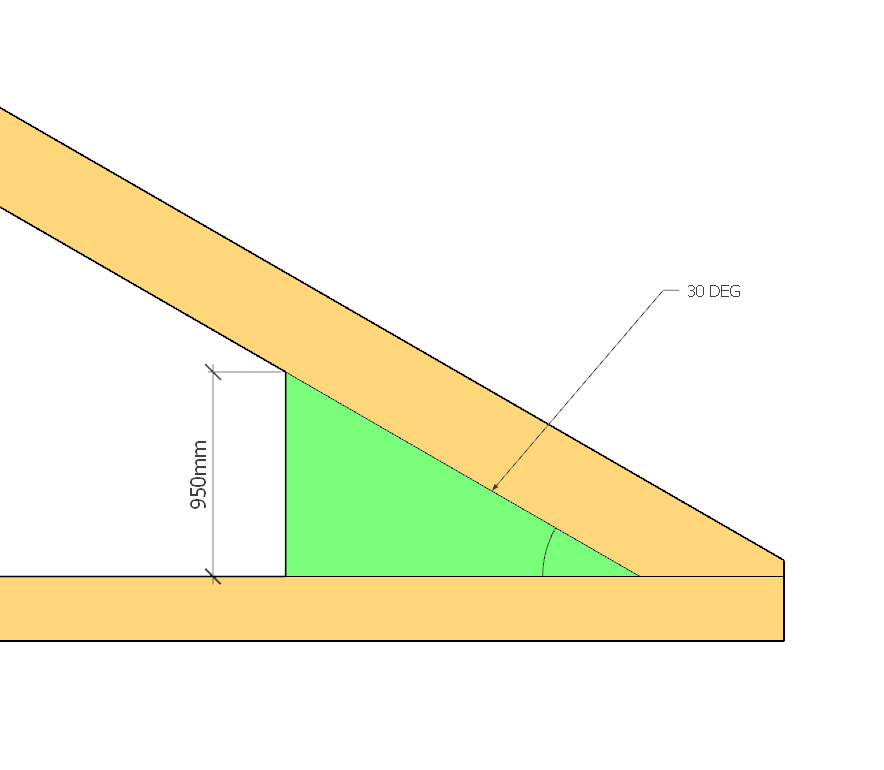
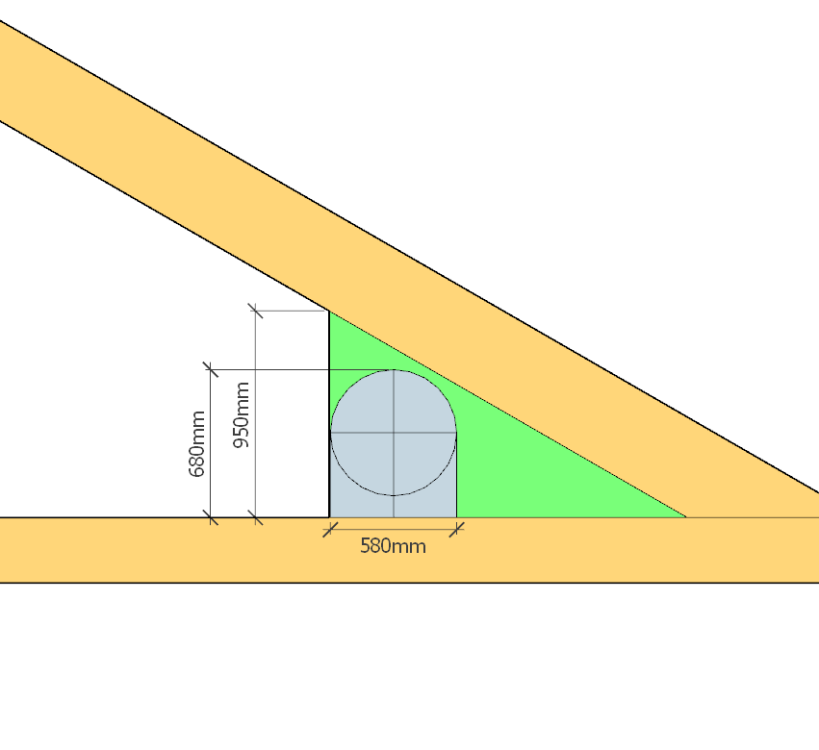
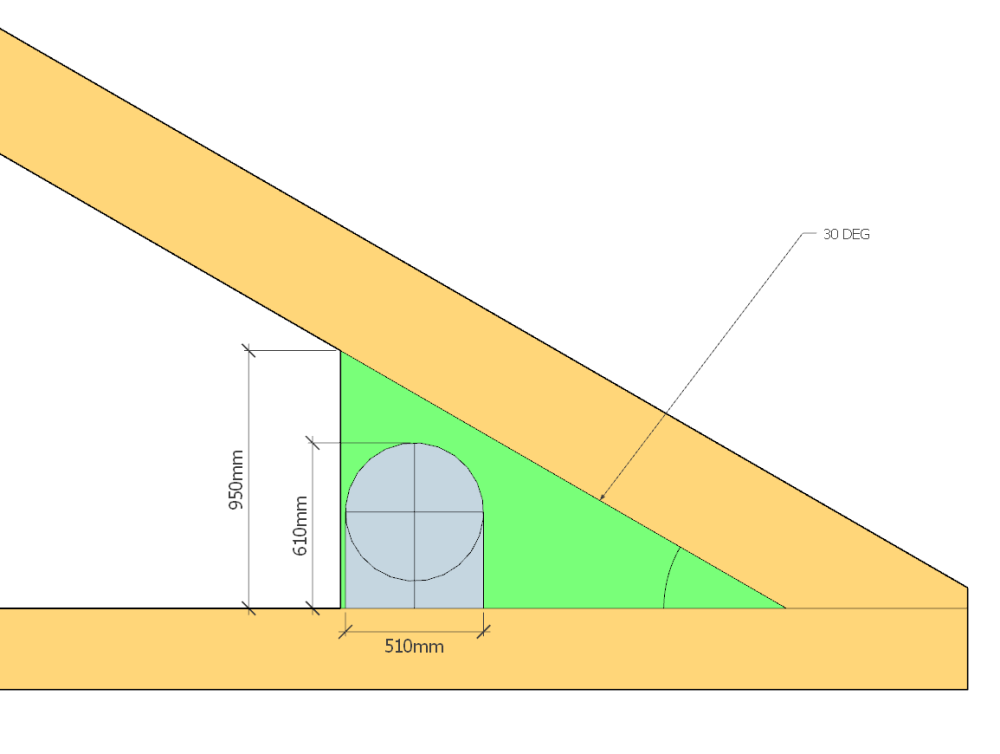
Is this green area what you mean by 95cm sloping away at 30 deg? Looking at the tempest website then their 300l Heat pump horizontal cylinder should fit just about. There won't be much to spare if you need to stay inside your 950mm line for fittings however. The 170l would be better size wise but you may need a pair of them I'm sure all cylinder manufacturers can alter the position of ports as necessary anyway.


-
Beat me to it @JohnMo. You'll get poor COP for an ASHP with a Sunamp as you'll be running it too hot. They really work best with higher temp inputs like direct electric, gas etc. How much space does your loft allow you? Could you parallel smaller tanks? ASHP works best with a Big cylinder Big Coil Low storage temps.
-
Tanking is more robust than a plastic membrane in my opinion. Will be following with interest.
-
Sounds good. I would encourage a good french drain to keep the foundations dry. How do you plan to keep the aircrete as dry as possible? It doesn't perform well when wet as I remember.
-
Closing cavity at the top for blown beads
Iceverge replied to MortarThePoint's topic in Heat Insulation
It will be fine as is. Some beads may make their way up into the first few mm of metac but that won't make any difference. The place I'd be concerned about is the facia. They'll spill out any holes bigger than about a 20p coin. Have you considered a warm roof with the PIR above the rafters? It'd really improve the junction at the eaves? -
Closing cavity at the top for blown beads
Iceverge replied to MortarThePoint's topic in Heat Insulation
More info please. Do you have any cross sectional drawings/sketches? Will there be insulation on the pitch or the roof or on a flat ceiling level? Will there be insulation below or above the rafters? Have you considered blown cellulose for the roof? -
Welcome. Always pleasing to see someone doing things properly. Any more details of the proposed techniques etc?
-
Separate concrete lintels on bother skins here. Very cheap. About €40/window in 2020. We used OSB window boxes but installed the windows beforehand to the outer skin only. Regarding width we did a 250mm cavity with stainless steel ties from Vartry in Wicklow Ireland. 300mm would only have cost about €1200 more. Money that would have been well spent in hindsight. What ever you do, go for a multiple that allows you to install 2x layers of insulation. IE. 75mm X 2 or 150mm X 2 to ensure the joints are all staggered. Am easier method of closing cavities might be to use a wide airtight tape returned to the inner leaf and then a J bead screwed into the window to slot in some plasterboard.
-
I stand corrected. My vote is for the smokers over the sewer pipes in that case and some proper carbon filters.
- 9 replies
-
- 1
-

-
- mvhr
- carbon filter
- (and 1 more)