Iceverge
-
Posts
4462 -
Joined
-
Last visited
-
Days Won
32
Everything posted by Iceverge
-

Kooltherm K103 - underfloor heating clips ?
Iceverge replied to bmj1's topic in General Construction Issues
How tight are you for floor buildup space ? The sums almost never make sense Vs using PIR at a fraction of the price and doubling up insulation elsewhere instead for less money overall. -
One example of many posts about this. PIR boards in cavity block walls is idiocy.
-
You've asked the easiest question of the night. Blown Beads . EVERY. SINGLE. TIME.
-
Hello from someone considering demolishing and rebuilding
Iceverge replied to Norbert's topic in Introduce Yourself
I would investigate building a replacement house adjacent to the house. It'll save loads of cash during the build and really take the time pressure off. On the subject of a void you could just fill it in. Otherwise consider it for something that was either easily removed during floods or preferably something that was not troubled by them. A car port or a few rainwater tanks maybe. On a large plot however, why compromise? Just build what you need above flood level and fill in below. Leave the burrowing to the hobbits. -
The beads haven't settled in the least. They bowed up the 450mm DPC cavity closer when they were blown in. Earlier this year I climbed into the attic and did a few spot checks to see if any settling had occured. None had. Similarly when I checked with a thermal camera there were no voids. We've used about 17kWh/m2 over the last 2 years in heating bills. A bit more than PHPP predicted but I'm not sure why. I don't think it is the beads. One thing that I think is important is getting wind tightness very secure as the nature of them is porous and susceptible to wind washing. (Where heat is lost by blowing through the insulation) If you are building a cavity wall I would recommend them or full fill fiber batts.
-
Hello from someone considering demolishing and rebuilding
Iceverge replied to Norbert's topic in Introduce Yourself
Can you build another house beside you current one on the plot and then knock the existing one down when you are finished, at least you'll have somewhere to live in the interim. Personally I would bin any idea of a basement/cellar. It'll just be a liability when the flood does come. Poured concrete walls would be my preference for anything below ground regarding flooding too. Be cautious cutting it too fine with any proposed flood levels, we're all aware of the higher incidence of extreme weather events -
This doesn't seem to make much sense. Did you mean 150mm?
-
Final (hopefully) bit of tape and membrane done today
Iceverge replied to Thorfun's topic in Ventilation
You'll need to seal them for the test. Either cap them or put a plastic bag over the top and seal with tape temporarily. You're unlightly to cause any damage IMO. -
Defo not. The outside leaf will be cold and possibly wet for much of the year. Any ply here wouldn't last the battle. I'm not sure about the gap there.
-
Final (hopefully) bit of tape and membrane done today
Iceverge replied to Thorfun's topic in Ventilation
They'll work fine for the depressurisation side of the test. They'll let a gale blow thorough for the pressurisation part. -
Should work fine if the nylon is strong enough. Green building store used compacfoam. https://www.greenbuildingstore.co.uk/kirkburton-passivhaus-strategy-for-windows-overheating/ What kind of windows are you using? The worst heat loss in our house is through the window frames. I would have liked to have overinsulated the frames if I could have easily done so.
-
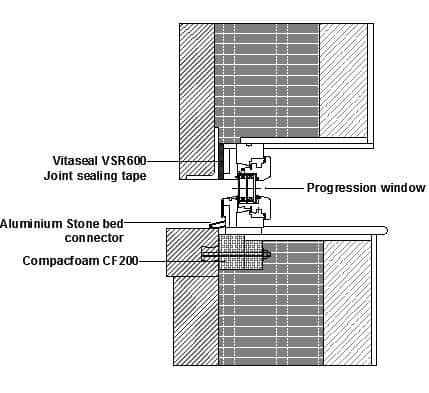
Our windows rested on the external concrete cill and were bolted to the outer leaf. Our 18mm OSB boxes didn't actually take any weight of the window but are quite strong so long as the window isn't too wide. I'd be slightly weary of having a cold metal bracket on the external leaf connecting to plywood. It'd be inviting condensation on the ply in my mind.
-
Replacing storage heaters with ASHP/A2A
Iceverge replied to Crofter's topic in Air Source Heat Pumps (ASHP)
Yes. Lift floor boards. Drape a breather membrane between the joists, tape diligently to all walls. Fill with batt insulation. Airtight membrane over the top. Replace floorboards. Don't worry too much about getting extremely low U values. The windtightness (breather membrane) and Airtightness ( airtight membrane) will stop the bulk of the heat losses.
-
Plenty of electricity poles > 50 years old surviving just fine. Mind you the intensity of creasote treatment would give you sunburn.
-
Some design strategies please
Iceverge replied to Nic's topic in Energy Efficient & Sustainable Design Concepts
Derisk your build by using masonry or stick build timberframe. Theres been a a few to many stories of people's projects being sunk here recently by relying on ICF companies or TF manafactuers that went bust. Also ability to drive 5 mins to your hairy knuckled local builders merchant with a car trailer and return with a few 9X2's, 2 dozen breeze blocks, a bag of cement and a box of nails is invaluable in the real world of building a house and saves lots of time and cash. -
Replacing storage heaters with ASHP/A2A
Iceverge replied to Crofter's topic in Air Source Heat Pumps (ASHP)
Tackle that suspended floor would be the first port of call IMO. -
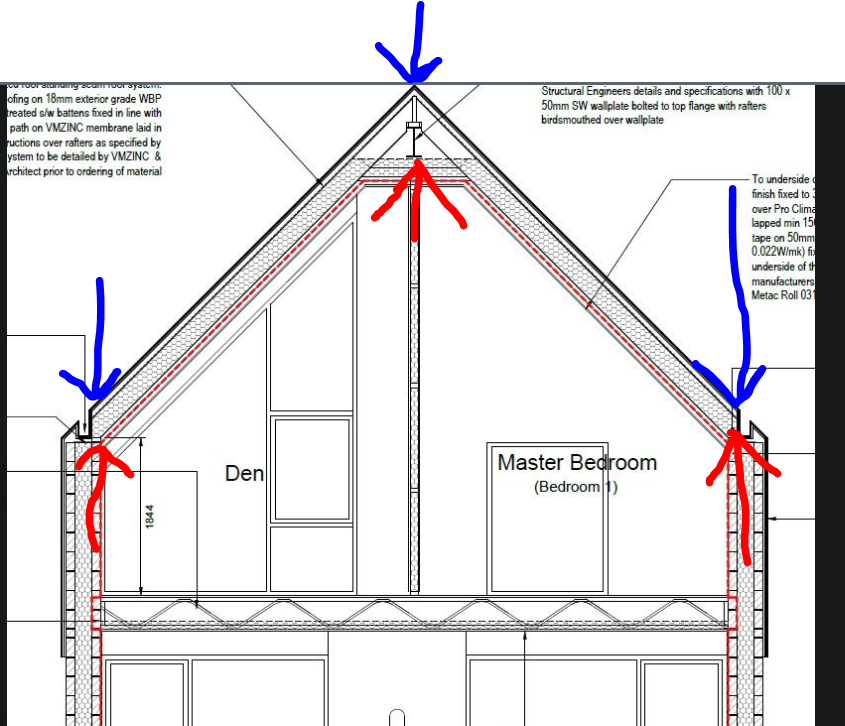
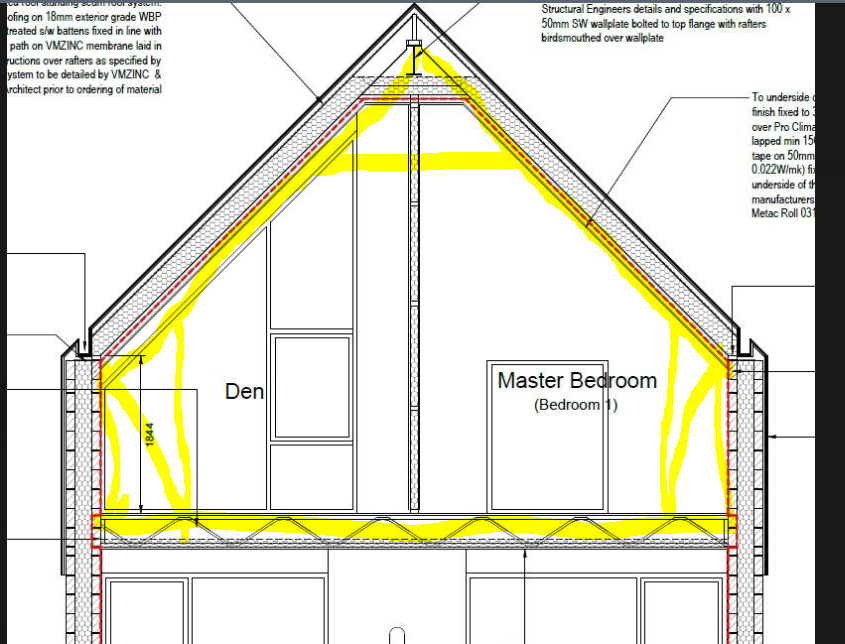
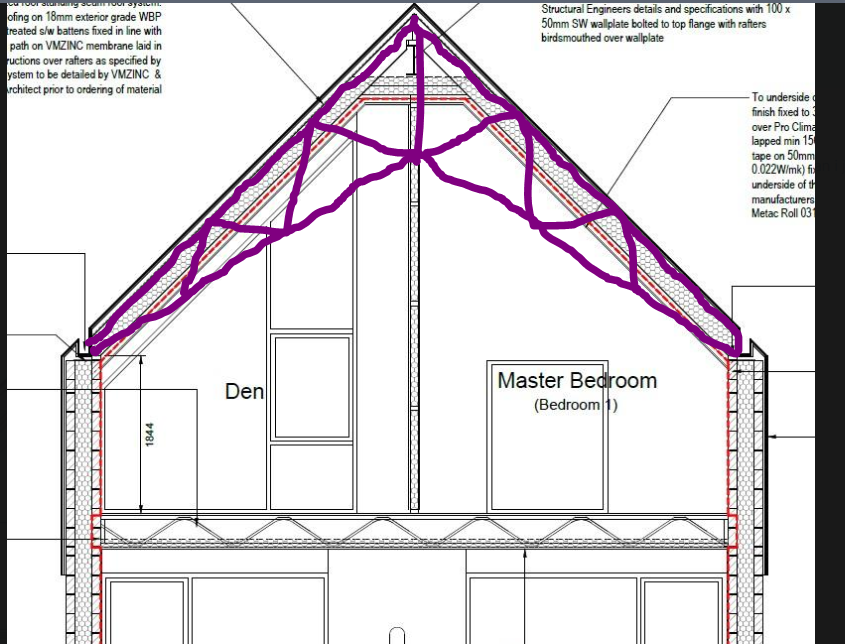
Can you post a full screen shot of the drawing ( without personal details) I'm unsure as to the total design and where you intend to make savings? At the moment your rafters are pressing down on the wall and Steel I Beam at the apex (BLUE) They are pressing up ( RED) and in turn transferring the load to the foundations via the walls. I assume the I beam is supported by pillars or the gable walls. It's pretty normal and allows your chippies to use off the shelf timbers and I can't see it as a very expensive solution. The Ecojoists ( metal space joists- pozi joists) for the floor of the upstairs won't really have much effect of the roof AFAIK. Attic trusses won't work unless you are prepared to loose some internal space from the rooms for bracing as well as at the apex. An elegant solution might be a scissors (vaulted) type truss. You'll still get a vaulted ceiling but your internal pitch won't be the same as the external. You can do away with the ridge beam then. Excuse the ropy drawings. Here's one from the internet.
-
SS steel ones from Vartry Engineering weren't too bad. I can't remember exactly.
-
It wouldn't matter as they would be entirely inside the heated envelope or outside of it.
-
Solid Joists? If so i would expect resilient bars are a must. Also you get a nice 16mm service cavity for your wires rather than drilling.
-
Why not separate lintels? Better thermally than catnics and as cheap as chips. Precast concrete lintels for our house were about €25inc VAT per window.
-
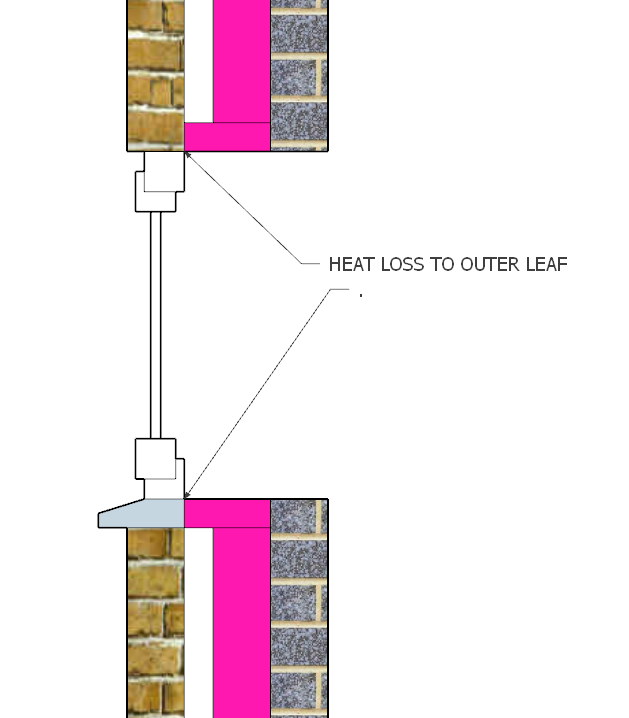
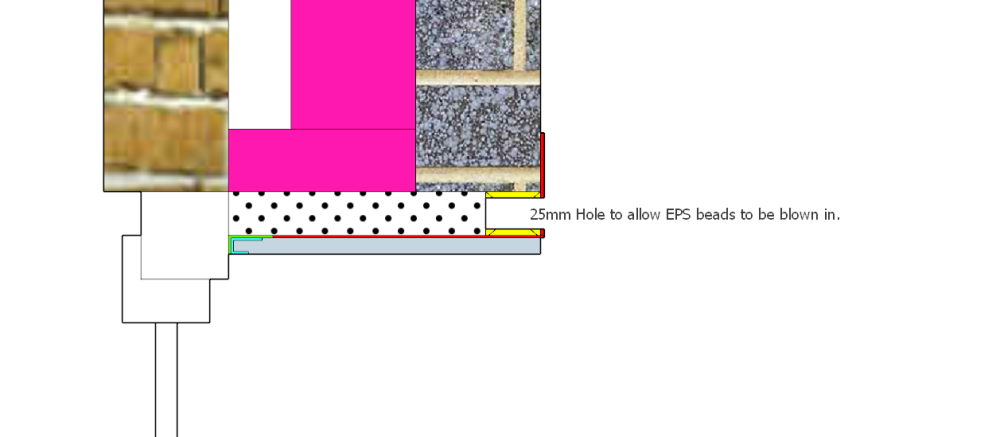
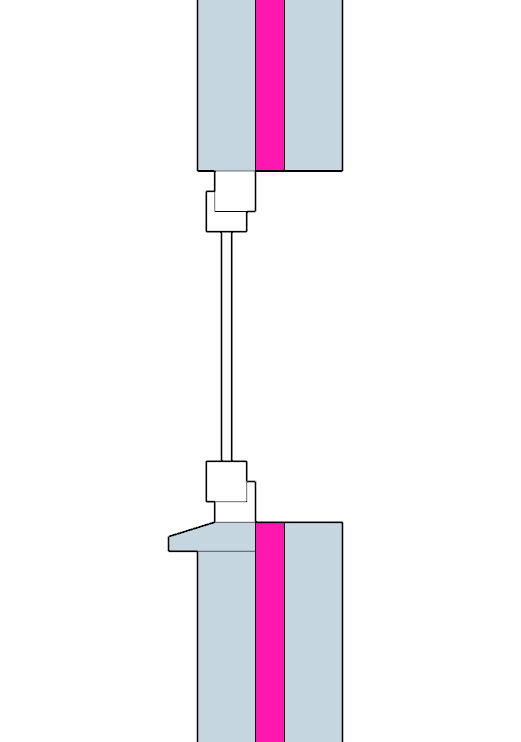
I don't know on the new build if the window overlaps the cavity closer. Worse case it is like this and the installers haven't done it. The cold outer leaf could be practically "touching" the inside which is a bad thermal bridge. I suspect in reality they've moved the windows more inboard and this isn't an issue. However it's still better to cover as much of the frame as practical with some insulation. However you'll need to drill a 25mm Diameter through the membrane and batten as shown in each of the four sides of the window to allow your EPS beads installer to give a quick squirt of beads to thermally isolate the windows. If you want you can drill a few extra holes in the batten only and not the membrane to visually check that it has filled to the corners (it will BTW). The Hole in the membrane can be very simply patched afterwards with a piece of A/T tape. Hey presto. A fully thermally insulated window frame. ZERO waste of insulation unlike boards products. A fully gapless install No thermal looping/bypass. Perfect A/T details. Exactly consistent frame gaps unlike other methods. A consistent pallet of very cheap materials. No need to fight with the window installers. Don't worry, almost all of us are in the same boat.

-
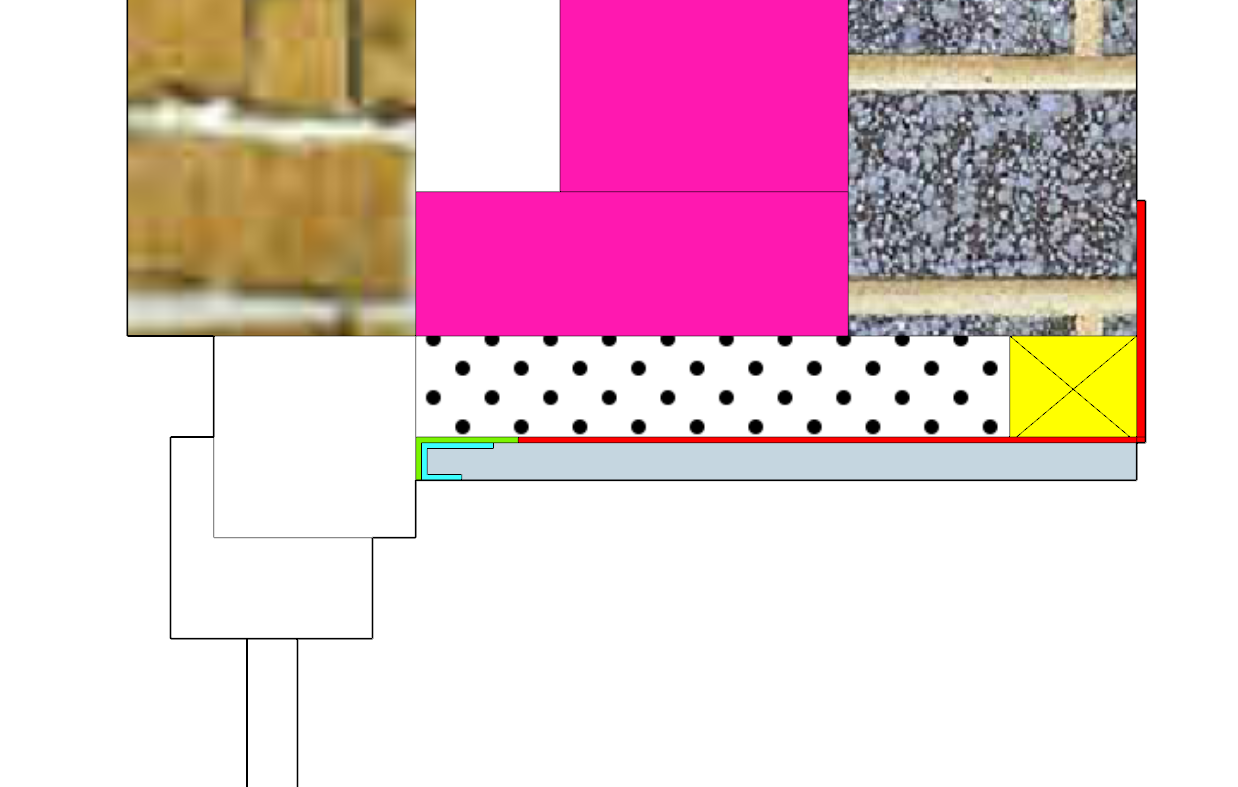
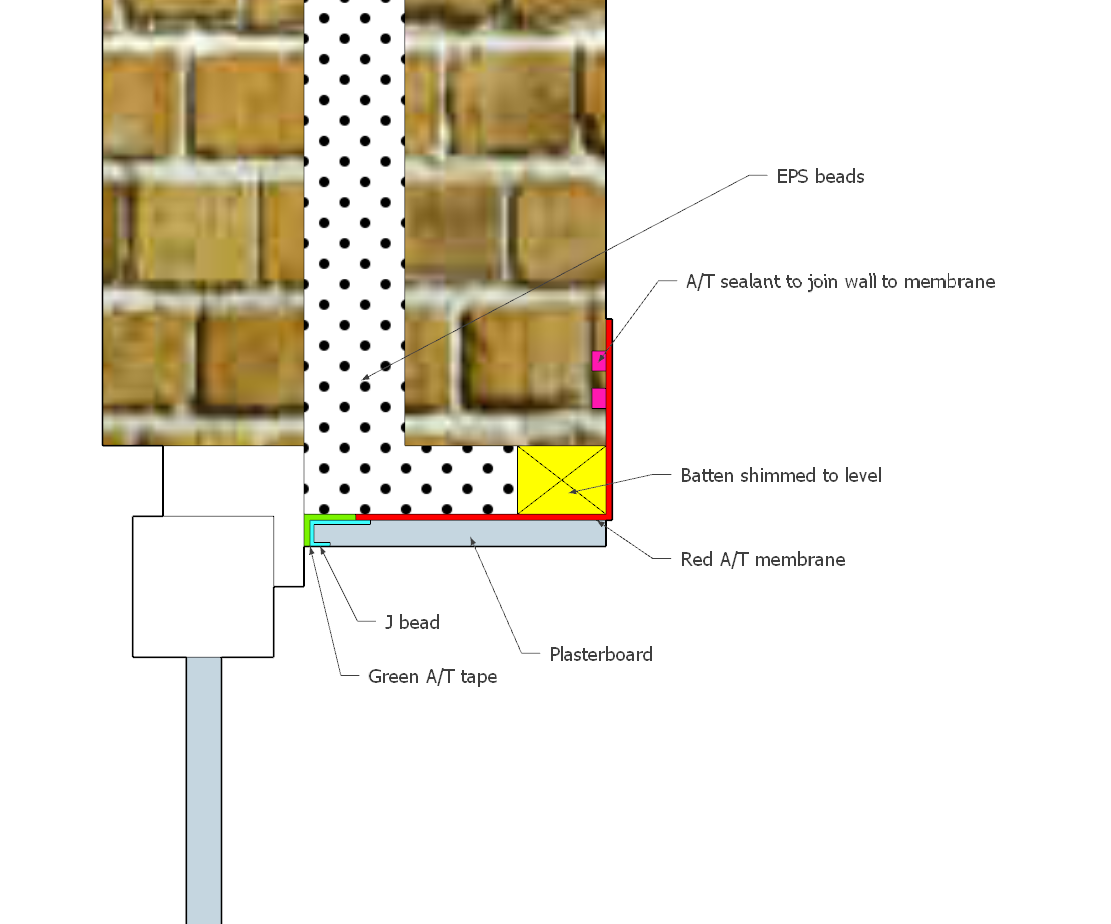
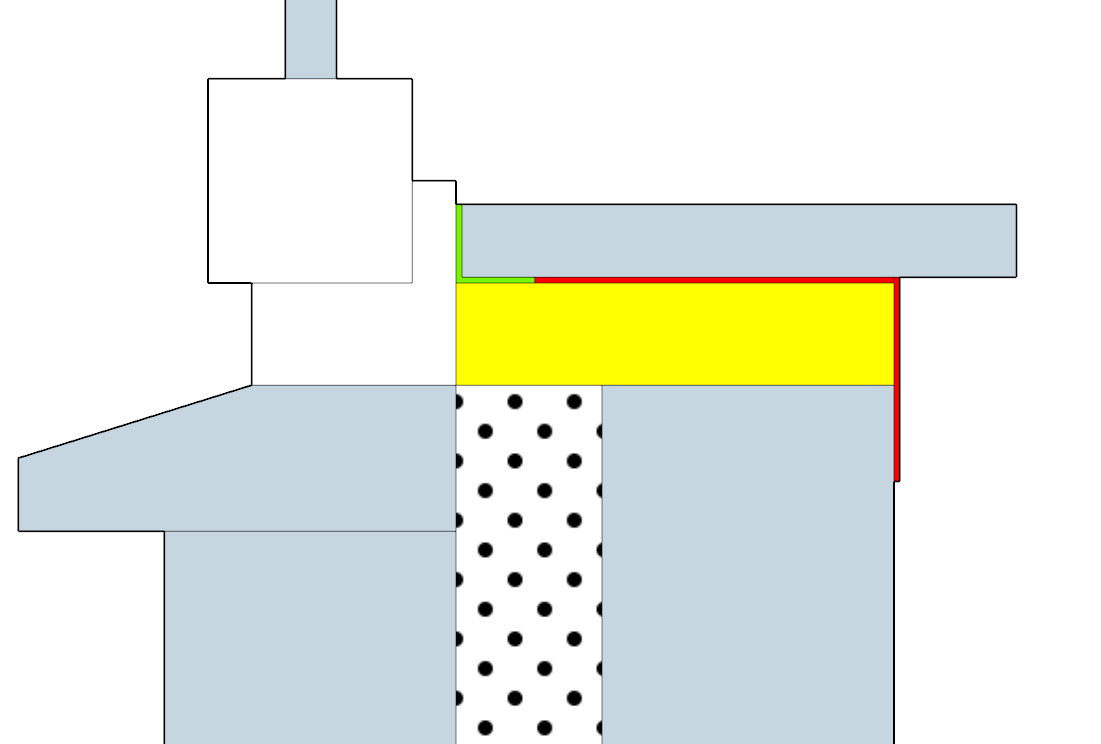
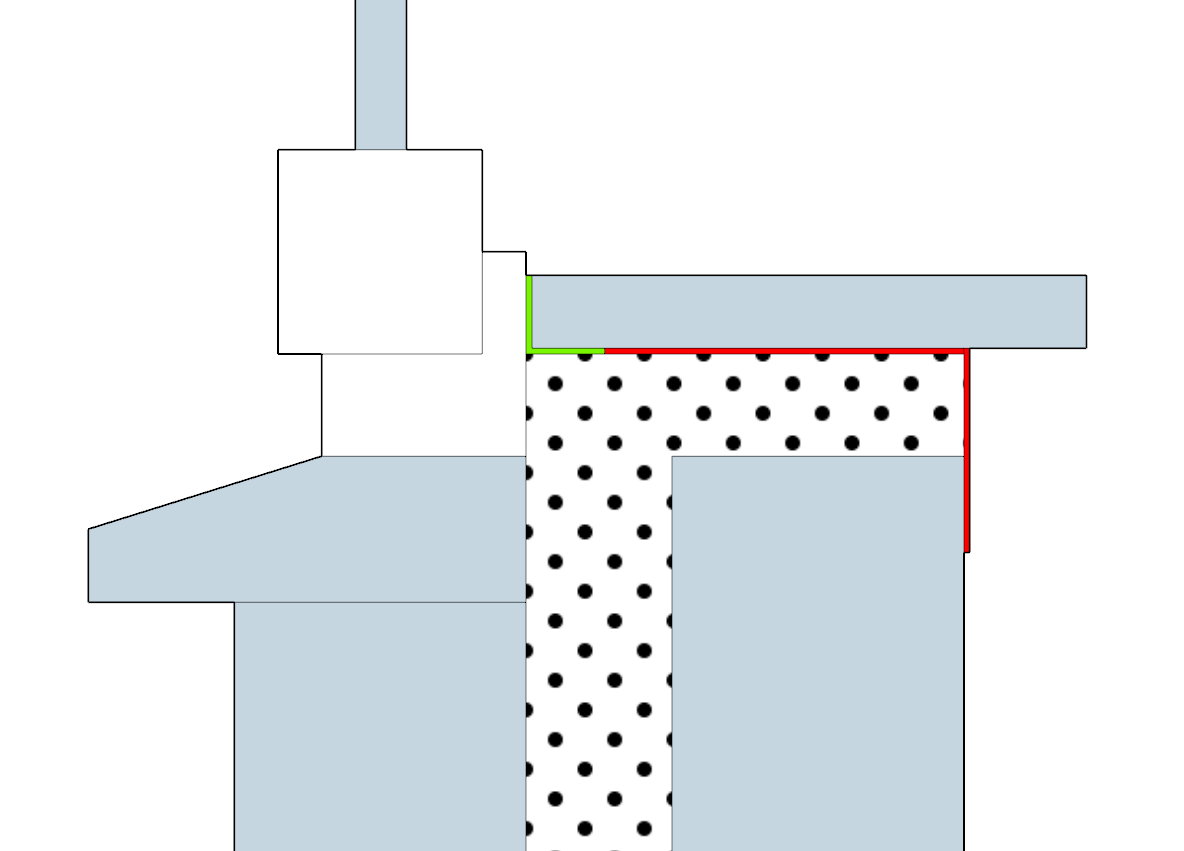
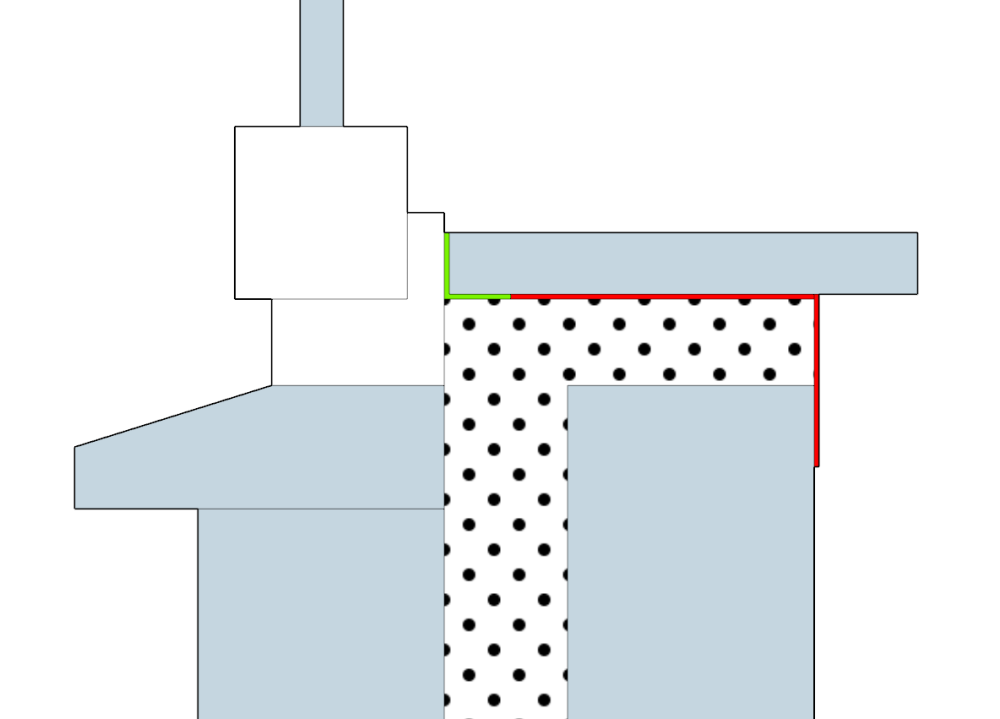
There's plenty of space to over insulated the frames internally there. I wouldn't sweat about it. In the existing house here is what you have. @Dave Jones is right it's a nasty thermal bridge. However it's easily solved. This will do for the heads and reveals. 1. A/T tape and membrane. 2. J bead. 3. Batten shimmed level with j bead. 4. Membrane returned to inner wall and sealed. 5. Plasterboard. 6. EPS beads injected into wall as insulation. For the Window board you'll need to run some support in the form of a few battens per window as below shown inn yellow. These should be fixed to the inner blockwork. 3- 4 should be fine. Then let the EPS beads Fill the rest. You could mess around with PIR boards etc but it's a mess. Just let the beads do the work.


-
For the DHW I would just run some 15mm pipe in the duct. So long as it's below the frost depth and there's not a gale of cold air blowing through the duct it should be fine uninsulated. The wait for hot water would be very small even at 16m. Say a 10l/min shower pulling 5l/min hot water would use about 1m of the water in the pipe per second so 16m would be about 16 seconds plus any dead volume in the shower body.
-
It looks like sand and cement. Problem is caused by the usual culprit, water. I would just mix up a bucket at 4:1 and patch it in. Sponge it after to match the finish. When it's well dried in a good dark coloured exterior paint should be enough to protect it from water running down the wall from above. If this isn't enough carefully cut the paving back 100mm with a diamond disc and dig it out 100mm deep. Then back fill with chippings to match the paving creating a mini french drain that will prevent any rain splashes and mini pools of water by the base of the wall. I think sand and cement patchs and a good coat of weathershield will be fine however.