Jeremy Harris
-
Posts
26430 -
Joined
-
Last visited
-
Days Won
360
Everything posted by Jeremy Harris
-

Help! Floor being poured tomorrow. Lots of air in UFH loops
Jeremy Harris replied to oranjeboom's topic in Underfloor Heating
It looks odd to me, too. One thing that springs to mind is that I remember once, years ago, mixing up some concrete that was far too wet, and as I tried to level it out something like this happened. I think that what happens is that when tamping it down, if it's got too much water in it the aggregate and cement sink and the fine sand floats up, with a lot of water. You then end up with a very wet surface, that "dries" to a slightly shiny finish, might well develop surface cracks and is very weak because there isn't much cement in it. Not sure if this is the case, but the shine in the top photo makes me suspicious. There are others here that know a heck of a lot more about the practical stuff relating to laying concrete - I only know a bit about the chemistry of the stuff really - and with luck they might chip in and say whether or not too much water in the mix can have this effect or not. -
pro's & cons of different ICF systems
Jeremy Harris replied to mvincentd's topic in Insulated Concrete Formwork (ICF)
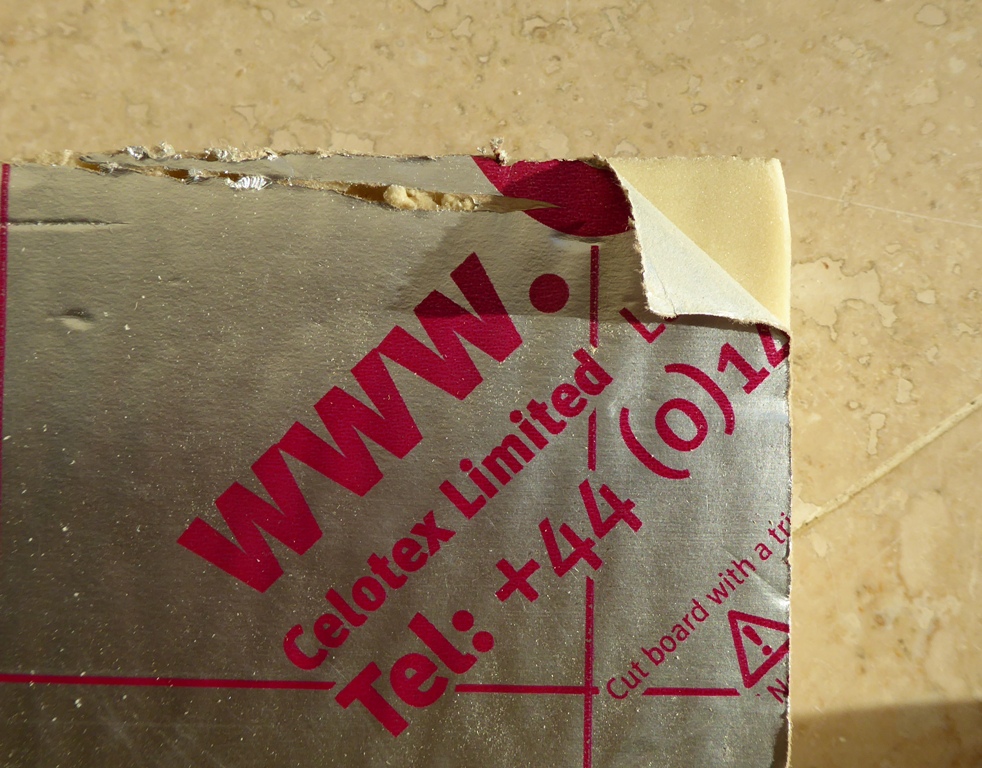
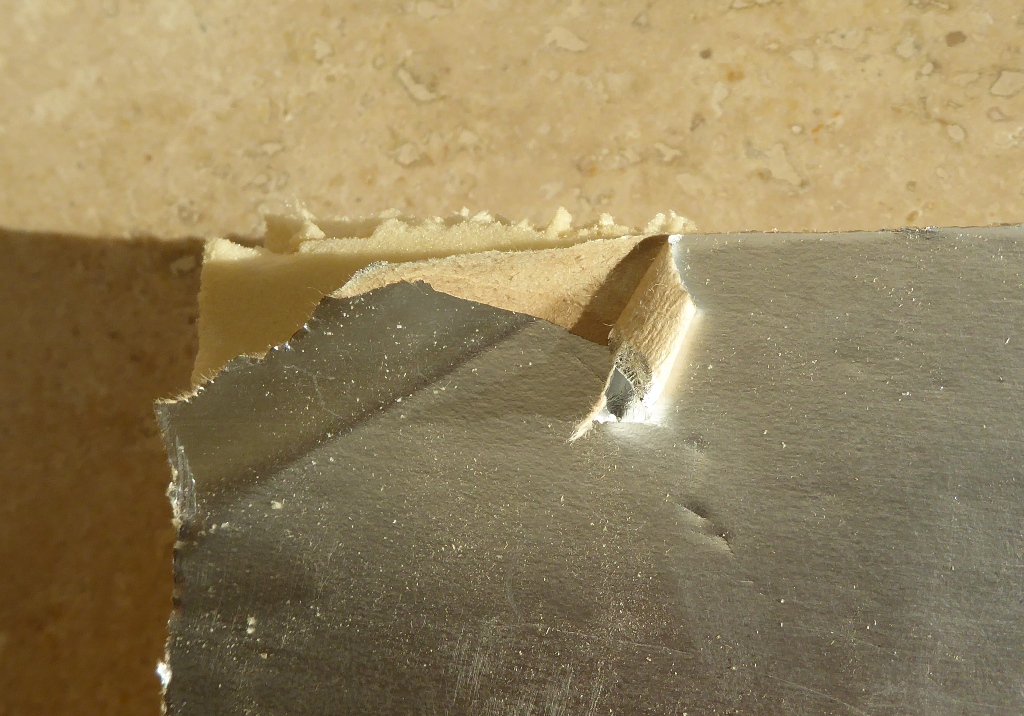
A bit late, but I got around to digging out the bit of scrap Celotex and taking some photos of the "foil". I will go on and do so reactivity tests with hydrochloric acid and then sodium hydroxide, and a bit of ready-mix mortar later, as they are the strongest alkalis and acid I have readily available. Meanwhile, this is what the two different sides of the sheet sof 50mm Celotex I have looks like, close up, with the surface layer partially peeled off. First, This is the printed side, which seems to be an extremely thin layer of aluminium foil bonded directly to the foam, with no sort of paper or fibre underlay. What looks like fluff is just bits of the surface of the foam that have come away: and this is the non-printed side, that looks a bit duller and seems to be coated woth some type of silver coated/painted paper: The fibrous paper-like material is clearly visible on this side, and it doesn't tear away like the very thin foil on the other side at all. With luck I should have some more photos of how the surfaces look after they've been exposed to cement, sodium hydroxide and hydrochloric acid tomorrow. I suspect the aluminium layer will just get oxidised away, not sure what the effect may be on the underlying foam, or the paper-like layer.

-
Welcome. We're about 45 minutes or so South of you. just to the West of Salisbury. I'd echo the above comments about the kit houses, they generally aren't good value, or particularly great in terms of performance, and there are also two other major snags with them. Firstly, the design and style of the house, externally, will be dictated very much by the plot, usually. Considerations like lighjt and shade, the view of the main elevation, the location of the site access and the shape and orientation of the plot all have a major bearing on the design, so much so that it would be unusual if a kit house would just fit well on the majority of single plots that are available to self-builders, without a fair few compromises. Secondly, I'd echo the point that @Crofter has made. If you are going to the hassle of building your own home, then you may as well get one that exactly meets your needs. It doesn't cost really any more to get exactly what you need now, and for the years ahead, than it does to accept the inevitable compromises from a kit build, especially given the relatively high cost of some of the more complete "turn key" kit suppliers.
-
This is not an easy post to write.....
Jeremy Harris replied to ToughButterCup's topic in General Self Build & DIY Discussion
I agree. I went through this process with the bastards at Santander, when they pulled their offer on the day I went in to draw it down. Complaining locally was pointless, they just wanted to get me out of the door. Complaining to the top just got a load of BS, none related to their contractual obligation (bearing in mind we'd already paid them their set up fees). In the end it these people: http://www.financial-ombudsman.org.uk/consumer/complaints.htm that got the ball rolling with the regulator (now the FCA, they've changed their name: https://www.fca.org.uk/consumers/how-complain ), and we eventually got our set up fee, valuation fee and a very small compensation cheque back. The process took the best part of a year though, start to finish. -
Another one tries to build a hidden house
Jeremy Harris replied to ProDave's topic in Housing Politics
People do get away with a lot, though. My mother's old farmhouse, a couple of miles away from where she is now, had two extensions added and a big garage, connected to the house by a wall and covered car port. All of this work was done without either planning permission or building regs approval, by the previous owner. I practical terms, the ground floor area of the house had more than doubled. Her solicitor didn't uncover any of this shenanigans when she bough the farm, it only came to light when a group from the Rambler Association walked up the track to the house and demanded to walk along the footpath that ran right through where the garage now stood............... I've no doubt at all that the farmer that owned the place before had deliberately flouted the planning laws and building regs; he was that type of bloke. As it turned out it was only the footpath being blocked that caused a problem that required a retrospective planning application and the construction of a new path, some fencing and a couple of stiles, as it was easy to prove that the extensions, garage etc had all been built at least a decade earlier. -
Design for Racks for Spray Painting Skirtings
Jeremy Harris replied to Ferdinand's topic in Decorating
I bonded all our skirting and architrave on, so no fixing holes to cover up. The skirting was all bonded on using the cheap Screwfix water-based grip adhesive. This was much better than the solvent stuff, no smell and it's a lot slower to skin over, so it reduces the haste with which you need to stick things on. None of the skirting or architrave anywhere has showed any signs of movement. I did leave the lower 100mm of every wall free from paint though (I had the walls painted before fitting the skirting and architrave). -
A few questions about vapour permeability etc
Jeremy Harris replied to Crofter's topic in General Construction Issues
Thinking about it a bit more, I think you may well be right, and, as we're only really interested in the worst case (as this is just a risk-reduction model), we could make do with 2D, and some data derived from some sample measurements of a few standard details. What would be useful would be to have a better idea between the weather and the temperature and humidity at various locations, like outside the base of a wall, inside the lower part of the any external cavity and at the sole plate to foundation junction. -
Towel rail timer
Jeremy Harris replied to Russell griffiths's topic in Electrics - Kitchen & Bathroom
The dual circuit system used to be the standard system when off peak rates were first introduced a long time ago, but persisted for a fair time in some areas. These usually have a time switch, separate off peak meter and separate switched circuit for all the off peak loads, often storage heaters and an immersion heater for hot water. When Economy Seven was introduced, things were simplified, so there was sometimes just a single circuit with a dual rate meter, with an in-built time switch. There could also be dual circuits with E7, but all electricity consumed on both circuits during the off-peak time is charged at the lower rate. Things then got more complex again in some areas, when controlled off-peak systems were introduced, along with schemes like the E10 dual off-peak period schemes (only available in Scotland and North Wales, I think). It very much depends where you live, as it seems Scotland has the widest variation of off-peak tariffs, AFAIK, whereas down here we get E7 or nothing, as far as off-peak tariffs are concerned (unless you're still on one of the legacy tariffs). -
This is not an easy post to write.....
Jeremy Harris replied to ToughButterCup's topic in General Self Build & DIY Discussion
Bloody hell, Ian, that's a shocker, especially given everything else you've had to deal with recently. I can very much sympathise, as the bastards at Santander did the same to us, right at the very last minute, as I related here: -
Towel rail timer
Jeremy Harris replied to Russell griffiths's topic in Electrics - Kitchen & Bathroom
Everything in the house that's turned on during the E7 period will be charged at the E7 rate, there's only a single circuit. There used to be two circuits for the older off-peak storage radiator type systems, where only the heating and hot water circuit was switched and charged at the off-peak rate, but I think that disappeared many years ago now. So, if your towel rails are turned on during the E7 period, the energy they use will be charged at the E7 rate. If they are turned on during the peak rate period the energy they use will be charged at the peak rate. If you only want them on during the E7 period then you need to fit timers that make sure they only come on during that period. -
A few questions about vapour permeability etc
Jeremy Harris replied to Crofter's topic in General Construction Issues
Just to add that there is a concern I have with the BS5250 and BS6229 model. I know that this steady/slowly varying state 2D model is widely accepted, and there isn't really anything better generally available, but it doesn't model dynamic changes. In the main, this doesn't matter, but when I looked at modelling the vapour transmission rates and rate of change of temperature of details like a SIPs wall to floor junction, it was clear that there was a condensation risk, even with a very good internal VCL. The risk came from external vapour movement during periods when external humidity and temperature were changing quite quickly, especially the local conditions close to the structure. A typical example would be a cold, still, night, with moisture condensing on the ground and external surfaces of the walls, followed by a still, sunny, morning that warmed up the ground and walls and created a zone of high humidity close to the structure. What can then happen is that, unless there is an adequate layer of insulation before the first component of the structure with limited vapour permeability, say the OSB skin and timber sole plate, the vapour concentration and temperature of the area around the sole plate can be such as to cause the water vapour to condense. If the sole plate region stays cool, as a consequence of heat conduction through the foundation (and this is a particular SIPs issue, as both skins need structural support) then there is a chance that there will not be enough sensible heat to cause the water to change phase and move back out as the external humidity drops. The challenge is to come up with a good dynamic model to allow this to be checked as quickly and easily as the existing, reasonably well proven models. I've not yet seen one, and it would need to be a full 3D model that allowed the actual house structure to be fully modelled. Not an easy thing to do, but perhaps something that needs to be looked at if using relatively new methods of construction where issues like this could arise. -
We had exactly this problem with our old house. We replaced all the old softwood windows and doors with uPVC. This included replacing a set of French windows, with fixed glazed panels either side, with a sliding patio door. The old French windows only had a very low threshold from inside the house, and the step outside down to the patio was only about 6 inches, maybe less, so was fine. The new sliding doors had a much higher threshold, much like that shown in the photo above. The supplier did warn about this when doing the survey, and suggested that we would need to add an additional low step to make the entrance safe. He offered to get this done, for a price, as a part of the installation, but I had half a dozen spare patio slabs and some bricks so added the additional step myself - just because the cost was just that of a bag or two of mortar. Our supplier was FENSA registered, and this allowed him to self-certify the whole installation for compliance with building regs. He was quite particular about this, making sure all the escape windows were the right size, etc, and I'm pretty sure he mentioned the issue of the step as being a requirement to make sure that the new installation was no worse than the previous situation, with regard to access. Because the work took about a week, I got the guys to do the patio door installation first, so I could crack on and lay a few bricks and slabs to make the new step that was required. That meant that by the Friday, when the boss came out to check the work over and ensure it was all up to scratch he was able to check the new step I'd laid as well. So, one option might be to check to see if the installer was FENSA registered, then check if the Part M compliance issue was mentioned when giving the quote. I suspect that if it wasn't, then the onus may well be on the supplier to put it right, but it would be an idea to check and see just what the FENSA self-certification scheme covers, first.
-
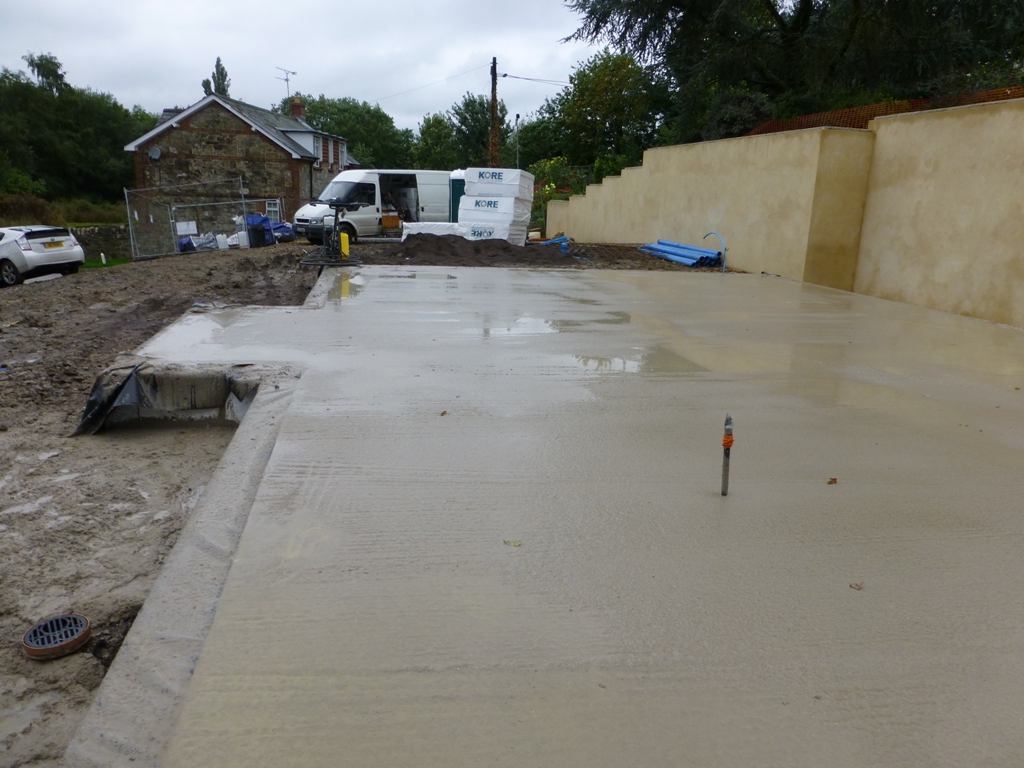
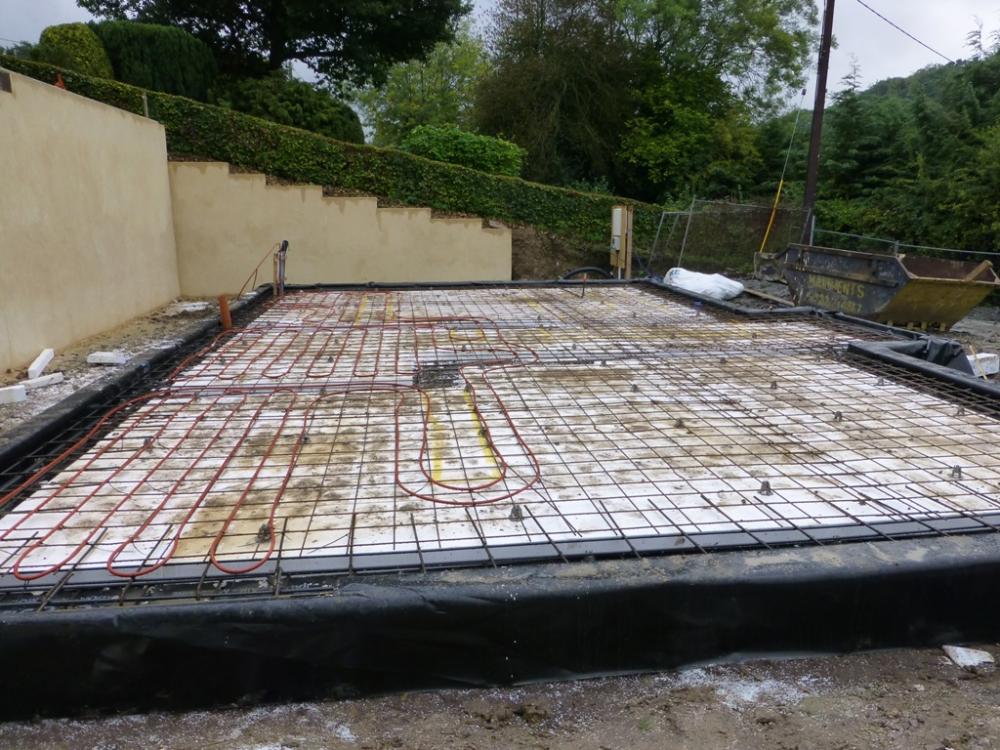
I only needed to get a length of 6mm² T&E to the island, plus a run of 2.5mm² T&E for a single socket, so I bent a length of 25mm plastic conduit and cable tied it to the reinforcing fabric, before the pour. Here are some photos, the yellow paint marks where kitchen units and the island will go and you can just make out the black conduit that comes up under the island right at the back of this photo (with a bit of red tape around the top): This photo was after the pour, but before the slab was power floated, and you can see the bit of conduit sticking up where the island will go:

-
I'm pretty sure the spec for ours was clean, washed, no fines, 18 - 35, which is not that easy to get here. I seem to remember we paid a fair bit for ours, as we weren't aware of the railway ballast option.
-
Depends what you're spraying, really. If it's emulsion, or water based paint, then just an ordinary dust mask will be fine, as there won't be any fumes and there's not a lot of dust created either. If you're spraying oil-based paint or lacquer then a respirator with an appropriate organic solvent cartridge would be a good idea. Even then I suspect the benefit is small, as the fumes won't be significantly different from applying the paint with a brush or roller. It's easy to think that painting with a spray gun is going to create a fog of paint and fumes, much as older, high pressure, low volume air spray guns used to create. Because there's no air with one of these guns, the only paint dust is going to be stuff that either doesn't hit the surface (usually because the gun isn't pointed at it) or that bounces back off the surface if the gun is too close, the pressure is set too high or the gun isn't perpendicular to the surface. The spray pattern on one of these airless spray guns is pretty tight, as long as the tip is clean and not worn (they do wear out after a few tens of hours of use). With practice you can paint without masking anything, just by using a larger version of a painter's george as a mask, held in your free hand. I found a scrap bit of thin plywood, with a bit of thin, but stiff, plastic sheet, with a nice straight edge, taped to one side worked well. You can just hold this into a corner and spray away, moving the mask as you move the gun. Decent gloves are essential, as there is a risk of paint getting blown into your skin if you accidentally point the gun at any unprotected part of the body. It's a bit of a compromise, as thick rubber gloves give good protection from the high pressure spray, but don't allow the dexterity needed. I ended up using the Port West A320 PU coated gloves. Not ideal, in terms of giving total protection, and they are porous on the rear surface, but they give good dexterity, and that's a greater safety benefit in my personal view.
-
Design for Racks for Spray Painting Skirtings
Jeremy Harris replied to Ferdinand's topic in Decorating
Bear in mind that there's nothing other than paint to blow dust with an airless gun. If the pressure is set right for the paint and tip size, then there is very little dust. What dust does get created seems to be from bounce-back, where the gun is too close to the surface, or the pressure is set too high. Some bounce back is inevitable, especially in corners, but you can paint right down to floor level without blowing up dust off the floor, because there's no air blowing around. When I painted the workshop walls, I just ran a soft broom around the concrete at the base of the walls (the concrete is going to be painted, anyway) and so the floor was still a bit dusty. It wasn't a problem at all, and other than me getting a bit of over-spray on the concrete no dust from the floor got blown anywhere. -
If you use a small spray tip, then lower the pump pressure a bit, you will easily be able to spray those grooves OK. My kit came with a 415 tip and a 315 tip, and I would suggest getting a 215 tip for the grooves (they are only about a fiver each). The first digit is half the width of the spray fan, in inches (so a 415 = 8" pattern, a 215 = 4" pattern, etc) and the second number is the size of the orifice, in thousands of an inch. I found that a 15 thou orifice seemed fine for pretty much everything. Follow @Nickfromwales advice to do all the grooves first, with a 215 or perhaps 315 tip, then change to a wider tip for the main coat. I doubt you'll want anything wider than a 415, I found that this was pretty quick, with a wide enough spray pattern to cover a wide area pretty quickly. In my case the speed of painting was set by how fast I could move around more than the capability of the spray gun; there is a knack to walking along keeping the gun at a constant distance to the wall and perpendicular to it.
-
I think that often planning consultants like to remind planners that they know all the relevant policies and just do this to try and emphasise that there are no real grounds for refusal within the laws and policies that apply. I didn't really see a need to do this, as I felt it was a bit like telling the planning officer that he/she didn't know their job, or understand the laws and policies that govern their decision making. Believe it or not, the planning system is supposed, in law, to operate on the principle that NO application for development shall be refused permission UNLESS it contravenes a planning law or policy. It never seems to work like this, and in my view the reverse seems true very often, that there is a presumption against development unless the applicant can find a loophole in the planning policies and guidance to allow it. Quite how we have allowed the system to get into this mess is beyond me, but it has now created entrenched attitudes on both sides; applicants assume that an application will be refused unless they fight hard to get it through, planners seem to assume that they will often be able to find a way to legitimately refuse an application if they, or more often consultees, like conservation officers and their ilk, just don't like the look of it.
- 39 replies
-
- 1
-

-
- planning permission
- planning statement
- (and 1 more)
-
If I don't ask this I will inevitably get it wrong...
Jeremy Harris replied to Crofter's topic in Rainwater, Guttering & SuDS
I have a feeling it's a dynamic thing, as the periods of over flow are only very short, barely more than a minute or so, and only in extremely heavy rain. It was raining so hard when it did it last week that I was disinclined from standing outside to try and make some more detailed observations................. -
1 or 2 extract points in kitchen?
Jeremy Harris replied to j_s's topic in Mechanical Ventilation with Heat Recovery (MVHR)
Our kitchen is around 4.5m x 4m and is fine with a single extract to the MVHR. On boost it flows way over the 13l/s required by the regs. -
Window cills gone green
Jeremy Harris replied to NIreland's topic in General Self Build & DIY Discussion
Copper sulphate solution works pretty well, and tends to be persistent enough on concrete to stop regrowth for a couple of years. Bleach or Jeyes fluid will kill it and clean it up, but the latter smells awful. I think the best approach would be to clean them up with diluted bleach and a scrubbing brush, then rinse them off and allow the concrete to dry out. Mix up a strong solution of copper sulphate (buy some copper sulphate pentahydrate crystals and gradually dissolve them in water until no more will dissolve). Brush or spray this solution on to the concrete, and don't worry about the bright blue colour, it isn't permanent. Allow the cills to dry out and the residual copper sulphate in the concrete will inhibit algae and moss from growing for a fair time. The rain will eventually wash the copper sulphate out of the concrete, maybe after two or three years, but just apply some more and you'll have protection again. This also works on concrete paths that are prone to going green, or concrete paving slabs. Use with caution on stone, though, as some types of porous natural stone may stain - test a hidden area first to be sure. You can buy copper sulphate crystals on ebay cheaply enough. -
If I don't ask this I will inevitably get it wrong...
Jeremy Harris replied to Crofter's topic in Rainwater, Guttering & SuDS
I'm not sure. The guttering at the front of our house has two downpipes (because it's divided by the projecting gable) and that at the back only has a single downpipe. Both overflow in heavy rain. However, the garage (roof is around 6.5m x 4.5m), whitch has a shallower 35 deg pitch gabled roof, with the same slates, is fine, the gutters never seem to overflow in heavy rain on that, so it may well be that the roof pitch plays as big a part in the rate at which rain flows off as the roof material. -
If I don't ask this I will inevitably get it wrong...
Jeremy Harris replied to Crofter's topic in Rainwater, Guttering & SuDS
I'm in the process of replacing all our house guttering with the deeper high flow stuff, as the standard half round stuff overflows in heavy rain. Last week the gutters were overflowing along their entire length, on both sides of the house, and I'm pretty sure it's down to the 45 deg pitch and the smooth surface of the slates and solar panels. Interestingly, when they overflow they do so very evenly and always on the gutter edge nearest the fascia. The odd thing is that the protection strip thing projects out just beyond that edge of the gutter, so the overflow water is coming under that and then over the gutter edge. Hopefully when I get the deep guttering up the problem will go away. -
Council Tax
Jeremy Harris replied to RichS's topic in Self Build VAT, Community Infrastructure Levy (CIL), S106 & Tax
The policy here is to try and issue a notice of intended completion as soon as possible after first fix, on the basis that the notice period is three months and all houses should be habitable three months after first fix. This may work OK for the big developers, but some of us self-builders take years to build a house, so the "rule" that our council apply is bonkers. To be fair, the first people in the council I dealt with were the ones that deal with commercial developments, and they have staff who go around sites after hours specifically to check on which houses on the development look as if first fix is completed, to trigger the completion notice process. The very rude woman that I initially spoke to probably thought I was a commercial developer, rather than a self builder, and even had my name down incorrectly on the paperwork, she had me listed as the previous owner of the plot. Her manager was very different, not exactly understanding, and did try to defend her staff having a right of entry without notice to restricted access areas of a building site (with no PPE, as it happens, either). Her attitude did change when she checked the files they held and couldn't find a reference to a water connection from Wessex Water. As soon as I explained we didn't have one (I didn't mention the borehole............) she did change her stance noticeably, asking me to let her know when we had the water connected. I did complain about the unauthorised access, but frankly was fobbed off three times by the council abusing their own complaints procedure, and I couldn't be bothered to continue chasing it up, as they were threatening me with being a vexatious correspondent. It was a good way to be sure that I would delay until the last possible moment getting the house to meet the legal definition of a rateable heriditament though, just to deny them a load of council tax, on a matter of principle. -
Council Tax
Jeremy Harris replied to RichS's topic in Self Build VAT, Community Infrastructure Levy (CIL), S106 & Tax
I think your problem is that the property was already on the valuation list, and so had already been deemed an hereditament. Not sure how you can undo this after the event, but I seem to remember reading somewhere that there might be a way to have a property taken off the list. The snag then is that it would need to be revalued by the VOA on completion, and they may well put a higher value on it that it has now.