


Temp
-
Posts
10675 -
Joined
-
Last visited
-
Days Won
43
Everything posted by Temp
-
Or batten out the wall and plasterboard it so the cistern of a close coupled isn't so far back. Depends if space is an issue.
-
You can do quite a lot with these things.. https://www.screwfix.com/p/floplast-push-fit-0-90-double-socket-adjustable-bend-grey-110mm/50087?tc=IB6&ds_kid=92700055281954505&ds_rl=1249404&gclid=CjwKCAjw0a-SBhBkEiwApljU0t-qsr3tiN-7qcG3DW4B2jFrQX_x3F5pg8VwMy2nQXiWjlhzEgNiYRoCY_oQAvD_BwE&gclsrc=aw.ds
-
Long time ago I made a spreadsheet to work out if there was a standard spacing for the bolts, waste and flush pipe. The result was that most are a common spacing BUT I did find two or three that were different and wouldn't fit. I'm not on my PC at the moment but will try and find it later.
-
Rear extension under PD part 2
Temp replied to Cameron78's topic in House Extensions & Conservatories
I think you are correct. The half width of original house restriction only applies when it extends beyond a side wall. Which it would do if it joins the previous extension. So leaving a gap should be OK. However I recall reading that planners have argued over the size the gap needs to be. It might be worth applying for a certificate of lawfulness to establish that an extension with gap would be Permitted Development and make a planning application for full width extehsion without a gap at the same time. If they reject it appeal on the grounds that overall the difference is insignificant. -
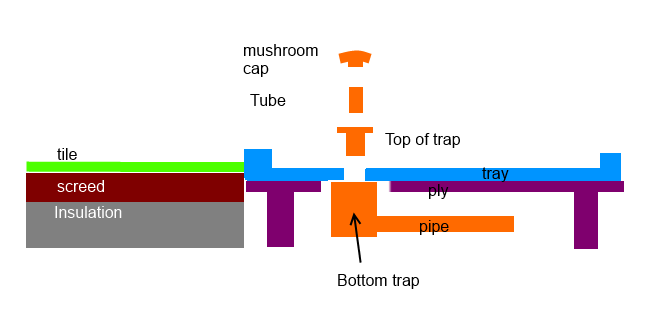
Yes to solvent weld. I find using plenty of adhesive gives you a few extra seconds to ensure everything is aligned. I also put depth and alignment marks on the pipe with a sharpie during the dry run. You should switch to uv stable pipe where it's exposed or perhaps sleeve it between wall and stack. Our stacks are all internal so not an issue for us. You can certainly run pipe in screed but a 50mm pipe in 75mm screed might be prone to causing the screed to crack. If the trap can't move you also need to be much more accurate with positioning it vertically and horizontally. If it can move slightly it can be pulled up to the underside of they tray if you are a few mm out. I think putting the trap and pipe in screed is more appropriate for a tiled tray or wet room where you can screed to the level of the trap.
-
DIY tiler here.. I'm currently using BAL adhesive which is readily available at Topps Tiles. I purchased about half what the calculators said and when I've used that I'll have a better idea how many more I'll need to go pick up. So far their calculator seems to match what I'm using. Im using the Flex Fibre Plus with a 10mm trowel. That would normally give a 3-4 mm bed but with this adhesive you are also meant to butter the back of the tiles as well which increases the bed to more like 5mm. They seem to have a calculator for each different adhesive. This is the one for the adhesive I'm using. https://www.bal-adhesives.com/products/flex-fibre-plus/#consumptioncalculator It says for 26sqm and a 5mm bed I will need 9 bags or 7 bags for a 4mm bed. I suspect I going to need 8. I'm laying 600x400x15mm limestone and discovering some is only 13mm thick which is causing a few issues. I choose this adhesive because I work really slow and it stays workable for longer than most. 8 bags is 160kg or about the weight of 2 people so not too heavy for the car.
-
Rear extension under permitted development
Temp replied to philnic's topic in House Extensions & Conservatories
Deleted. -
Call it a run of about 4.3m. I think the pipe run can be entirely in the insulation.. If the 50mm pipe is just below the screed at the trap end then there is 100mm of fall available within the 150mm insulation. A 100mm fall over 4.3m works out at 23mm/m. That's within the 18-90mm recommended. 23mm/m is 1 in 43. What does @Nickfromwales think? If that's OK your tray could sit on top of the screed or even be recessed into it by about 20mm depending on the trap used. If possible use large radius/swept bends where it goes around corners and support it regularly on to try and keep the fall uniform.
-
Party wall agreement excavation for services
Temp replied to Maria's topic in Party Wall & Property Legal Issues
There is an easy way and a hard way to comply with the Act... Easy way.. You give the neighbour drawings and a notification letter and they agree the work and sign a letter in reply. Template letters are in the Guide to the Party Wall Act booklet online. Hard way... They refuse to agree to the works and you have to appoint surveyors to draw up a Party Wall Act Agreement. Worse case you end up paying for your surveyor, their surveyor and a third to settle any disputes if the two surveyors can't agree. The neighbours are not required to use the same surveyor so this could mean paying for as many as four surveyors. That would be reasonable in my opinion. If it was me I would want to know how far away from my garage you were digging and how deep. If you have a contractor available ask him if he can help you make a drawings. -
Party wall agreement excavation for services
Temp replied to Maria's topic in Party Wall & Property Legal Issues
If digging within 3m and deeper than the foundations of the garages then yes the Party Wall Act applies. There is no penalty for not complying with the act but if they claimed your work caused damage and it all ended up in court the judge woukd take a dim view and might be more inclined to award against you. I'm not sure if moling pipes past the garages would count as excavation for the purpose of the Act but I think it would be very hard for them to claim that caused damage. -
I think ASHP have a minimum power output. So you need to be sure the minimum load is higher than that or a) the temperature of the whole system must rise or b) it must cycle.. https://mcscertified.com/wp-content/uploads/2020/07/Heat-Pump-Guide.pdf Page 35..
-
Many LED are around 90-120 Lumens per watt so I agree you will need 10W or more. Can you change the socket in the light fitting?
-
Valiant Ecotech Plus 637 - Error F76
Temp replied to steveoelliott's topic in Boilers & Hot Water Tanks
Google found.. https://pricethisplease.co.uk/vaillant-76-error/#:~:text=The F76 error code means,by a high temperature reading. Has a bunch of suggestions for potential causes. Perhaps start by bleding any air in the system and reseting the pressure? You might also consider getting the system drained and refilled with corrosion inhibitor like Fernox F1 if it hasnt been done in years. -
We are British but lived in Belgium for 10+ years. There is quite a difference between the rules in the EU and the UK. Here in the UK the Planning Department at the local Council frequently have strong views on where you can build and what you can build. I would say the biggest difference is in the UK they normally like the size and style of a new house to be similar to existing houses in the area. The more uniform existing houses are the harder it is to get permission to build something radically different. In many areas the difficulty of finding suitable land means that you sometimes have to find land first, then see what the Planning Department will allow you to build on it. If you decide on the design of the house first you may find it near impossible to find land on which the planners will allow you to build it. You also need to know that obtaining Permission to build a house on land greatly increases its value. In some parts the difficulty of getting permission can increase the value of land by a factor of 10 or 20. So a field worth £20,000 might be worth £200,000 or £400,000 once permission has been obtained. Beware this means there are scammers that will try to sell you part of a field by telling you it will be easy to get permission. Always use your own solicitor never one recommended by the seller. If in any doubt post a question on the forum.
-
BAL adhesives/Tops Tiles have some advice.. https://www.toppstiles.co.uk/knowledge-base/how-to-tile-onto-a-screed-with-cracking Looks like they recommend DURABASE CI++ matting for cracks upto 3mm. £16 per sqm plus adhesive.
-
We have a wall between two bathrooms. Its got 100mm studs and both sides clad with 12mm Hardi Backer board (heavier then normal plasterboard). One side is also covered with 15mm limestone tiles. The stud work is filled with sound insulation but the studs bypass this. Right now you can hear someone talking to themselves in the shower through the wall. I'm thinking you definitely want staggered studs each supporting just one side with sound insulation woven between.
-
Extension over weep holes - What to do?
Temp replied to warmington_ash's topic in House Extensions & Conservatories
Sometimes you can get away without one if the bricks are particularly waterproof or its not an exposed location or if you render the wall. I hadn't realized how porus bricks can be until a few years ago. I filled a bucket with bricks in then filled all the space with water. They fizzed and popped and soaked up all the water. -
Use some sort of decoupling mat. eg Ditra and a flexible adhesive (but you were probably using flexible anyway). Still a slight risk but not sure what choice you have.
-
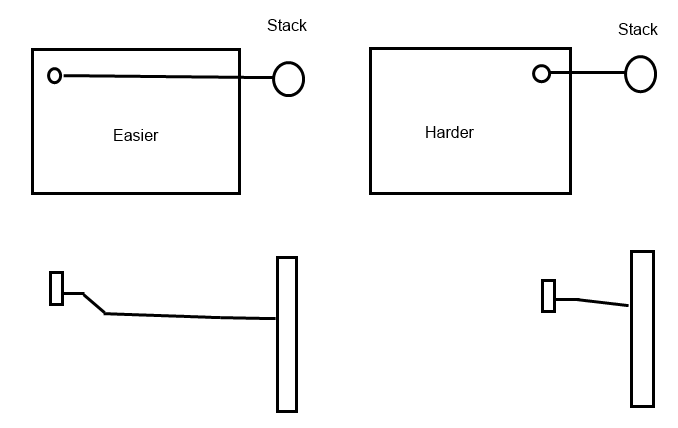
Sometimes life is easier if the waste has to cross the tray to get to the stack... The longer pipe will flex more easily to make minor corrections to the alignment with the tray and space for the pipe to dip below the screed.
-
This is a drawing I did for a similar previous question I think..
-
I would just trim it flush.
-
At one point I considered using a multi coloured roof tile and hiding a comment about the planners in some far Eastern language/script. Apparently the Chinese character Fu (福) means happiness, blessing, and good fortune!
-
Fills me with horror but if you are determined... This "red board" really needs to be some form of "basement tanking system" suitable for both concrete and wood (and bridging a joint between concrete and wood). Get one with a long warranty. It looks like after fitting the "red board" you plan to do another concrete pour outside that? Why do that outer concrete pour? It strikes me it will just trap water. Wouldn't it be better just to back fill with free draining material and a drain pipe? I would see what the basement tanking company recommend.
-
It's possible it needs 55C hot water to achieve the maximum possible 48C output temperature under certain conditions. For example if the hot and cold water pressures aren't equal? Or if the cold is very cold in winter? If you never want it set that hot then perhaps lower flow temperatures still work. I suppose someone should remind you about legionaries disease.
-
The drain can be moved a certain amount within the footprint of the tray. Perhaps just not right where the pipe enters. I fitted a very shallow tray then had a change of mind and decided to fit a deeper one as we like high flow rate showers. The waste moved from the corner to the middle of one side. Just had to rip out the supporting frame and rebuild it to suit the new waste position. I can imagine it isn't always that easy.


