


Temp
-
Posts
10690 -
Joined
-
Last visited
-
Days Won
43
Everything posted by Temp
-
I think ASHP have a minimum power output. So you need to be sure the minimum load is higher than that or a) the temperature of the whole system must rise or b) it must cycle.. https://mcscertified.com/wp-content/uploads/2020/07/Heat-Pump-Guide.pdf Page 35..
-
Many LED are around 90-120 Lumens per watt so I agree you will need 10W or more. Can you change the socket in the light fitting?
-
Valiant Ecotech Plus 637 - Error F76
Temp replied to steveoelliott's topic in Boilers & Hot Water Tanks
Google found.. https://pricethisplease.co.uk/vaillant-76-error/#:~:text=The F76 error code means,by a high temperature reading. Has a bunch of suggestions for potential causes. Perhaps start by bleding any air in the system and reseting the pressure? You might also consider getting the system drained and refilled with corrosion inhibitor like Fernox F1 if it hasnt been done in years. -
We are British but lived in Belgium for 10+ years. There is quite a difference between the rules in the EU and the UK. Here in the UK the Planning Department at the local Council frequently have strong views on where you can build and what you can build. I would say the biggest difference is in the UK they normally like the size and style of a new house to be similar to existing houses in the area. The more uniform existing houses are the harder it is to get permission to build something radically different. In many areas the difficulty of finding suitable land means that you sometimes have to find land first, then see what the Planning Department will allow you to build on it. If you decide on the design of the house first you may find it near impossible to find land on which the planners will allow you to build it. You also need to know that obtaining Permission to build a house on land greatly increases its value. In some parts the difficulty of getting permission can increase the value of land by a factor of 10 or 20. So a field worth £20,000 might be worth £200,000 or £400,000 once permission has been obtained. Beware this means there are scammers that will try to sell you part of a field by telling you it will be easy to get permission. Always use your own solicitor never one recommended by the seller. If in any doubt post a question on the forum.
-
BAL adhesives/Tops Tiles have some advice.. https://www.toppstiles.co.uk/knowledge-base/how-to-tile-onto-a-screed-with-cracking Looks like they recommend DURABASE CI++ matting for cracks upto 3mm. £16 per sqm plus adhesive.
-
We have a wall between two bathrooms. Its got 100mm studs and both sides clad with 12mm Hardi Backer board (heavier then normal plasterboard). One side is also covered with 15mm limestone tiles. The stud work is filled with sound insulation but the studs bypass this. Right now you can hear someone talking to themselves in the shower through the wall. I'm thinking you definitely want staggered studs each supporting just one side with sound insulation woven between.
-
Extension over weep holes - What to do?
Temp replied to warmington_ash's topic in House Extensions & Conservatories
Sometimes you can get away without one if the bricks are particularly waterproof or its not an exposed location or if you render the wall. I hadn't realized how porus bricks can be until a few years ago. I filled a bucket with bricks in then filled all the space with water. They fizzed and popped and soaked up all the water. -
Use some sort of decoupling mat. eg Ditra and a flexible adhesive (but you were probably using flexible anyway). Still a slight risk but not sure what choice you have.
-
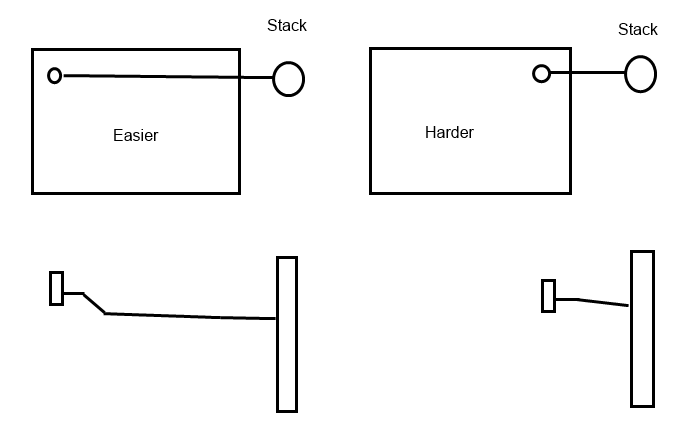
Sometimes life is easier if the waste has to cross the tray to get to the stack... The longer pipe will flex more easily to make minor corrections to the alignment with the tray and space for the pipe to dip below the screed.
-
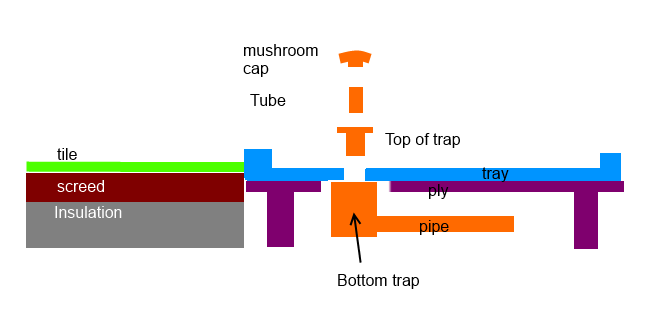
This is a drawing I did for a similar previous question I think..
-
I would just trim it flush.
-
At one point I considered using a multi coloured roof tile and hiding a comment about the planners in some far Eastern language/script. Apparently the Chinese character Fu (福) means happiness, blessing, and good fortune!
-
Fills me with horror but if you are determined... This "red board" really needs to be some form of "basement tanking system" suitable for both concrete and wood (and bridging a joint between concrete and wood). Get one with a long warranty. It looks like after fitting the "red board" you plan to do another concrete pour outside that? Why do that outer concrete pour? It strikes me it will just trap water. Wouldn't it be better just to back fill with free draining material and a drain pipe? I would see what the basement tanking company recommend.
-
It's possible it needs 55C hot water to achieve the maximum possible 48C output temperature under certain conditions. For example if the hot and cold water pressures aren't equal? Or if the cold is very cold in winter? If you never want it set that hot then perhaps lower flow temperatures still work. I suppose someone should remind you about legionaries disease.
-
The drain can be moved a certain amount within the footprint of the tray. Perhaps just not right where the pipe enters. I fitted a very shallow tray then had a change of mind and decided to fit a deeper one as we like high flow rate showers. The waste moved from the corner to the middle of one side. Just had to rip out the supporting frame and rebuild it to suit the new waste position. I can imagine it isn't always that easy.
-
+1 Many BCO want one open vent on the furthest stack from the sewer in the road and everything else can be AAV. Got a feeling the rules actually say you can have less than one open vent per house on an estate/group of houses but plan for the above.
-
Volume works out at 0.05 cubic meters per post. The calculator here.. https://everydaycalculation.com/concrete.php Says for each post/0.05m^3 you need... Cement 16kg Sand 0.02 m^3 Stone 0.04 m^3 It can also work out how many 50kg bags you need or double up if you have 25kg bags.
-
Rather than cutting 150mm sheets.. it might be possible to fit layers of say 25 or 50mm above and below the pipe. Eg make up the 150mm depth near the pipe from thinner sheets so they bridge over or under it. Lot depends on the heights and fall. I normally use 12mm WBP which seems to clear the trap connector. The latest mcalpine is super shallow and has a solvent weld connector to reduce depth further (eg no nut). But only had 25mm water seal. You don't want the outlet pipe too low as that frequently reduces the fall available for the waste pipe. It might actually be easier to build the stud wall next to the tray rather than install tray afterwards. Some trays are v.heavy and easier if you can have one person each side.
-
The project might take 2-3 months but from what you say I think most of the noise will be demolishing the wall. I suspect that will come down faster than you think. Perhaps think about how rubble will be removed. Try avoiding throwing bricks into a metal barrow or skip. No builders radio. Otherwise what @Fazsaid. You have a right to make reasonable/unavoidable noise during building work during working hours. If they complain to the council the EHO may visit to check you aren't being unreasonable by starting work too early or too late at night. You could consider writing to the EHO stating that you are going to be doing some building work and stress you hope to minimise noise but some will be unavoidable. Ask for advice on what they consider reasonable working hours. Then if he rocks up following a complaint you can say you took his advice. If feeling really brave you could ask the neighbour if they have a particularly important regular video call you could try and avoid or if they would actually prefer you to work at weekends as well to speed up the project. This might open a can of worms though.
-
PS McAlpine make several traps of this type. They have various heights but the shallower ones have lower flow rates. I think one also has a shallower water seal so more prone to siphoning and evaporation. I think the one I linked to is the best one.
-
This is what we did on a beam and block floor. Same would work on yours I think. Basically you run the waste pipe in the insulation. UFH in the screed. Tray can be recessed or above the screed. Use a "top access, top fitting" waste trap. These have a part that goes through the tray and screws into the part below the tray. Trap can be removed for cleaning from above through the drain hole. No need for access below. Example.. https://mcalpineplumbing.com/traps/shower-traps-accessories/st90cp10-hpc-2-90mm-hi-flow-shower-trap I would use a 50mm/2" waste pipe not 40mm. Procedure.. Lay concrete slab. Construct timber support platform where tray will go at the right height. We used pressure treated frame with WBP on top. WBP has hole for trap in it. If the tray is being recessed into the screed you need shuttering as well. This can be temporarily screwd to the support frame. Trap and pipe should be installed before adding the WPB top to the frame. Support the waste and pipe but don't fix it down. It's best if it can move a bit (including vertically so it can be pulled up to the hottom of the tray later). The frame can be partly filled with insulation if you like. Temporarily position tray to check location of trap. Test waste for leaks. Lay insulation, ,membrane, UFH and screed. Remove any shuttering when set. To fit tray.. Mortar on WPB Lower tray into place, check level Fit sealer around waste, screw top of waste through tray into trap. Tile down to top of tray. Etc If you recess the tray best leave the top about 5mm above the floor tiles. That way the door seal doesn't rub on the tiles. If you need a drawing let me know.
-
We just used regular sand cement screed. UFH and stone. Only issue we had was.. Didn't know we needed expansion joints at doorways and had a crack. Basically the screed in each room shrank towards its own centre. The crack propagated through the stone above because we tiled through the doorway. An expansion gap (aka deliberately straight crack) and careful placement of grout lines lover it would have avoided the problem. No cracks anywhere else.
-
What about this bloody monstrosity!
Temp replied to SuperJohnG's topic in Rainwater, Guttering & SuDS
Pipe through the floor to the other side of the house. -
These were the only two in stock at Farnel... Rocker.. 4A https://uk.farnell.com/marquardt/01834-3402-00/rocker-switch-dpdt-4a-250vac-black/dp/2835993 Toggle.. 5A but too expensive? https://uk.farnell.com/idec/lb1t-33t6/toggle-switch-dpdt-5a-250vac-panel/dp/2833320 RS Components has these. I think (ON) in brackets means momentary. So ON-(ON) is a double throw spring loaded one way. Think that does what you want but best double check. https://uk.rs-online.com/web/p/toggle-switches/8200508 https://uk.rs-online.com/web/p/toggle-switches/8200532 Check Dimensions? Not much on Amazon.. Toggle but too modern? https://www.amazon.co.uk/Jgzwlkj-Switches-R13-402I-Momentary-3Position/dp/B08NX6PF6G/ref=sr_1_196?crid=CHIN3N3KIS97&keywords=Toggle+switch+momentary+black&qid=1648077715&sprefix=toggle+switch+momentary+black%2Caps%2C70&sr=8-196 Push button https://www.amazon.co.uk/Momentary-Switch-Black-Button-Toggle/dp/B08J47938J 12V only?
-
What's the difference between a retractive and a momentary switch? Is it like a three position switch sprung loaded to the centre? In the past I've purchased blank plates and made combinations that don't eexist. Things like speaker terminals or combination of TV, Network and Speaker. Perhaps try Farnel for a panel mounted switch?


