Leaderboard
Popular Content
Showing content with the highest reputation on 10/29/24 in all areas
-
Hi. We built a three story ICF house with basement, but not on this scale. (I'm a civil / environmental engineer, not structural, I'm sure our resident expert will comment in due course) With the scale and design of this structure you might beyond the realms of normal building methods, and builders for sure. The best construction method will be determined largely by the structural requirements. Your basement walls will likely have to be shattered reinforced concrete as ICF blocks aren't ideal and most won't be wide enough, you are looking at 400mm+ thick walls here. I'm sure there are ICF projects similar to scale, you'd need to dig in to it. Same for you floor decks. These will be commercial building / car park type affairs at ~250mm thick with a bit of chunky steel holding them up. These kind of things, plus the excavation requirements, massively change the game, and costs. There is little economy of scale when you jump from a residential brick n block to a pseudonym commercial type construction. Not going to comment too much on the design, but things like you have an unfeasible amount of glass (apart from being uncomfortable, unlikely you'll pass SAP assessment), and cars are waterproof and don't mind the cold Cost wise, you say you are prepared, I'm assuming you know this will cost about £4m? It's never too late to change a design. A full redesign could cost you less than 5% of the construction cost, but could save you 30% or more. I'd speak to an SE before you go anywhere, and another look at the design. You could shave off a £million and not lose any rooms /functionality for sure.5 points
-
Rather than converting the building, I probably should have applied to demolish and build something better, but the planning process was so painful, with all the conflicting advice I was given, I couldn’t face it: I wanted to see my money turn into something. I found it all very stressful, I’m not sure if it would/will be if I ever do it again but hopefully it would/will be easier with the benefit of experience.3 points
-
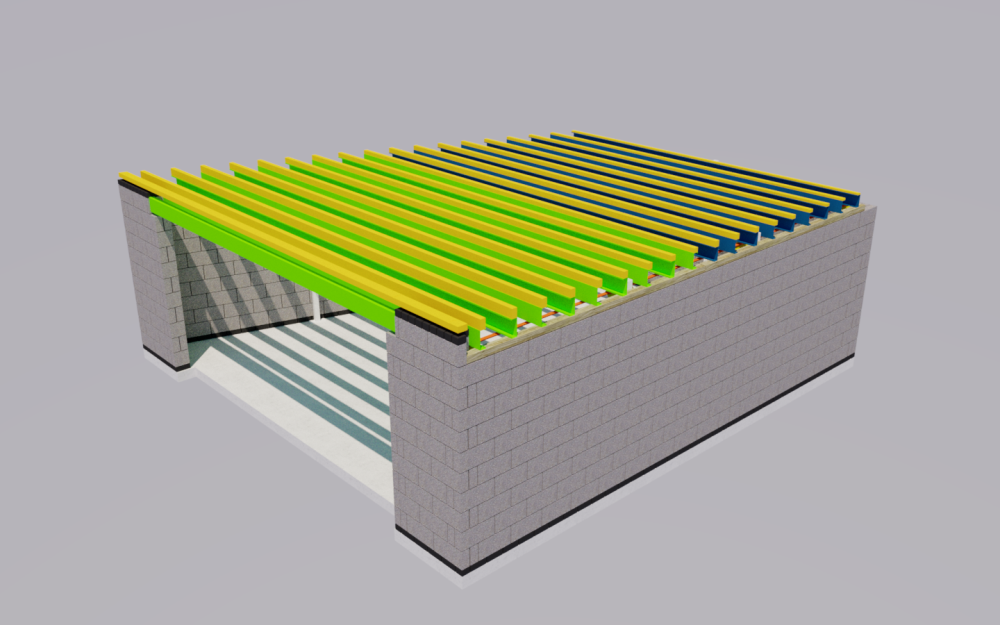
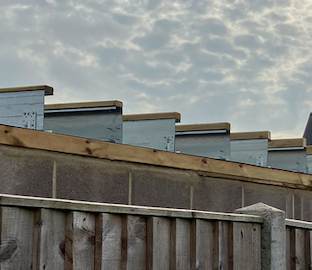
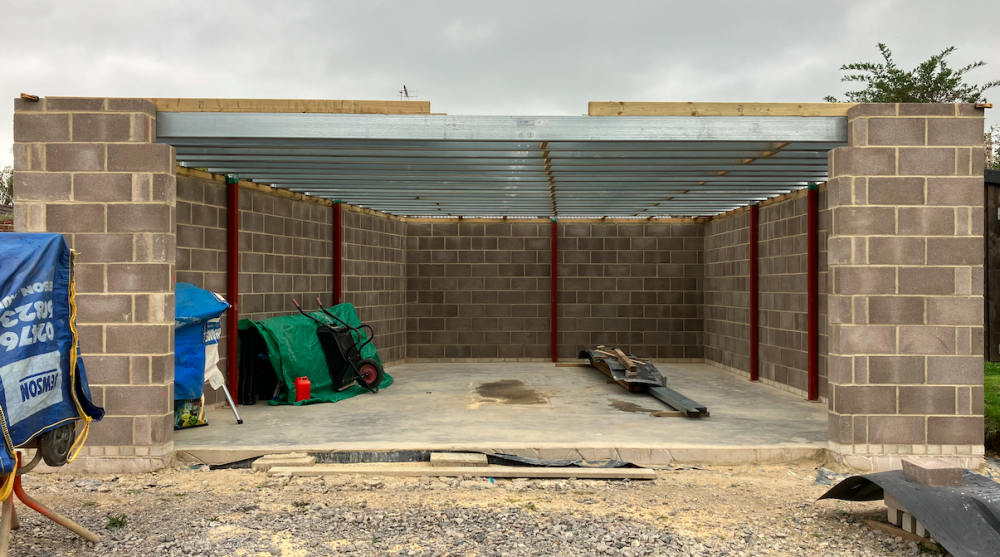
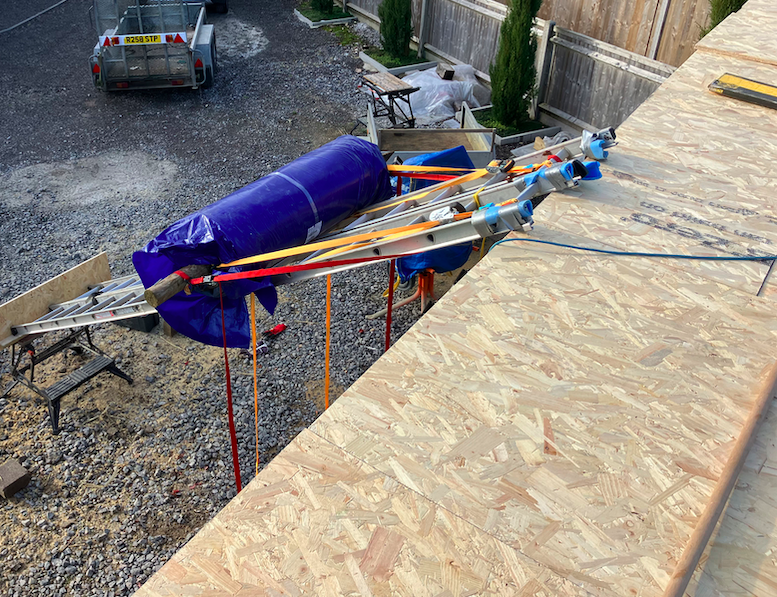
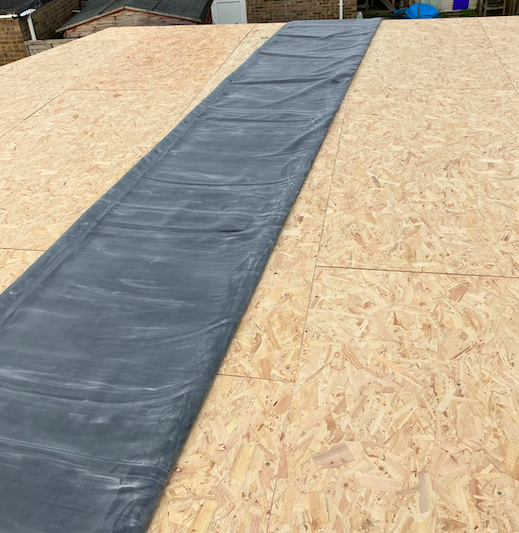
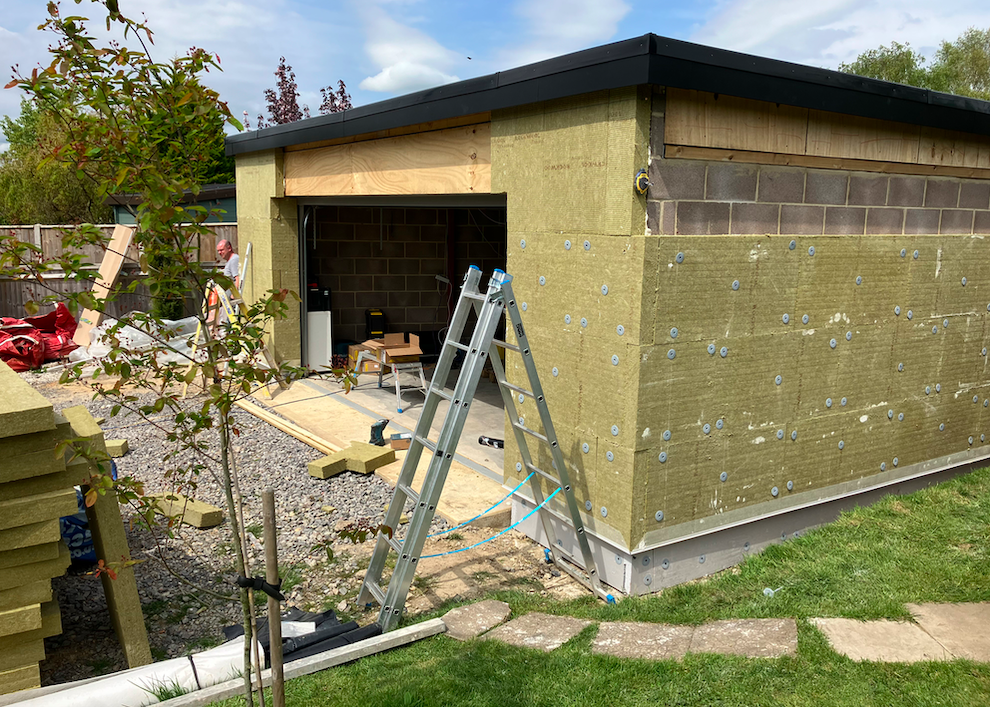
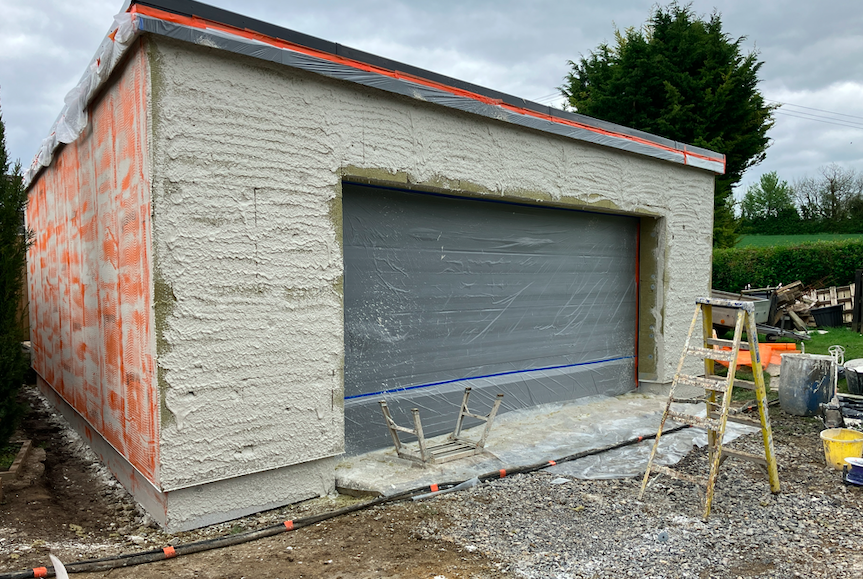
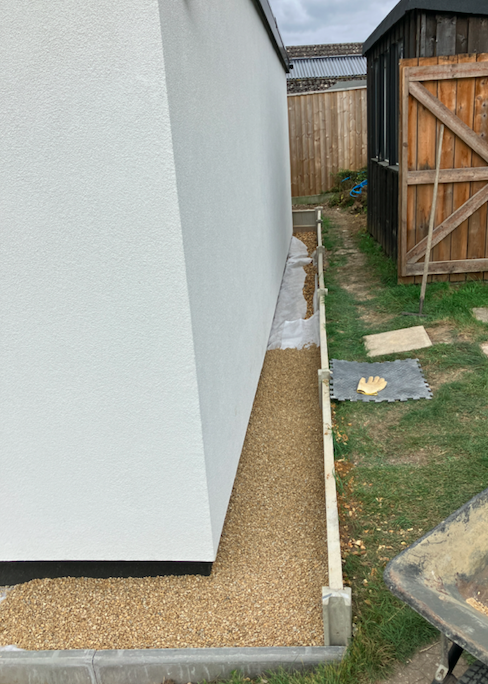
A total of 19 'C' Section steel joists were used for the roof. We had two different sizes, the taller ones were for the larger span at the front of the garage and the smaller ones at the rear. The joist were mounted side to side and the 'fall' of the flat roof was to be front to back of the trapezoidal garage. To get the required fall I needed firring strips on top of each joist but with the fall being front to back and the firing going side to side each firring would be a different size. I couldn't get a saw mill to cut me 19 firings that were all completely different sizes so I did it with a skill saw. I also put a slight taper on top of each firring so that the roof boards would sit on the whole of the firring. That all seemed to work a treat and was less tedious than it sounds. The rest of the roof was standard warm roof build up: OSB - Vapour Barrier - 120mm PIR -OSB - EPDM. Getting 56m2 of EPDM up on the roof proved tricky. It arrived rolled up and I thought it might actually roll. Not a bit of it, it was reluctant to go anywhere. In the end we placed a couple of ladders against the roof and then used ratchet straps to hoist it up bit by bit. Once the EPDM was up on the roof the rest was a breeze, really easy to work with and stick down. For the external wall insulation, we started with a 300mm high band of XPS around the base, sat on top of the foam glass. Above that was Rockwool for the breathability and fire resistance. The XPS was finished in black render and the Rockwool in white render, we then filled the trench around the garage with gravel leaving 150mm of the rendered XPS as a plinth. I couldn't quite get my head around how the finished rendered rock wool would feel, it's quite amazing, solid as a, well, rock. You'd never guess it was rock wool under the render.3 points
-
I would have checked the window cil heights and window sizes more carefully. There are several where I can’t easily reach the handle to open them as they are set too high in the wall. I would also have spent more time on site making sure the workers felt accountable. Looking back, they took the piss quite a bit (late starts and early finishes most days), and as neither I nor the building company owner/site manager were on site much this behaviour continued for too long. I’m now resentful of all of the things they didn’t do which there was plenty of time for them to have done, that I’m having to do myself.2 points
-
Believe it or not it all works, like via a remote key fob! Of course there's peripheral bits to finish off... Need to come up with a plan for doing the sloping bit of the drive now. How deep a sub base, sub base of what, how to edge by the road, sleepers on edge up the sides maybe? Then block pave, concrete, tarmac etc etc?2 points
-
Is your garden room masonry, and does the room wall itself form the retaining wall? If not, and you have effectively retained 'the end of a swimming pool' inside which you have built the garden room then, according to my LA, the measurement is from the flat bottom of that 'swimming pool'. If you have properly built in to the ground, and the ground abuts the building then IMO the height is measured from that 'highest' level. In my case I retained a bank, and built a TF shed from the bottom of the retaining wall. Appr 1.2m was retained, so 1.8m to eaves height, therefore PD with ridge ht of 4m. "No", said the LA! "It's more than 2.5m above GL at the eaves, so it's not PD". So it has Planning Permission.2 points
-
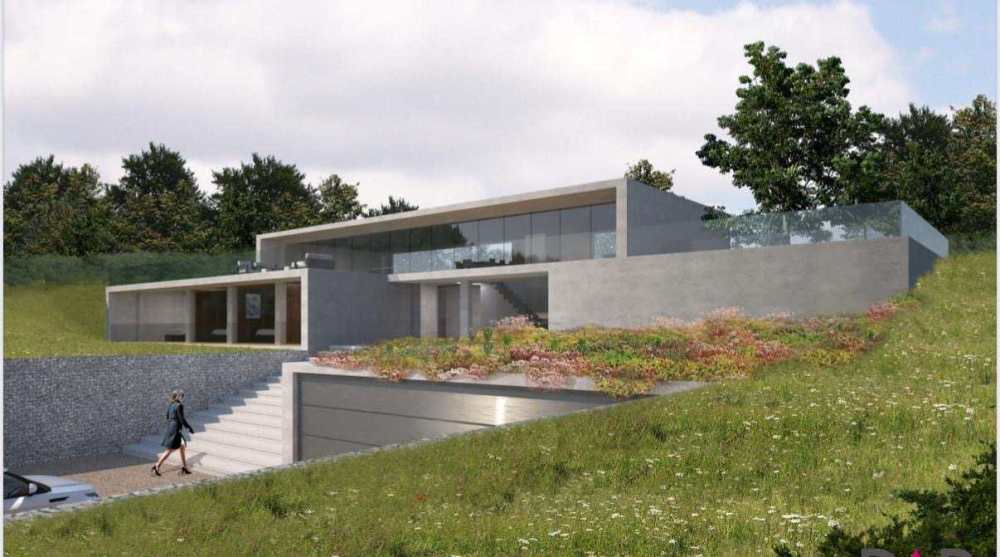
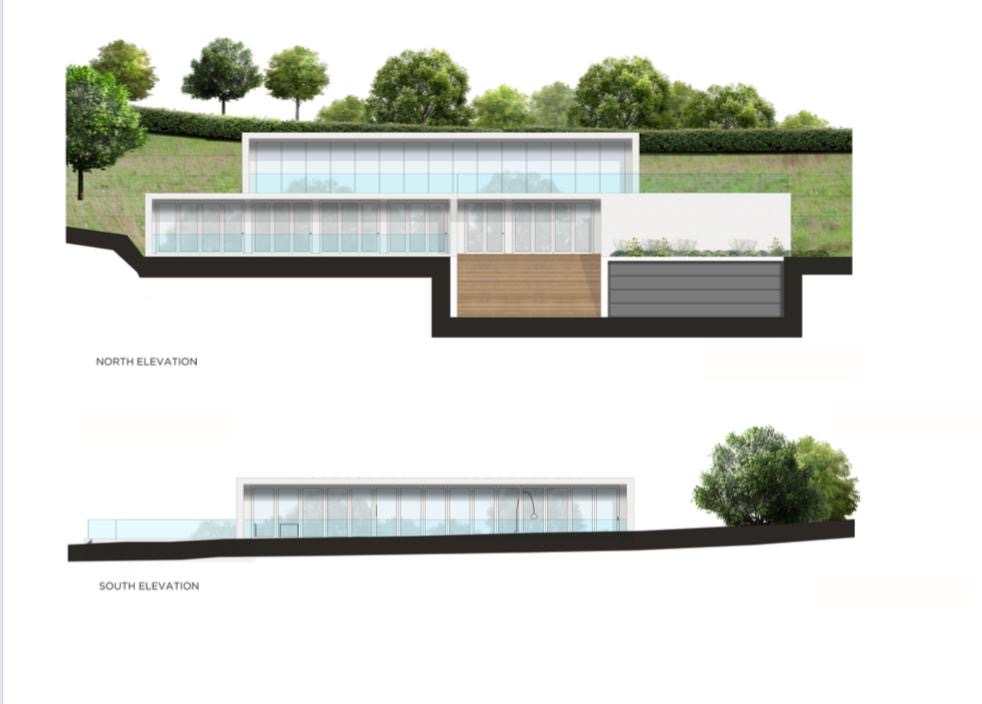
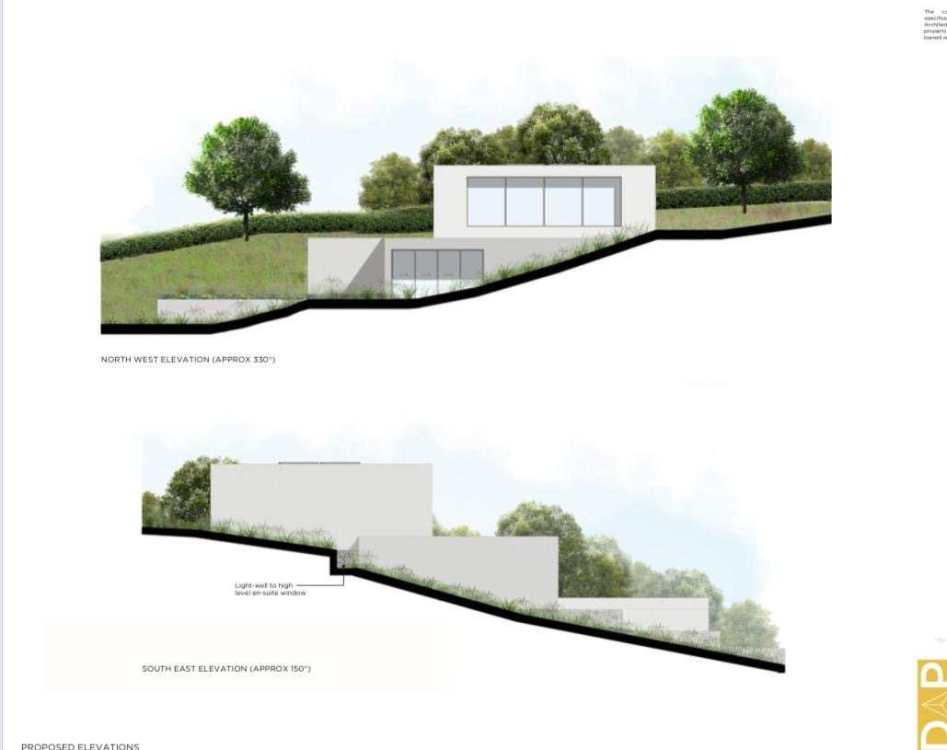
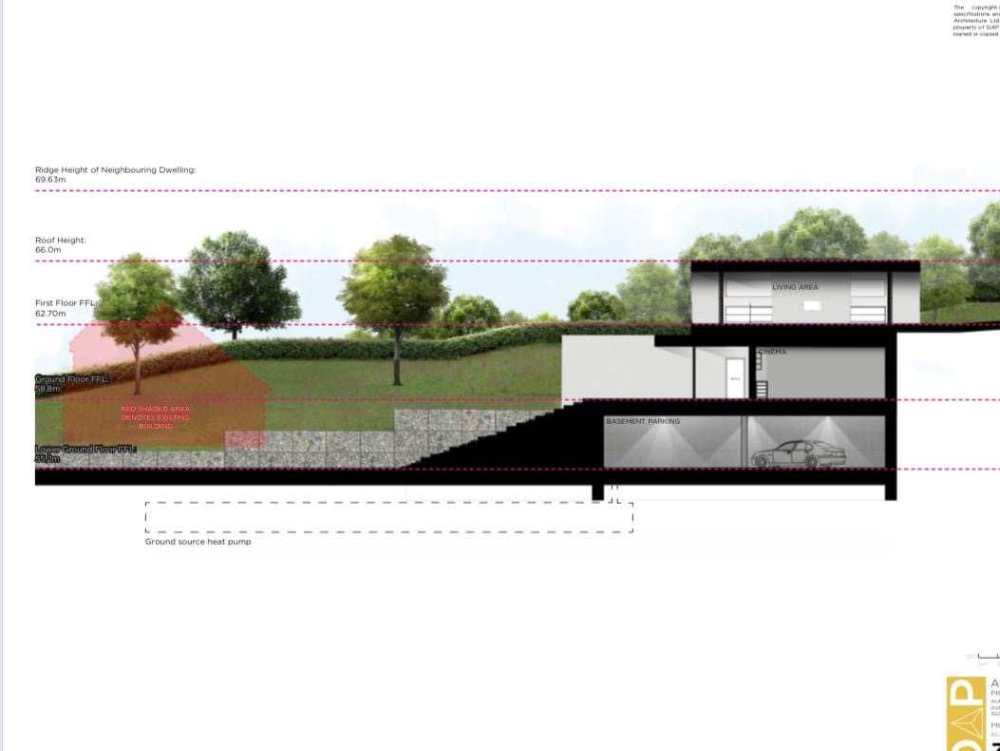
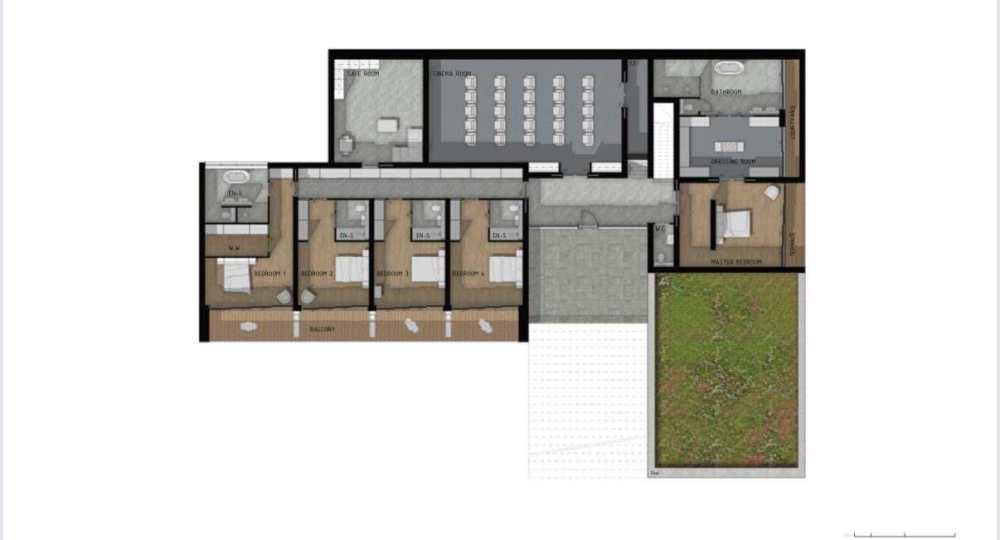
Hey guys 👋🏻 I am based in Hertfordshire and seeking mentors, new friends and friendly advice from any kind and willing soul with experience. I bought a bungalow with the benefit of planning permission and certificate of lawful development to build a dream home. Our self build has been designed as a reinforced concrete frame superstructure. With a subterranean basement and 1st floor. I am reluctant to go back to the drawing board with a new design since a lot of design work has been completed and anyway, why mess with greatness? But... the astronomical estimated cost of the rc frame (the 1 quote I have received) has me seeking out quotes and suggestions on solutions to my 'budget' issue- there are of course many ways to skin a cat- I'm just unaware of the methods... We have inherited some cgis from the seller: which you can see on my instagram: @londoner2landowner (trying to maintain a level of location privacy on the www)... I have drawings which I own copyright of, the architectural drawings and the structural engineers drawings- in read only format at the moment (need to figure who owns the copyrights and agree a price 🙃) but may not be necessary to purchase if we go with a MMC. I still need to hire an M and E contractor and and an interior designer. Which I have decided to do right from the start so that everything can be properly pre-planned into the drawings. I have sent enquiries to around 15 ICF contractors and concrete framework contractors combined in respect of the super structure. Question 1: what contractors and method of concrete build did you use for your superstructure and why? Recommendations would be greatly appreciated. I watched an episode this morning where the self builders used pre cast concrete framework and what looks like a pre cast concrete basement. I have spoken today to a wonderful gentlemen at Glatthaar Keller. Question 2: Can someone please tell me what will be the most economical way to build my house? ICF, pre cast framework or rc frame concrete pour? Am I missing any other method? I don't know where to start so I've subscribed to build it mag 😆, since September 24 I've been to the Home building and renovation show, then I went to grand designs live, decorex international and the NSBRC 😥 I've booked to go on 2 courses at the NSBRC in February and March 35. I'll be honest: ChatGPT is a great help: I have asked questions like: 'Write me an invitation to tender on my new build project' And 'List the packages that need to be priced on a new build house project' And 'What are the pros and cons of sips and ICF frame systems' Try it 😆 I've probably left the most important details out of this post and waffled on. Please if you have any similar projects and are welcoming site visits, I'll bring coffee on my way to site 😀 I'm determined to make this a worthwhile learning experience and I will always welcome others to my site: I just need a plan first. For now, the bungalow is rented on a company let which gives me sometime to figure this all out. If you got this far- thanks for reading. Kr, J1 point
-
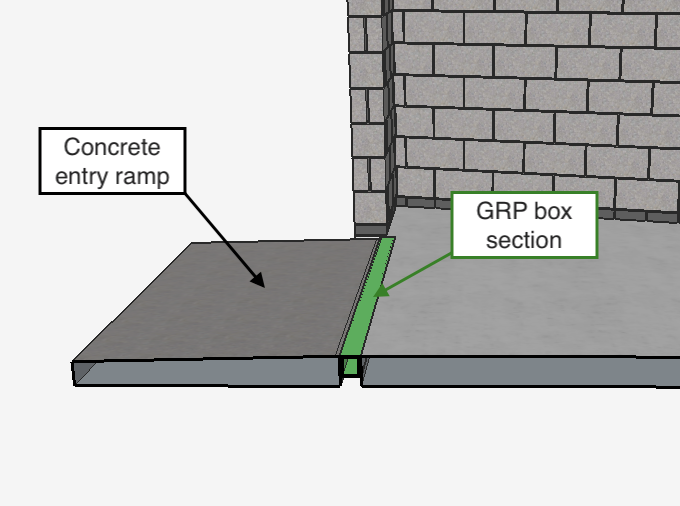
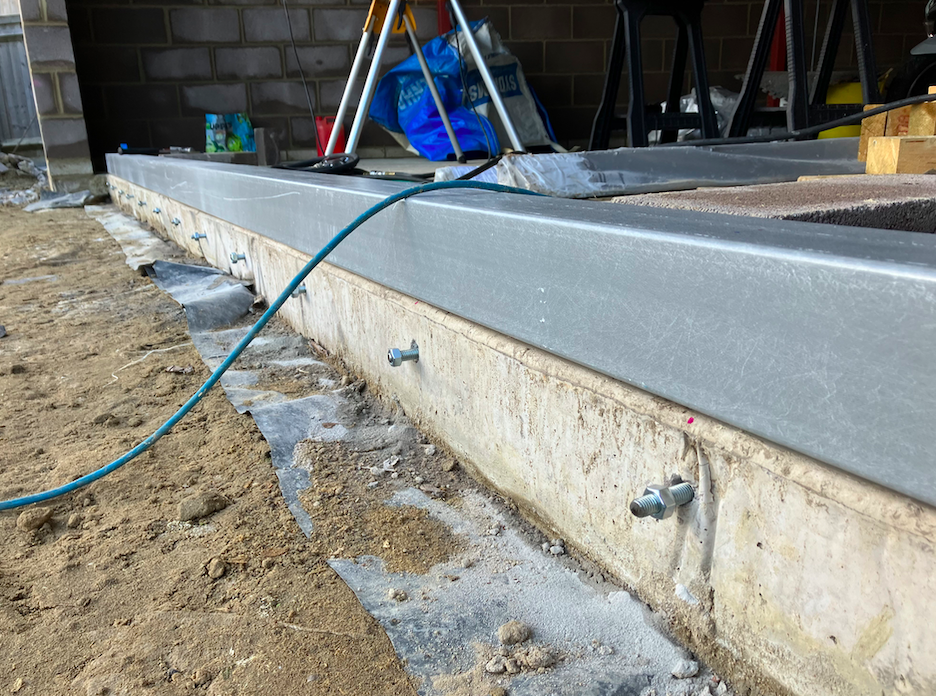
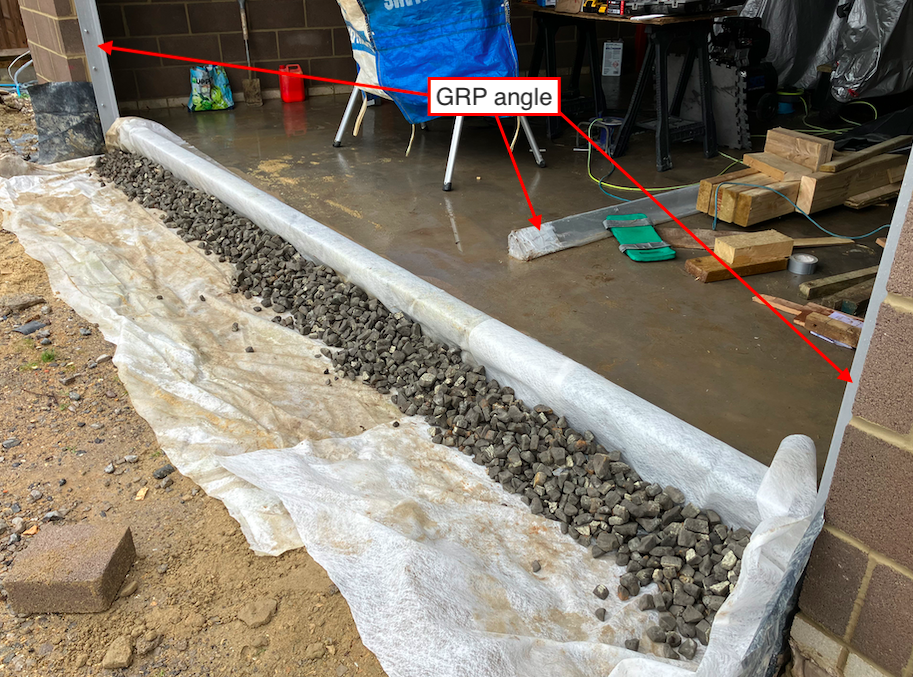
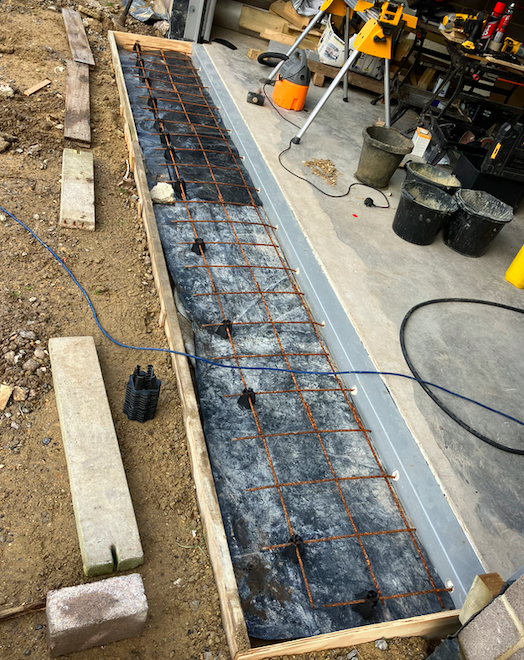
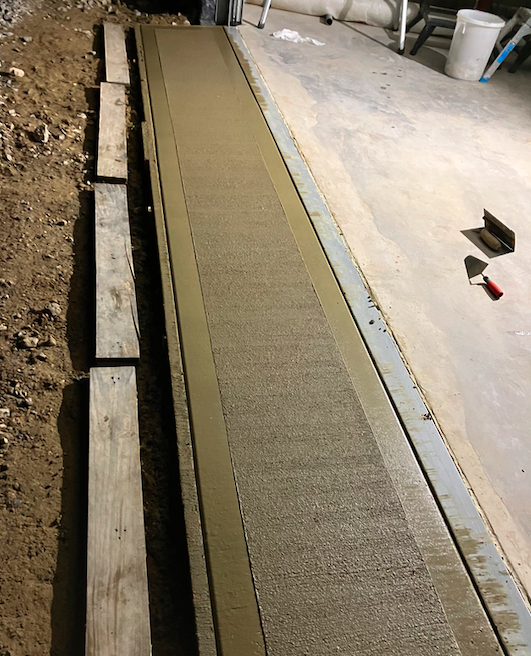
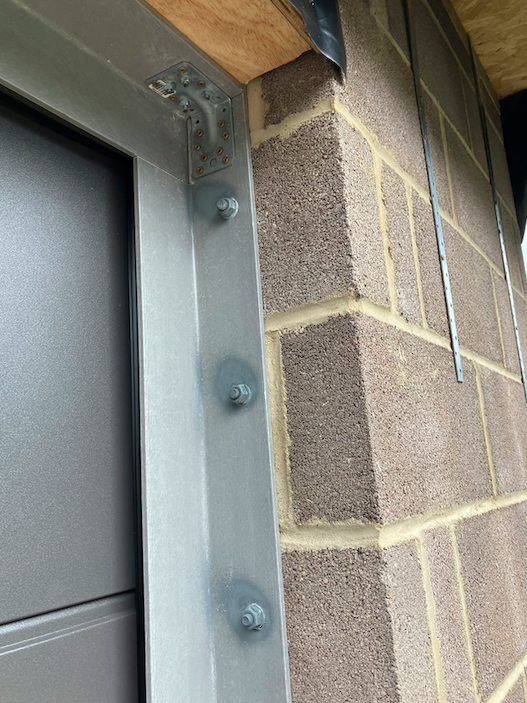
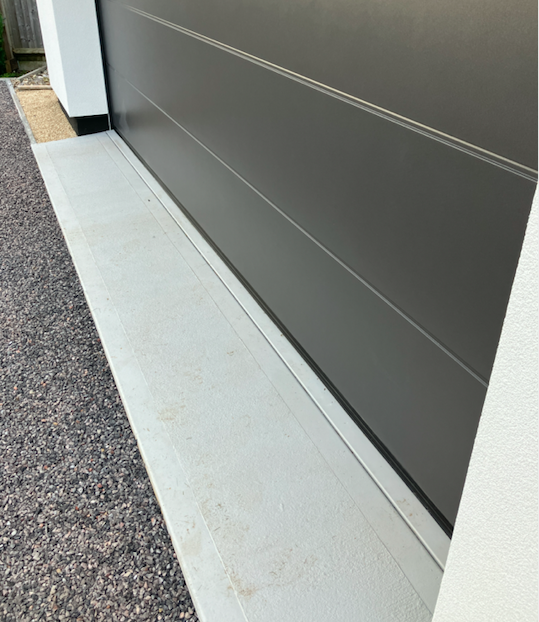
After going to the effort and expense of insulating the slab, walls, roof and door I had to do something about the transition from outside to inside the garage. Garage slabs normally extend beyond the door creating a big thermal bridge that I didn't want. What I decided to do was use some GRP box section to thermally break the inside from the outside. It's early days but it seems to work well and it hasn't fallen to pieces with cars driving over it yet, which is a bonus. I may be on to a winner. To start with I resin anchored some threaded bar into the slab and then bolted the GRP to the slab. I then rammed some left over foam glass into the gap underneath the box section for added support. I also used GRP angle as a 'stop' for the EWI on the returns to the door and the door head. I'd filled the box section with left over insulation and finished it off with expanding foam, added some left over mesh, shuttered it and made myself a concrete entry ramp. A quick lick of paint finished it off and it all largely seemed to go to plan as well. Here's hoping it stands the test of time.1 point
-
1 point
-
Like @Jilly I would have pushed more for knock down and rebuild, all this bloody underpinning and rebar etc. etc. is getting me down. I totted up the other day and so far I've spent circa 30k on 'preliminaries', I could have got a good consultant and better architect for that and pushed for rebuild for that money. Instead we've paid out multiple times to 'fix' issues which have needed SE / planning / architect multiple times. And I don't think it's over yet.1 point
-
We have hired a different architect and have submitted a pre app. Nothing is set in stone at this moment in time.1 point
-
Our previous house was a barn conversion. Huge thing with the lowest ceiling at 3m. The conservation officer absolutely insisted that the windows could only go where the holes in the walls were. Consequently most of the window cills, other than the living room, were all above head height 😂 The windows were enormous and gave you a good view of the sky. I bought my wife a step up ladder (as a joke) for her birthday so she could see out of them. 😂 I also fitted a camera on the external south elevation attached to a screen in the kitchen so we could see out into the paddock to keep an eye on our really old horses and chickens!1 point
-
Thank you- I have really enjoyed reading your blog posts this morning- you have probably noticed 😂😂 I have spoken with a few ICF contractors this week who are confident they could build design or work with me to alter it. I have no firms decisions and I'm still trying to formulate a plan and navigate. We have submitted a pre app- and await the response from the planners and will take it from there.1 point
-
You are not dim, it’s legal speak only understood by solicitors etc, just ask for an explanation (in plain English).1 point
-
1 point
-
The initial post indicates that it already has planning so I'm sure these things would have been considered already?1 point
-
Go smaller / sub divide Did I really need to convert most of the barns and end up with 7 large bedrooms all with ensuite bathrooms, and a lounge that measured 44ft x 22ft and 14ft high. There we're only 3 of us rattling around in it. Should have gone for smaller units and a recording studio in the lounge area1 point
-
In this instance I would say GL (a) as this is the highest point adjacent to your new structure1 point
-
Great plot Bad design. I would hire in another architect and do a design that works for your family. Art Deco on the side of a hill could look spectacular. You may go through a couple of architects until you get one that really understands what is needed on the site that fit's your, "must have list and it would be nice if" Unfortunately some architects just don't get it and see it. There are plenty of good ones to choose from in the area that are RIBA affiliated. Even when you get one that works with you; you may have too reign them back in as they can get carried away.1 point
-
Build a smaller house. 315m2 gross (250m2 habitable space) is too big for a family of 4. I'm currently working from home in one of our basement rooms.... 50m2 with a desk and some shelves 🙄1 point
-
I feel like going underground is always easier with planning as no one can see it, so people care a lot less. I recently had a look at walk on glazing as there's a few areas I thought it would work really well - I then looked at the pricing and decided actually I could do without!1 point
-
Don’t be disheartened by all these comments! It’s looking possible that the design was done to capture the imagination to gain planning permission and a significant uplift in land value, but might not have been intended to be built as there was no budget. Self build is often a once in a lifetime thing, so most of us have a personal wish list which is modified by costs or family constraints. People very often submit new plans after purchase, safe in the knowledge that something will be passed. You enter the game of planning permission with more certainty. I laughed to read the comment about not living in a static, but it’s not unheard of for Grand Designers to go bust/divorce etc so it’s important to be realistic. Many of us on BH have saved £1000’s with the advice and pointers given.1 point
-
@marshian thanks for the info. I understand what you mean and realise in PDHW is looks to minimise the down time of the CH so gives it max power to reheat the water quicker, but I thought there'd be an option like John suggested to change this. What flow temperature does it provide in PDHW mode, is it 70-80? What do you set the cylinder hysteresis to so that it doesn't cycle too much when showering, or do you operate it based on time only?1 point
-
Welcome! Wowzser! LA hills or Bond Villian mansion, I love it. The scale and complexity of it are going to drive up the cost. More or less everything you see about costs here will not apply sadly. I was guessing £4million initially but on refelection I don't think I'm even close. Maybe £6m. Professional fees alone are lightly to be well into 6 figures. It'll be a commercial contractor for the project as it's too expansive for a domestic builder. However you're unlightly to get commercial discounts as it's a one off project and will require much better asthetic detailing than the equivilant warehouse or block of apartments. Don't be suprised if most refuse to quote or else come back very very expensive. On the practicalities I would say ICF alone is unlightly to be the best solution, or prefabricated concrete. In LA or the 1960's it would have been an easier build as the thermal considerations would be far reduced. Steel frame and poured on site floors and roofs would have been the order of the day running right through from inside to outsde. However I think if you want a really warm and durable house there's going to have to be serious consideration given to how effectively completely decouple the external conctrete shell from the house interior whilst still retaining the continious feel on a monolithic design. I'm going to scratch my selfbuilder chin and think about it for a moment I think! Good luck!.1 point
-
1 point
-
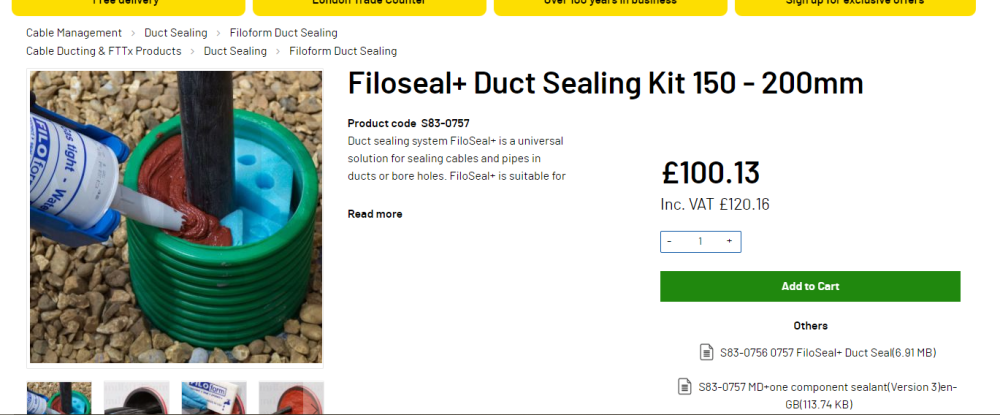
Haven't used it but this looks like it might allow for >1 pipe/cable per hole and be re-penetrable https://www.filoform.co.uk/filoseal-re-enterable-duct-sealing-system1 point
-
There’s space then there’s useable space. Our last house was twice as big as the one we built. The one we built feels bigger in part because we use all of it. I reckon we used 60% of the previous house at a push. There was one bathroom I never used once and was only in it a handful of times. I know someone that lived in a huge house. Not as big as this but still huge and a bit sprawling. It was terrific but he said they spent their life walking miles everyday as it was badly laid out until they eventually remodelled part of it to create a better living space with kitchen living room and a couple of bedrooms and an office. Almost a house within a house. All done to a high standard. He is a network consultant and placed activity monitors all round the house to track how they used it. They found they rarely used the rest of the house. To add it’s a stunning looking thing and more power to you for considering it. Our plot is on a similar slope and for a brief while we contemplated doing the same on a much smaller scale but similar idea.1 point
-
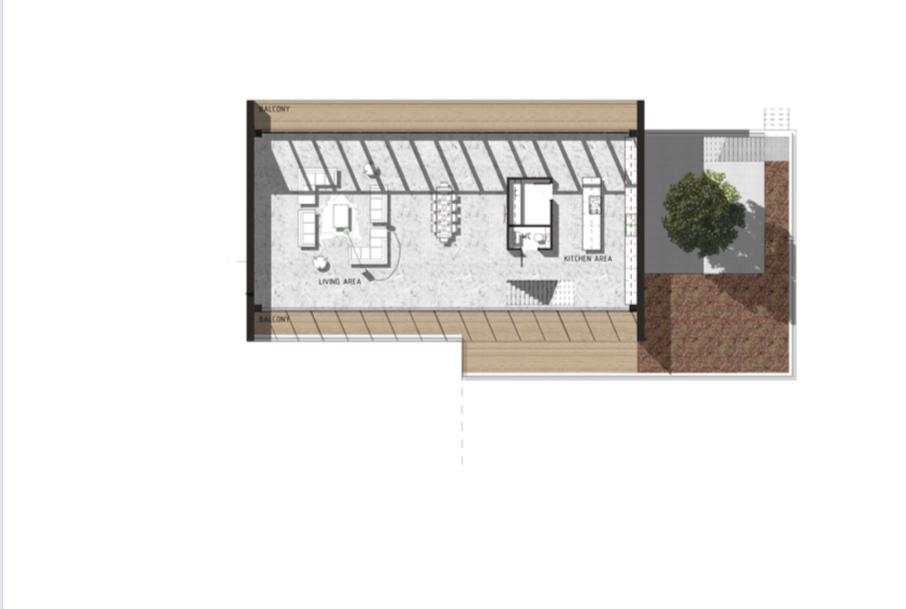
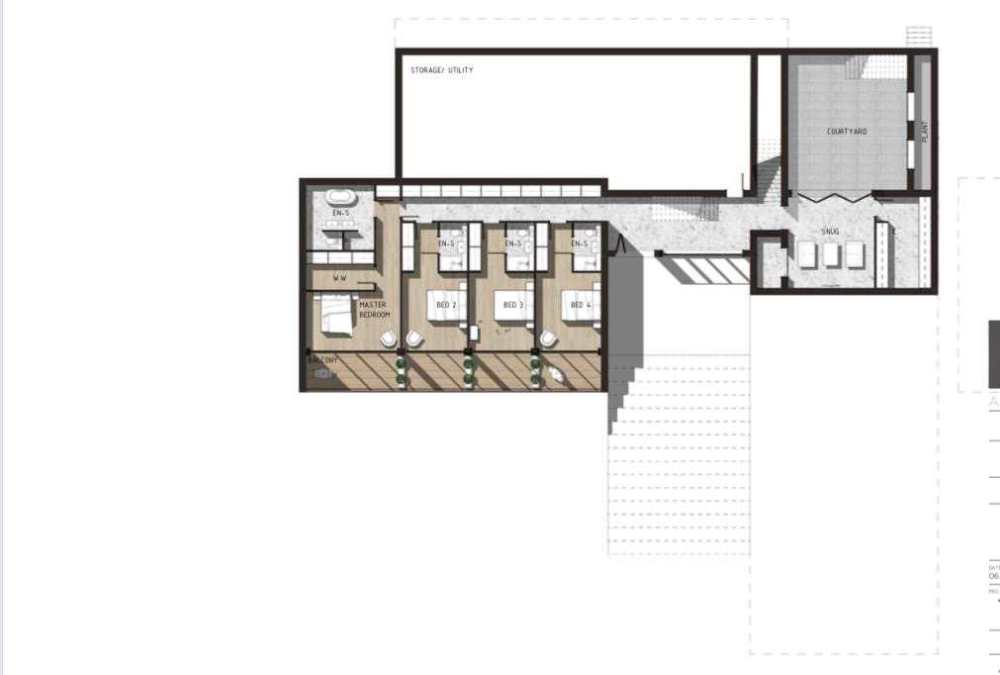
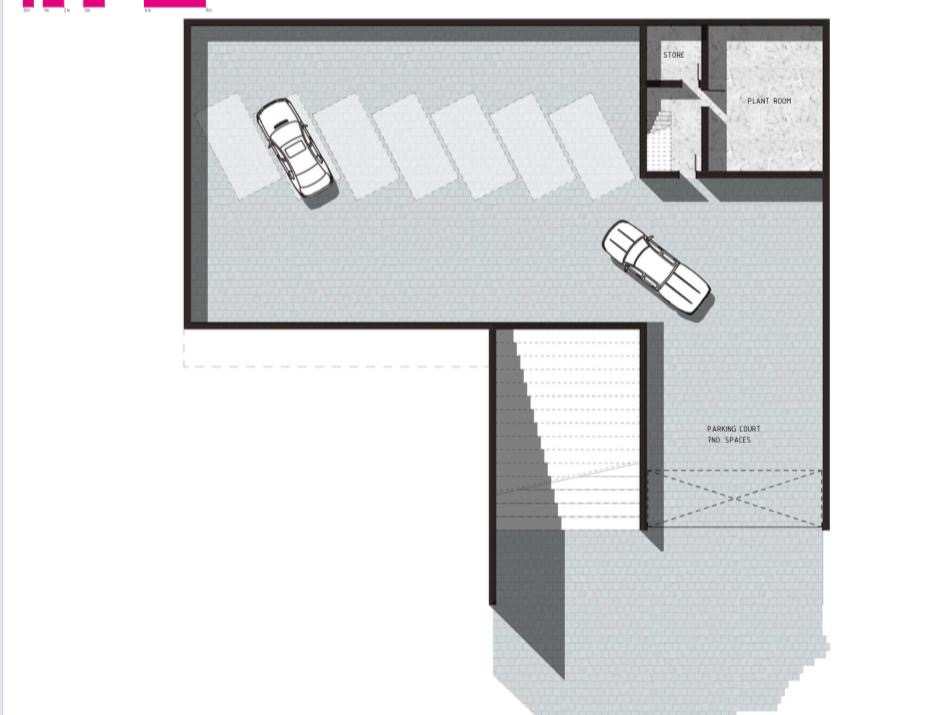
Welcome! Another Hertfordshire based self-builder here. I did a deep retrofit in Harpenden in the pandemic, and been helping with M&E and home controls for a number of friends on self builds since then - happy to have a chat on local options for this if you're nearby, feel free to DM me. If I am reading this correctly, from the elevations this is a 3 story build but includes plans for 4 floors - It looks like the first and third floor plans in the series are alternative options for the "middle" bedroom floor: one with w cavernous placeholder "storage util" room, and the other with it built out as a cinema and safe room. So in fact it's a slightly more modest 4-5 bed house?1 point
-
I think there is. I had always believed so and a quick search suggests that my mind is not addled in that view! Ye-e-e-e-s. My preference for retrofit is to choose methods which do not rely on a VCL (which in the methods I use limits how low you can get the U value). Theoretically if you use moisture-buffering materials and have a guaranteed excellent air-flow then you can go for lower U values and deficiencies in the VCL are less of an issue (though you still want an air barrier).1 point
-
This looks fantastic and I'm going to go the opposite direction and say why not build the space if you can afford to. Whether you need 13k+ sq feet is debatable but I'm all for space. The other points already raised also ring true - if you can afford to build a house of this house, then its unlikely you'll be living in a static caravan for 2 years especially with kids in tow. Also, I would want a specialist concrete builder doing the E2E project management on this rather than risk taking parts of it on yourself. Sounds like a lot of structural elements to consider and be done right. Following the thread with interest.1 point
-
Why is it so big? Do you really need so many bedrooms? You could half the size (which would still be enormous) with a similar design. There’s a £2 million saving. Unless you really need a commercial sized building I’d seriously rethink the design especially as you are already baulking at some early estimates.1 point
-
On such a large project you could consider doing it in two stages so that you could move in earlier (rather than the caravan option!)? Loads to think about, but with lots of land you have plenty of options with aesthetics, screening planting etc.1 point
-
Nice looking place but not convinced by a number of things that seem strange. Loads of bedrooms (2 floors worth) and limited living space in comparison. Not all those people housed in the bedrooms should want to crouch up on a couple of sofas. But sorry that size build everything will all be astronomical. 1200m² is just huge it's 6x bigger than our very roomy 3 bed house. Hope you proof read and facts everything, so you don't make yourself look a foolish. Chat bots make a good looking document that may or not be factually correct.1 point
-
I have just ordered the Tricel Novo 10 gravity outlet. It won’t be operational until next year. Looks to be a good treatment plant.1 point
-
We are in a similar position on a hill over looking a Loch, we have loads of glass also. We use UFH in cooling mode and it effective in knocking the thermal gains down a bit, but importantly reduces the recovery time to normal temps, quite quickly. It not Aircon, but effective enough, for no cost.1 point
-
Gone old school and found a way forward to cap the boilers output - can't stop it going to 80 deg or trying to shove 20kW at the Hot Water circuit with the Demand Box parameters but I'll update that in my Viessmann Boiler thread.1 point
-
Because bounce is noticeable and should show up in thorough surveys. The solution may not be too drastic.. select from... 1. Insert additional joists. 2. Screw timbers to the sides 3. Screw plywood to the sides 4. Build floor and/or ceiling in plywood. I did 4, where I had very limited depth to match an ancient skinny, bouncy floor. Plywood on top with lots of fixings satisfied bco and performed well. (it transforms the joists into T beams with very strong top flanges.)1 point
-
to round this slight off topic element off - london loop fitted to return from coil - was a right pain to make and fit because of space constraints in the airing cupboard but I normally see 0.66 deg tank loss per hour (it used to be 1 deg per hour before I reconfigured the zone valves) 1900 hrs yesterday - heated the tank to 50 deg - at 8am this morning it had dropped to 46 deg (no major consumption of HW during that time) 0.3 deg loss per hour is an improvement The biggest obvious sign was that flow and return pipes at the boiler were identical - normally I see a higher return pipe temp before I even start space heating I don’t need one on the top of the coil because the zone valve is right next to the coil inlet. I might have to put one on the HW tank outlet now as that’s probably another driver for the losses.1 point
-
It isn't a surveyor, but a Structural Engineer. Look for a local practice and phone them.1 point
-
I really feel for you. I have no experience of rectifying the issue, but it occurs to me that if you use double threaded screws (that is a secondary thread at the screw head as well as the normal shank), then that might go someway to alleviating the problem in the meantime. Good luck with your search.1 point
-
I asked Viessmann technical help if I could 1. set the max flow temp lower for HW (when demand box was being used) their response was no - it’s preset to max flow temp 2. Use the max output setting on the boiler (range rate effectively) to reduce the kW being used when doing HW (using the demand box) their response was no - this would only impact the CH side the demand box calls for max boiler output and only modulates down when the return temps mean it has too. As a result I shall do what I said I would do earlier in the thread and in none heating months switch back to dumb boiler mode. I will say it’s reheat time is bloody fast - this morning tank was 20 deg C (we’d used all the water yesterday - bath night) and in 18 mins it was 54 deg - I don’t need that speed in the summer 🙂1 point
-
Greetings on a miserably rainy Sunday October morning. Perfect weather for catching up on some blog writing! As the title suggests this blog will be about our external coverings of the house and, by the end of it, the outside of the building will be pretty much finished allowing us to crack on internally. We started many months ago by battening the outside of the buildings. As we are having external blinds and they have a requirement for fitting the blind cassette we needed a large gap between the house walls and the outside of the cladding. This meant 50mm x 50mm timber battens and counter battens. We did this ourselves and saved many thousands and, even though it was slow going (as, it seems, everything is when you do it yourself!), it was very satisfying with the carpenter saying that it was good work and he’d seen chippies do a lot worse jobs than we did. Nice warm fuzzy feeling ensued. We are having a mixture of burnt Siberian larch (https://en.wikipedia.org/wiki/Yakisugi) and, to contrast the black, standard Siberian larch on the ‘arms’ of our property and entrance porch (all will be revealed in photos below) and I ordered all the cladding to be delivered on-site prior to the carpenter starting. The carpenter started on the garage using the standard Siberian larch which we bought from Jewson at a very reasonable price, and quite a bit cheaper than we could get from the usual timber cladding suppliers and we are very happy with the quality of the wood. He then went on to the black charred larch (which gets everywhere and he and his tools looked like they’d been in a coal mine by the end of each day!). We purchased the charred larch from Permachar (https://permachar.co.uk) who gave us a brilliant price. The wood itself was burnt and delivered from Lithuania (https://degmeda.eu) but they will only sell to the UK via Permachar. It is stunning wood, but incredibly fragile and any sort of dragging or scraping will cause the black char to flake off. While he was busy doing that and while the scaffolding was up I thought it a good time to get the guttering started. Our architect specified Zinc guttering and after a lot of thought and looking at stainless steel and zinc we also decided that zinc was the choice for us. We ordered it from Rainclear (https://www.rainclear.co.uk/guttering/copper-zinc-guttering/guttering-fittings.html?color=235) who offer next day delivery if in stock and were incredibly helpful and very well priced. It’s also a clip on system which even I managed to install without any major issues! Around the same time and while the carpenter was busy putting the cladding up our external blinds got fitted. We bought those from a local company called Powell blinds (https://powellblinds.com) who stepped in brilliantly at the last minute after we were seriously let down by Cornerstar Aluminium (long story which I won’t get in to here). The blinds are fitted up behind the cladding above the windows but externally so they will be hidden from view when lifted up. We absolutely love them and during the heatwave this summer we lowered them and this drastically reduced the temperature inside the house. There was still one large south facing window that didn’t have blinds that needed shading. We wanted and the architect designed a Brise Soleil in this area but all we had to go on was a 2D drawing. I contacted a few companies about getting one made and installed and the quotes came back at between £6k - £7k! A figure we simply could not afford. So I did research and spoke to a local forge called Horsham Forge (https://www.horshamforge.co.uk) with an idea I had. He said ‘that could be done but how about this instead?’. He suggested brackets with a pole running through them and vertical timbers slid on. Genius! On to Sketchup where I draw up the brackets and gave them to the forge to be created and spoke to my timber manager at Jewson who procured me some thermowood at the size I needed and got my carpenter to fit it and it cost me £1700 in total. So we saved around £5k by doing it ourselves and we also enjoyed the journey and got a solution that we designed (with the help of the forge of course). We think it looks fab and it does a good job of shading from the sun apart from a couple of hours when the sun is directly facing that side of the house. So we will still get some solar gain but it is definitely reduced and it’s a brilliant architectural feature. 😉 Right, while all this was going on the chippie was finishing up the cladding and now that it is all finished and I have put the downpipes on we have an almost finished external facade to our dream home. We love it and think it’s stunning. So very happy with the carpenter’s work (http://www.kmlcarpentryandroofing.co.uk). Kieran’s attention to detail at the junctions between the 2 types of wood is fabulous as it is in other areas too. He would also discuss any issues and potential solutions with us to make sure we were happy with them rather than just doing something he thought was right. Hopefully the pictures below do it all justice! (Note: please ignore the 110mm brown downpipe in the below photo! It will eventually be a rain chain but this works for now. 😉 ) Thanks for reading and we hope you like what we’ve achieved so far.1 point
-
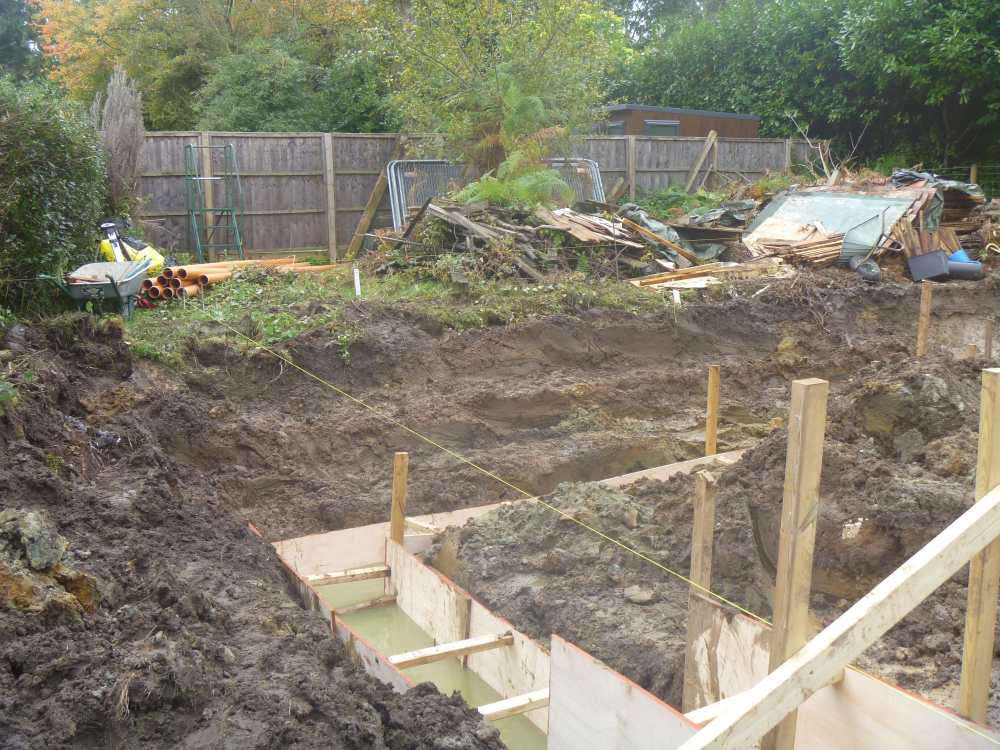
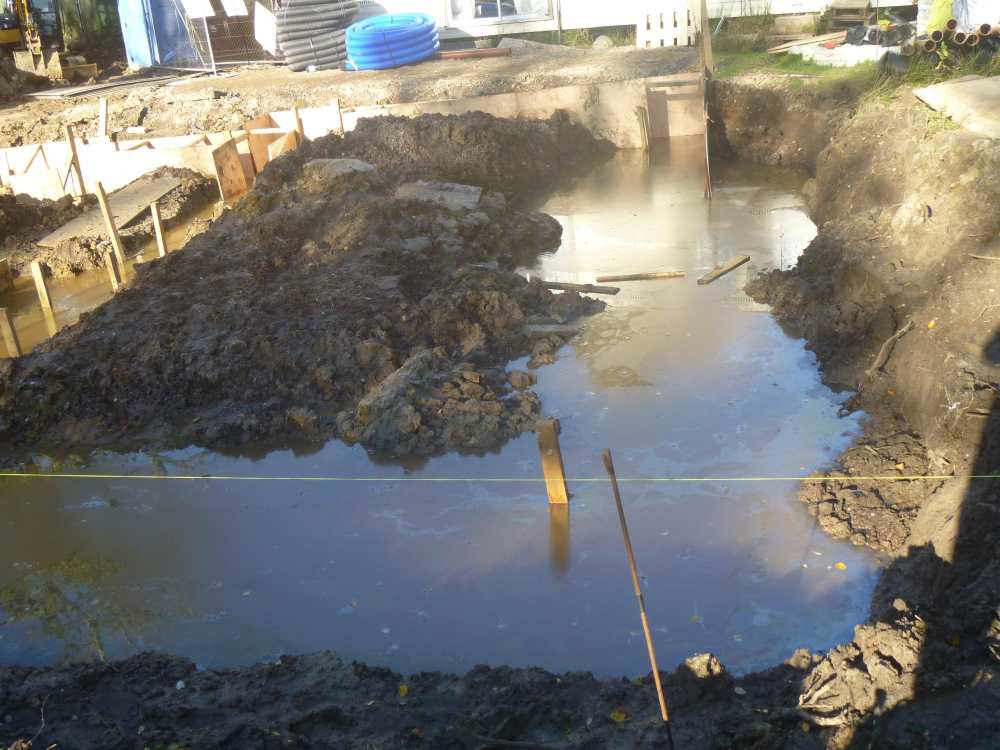
so, here we are at the end of the 3rd week of our build with the groundworkers having dug the basement to depth and put the sub-base down ready for levelling and compacting on Monday with the blinding and insulation to also be completed on the same day. We got a second digger driver on site this week and things have really got going and on Friday we even had a 3rd person to stand around with the laser level to assist. Here's the time-lapse video of the week. The basement contractors were due to start on Monday but as the groundworks aren't quite finished they've been pushed back to Tuesday. Despite that we're very happy and even happier since I've been told that the basement construction should only take 5 - 6 weeks, whereas previously I'd been working on around 8 weeks to complete. This is brilliant if they can do it in that time frame and I've already given the timber frame company notice that we might need the TF a couple of weeks earlier than anticipated if they can accommodate that. only time will tell if that's the case. The week finished off with me laying my first ever slab. It will house the electricity kiosk and also be a place for our wheelie bins to go. it was actually the UKPN surveyor who suggested to me to make the slab for the kiosk a bit bigger to allow the bins to go there. I thought it was a great idea and saves me creating something further down the line. Being a bit of a cheap-skate I use some of the old shiplap cladding from the pool house that got pulled down so it probably wasn't the best wood to use for the formwork and, after I put one piece down I did notice is was a bit warped but figured it's just for bins so just left it there. if it's not obvious it's the piece on the left hand side. Also, the 150mm ducting for the electricity cables made tamping the concrete down quite tricky around them so it's not perfect but it'll do. And if anyone asks I'll just say it adds character. seems to be a one-stop excuse for shoddy work. I promise I will take more care over the actual house! For mixing the concrete I was going to hire a cement mixer but at the last minute decided to cancel that and save myself £25 and a drive to pickup and drop-off the mixer and ended up mixing it by hand in a wheelbarrow. that was pretty hard work for someone who sits behind a desk all day and I'm feeling pretty stiff and sore right now but I'm sure as the manual labour progresses it'll help get me in shape in the long run. I'd like to finish with an observation.....this self-building is a funny old thing as I've never ever looked forward to a Monday morning so much in my entire life! I'm just so excited to get to Monday to see what next week will bring. Hopefully I'll go back to hating Mondays once the build is completed. that's about it for this week. I can't wait to see what next week brings.1 point
-
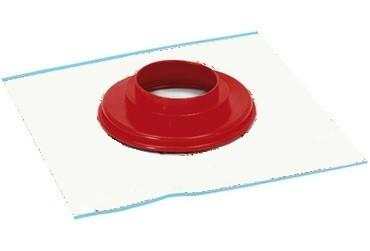
Well, it’s been quite a while since my last blog post but we’ve not been idle but I do admit to having been slack in updating the blog. At the end of the last blog we had a superstructure and the roofer was about to begin his journey up the scaffolding. This is where that tale begins….. ’Twas a sunny November morning when all was quiet that a white van man arrived at our site to felt, batten and slate our sloping roofs. And he wasted no time at all in cracking on with it after the site orientation was complete. With his dad along to help with the battening it didn’t take long for the membrane (or ‘felt’ if you’re a roofer) and battens and counter battens to be done. After discussions with our BCO it was decided that we would fully fill our rafters and use a breathable membrane (Proctor Roofshield) attached to the roof trusses and then 25mm x 50mm counter battens and then slate battens which gave us 50mm ventilation. This allows us to not need soffit vents (or indeed soffits) which fitted in to the design of the house better and also meant we don’t have to worry about creepy crawlies living in the soffits. We started with the southern elevation so that the solar PV array could be installed and the roofer (Chris) fitted the first few rows of slates and some flashing leaving it ready for the solar team to arrive before moving on to the northern elevation So while Chris was busy working on the north side of the house the solar installers arrived and fitted our GSE trays. Once done they started to fit the panels. But it was then discovered that the company who did the ordering ordered the wrong size GSE trays and the panels wouldn’t fit. So the solar installers took all the trays down and left site after wasting a day’s work. Meanwhile the flat roofers attended site to single-ply membrane our flat roofs and balcony. A great bunch of guys from a company recommended to me by Chris so I had every confidence of them doing a great job, and they didn’t disappoint. DPM, PIR, OSB then single-ply membrane. First roof which will have a wildflower green roof being overlooked by our bedroom balcony Second roof above our utility room which links the house to the garage which will have a sedum roof They will return a little later on in the blog to install the green roofs. Meanwhile the solar installers returned after the correctly sized GSE trays had been delivered and managed to fit it all in a day. We think it looks brilliant. 28 x 375W LG panels, each with Solaredge optimisers as we have lots of trees around us. And when they’d finished each panel was giving out 1V and was confirmed each was working by being shown the 14V on each string in the loft. Job done for now until we get electrics first fix done and they can come back and fit the inverter. The only real issue we had with the solar is that the panels were resting on the slates making them lift up in places. I created a thread about them (https://forum.buildhub.org.uk/topic/24530-slate-tiles-lifted/) and after much discussion and deliberation I decided to simply use black CT1 to stick them down which worked nicely. A bit of a bodge but you can’t tell from the ground and a lot less disruption to timelines than other solutions. While all of that was going on Chris was busy slating the northern elevation and it was all coming along nicely. During that I had another discussion with the BCO about vent pipes. I asked if I could have one by the STP but she was adamant that I had to have one through the roof. When I mentioned I didn’t want a pipe sticking out the top of the roof she said that they do slate vents. A quick google search revealed what she was talking about and I purchased the item and it was installed. Looks fab and from the ground you can barely notice it which is just what I wanted. And now the solar PV install was finished he could move on to the southern elevation. But while he was doing that the flat roofers came back and installed our green roofs. The wildflower material So that’s those finished although we were still waiting on a Velux roof light for one of the roofs which was delayed but the flat roofers came back to install that for me and finish off that roof a bit later. They also installed our patio paving slabs which we think look ace. So, back to Chris and he’d now finished the main house roof slating and it finished off around the PV panels nicely. He did make a start on the garage roof but as we were still waiting on Velux windows he couldn’t finish that so he left site and would return once the Velux’s were delivered. During that period our windows and doors arrived! We used Norrsken for these and went for alu-clad triple glazed windows and sliders. The majority of our windows are fixed and we had quite a small profile for the frame which means more glass. The installers, Elite Installations Nationwide (https://www.eliteinstalls.co.uk) were brilliant and Jim and his team were a joy to have on site. They brought their spider crane with them which made lifting our windows up to the first floor a breeze for them. We decided to be bold and went for a red front door. We love it. As the window install was done the week of Christmas the installers couldn’t finish them all in time before the Christmas break so we wished them a safe trip back to York and would see them in the new year. Happy new year!! (Belated). With the new year came the return of Jim and his team to finish off all our windows and doors. Once they were installed it made the house feel so much more like a house. Closing the front door had a feel of shutting out the outside world and we were (almost) water tight at last. We also eventually received our Velux roof light and sloping and vertical windows. So the flat roof was finally completed and so was the garage roof. So we are very nicely watertight at this point. All that’s left now is the time-lapse video for this period of time. Sadly our camera only shows the south side of the building so we only get footage for stuff that happens on that side but it still makes for an interesting watch and I hope you enjoy it. Until next time.1 point
-
Greetings! Apologies for the crass title but I am still a kid at heart. ? After a brief delay due to Covid-19 the carpenters were able to attend site and erect our timber frame. Thanks to the accuracy I insisted on and ensured for the coursing blocks the sole plates were a doddle and were done in no time at all although we did have a bit of rain and I had to get the puddle pump out! We used Flight Timber for our timber frame and they have their own lorries with cranes built in and so each stage of the build was delivered by the lorry and then craned in to place. Here’s the ground floor panels arriving. It took them just 2 days to finish all the ground floor external and internal wall panels. The speed of it all is very impressive. Then the posi-joists arrived These took a few days to do but thanks to the 8mm designed deflection and 300mm centres they are rock solid even across the 6.2m spans. It’ll be a bit of a nightmare trying to run MVHR, electrics and plumbing but we won’t have any bounce on the floors! Plus when the sun shines through it creates some lovely lighting effects Next we had a weeks delay as Flight didn’t have any chipboard flooring in stock as they were let down by their suppliers. This was a frustrating delay but with the current material shortages not one that I should really grumble about too much. It was eventually delivered and the chippies got on with laying it and the first floor panel starter plates. And then it was on to the first floor wall panels. These took 2 days to do as well and so within a couple of weeks of starting we had both floors done ready for the attic trusses They were also a couple of days delayed due to Covid-19 but arrive they did They didn’t take long at all to go up and I love the symmetry of them Then it was another week or so getting the roof finished and building the vaulted ceiling in our entrance hall etc and then they were done! It was 18 days on-site from start to finish. Amazing to see. I took some time-lapse footage and you can see the video below: And so we have a superstructure! The roofer is not far behind so my next blog will be about the roof slates and Solar PV array. Thanks for reading and until next time…1 point
-
Since the basement was finished at the end of June things seem to have been dragging on for ages but we are finally out of the ground and ready for the timber frame. It has taken 13 weeks and we had delays with materials that held things up but when I look back at the photos from the basement being finished to where we are now it is amazing how much has been done and we’re very excited about the timber frame going up next week. When the groundworkers came back post-basement they started by insulating the basement walls externally with 200mm of EPS 100 and then backfilling with clean crushed as per the structural engineers specifications. Then they started digging the foundations for the ‘arms’ of the building as I call them and you’ll see why from some later photos as the main building looks like the body with 2 x arms coming off it. These are a garden room (that links to the kitchen/diner) and the utility room and garage. These are designed as insulated slabs with 300mm EPS underneath which you can see in the photos. Here we see I had to put some Perinsul blocks in, thank you to @ToughButterCup for getting them to me. While that was happening the brickie was also on-site building the internal walls for the basement. We have a 3m ceiling height in the basement so we had to get scaffolding in to build them safely which was another expense I hadn’t planned for (beginners naivety) but something that had to be done. It was around this time that I purchased a DJI Mini-2 drone. It is brilliant and has given us a whole new perspective on the build. Here are a few videos from before the slab pours (please excuse the auto-added cheesy music that DJI added). And some photos of the slab pours. I also put in some VCL between the basement and ground floor as a Tony tray. Once the slabs were poured we move on to the block and beam flooring. This caused the biggest issue with getting materials as the company the groundworkers were using moved their lead times from 15 days to 6 - 8 weeks which would’ve put us stupidly behind schedule. So I sourced some beams from a local builders merchant and paid the beamers to cut them to size on site rather than waiting for the correct sizes to be fabricated and delivered. It was pretty stressful to say the least. But what made it worse is that I decided a while ago to move from precast hollow core slabs to block and beam but no one along the way told me that the beams couldn’t take the load of the walls above like the hollow core could and, by chance, during my conversations with the block and beam company designing it I found out that I had to put supporting steels on top of the basement walls to take those load bearing walls from above ground. Back to the structural engineer to get those designed and then fabricated and installed. And then the beamers tell us that they won’t do the work without a complete fall arrest system across the entire basement 600mm down from the top of the basement walls. Back to the scaffolders to come and put that up at yet another expense (although the safety of the contractors is important to us so I didn’t grumble too much!) and we were finally ready for the block and beam to be installed. So what turned out to be the decision to save a few £k by moving to block and beam has in the end cost me a lot more due to the extra work involved. Oh well, you live and you learn. Anyway, the day came for the beamers to install it and they were a smash and grab outfit but that is, apparently, what all block and beamers are like. They just turn up and smash it out and leave without any due care and attention. To say they were miffed that they couldn’t do that on our build due to the steels on the basement wall is an understatement and comments like ‘if I’d known there were steels I wouldn’t have taken the job’ and ‘I’m losing money of this job’ really filled me with confidence. And if I ever do this again I will probably do the block and beam myself as, although hard work, it’s not complicated and I would’ve done a much better job. Anyway, it was done and they left and we could get on with laying the coursing blocks for the sole plates to sit on. This is where I insisted on precision and I spent a lot of time out there with the brickie assisting with setting out to make sure everything was spot on for the sole plates and checking that the levels throughout were within 5mm - 10mm across the building. It was time consuming but I think the accuracy will pay off in the end. While that was happening and with the timber frame imminent the scaffolders came and put up the required 2 lifts around the entire building and by 5pm the Friday before the frame was due it was all finished and we were ready……or so we thought. The timber frame ended up being delayed by 4 days due to the chippies testing positive for Covid-19 (the first time we have been directly impacted (not including the material shortage etc) by Covid) and during that 4 day delay the contract manager attended site and noticed that the garage (which is 120mm below the main house) had it’s coursing blocks below the main house. After a quick email exchange it was pointed out to me that I’d misread the plans and that those blocks, and the sole plates, need to be at the same level throughout so I needed to raise the coursing blocks by 120mm in the garage by the end of the following day. The groundworkers have moved on and I couldn’t get anyone to do it so I knocked up some pug, borrowed a disc cutter, bought myself a trowel and got laying. I’ve never laid blocks before but I did spend a lot of time watching and helping the brickie so I had a good idea as to what to do. I started after work on Wednesday (sole plates due to be fitted Friday) and finished half of it well after dark and then got up early the next day to finish the rest off. And it worked! Level and straight (ish) and still standing the next day. Phew! And this is where we’re at right now. Timber frame ground floor wall panels are due next Tuesday so we should really start to see things happening rapidly now and within 4 weeks our superstructure will be up. But that will be the subject of my next blog. Here’s a time-lapse video of this part of the build. I had to speed up the footage x10 and each day is about 4s long so things happen at quite a speed but it’s amazing to look back and see what has been done these last 13 weeks. Thanks again for reading and I hope you’re enjoying this journey as much as we are. Until next time…1 point
-
Once we'd exchanged on the bungalow we knew that completion would happen and so we didn't waste any time in interviewing and hiring an architect. We got 3 different architects to come round to see us (it was supposed to be 4 but the 4th didn't seem to be interested as after I phoned and left a message with details as to what we wanted I got a voicemail back saying he'd received a message about an extension or something rather than the complete demolition and self-build we're doing! it goes without saying that I didn't call him back). All 3 came to site to have a look around and for us to get a feeling if we'd be able to work with them. we then got quotes and all were pretty similar but we chose the chap we thought we'd most like to work with. After an initial consultation he came up with a few sketches which we were completely not what we wanted and we also questioned as to whether he even listened to us at the initial meeting. We were thinking of phoning around and trying other architects but we went for a meeting and explained how we felt and he said, no worries I'm never going to get it right first time and we took aspects from each of the sketches and discussed it all and now we have final plans that we absolutely love! My mum is getting on in years and she lives alone about a 50 minute drive from us and so I broached the subject of her coming to live with us which she loved the idea of. I thought it'd be great for her to be able to see her Grandchildren every day and also meant I could be near if/when she needed help with something as otherwise it would be about 3hrs out of my already busy life to pop and see her to fix her computer or put up a shelf or do whatever! so this would be a win-win for both of us. So the architect has designed in an annexe to the main house for my mum to live in which keeps her separate so she has a semblance of independent living but as her health declines I am nearby if required. Anyway, on to the plans...here is the site plan and the elevations we love what the architect has come up with. loads of glass and a fabulous entrance and full height hallway and windows that go from the floor (although the quotes from the window companies are pretty high and, in some cases, are about the same as the timber frame!). We also decided to go with Shou Sugi Ban larch cladding (https://shousugiban.co.uk/range/charred-larch-cladding/ - the Takage style of charring) for the main building with standard larch on the single story parts and entrance to contrast the black. it would seem that we have expensive tastes, but as this is the forever home we're willing to spend more to make it right so we don't have to do this all over again. All we can do now is hope that the planning officer loves it and signs off on it! Forgot to mention that we built a scale model of the house (not including the basement), plot and surrounding trees and hedges. it was fun to do!1 point
-
It's been a while since we obtained planning permission and my last blog entry but we've not been idle. it seems that the last 3 months or so have been a constant stream of decisions that need to be made to get this project started. It's also been a period where money seems to be going out but we don't have much to show for it! The majority of the decisions have stemmed from the architects needing to get the detailed BC drawings finished. here's a nice summary of our decisions so far (although I've probably missed and forgotten a few) Timber Frame Company This was a one of the biggest decisions for us (windows and doors was the other) and was the one that had to happen as soon as possible after getting planning permission so that we could get the timber frame designed and the BC drawings created. We previously had quotes from 9 on the original plans before we had to make changes to get through planning. Of these one was discounted as they never got back to me about changing their set specifications, one because they wouldn't use metal web joists insisting that they only used I-joists, another due to extortionate costs and one more because of costs although not as excessive the ones that made the shortlist but just enough for us to make an easy decision not to include them. That left 5 for us to get updated quotes on the approved planning documents. We are going for an open panel system and I will be fitting the insulation to help reduce costs; even though this will extend the build time the savings are substantial enough to justify it. With those quotes we discounted another due to their location and narrowed it down to 3 local companies and MBC. MBC were by far the most expensive for an open-panel TF but they get such good reviews on here and we have friends that are using them we couldn't discount them out of hand, but in the end we couldn't justify the extra cost when we weren't getting from them what they excel at, i.e. factory fitted insulation and promised air tightness levels. to give them credit they were completely upfront about it and completely understood the decision. So that left just 3 local-ish companies to choose from. We visited sites from each company to see their work and after that, although it wasn't easy, there was one clear winner and that was Flight Timber (https://flighttimber.com) based in Essex. We were very impressed with the quality of the build we visited and are very happy with how they've conducted themselves during the negotiations. So we signed the contract and paid a deposit. Since then they've been doing great work in getting the TF design done and liaising with the architects to finalise everything. That has now been completed and it's all with the structural engineer to do the basement/foundation calculations and drawings. Structural Engineer For the structural engineer we had 3 quotes from firms that the architects use, one from a friend of a friend and 2 from recommendations from the buildhub hive mind. We are having a basement and so this was a consideration and needed someone who could provide us what we needed. One of those requirements was an insulated slab foundation under the basement and the arms of the house. There was quite a discrepancy on costs between the 6 quotes and a couple were easy to discount as they were so much more than the others. So from the remaining 4 and after much consideration and communication we decided to go with TSD as they have a great reputation for insulated slabs, are highly recommended by many on here and their price was very competitive! So far, they've only been working on the design since the start of the week, I've been very impressed with the communications and their open-mindedness to my ideas and requirements. I made a decision (doesn't really require it's own heading) to ditch the idea of using block and beam for the lid of the basement and will be using hollow core precast slabs. Sadly though, after the SE spoke to a supplier it was obvious that they wouldn't span our basement at a reasonable thickness without internal structural walls (which we were trying to do without) and so we've resigned ourselves to having load bearing walls in the basement, otherwise costs could easily have gotten out of hand by going for thicker precast slabs, thicker foundations and thicker external basement walls to all accommodate the extra weight of the thicker slabs. so be it, I'm sure it's not the last concession we'll need to make to save money. Civil Engineer we are creating a new entrance to our plot from the road that will go over a ditch and so requires a culvert. so we decided to hire a civil engineer to plan and manage that, the drainage, driveway levels and water course discharge. we only got 3 quotes (it's my magic number for quotes) all from companies that the architects deal with and simply chose the one that wrote the best proposal and the costs were reasonable trusting that the architect's recommendation for each company was good enough for us. Windows and Doors This was a huge decision for us and caused a lot of brain power to try and work out who best to go for with spreadsheets being created to compare the various companies. We have a lot of glazing (about 120m2) and we want triple glazed alu-clad units. We approached 7 companies initially, visited lots of self-build shows to get a feel of the windows to help us to decide. We did consider IdealCombi for full alu windows but in the end our desire to have timber internally won and we didn't proceed with them. We discounted a few others due to costs and in the end it came down to Internorm and Norrsken. Internorm windows are so nice but they are so expensive; despite this we thought we could potentially justify the extra cost but the reviews of the supplier on here put a dampener on them as the last thing we wanted was to pay a load of extra money for windows that we didn't get any sort of support for when things go wrong. We visited the Norrsken showroom in Poole and were very impressed with the windows, doors and sliders and I couldn't find any bad reviews on here for them. The price was very good and so we signed on the dotted line and paid our deposit. We are very happy with our decision and the money we saved over going with Internorm will pretty much pay for our kitchen! External Blinds With all the windows we are having I was worried about overheating, especially after reading some of the issues other forum members have had with solar gain. We needed to make a decision on these before the TF design was completed so that they could be built in to the frame and are then hidden from view. So, external blinds were on the cards and needed to be researched and a decision made posthaste. I've posted elsewhere about my experiences with Roma blinds so I won't repeat that here. In the end I came across Warema blinds which look good and seem to do what we would need them to and found 2 London based Warema suppliers to get quotes from. Both were so similar in price it was hard to choose between them. In the end, after my company house checks (which I do on all people I wish to do business with) it looked like one of the companies had grown their business really well over the last 5 years when looking at their accounts that I decided to take a punt on the smaller guy and went with Corner Star Aluminium. Only time will tell if I made the right decision on that one. MVHR This is a subject that I have done a ton of reading on here in the forums and also posted a few times on the subject. the whole 1 or 2 unit debate is real but I really would like a single unit solution. I got 5 quotes (one through the architect and 4 off my own research). BPC wouldn't do a single unit saying that the largest unit they do is for a 350m2 house but our house is 450m2 and so we need 2 units. I felt that they're just sizing on Part F calculations and the manufacturers own statements regarding house size for unit size and didn't take running at Passivhaus levels that most on here feel that running their MVHR units at is fine. Also, they do sell bigger units, e.g. the Airflow DV245, so they could do a single unit but I just got the feeling that they couldn't be bothered to consider another option. so they're not getting my business. CVC were just too expensive and I didn't trust the company the architects asked to quote as they didn't give any details as to the ducting etc that they'd use (and also were selling a 2 unit solution). so it came down to PAUL Scotland and Enhabit, both of which were offering a single unit solution (Zehnder Q600 with 90mm ducting). Pricing was very similar so in the end it came down to location again (although a price reduction did help!) and Enhabit won. the deposit will be going over today and then they can crack on with the design. Others I'm sure there are loads of other smaller decisions we've made, like external finishes for the discharge of planning conditions etc, and I know there will be hundreds more to come as we move forward with the build including ASHP, Solar PV, UFH, DHW, RWH, floor coverings, tiles, lighting, home automation and so on. The next big decision will be the groundworks company to do the culvert, driveway, foundations and basement. Once I have the SE plans and designs I can approach the companies I've shortlisted to get detailed quotes and can carry on with the decision making. I have ended up having to make a list of decisions to be made there are so many. that way I can tick them off when they get done as it was getting to the point that it seemed they were never ending. at least this way I can see what has already been done and can see the list getting smaller as we progress. thanks for reading. ?1 point
-
Why is it so hard to get planning approval? Such a simple thing is mired in bureaucracy, pettiness (at least perceived), personal interpretations of the planning policy (e.g. the definition of disproportionate to the existing building) and, in some cases, pure incompetence! One such example was from Southern Water who said they couldn't approve the proposal with a sewage treatment plant and we had to apply for connection to an existing sewage system. err....the nearest sewer is about 200m away as the crow flies over roads and fields that aren't owned by us! none of the houses in our hamlet have mains sewage and we even have an existing Klargester which we will simply be replacing with a new version. so why would they say that we need to connect to mains sewage? crazy. fortunately, I got on the phone and a few weeks later I got a call from someone who actually knew what they were doing and eventually got an email saying that using an on-site treatment plant was not an issue. Then we get to the highways agency. we're asking for a new entrance off the road as it's more practical with the way the plot is and where the new house is going to have it rather than use the existing entrance that is shared with our neighbours. We submitted the visibility splays (although the architect forgot this initially and the first letter from the highways agency was asking for them) and the response we got was basically, how can we put a new driveway in when we don't own the (approx. 1') of verge between the adopted highway and our land and also we needed a traffic survey for the road as it's national speed limit (albeit a single track road so no one could get or does get above 40mph). I got our solicitor on the case about the potential ransom strip and he's sorting that out so we pointed this out to the highways agency and also submitted the existing visibility splays and showed that the visibility of the new entrance is better than existing and so the highways agency eventually agreed to the new entrance and had no issues with the application but did stipulate some conditions. This whole thing took so long that we had to grant a 1 month extension to the decision date. It wasn't all bad though, the Parish council didn't have any objections but did raise a concern about the flat roof as there's a policy against flat roofs in our parish apparently and we had no complaints from neighbours as part of the consultation period and even had one lovely neighbour who wrote in support of the application. so, with all the above done and no issues it came to the planning officer being able to view the application in its entirety. We really weren't expecting too much of an issue here as, although the footprint was quite large, we were adding an annexe for my mum and figured that would be considered as a separate entity to the main house for footprint etc. also we have planned a basement but that also shouldn't count to the footprint. we thought we might get pushback from the ridge height as the outlying planning was for a chalet bungalow and we submitted for a 2 storey house with a pitched roof. So we were shellshocked when the architect said he'd heard from the planning officer and said that the gross internal area (GIA) was too much and we'd need to lose the basement, studio (the room above the garage) and the garden room and also shrink the annexe! wtf! we honestly couldn't believe it. Our initial reaction was to comply and then build the garden room and convert the garage loft post completion. but after thinking for a bit I decided not to capitulate and that we would fight it and so hired a planning consultant to fight our corner for us. we have since supplied to the planning officer the potential size the existing bungalow could be if extended under permitted development with an 8m deep rear extension along the entire length of the property and a loft conversion. with these figures it shows that what we intend to build isn't actually as much of an increase as the planning officer officially thought. hopefully common sense will prevail and he'll understand what we're trying to achieve here and that we don't want to have to have buildings in the garden to get the space we need but want it all under one architecturally designed roof that is sympathetic to the surrounding woodland. if it doesn't though and he's still adamant that the property is too big then we have a list of potential reductions that we're willing to do. And that's where we're at with the planning application at the moment. there's another extension in place until the middle of June so hopefully we can come to some sort of agreement to get the house built. fingers crossed!1 point
-
A long time ago (about 15 years) in a county not so far away I met and married my wife. Soon after we had a couple of kids and started thinking about our future. When I was a teenager my parents moved us abroad and built their own house and I think that sowed the seed for me as it seems that I've always wanted to build my own house and would sit down and watch Grand Designs back in the day and be drawn to the idea of it all. So about 10 years ago we decided that we wanted to build our own house but weren't in a position financially to do so but I was always keeping my eye out for something with potential and signed up to self-build websites and plot searches just in case something popped up. As life went on we sadly lost my Grandmother to the sands of time. The upshot of that was my inheritance (every cloud does have a silver lining I guess) that gave us a bit more capital to allow us to widen our search a little. Then about 4 years ago we found a house within 1.5 acres that was ripe for knocking down and starting again. it would've stretched our finances but we could've lived in it for a bit to get those sorted out while we planned for the build. We put an offer in and it was accepted. We were so excited about it all that we got an architect involved and paid for surveys to be done and drawings to be made only for the sellers to let us know while we were out of the country on a family holiday that they'd decided to accept another offer on the house and would no longer be selling to us. talk about a kick in teeth! we were shellshocked. But, life goes on I guess and a year later we found a steel framed agricultural barn with 4 acres of land/woodland that had planning permission to convert to a residential property. offer made and accepted although with the old adage of once bitten twice shy we decided not to get ahead of ourselves and didn't shell out for architects etc at this point, although we did spend a lot on solicitors fees and also a contamination survey so it was not cheap as we moved towards an exchange of contracts. The barn had agricultural access over a 3rd parties land but no residential access and as the seller's solicitor tried to get that access it seemed to be apparent that the owners of the land (the Catholic Church) were against the development as they slapped a £200,000 price tag on the access (about 1/4 mile of farm track/bridle path). as we weren't paying that we thought the negotiations were ongoing with the sellers and the Church until one day out of the blue I got an email from my solicitor saying that he'd heard from the seller's solicitor and that they were no longer proceeding with the sale. this was 2 YEARS after the offer was made. it seemed that we were destined to never find somewhere to build.... ...but never say never as about 2 weeks later we found an old 70's built bungalow that had outline planning permission and full planning permission for a replacement dwelling in 0.8 acres of land surrounded by woodland. it was perfect and we had our offer accepted and started the purchase process. little did we know that we couldn't get finance on the property even though it was a habitable property no one would offer a residential mortgage as the construction of the house was 70's prefab and the banks wouldn't lend on it. I even had a bridging loan company refuse to lend on it despite the inherent value in the residential plot and land. it was crazy and the house was put back on the market while we tried to sort something out. fortunately, our family were able to sell an overseas property to allow us to get the funds to not need a mortgage and we exchanged and completed in October 2019. We're now living in the bungalow as we await planning approval for the new designs our architect has drawn up, but that will be the subject of another post. thanks for reading and I hope you find our journey interesting. I'm sure it'll have many more ups and downs as we progress but we're hopeful that at the end of it we'll have a house that we can live in for the rest of our lives.1 point


