Leaderboard


Popular Content
Showing content with the highest reputation on 08/18/23 in all areas
-
Don’t build a cold flat roof.2 points
-
Day 31 of the build. (this is taken from the day we started shuttering the foundations) The weather up North has been spectacular for about 3 weeks, so we (Mandy and I) pushed to prepare and pour the slab before the weather changed, as I'm sure we will get a few weeks of low pressure, wet changeable weather after this spell. Following on from the foundation ICF walls, I'd already loaded around 20ton of 40mm to dust in a pile the slab area. Sat on the sand blinded radon barrier. Job one was to sort the drainage. I'd posted previously about my plan, and some constructive comments suggested changing my planned route, but with the extra length of run to the drain invert level I would have had to increase the floor height even more. So stuck with my original sketch. We ran string lines to mark the main areas, namely WC, SVP in the plant room, shower, WC and Bath, a need ran the drainage to the locations, as the utility backs onto the plant room I didn't add a drain in here as I'll run through the stud and use the SVP. Once the drainage was in place and is tested. We spread out the hardcore and compacted it. I used 10mm crush and run to bed the drainage and cover the pipes, I also ran ducting at this level, bringing in water, power, treatment plant feed plus some future ducts. To get the hardcore level / flat I used 3m lengths of galvanised conduit set on mortar pads all level to each other and used a 4M ally beam to screed the slab. I compacted the first layer then used another screed pass to fill in any deviations and used this as the level for insulation. I used a combination of 200 mm EPS 70 (50mm sheets and 100mm sheets all layed to stagger the joints, and used foam to seal to the ICF. The top layer was 100mm EPS150 this gives a firm hold for the UFH staples, and a firmer feel to the insulation layer. We plan to use a large shower tray and have this level with the floor, so I made this area sunken with two layers of EPS150 and a layer of 50mm PIR. As we were installing the insulation I installed 2 * 100mm ducts for the ASHP in the second layer of insulation these were only 800mm long, and a duct for cables. I also added flex ducts in the insulation for Hot & Cold services to the kitchen, utility, WC,Shower,bath, all these were cut using a hot knife. Lastly I cut some pipe for floor sensors in the kitchen, lounge, bedrooms and bathroom. The underfloor heating consists of three loops around 95M length, planned using Loop cad. The manifold was plumbed , filled and a pressure gauge to ensure no leaks. We have good water pressure so could pressurise to 6 Bar. ( With the heat ☀️ this rose to 9 bar one day). The above picture also shows K Steel screed rails. I used these to break the slab into smaller bays, and mainly will be under stud walls. The slab will for the foreseeable future be our finished floor, so I wanted to introduce expansion joints and force any cracking to these locations🤞. I also used Tibmix metallic dry shake topper on the concrete, the dry shake should help suppress the fibres and also increase the surface hardness. The pour happend on Friday 16th June, the first 5cube arriving at 8.30. we did the kitchen bay first which needed the 7t 360 to move / place the concrete, then, poured the WC / plant room and utility bay. This was an error, I wanted to pour the lounge next so both bays could be finished at the same time, but under the pressure of the pour took advice to do the awkward section next. This resulted in only a 3rd of the lounge bay having concrete, so this was spread out lower so the next load could fill the bay. By the time the second load arrived, the kitchen and utility bay was ready for power floating. The pan worked well and I had some time to start edging the slab, the rebar didn't allow the power float to get to the edge of the slab. By 13.00 all bays were in and leveled, but not floated, but the sun was very hot, and the kitchen bays was getting hard rapidly, I managed to float this but was struggling to to get a perfect finish. To dry shake makes the surface hard and this was apparent, the lounge and bedroom bays floated better, and to the main the dry shake suppressed a lot of the fibres but there are still some visible. The kitchen bay was rock hard by the time I managed to float again, and although it is fairly flat you can see, but not feel, the path of the power float. I used Setseal 6 as an acrylic sealer, which seals the surface and aids the curing process. By the time we finished the floor was rock hard, I mean hard, the idea being that the slab will slowly cure now but will not be affected by rain etc. Time will tell. Due to the temp, and the float not getting to the edge, I will have to carry out some remedial work on the edges of the slab, as by the time I go to troweling these it was too late. Today the slab looks great, it's flat and level, but the perimeter 2 inch will need some polishing, as will a section in the plant room. I'm confident I can get this fixed. Time will tell. The following picture doesn't do the slab surface any justice. It looks rough, but it's glass smooth. So 10.5 cube of fibre reinforced concrete. Power Floated, and this was non stop until 17.30. My chest and fore arms are wrecked from trying to tame the power float. I'm a little disappointed in the edge finish, but looking at it another way, it's way better than if it would have started raining, or the wind that we have today. I'm sure a few hours with a wet diamond polisher will rectify the edges. Maybe another hand would have been good. 🤔. Onwards to the ICF walls... .1 point
-
YES - but You don't need any plaster, as the plasterboard itself is airtight enough. But doesn't mean you will have an airtight house. Just the plasterboard will be airtight.1 point
-
I totally agree with your colourist, F&B can be a nightmare on wood, esp MDF. There are much better paints IMHO1 point
-
A little bit of progress (had a bad back) but cracking on this weekend with a mate.
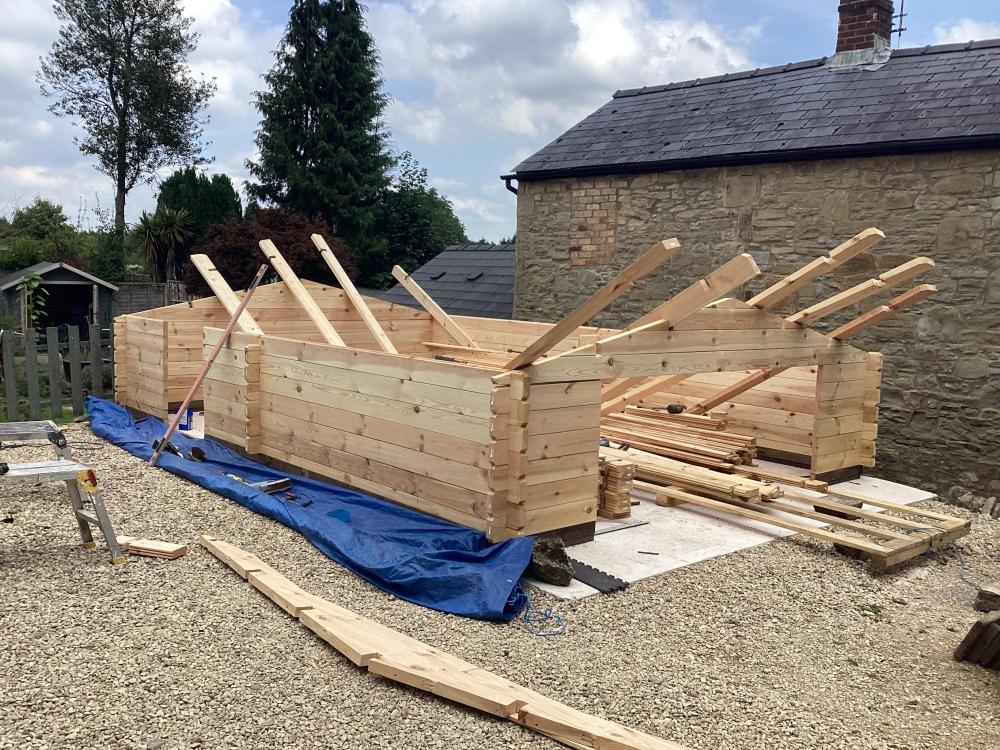 1 point
 -
Make your back board (MDF, Ply, OSB etc) a little larger so in the example above it goes all the way left to the corner of the room, a bit further right behind the feed pipes and all the way down to the floor. then it is simple to plasterboard and skim around it. Set the back board flush to the wall so you are plastering up to it, NOT behind it.1 point
-
I have gone to a structural engineers with my passed plans in order to get some calcs, and to make sure that what i had planning to build was not going to be a pain, or cost a fortune. Turns out that he is a Chartered Engineer, and an Architectural Technician. He came back to me and said that he thinks my floor plan could be improved. Boy was he right. He has kept my footprint, and made the internal so much better. Seeking the opinion of other people is difficult. As @SteamyTea said, what One person likes, another might hate. It might be worth seeing if you can find an Architectural technician locally who might have some ideas as to how you might sex it up, without costing you a fortune. There is a bod on here @ETC who has made peoples posted plans immeasurably better. He might be willing to take a look at your plans.1 point
-
I'd batten out first using either 25mm or 50mm, depending on what services you need to get up there. Then you can fit the boards easily with the correct screws and spacing. How did you fix the ceoltex to the rafters?1 point
-
What i found made the job of a vaulted ceiling MUCH easier, is screw a temporary batten to the wall with JUST enough gap to slot the bottom edge of the PB in than that's the bottom edge secured. You only then have to hold the top edge while you get a couple of screws in. For a long (as in >1 board from eaves to ridge) screw another temporary batten over the top edge of the bottom board to similarly slot the bottom edge of the next board in. Start with full size boards, if you must cut, cut them from that, but persevere to get full boards up. 9mm boards won't be any cheaper than 12.5mm and you may have to order them.1 point
-
I am not keen on 9mm boards. 12 or 15 is better. The cold spots from screws will be non-existent. Use a plasterboard lifter to get the boards in place.1 point
-
I recently went through this, I think I then submitted the quote, and a bit later an application form was sent out to me, which I then completed. they then did a site visit, but also contacted me to discuss, they then produced a plan which is where they will bring in the service. This also gave me a contact name to discuss anything with. I was concerned that submitting on the portal would make me pay, but it didn't it just started the process of engagement.1 point
-
I suspect it might just be taking a long time to dry. High humidity? Was it stirred properly? I'd give it 24-48 hours before deciding its not drying. Perhaps paint up some scrap wood with a primer (Zinsser products are good) and then the F&B. See how that turns out. If you have issues with the F&B I've had success with Rust-oleum over Zinsser on mdf. You can get small samples on Amazon. https://www.amazon.co.uk/gp/product/B0BJ2Q1V6K/ref=ppx_yo_dt_b_search_asin_title?ie=UTF8&psc=1 https://www.amazon.co.uk/gp/product/B09NW4ZG4K/ref=ppx_yo_dt_b_search_asin_title?ie=UTF8&psc=11 point
-
Check that is the correct fitting for the pipe not just an ordinary compression fitting, and check he has put an insert in both pipes before tightening it up.1 point
-
Met Office Central England Temperatures. Top chart is min temp, bottom max temp. Here is the mean temps (well actually the mean of the daily median temps)
 1 point
 -
I do the same 🤷♂️ why waste heat?1 point
-
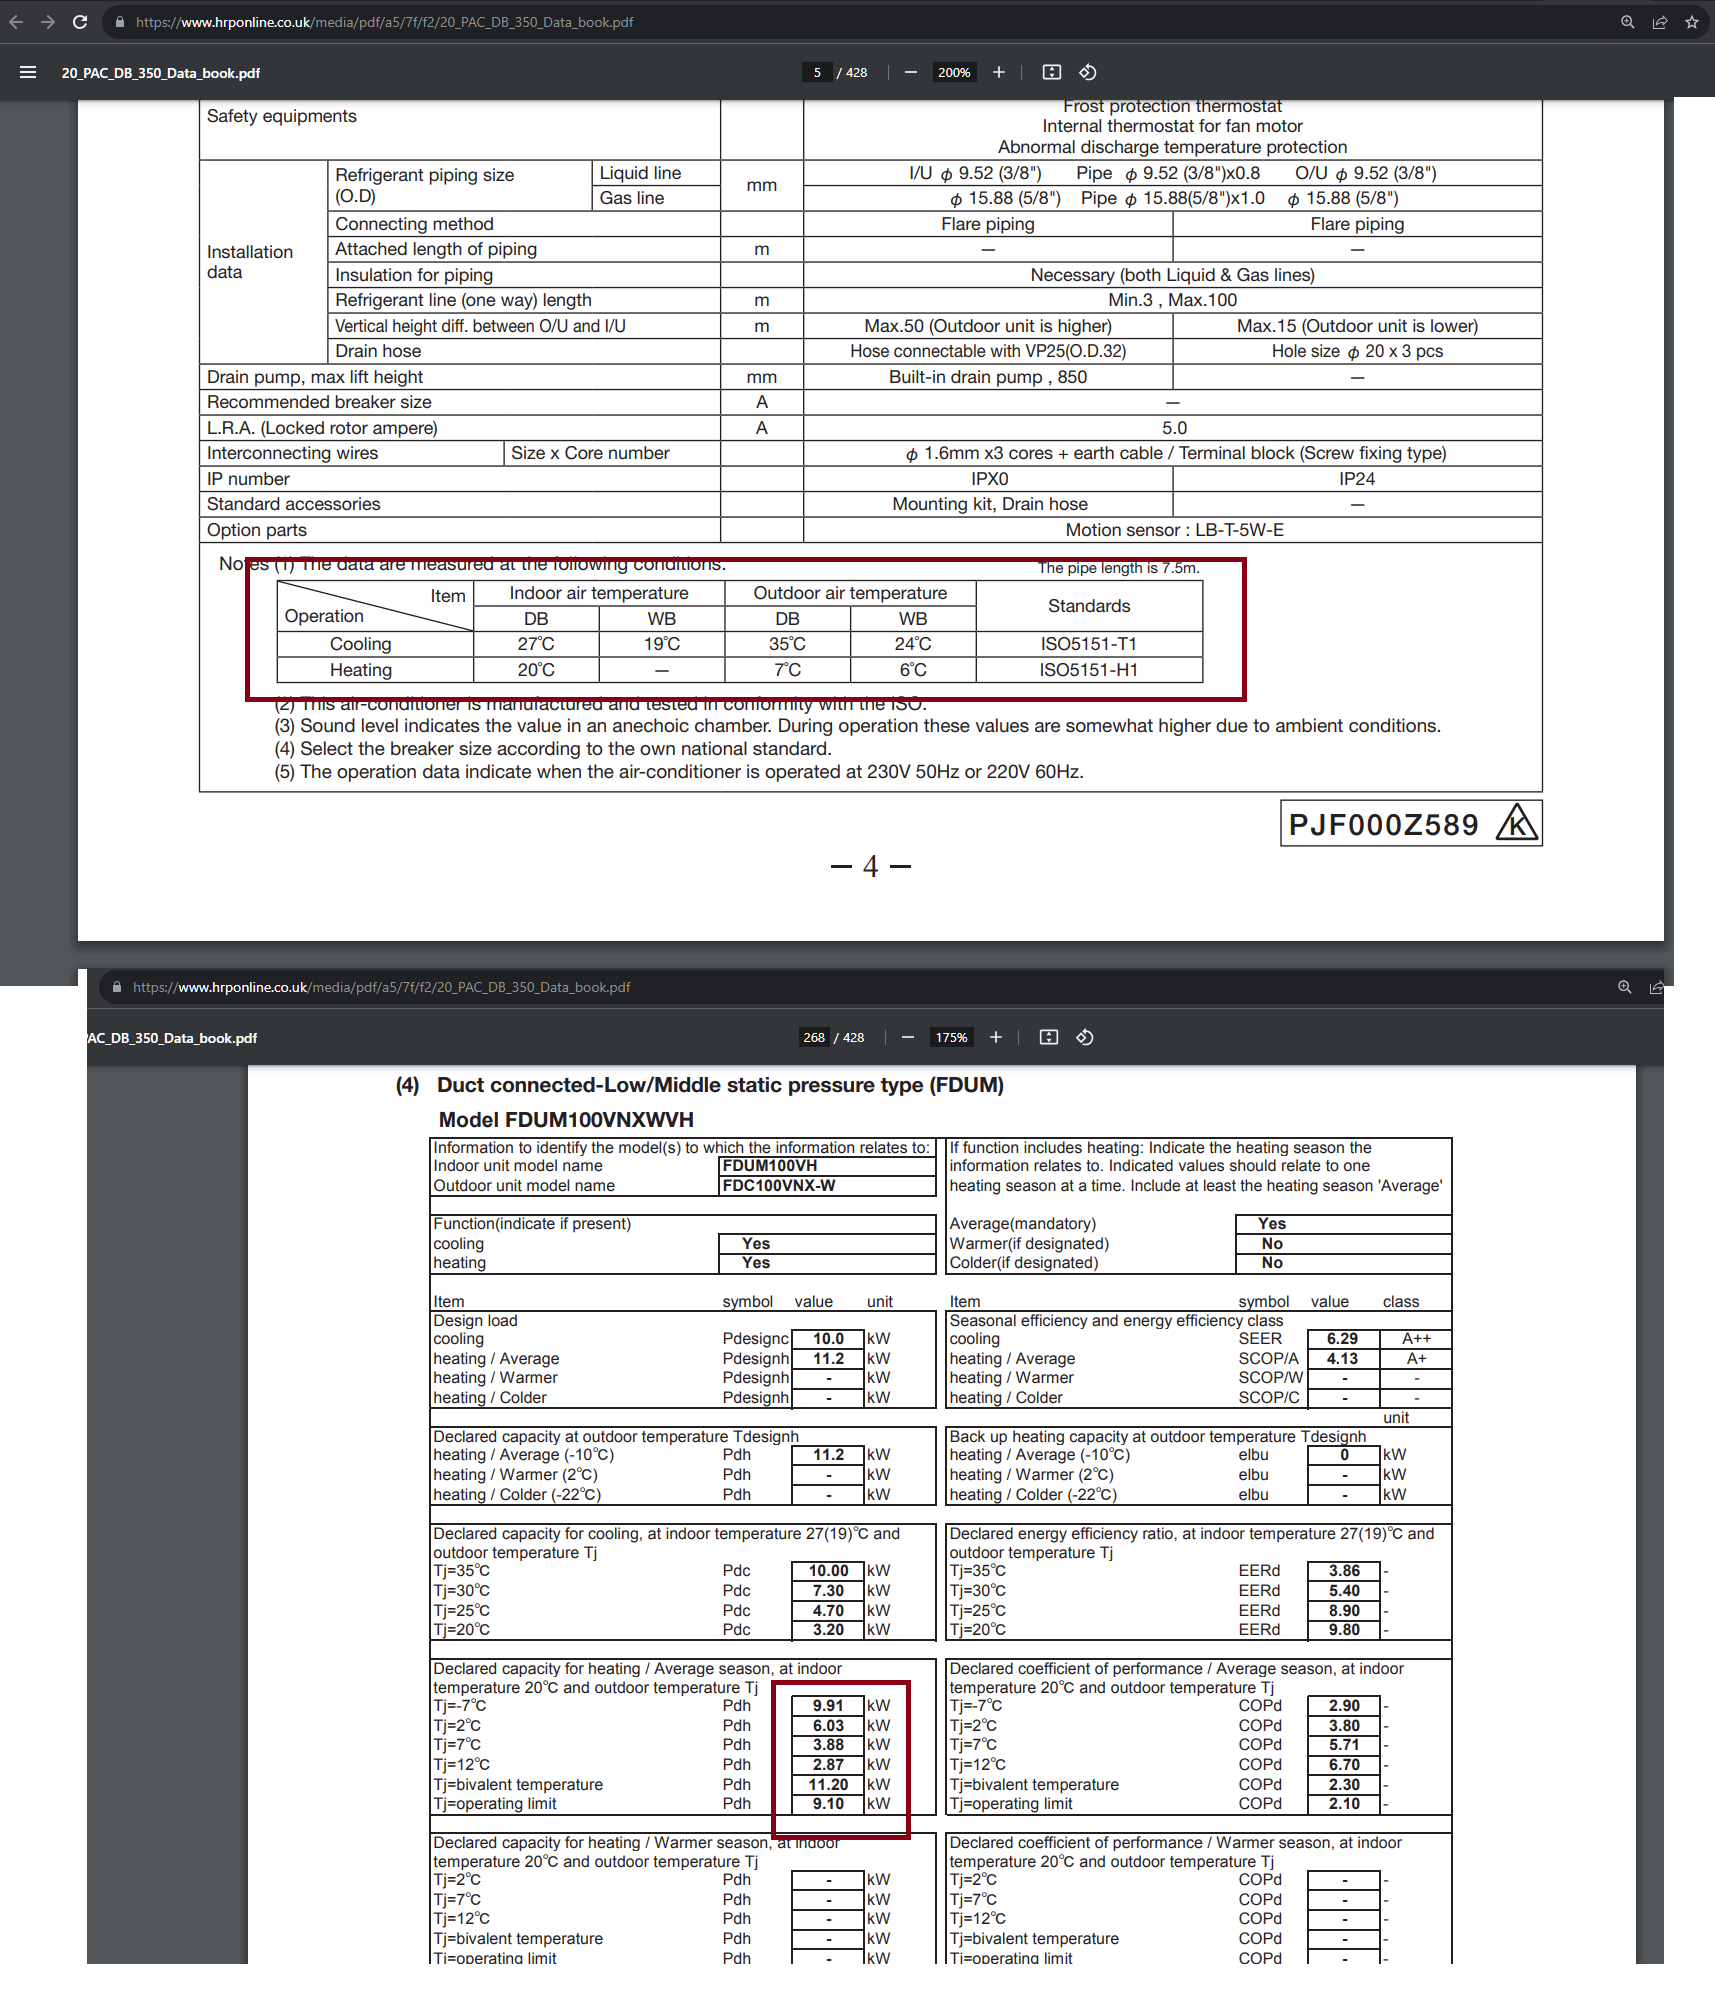
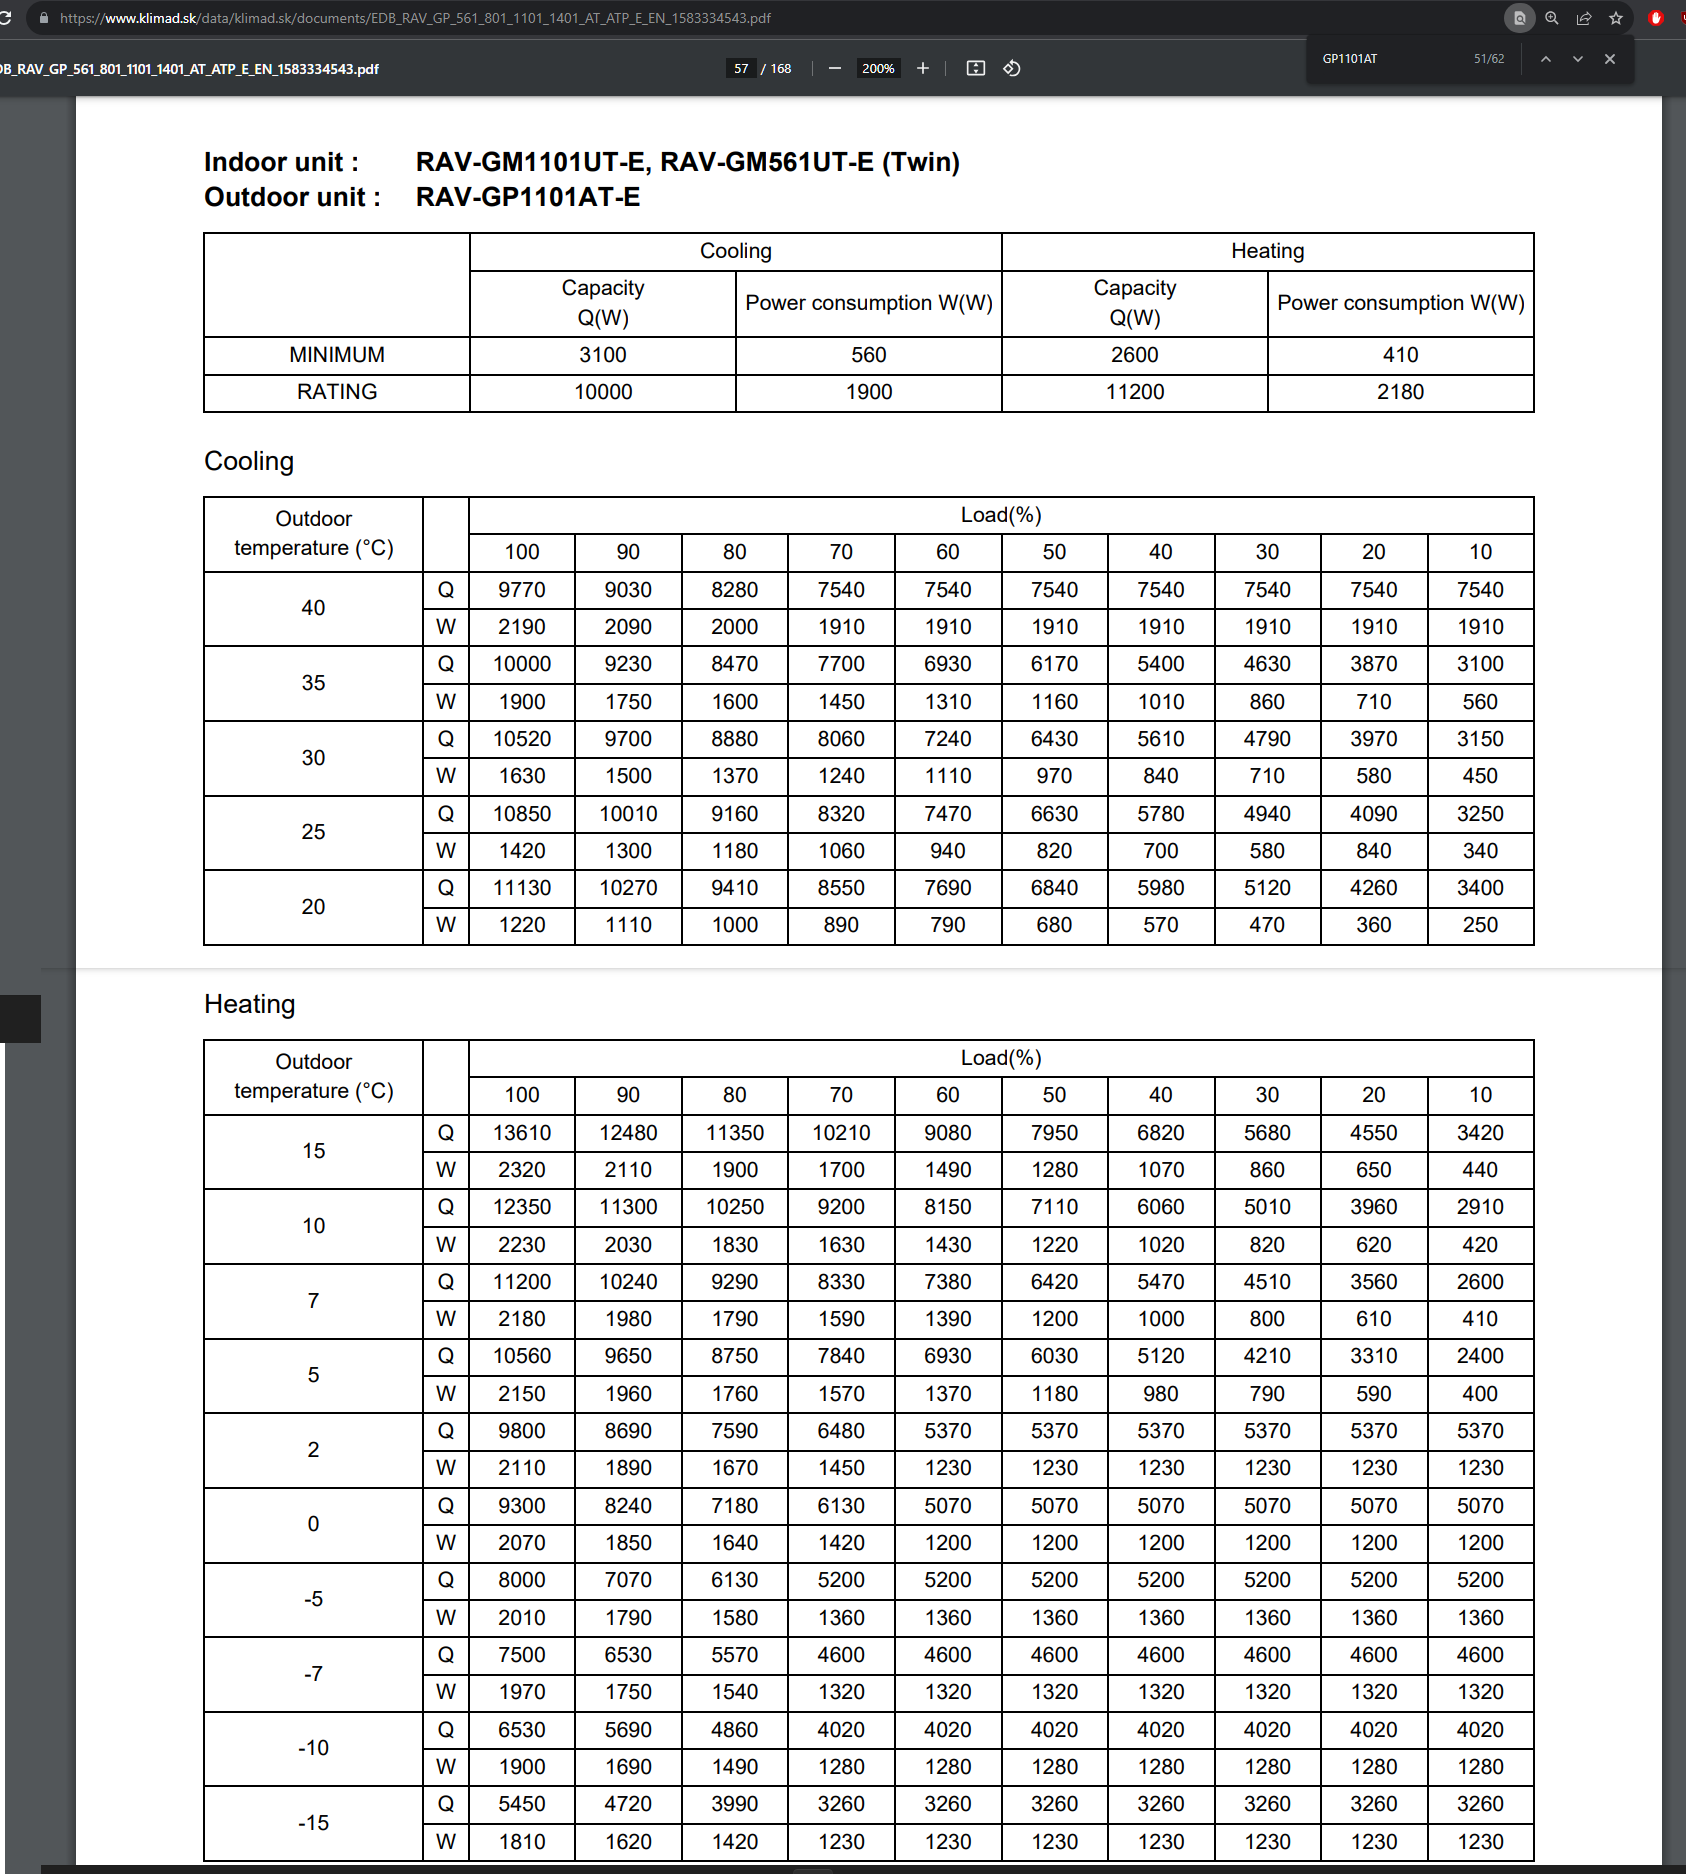
In all data sheets the rated output be that min/normal/max is always stated at the same 7outdoor/20indoor for A2A and 7out/35water or 55water. With other temp ratings specifically pointed out. I don't know where your -5 comes from. The lowest minimum output at lower temp also does not necessarily holds true, due to the safety minimum modulation of the compressor at freezing temps which is higher than at +7...+12. But spinning the compressor at the same speed will obviously put out more heat with every degree of outdoor increase.1 point
-
The pump will have to work harder. They are only tiny. I wouldn't go further than 2 meters of hose.1 point
-
The discharge from the machine is pumped, as long as you're not going uphill above the unit, distance isn't an issue. Our machine came with a 2m hose and I cut it down.1 point
-
you can extend drain hoses, and buy longer water hoses if necessary.1 point
-
Electrical Safety First publish a set of official Best Practice Guides in partnership with the IET, the main certification schemes (NICEIC etc) and others. Best Practice Guide 4 covers periodic inspection https://www.electricalsafetyfirst.org.uk/media/fpton1au/bpg4-a5-2022.pdf That specifies a C3 - Improvement Recommended (which means it is not an immediate or potential danger but the installation would be safer if addressed) as @ProDave says for: > Presence of a consumer unit or similar switchgear made from combustible material (e.g. plastic) that is not inside a non-combustible enclosure and which is located under a wooden staircase or within a sole route of escape from the premise. If you only have C3s then the overall report is satisfactory. But note that they also say if it is not in a sole escape route or under a wooden staircase then it shouldn't even be C3, it's not compliant with current BS7671 but does not need to be recorded on the report. Obviously if there are loose connections inside or evidence of arcing/overheating then that would need to be addressed. The absence of RCD protection on the lighting circuits is listed in BPG4 as a C3. However the unsheathed cables @TonyT spotted would be a C2 Potential Danger as they are accessible to touch so that would give you an "Unsatisfactory" report until addressed.1 point
-
We have started fitting our external wall insulation and render. Whoever invented sponge floats need a knighthood. That’s all.1 point
-
I would personally code that C3 which if everything else is okay would be satisfactory. Official guidance seems lacking and a lot of electricians think a CU like that would be a C2 and hence unsatisfactory.1 point
-
+1 The various smarthome speakers will soon be able to listen for an alarm going off and send you a notification when it hears one. Apple's HomePod can already do this and I am guessing it will become a standard feature for other providers too. Link for Apple below. Buy reliable detectors. And let your choice of Apple, Google or Amazon send you the notifications. https://support.apple.com/en-gb/guide/homepod/apd1f1921722/homepod1 point
-
You don't want smart, you want proven and reliable. For me it's Aico hard wired. 2 core & earth mains supply to the first one, then 3 core % earth from there looping to all the others. Aico do some neat combined heat and CO an combined smoke and CO alarms for rooms that need both.1 point
-
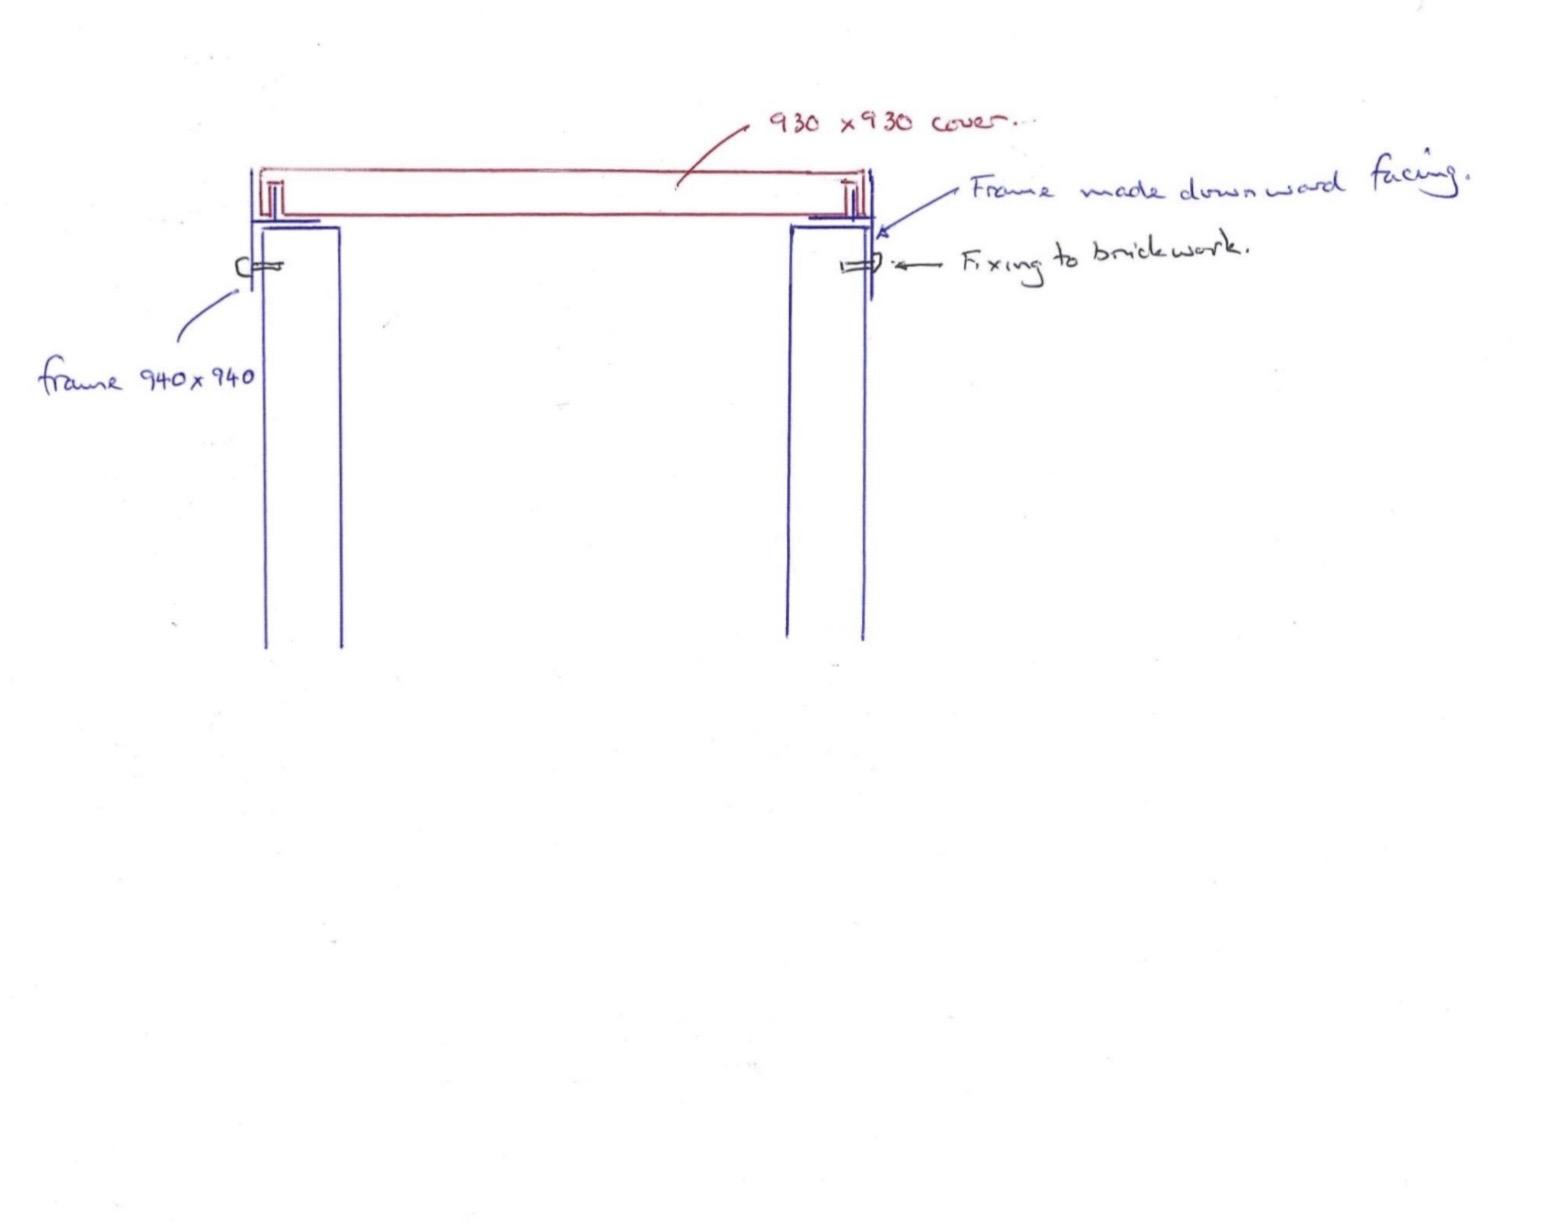
A little result today. After building the borehole headworks I’ve struggled to find a suitable lid and frame for it. I bought a Clark Drain lid but it’s crap as the frame is too flimsy and the lid is poorly made so started the search again. The internal headworks space is 750mm x 750mm which turns out to be a slightly unusual size. I ideally wanted a plastic lid as they are lighter as the metal lids are pretty heavy. I found a company that did suitable plastic lids and frames but they were too expensive at £800 plus delivery. Long story short I came up with a design and got a company to make it for me. It arrived today and it fits perfectly and I finally have a weatherproof frame and lid that I can actually lift! £300 inc VAT and delivery.

 1 point
 -
I did that, then had to go to the clinic.0 points
-
Some people report drying issues with F&B. Scroll down here to the comments.. https://fromevijawithlove.com/2018/04/23/things-you-need-to-know-before-painting-with-farrow-ball/0 points
-
No. The sealer is specifically a bonding barrier between the mdf and the finish paint. Pointless adding it now. Either remove your paint and start again with sealer, or see if it happens to be OK by luck. But it's likely to change appearance or flake off in time.0 points
-
Are the two compatible? I painted a door with a water based gloss, there are patches where it has reacted and stayed soft where the previous gloss/undercoat was not fully removed back to the timber. Even 'same base' undercoat and glosses and react.0 points