Leaderboard
Popular Content
Showing content with the highest reputation on 05/06/19 in all areas
-
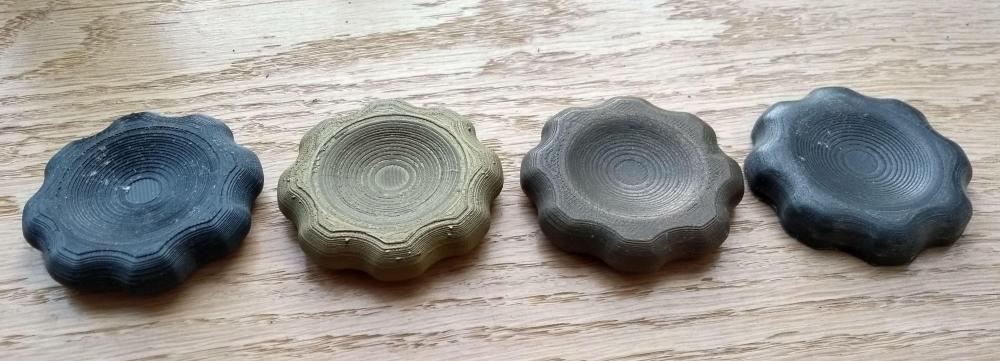
Last picture for the day.. Comparison of different filaments. Left to right.. Black PLA+ (As printed but I see it has some white fluff on it or something) Bronze coloured PLA (no actual bronze in it. As printed) Bronze filled PLA (80% real bronze, sanded and "polished") Iron filled PLA (80% real iron, sanded and "polished") Polished in quotes because it's not really hard enough to take polish. I tried T-Cut and Brasso. All were printed with 0.3 layer height and are about 45mm across. I'd like to try copper or brass filled PLA and may have found a source for cheap samples to play with.2 points
-
Don’t you just love it when someone local helpfully keeps the planners informed of such things! You should stir stir the pot a little yourself next time your down the local pub, maybe something along the lines of “how helpful the planner was in suggesting that you’ve got a great infill plot for few more houses”!2 points
-
2 points
-
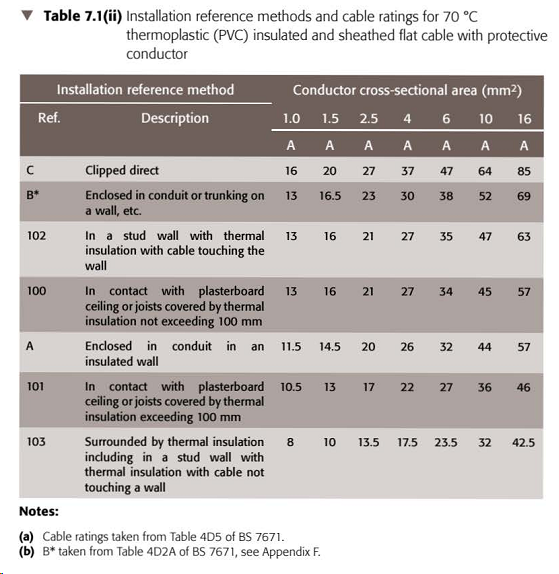
A friend used this when refurbishing his house in France, where it seems that pretty much all internal studwork is done in steel. I was pretty impressed, as it's quick and very accurate. The walls were also pretty soundproof compared to timber stud walls, something that surprised me, as I expected them to transmit more sound. One thing I did notice was that it seems to be the custom in France to run all electrical wiring in flexible conduit. With the steel stud system this seemed to me to be a very good idea, as it kept the cables in place and also provided abrasion resistance where the cabling ran though sharp edged holes in the steel studs.2 points
-
Like all Self builders we found we had a limited number of options for living accommodation during the build, given that we needed to demolish the bungalow to clear the plot for the build. The options were, rent locally or a caravan on site. Renting locally wasn’t an option due to the high rental costs, so we looked at the caravan option. The main problem was access, an 8 feet wide drive with a hairpin bend half way up, a dry stone wall, 80 feet tall trees and limestone outcrop put paid to that idea. A local crane company visited the site to look at the feasibility of craning the caravan over the trees, the narrowness of the road, a road closure and 4 mile diversionary routes for vehicles, a licence from the local authority soon put paid to that idea. Then a brief conversation with a neighbour and a lightbulb moment, we can up with the idea of a timber framed tiny house built in an orchard that formed part of the plot. The day before submission of the planning application a sketch of a small 7 x 5m cabin was added to one of the drawings. Thankfully we got planning approval. The construction of the cabin allowed us to practice our woodworking, insulation and other construction and trade skills. This is where we currently live. This what it looks like on a wet autumn day. Not the power cable over sailing the cabin. Happily the DNO installed taller poles to increase the clearance.1 point
-
I'm using a Reolink Go with a sim card and solar panel attachment to keep it powered. So far so good in terms of battery life as it's almost always at 100% given the recent sunshine. Nothing fancy but does the job - can view it on my phone, sends push alerts whenever motion is detected (usually deer!) and automatically starts recording. Night viewing is decent too. Got it off ebay.1 point
-
@newhome those 10 are all complete as far as I am aware. Grand designs just decided they didn't want to wait any longer for the final homes to complete, and Graven Hill we're quite desperate for them to air for marketing purposes, meaning the tail end of some of the builds didn't make it in.1 point
-
I would think with that level of insulation it would only be any good for living in in the summer, wood burner needed for winter.1 point
-
Have a look on Bing Maps too. That can bring up a different view from Google Maps.1 point
-
1 point
-
Tin roof sheds can get very hot in summer. Not sure what to recommend. My shed stays impressively cool but it's got a concrete floor and tiled roof. Walls are oak boards, air gap, membrane, WBP, studwork filled with cheap loft insulation, more WPB.1 point
-
you do get them, such as this one https://www.pureh2o.co.uk/product/quatreau-touch/, however they are ridiculously expensive. I have gone for the Quooker Fusion after a fair amount of research. If you are buying a boiling water tap compare the frequency at which the filters need to be changed and the cost of the filters. This is one of the reasons I went with Quooker as with a lot of the other taps I would have been paying a lot more for filters over the lifetime of the tap.1 point
-
The default for fusion 360 is save to the cloud but it's only a few extra clicks to export to your hard drive as well and I do both. Most CAD programs have tools for collaborative projects and document management - which I don't need - but I can imagine they only work with the cloud.1 point
-
For a laugh, I made a curved beam for one of my Simple Sunday Experiment. Then bust it.1 point
-
Pretty easy to drop timber into the U channel - tends to get done on uprights where doors go but not much else.1 point
-
My Anet A8 came with a hot bed and has ABS settings in the menu. I use the hotbed set to around 60C for PLA. Not sure what temperature ABS needs but it might take a long time for my hot bed to get up there. Mine runs on 12V and I think some people upgrade to a 24V system to improve the warm up time. My success rate with PLA is up to about 80-90%. eg most of the time I get usable prints but almost all have some minor defects. I'm certainly still ironing out the bugs. The two most annoying problems I have are: Warping. This can cause two problems. 1) The edges of flat objects lift off the bed so the base of the object isn't flat. worse case the head hits the print and the whole print comes unstuck. This can usually be fixed by adding a brim or raft around the object (Cura will do it automatically) so the lifting occurs away from the object. 2) Warping in mid air. Sometimes when printing something with an overhang the perimeter curls up. For example if printing a sphere after say 5-10 layers the unsupported edges curl up above the nozzle instead of staying flat. I need to do some more investigating to fix this. Could be I'm using too high a hot end temperature. Seems worse with PLA+ than PLA. The iron filled PLA was also a lot worse then the Bronze filled for some reason. I ended up wasting most of the iron sample trying to solve the problem. Circles on the first layer not sticking. When drawing the first layer the outlines of holes and other curves tend to pull off the bed as if the filament is shrinking. Slowing the printer right down to a crawl helps but I think I also have an issue with retraction - the extruder retracts the filament when moving from one circle to the next. I noticed that the problem occurs most when starting the next circle. I think the filament might be retracting too far so that when starting the next circle it takes awhile to get the flow going again. Sometimes the miss printed filament gets in the way and I have to abort the print. Usually if it gets past the first layer the rest is OK. Be prepared for long print times. Cura will estimate it for you but tends to under estimate print time by about 20%-30% If it says 2 hours I allow 3 hours including set up time or having to restart due to first layer issues.1 point
-
used 6" gyproc jumbo studding when i split my building into bits. as it was industrial i started on concrete floor with a 6x2 sole plate and then screwed bottom run to it. same at top slopping from 3m to 5 metres high !!--that is max approved height for jumbo -fastened 6x2 to the purlings of the building -then attached top rail to it dead easy-then to fit in the verticals . as it was afirewall it had to have 2 layers of 19mm plank gyproc on EACH side+ 1 layer of normal fireline with a fire curtain hanging in middle thats a lot of weight and long screws+ all overlapped !! its very soundproof with all that plasterboard feels very flimsy till you screw some plasterboard to it i was worried the framing would be too weak cos when truck came with the pallet of 19mm planks its hiab could not lift it ,was loaded with a stacker truck had to manually lift half of it off,before hiab would lift it. definitely not a one man job I bought the fancy gypoc pliers which pierce , bend and lock the bits together . only downside was you do not have a very wide flange to fix in to ,so spacing's of verticals must be perfect . but yes a good system and not as flimsy as it looks once erected and a layer of drywall on it would i use it again --YES -even considering it for any internal walls in new house you know it will all be straight --which if you buying CLS form local Bm therer will be bits that are not either straight or are twisted. I agree with @JSHarriselectrics need to be in flex conduit -the edges will slice you very quickly if no gloves when erecting it or you will have a perfect wire stripper.1 point
-
They look like a good solution. The problem with using rubber grommets in something like this is that they will end up getting displaced as cables are pulled through them. It doesn't take much to dislodge a rubber grommet, and they can be a PITA to get back into place when they come loose with a couple of cables threaded through.1 point
-
I've not tried to print ABS but I've heard it's difficult. Some people say you need to put the printer in a temperature controlled cabinet but not sure how essential that is. I've printed PLA, PLA+ and some samples of metal filled PLA. Don't like PLA+ as it seems to warp a lot. Any overhangs can curl up higher than the nozzle which can hit it later. The Antique Bronze filled PLA printed ok but straight off the printer it looks like brown plastic. Sanding it exposes the metal but the effect isn't as good as I had hoped. Apparently putting prints in a rock tumbler with brass nuts improves the finish so I'm going to try that. The iron filled PLA isn't very impressive either straight off the printer. It's rather grey. It does stick to a magnet though. I plan to try rusting it to get an aged look. Be prepared for a steep learning curve. I still struggle to get some things to print. The first layer is frequently the problem. I've got a glass plate to make the bed dead flat and have tried hairspray, prittstick and blue painters tape on the bed. These are the three main things people recommend to improve adhesion. Blue tape seems to work best for me. One thing I had to learn was how to design parts so you don't need supports. Sometimes it's just faster or necessary to cut something in two in CAD, print both parts and super glue them together. Will try to post some photos when I get home.1 point
-
We fitted an Itho Daalderop combined hot,cold and boiling water tap and wouldn't be without it. The only thing I wish I'd done was specify the optional larger boiler together with the mixer option for hot water, as that gives near-instant hot water, using mixed down boiling water from the under plinth boiler. We run the boiler on a time switch, so it's off overnight and only on during the day. It doesn't seem to use much electricity, though, as the boiler is very well insulated. I also fitted flow restrictors to the water supply to the hot and cold pipes, to restrict the flow to a maximum of 6 litres/minute. These had the useful side effect of making the tap much more controllable, with no splashing at all.1 point
-
"Dear XYZ Thank you for your letter. Whilst I always enjoy visits from Council Officers, in this case I was simply maintaining an existing access into my field, for convenience and in order to prevent mud being spread onto the lane by vehicles - thus preventing a potential hazard. As it is a field entrance, I am entitiled (required?) to carry out such maintenance. I enclose a screenshot from Google Earth, and also a photograph taken this morning. You are, of course, welcome to visit in any case. Rgds etc Basil II, the Bulgar-Slayer, Founder - Varangian Guard"1 point
-
1 point
-
I might have thought rent a LIDAR for that - it seems to be what the Archaeological TV programmes use now for their Whizz-Bang element , and should be relatively cheap. I like the 3d presentation of the stairs, though (on the subject of 3d visualisations) I see that Richard of Northampton had one of his head displayed in the Norwich Museum. I hope you are better now, after all those years in that car park . Ferdinand1 point
-
It would be really useful if someone did an on line 3d print service for house models from autocad.1 point
-
1 point
-
Little tip for engineering bricks-paint them with linseed oil on the day of use. You’ll need to wear gloves when laying but saves all the after care with them.1 point
-
The flexible duct linked to is primarily for use underground and through slabs and walls, not internal or external use as conduit. Polyethylene isn't very UV resistant, so whilst this duct is fine when buried, it may well degrade if used as conduit that's exposed to light. Plastic electrical conduit (as distinct from duct) is usually made from uPVC or sometimes ABS, so that it can be solvent welded.1 point
-
It’s really up to @nickw to go back to his roof manufacturers and find out what they want under their sheets, if he doesn’t install to their spec he probably won’t get a warranty. I will I’ll be using a membrane called klober permo sec metal, which is a breather membrane with an extra layer of spun polypropylene on top to allow any condensation to escape, wicked expensive but I have not been happy with the roof makeup that the manufacturers want.1 point
-
Have you checked google street view (assuming the secondary access entrance is accessed from a road)?1 point
-
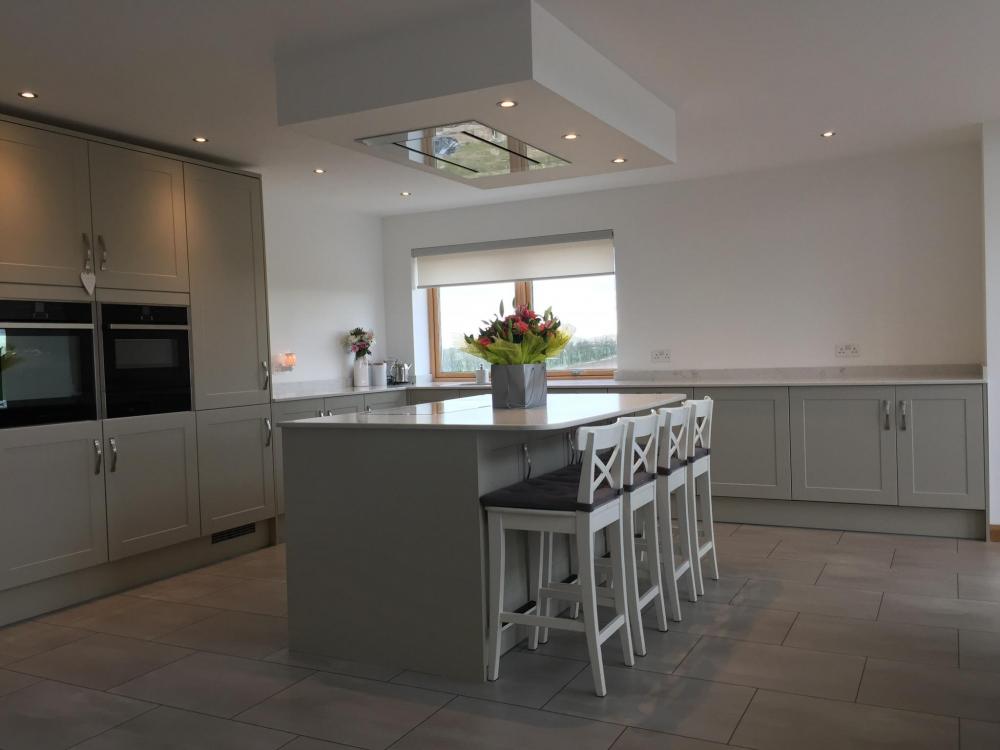
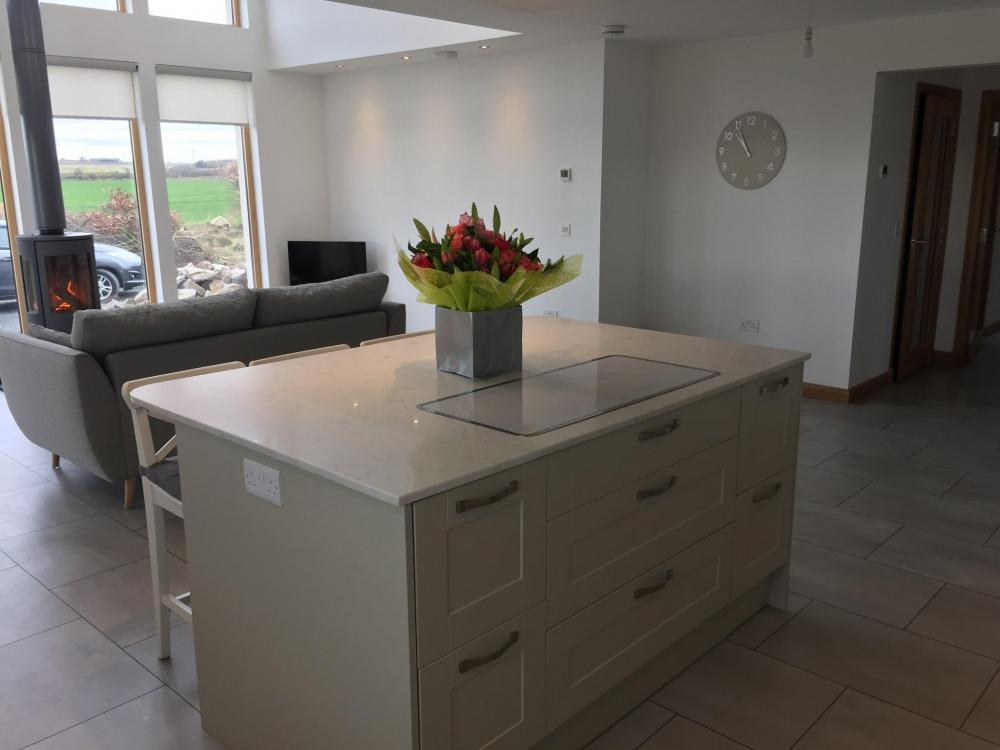
Love our kitchen island, our last one didn’t work too well and had put me off a bit but now we have our hob set into it, and sockets on the furthest away end panel like someone else has mentioned making it easier to wipe surface. One thing i would change is a separate cutlery drawer somewhere else as ours is under the island along with pan drawers and i constantly need to step aside to allow folk to get things. I would also have chosen/made better end panels as underestimated how much i would be looking at them. We also have 1200mm space around island and intended pushing it back to 1/1.1 once building control signed off but now really like the space as is. The silkstone worktops are really easy kept, and nice and cooling as our kitchen is prone to overheating from the glazing. I like the worktops kept clear, so small appliances are in the adjoining pantry and no kettle as have Boiling water tap.1 point
-
I prefer to go a little deeper whenever possible (ie assuming availability of the chosen worktop) as it allows for greater worktop area when you've got things sat on the top at the back. It can also make plumbing at the back a little easier.1 point
-
As a cheapskate, I never consider anything except French Doors. Until I build my Para 79 Haese in the Peak District. F1 point
-
Just buy some bloody spiral bricks. https://www.ibstockbrick.co.uk/kevington/specialshapes/spiral-bricks/ If you really want to do it properly, build it solid out of blue engineering bricks, then carve it by hand into statues of a pair of bobbing dogs, and 2 sausages forever just out of reach. F1 point
-
And since only you will be doing the considering (because its your money).... who cares, but you?1 point
-
Pointing this out in case anyone is interested, it started last night on the new Scotland channel on the BBC. https://www.bbc.co.uk/iplayer/episodes/m00043v0/scotlands-home-of-the-year The quality of the programme isn't quite as good as some of the channel 4 property programmes, however still worth a watch if you like property programmes.1 point
-
EpsilonGreedy Here goes.. Windows and doors 7.5k Roof and insulation 6.5k Blocks and ties 3.7k Lintels 1.5k Sandstone 7.2k Mortar and plasticiser 1.3k Foundations 12k? Wall insulation 700.00 Stone cills 1k Surecav cavity system 3k Scaffold, skip, portaloo..1.5k This is materials only, and does not include LABOUR or legal costs. Does not include site insurance cost or plant hire. Does not include ANY mains connections.1 point
-
Patp Definitely get some sort of heating. We have tried several types of storage. Previously, during a house renovation, we put everything in a big yellow storage facility. Stuff was secure and dry, but we hired such a large unit that the costs were considerable because we used it for 6 months. At the moment, we are like you living in a caravan because we sold our property. We gave away most of the stuff we knew we wouldn't need because of downsizing, but the remainder is stored in a barn. It's not good! White goods are fine..but if your thinking of upholstery, or mattresses etc cover it well and keep away from damp. I suspect your things will be better off than ours in a modern garage compared to a ropey old barn though!! In summary, if costs allowed, I would opt for a storage facility.1 point
-
Welcome to the pleasure dome. Take your time and get it right so you stay there as long as possible, as by definition we only have one forever home. Ferdinand1 point


