Leaderboard


Popular Content
Showing content with the highest reputation on 01/09/18 in all areas
-
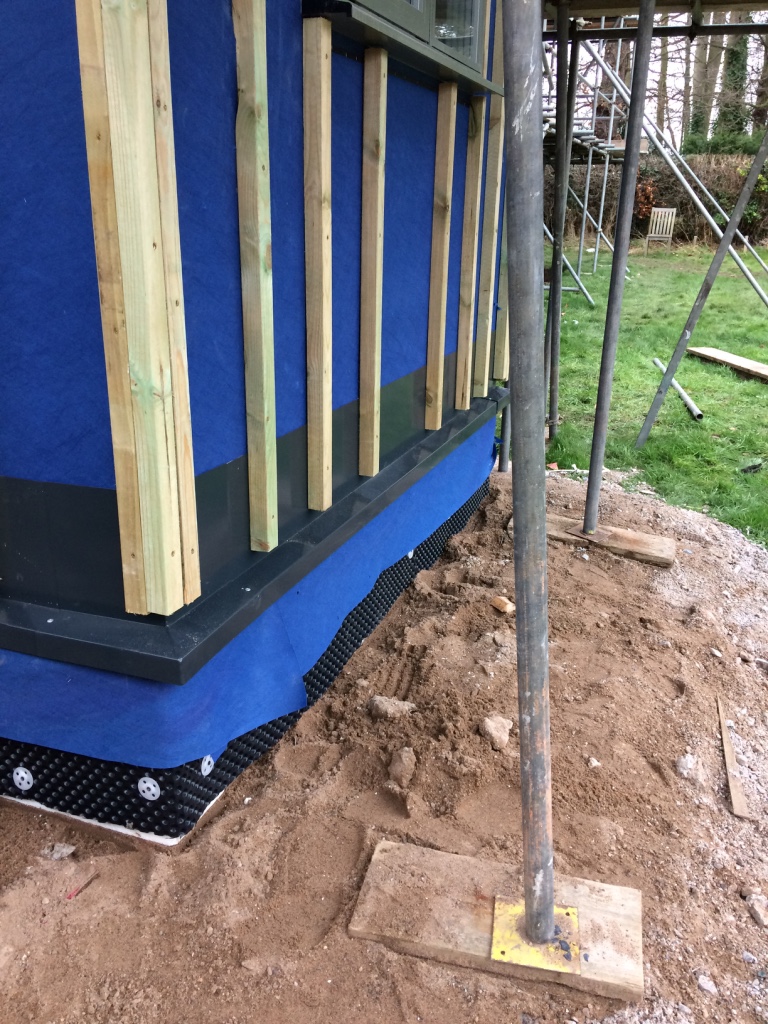
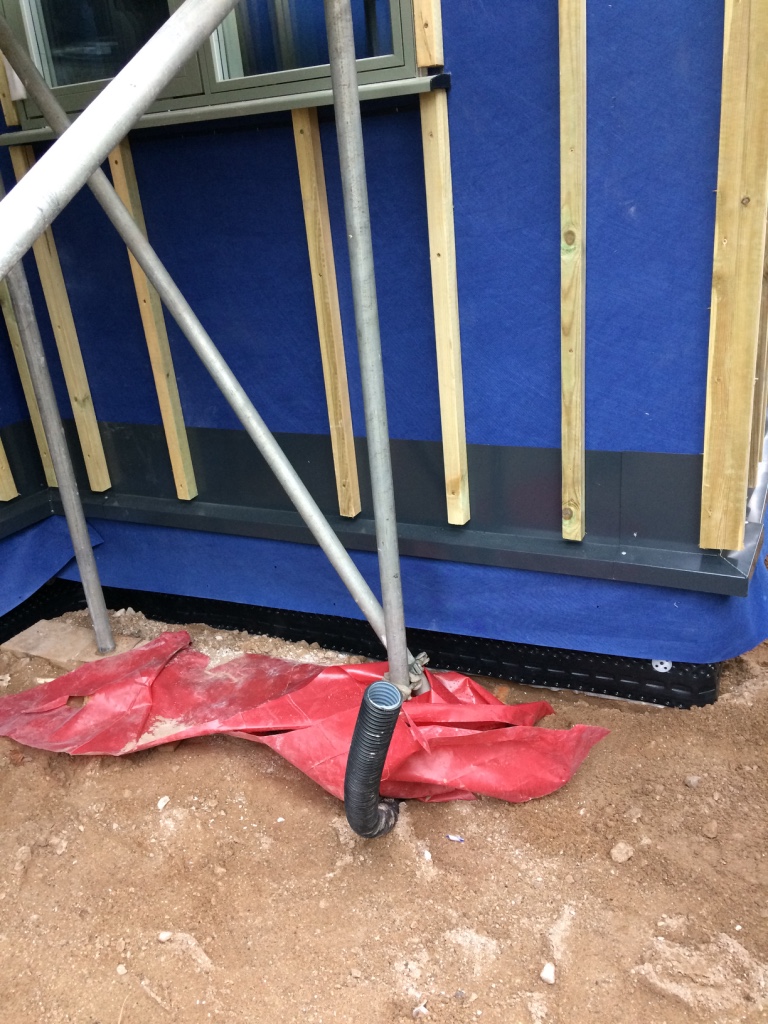
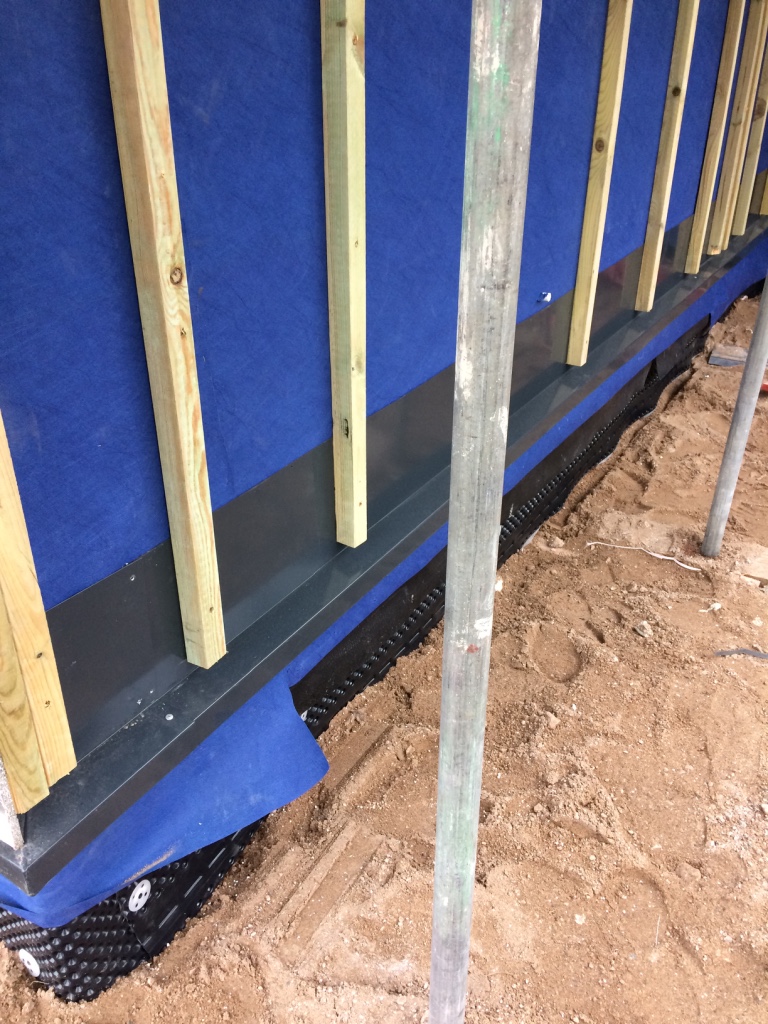
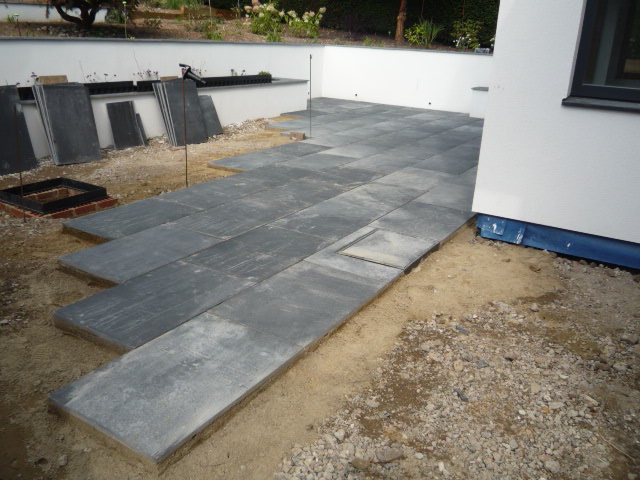
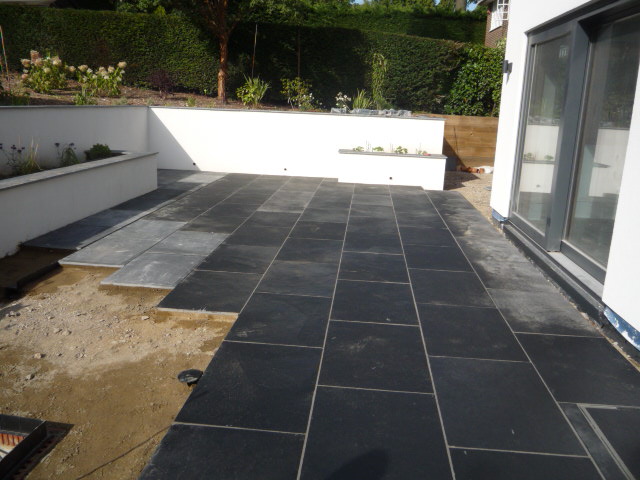
Good morning all, I am building a house with a frame supplied by MBC Timberframe. I have been very impressed with the service so far. We are not finished yet although the frame is up and my windows and doors are in. Roof covering is also on and the render guys are on site at the moment. We are using Parex rendering by the way. I also had MBC install a passive slab and this made me thing about how to finish the works below ground and up to what will be my finished ground level. if I was building with block/brick i would have installed several courses of them agains the insulation. But since we don't have conventional trench foundations that isn't ideal. The passive slab sits on hard EPS insulation as you probably know. I asked Peter Gray who is my project manager at MBC if he had any suggestions and he told me about a previous installation he had designed for a client. I involves fabricating a trim of powder coated aluminium which is attached to the bottom of the frame with a layer of Geotex waterproof membrane protecting the EPS as this is below ground level. Peter was very helpful, sent me a drawing of it and talked me through the process. I had a local fabrication firm (Barnett Engineering in North Wales) make up the metal. They also made me a selection of inside and outside corners which neaten up the corner element of the trims. The cost of the metal came to just over 2K. I applied the Geotex to the outside of the EPS and then attached the metal trim to the bottom of the frame which was very straightforward to do. I have attached some pics and I hope that this might be of interest to others who are self building! The battens in the pics are the carriers for the render board. if you have any questions, I would be happy to help, and I'm sure Peter would be too. Derek


 3 points
 -
So I think my mind is being distorted by costs. The prices I have seen for eps look to be higher than the ones @IanR is quoting, and the cost of concrete is cheaper. I was typing this as Ian did his last reply. What an excellent reply and just what I was looking for. Top man Ian. So in essence having 20% of a slab with a slightly lower u value than the rest of it will be better than 100% of the slab at the lower value. I was having trouble thinking a colder area all around the edges would be sucking all the goodness out from the middle so why bother trying to improve the middle if the edges just rob it back. Excellent as always thanks everyone. ??2 points
-
Even at the localised 200mm thick EPS below the beams the U value is still better than Building Regs, so I wouldn't characterise it as cold spots, and certainly not "majour". But it does need to be taken into consideration when calculating the whole floor U Value, just as timber fraction does when considering the whole wall U Value. Taking my floor as an example, I have a 475m2 slab, of which 79m2 "only" has 200mm EPS underneath, due to integral beams. But 396m2 has 300mm EPS underneath. So 83% at 300mm thickness and 17% at 200mm. The overall effect on U Value is quite small. Your suggestion is to remove the top layer of EPS and have the 100% of the floor with 200mm EPS. Still an OK U Value, but not as good as good as keeping the reductions localised. It's really not a lot of work to set out the EPS formers. I believe AFT allow 3 days for 3 people to get from compacted sub-base to concrete pour for an average slab. There's really not a lot of work to do the whole floor with beams, so very little to save by not doing the beams. The additional reinforcement would still be required to strengthen the slab where the load bearing walls will be sitting.2 points
-
HI @Russell griffiths No problem - your post generated a lot of useful responses, which hopefully will give you (and others) food for thought on the design, supply and construction of your Insulated Foundation(passive slab). As you will realise there are various alternatives and designs, all with differing propietary materials and variation of designs, to follow-up and think about. As @IanR points out, your ideas and questions are not stupid and you have been given two examples of designs/builds which do not involve a "complicated" design and use more concrete as you proposed. As with all construction projects, you have to bring your ideas to a specific project considering all the relevant aspects - location, ground conditions, ease of access, closeness to supply chain (concrete plant for instance), house build type (timber frame, conventional, etc), contracting strategy ( managing contractor, self manage with subcontractors, self build), budget, planning constraints & requirements.... At the end of the process, your project like most others will probably be a series of compromises resulting from all of the above and mores Best of luck and keep posting. I am sure that you will get lots of support2 points
-
EPS100 is quite a bit cheaper than concrete per unit volume. It's not stupid, but if you're happy with the U Value that 200 EPS provides, and you have the bearing capacity in the subsoil that can take the higher pressures from the line and point loads, why put in the extra concrete if it's not required? The localised 200mm thick integrated beams are very easy to produce, you just leave a gap of the desired width in the top layer of EPS, so there really isn't any extra labour needed to produce them. Since UFH is generally included within the insulated slab, there is a benefit to keeping it "thin" - to keep its heat-up time as low as possible. Edited to add: I have an AFT engineered insulated slab, which is on similar principles to the MBC version.2 points
-
This may help - it's the construction drawing for the MBC foundation on my build , which details all the elements and dimensions. 1528-01 Foundation Plan- REV A.pdf2 points
-
Hi Folks I am currently trying to plan a renovation and extension on our home. Managed to get the plans approved late Dec. So hoping to start work in May. I am hoping to improve the insulation and airtightness of the whole building as this is for the next 20 years hopefully. House was built in 1982 and is built into a slope. It has beam and block floors with no insulation, and a void underneath of between 600 and 1400mm straight to earth, no oversight. Walls are dense block with slumped cavity insulation, roof is slate covered with 25mm of polystyrene as insulation. The living room is double height up to the underside of the pitched roof. It is draughty, mainly through the floors. We have a gas condensing boiler so was planning on keeping this. So I have many challenges, as hoping to do as much of the work as possible. Current layout gives us about 1.5 floors, as the bedroom is in the apex of the roof as is not really full height. So I am raising the roof level to create normal ceiling height, which will give an extra bedroom. Downstairs will be one open plan room for living, dining and kitchen, with a separate utility room and bathroom. my first challenge is deciding the best method of insulating and making the beam and block floor airtight, anybody done this successfully from underneath. looking forward to getting stuck in, but really conscious of the value in good planning before starting thanks Tiny1 point
-
It's difficult to tell whether the planners objections are reasonable without more information, however I would prepare a more detailed design and access statement disproving the planners complaints and laying out your permitted development fallback position, which by the sounds of it may be "worse" looking.1 point
-
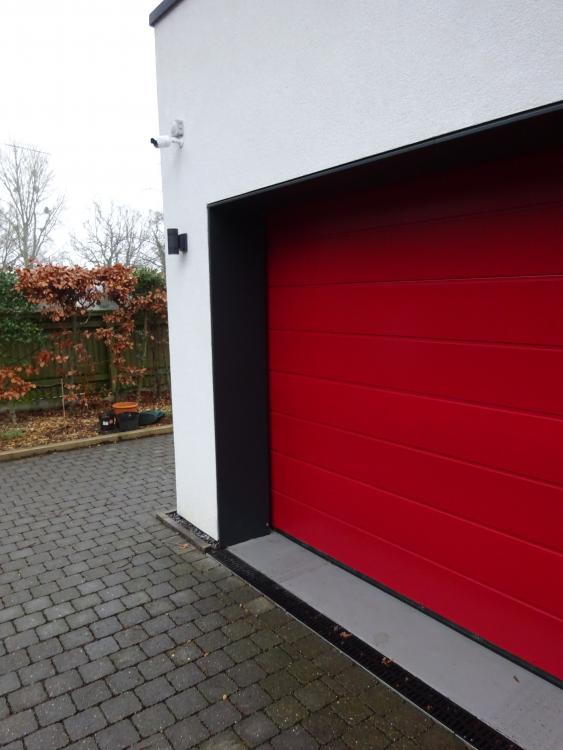
Nothing to add abut the bricks - but great garage!!!!!!1 point
-
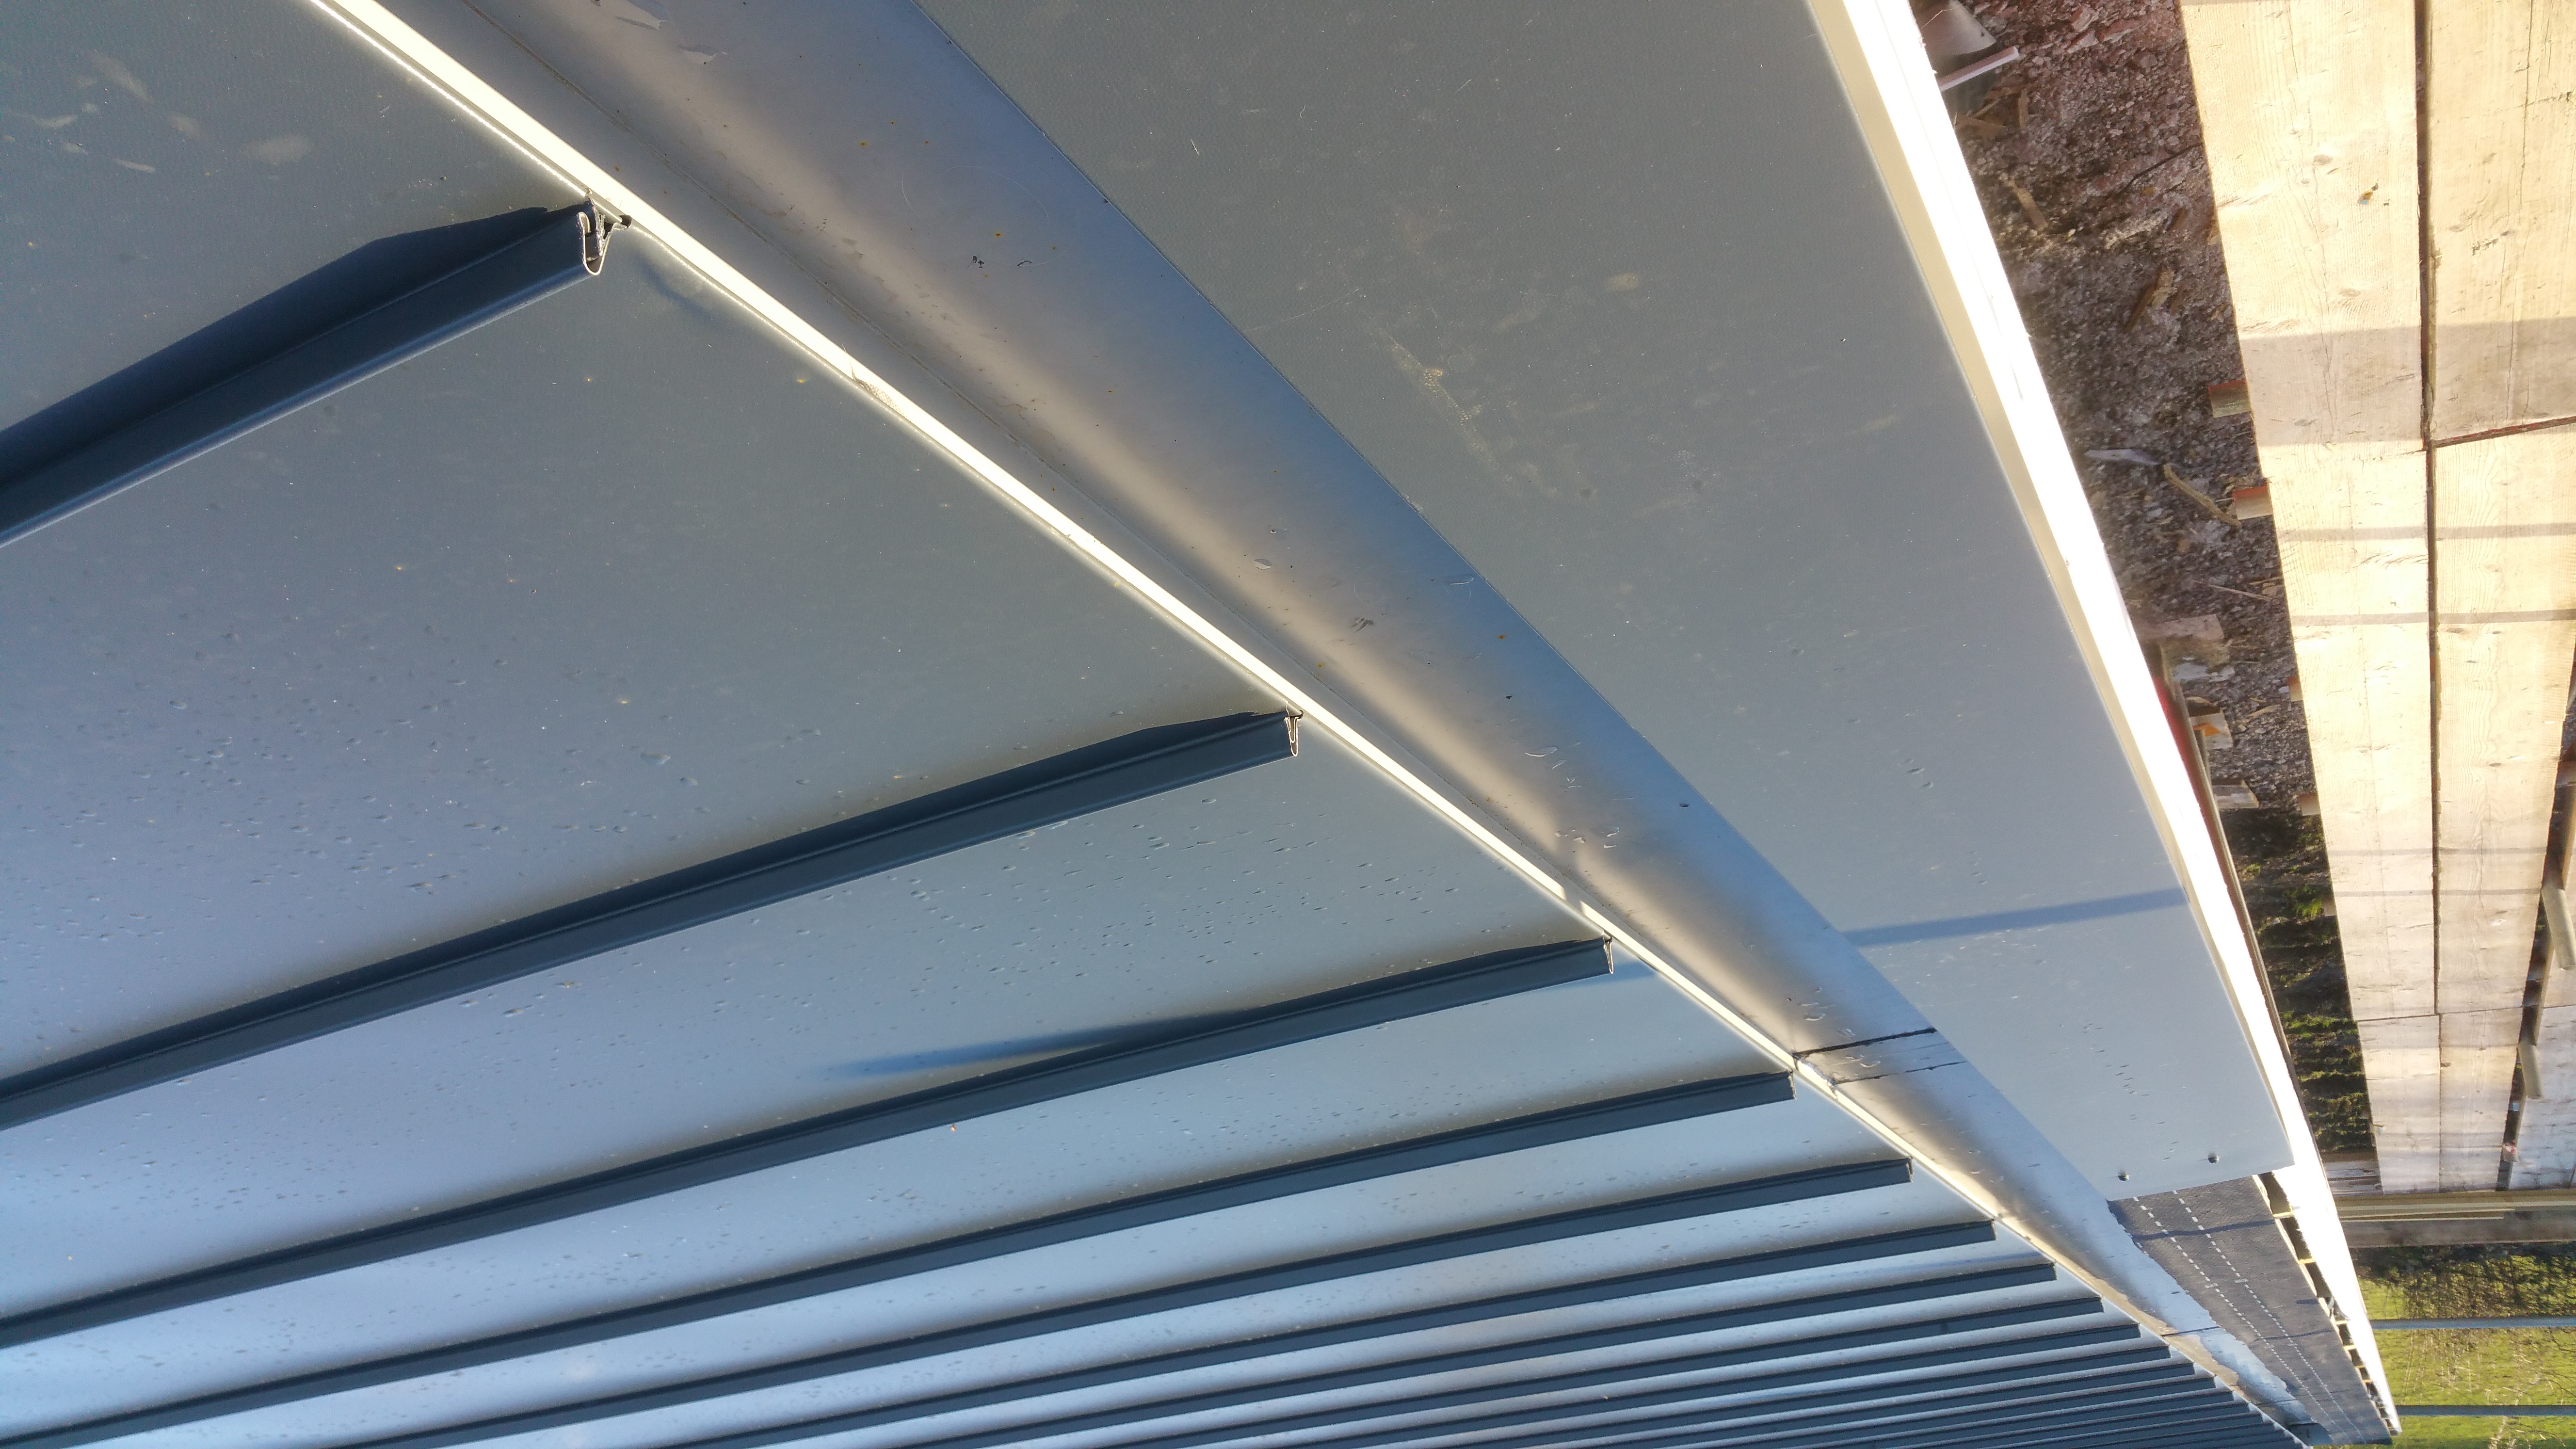
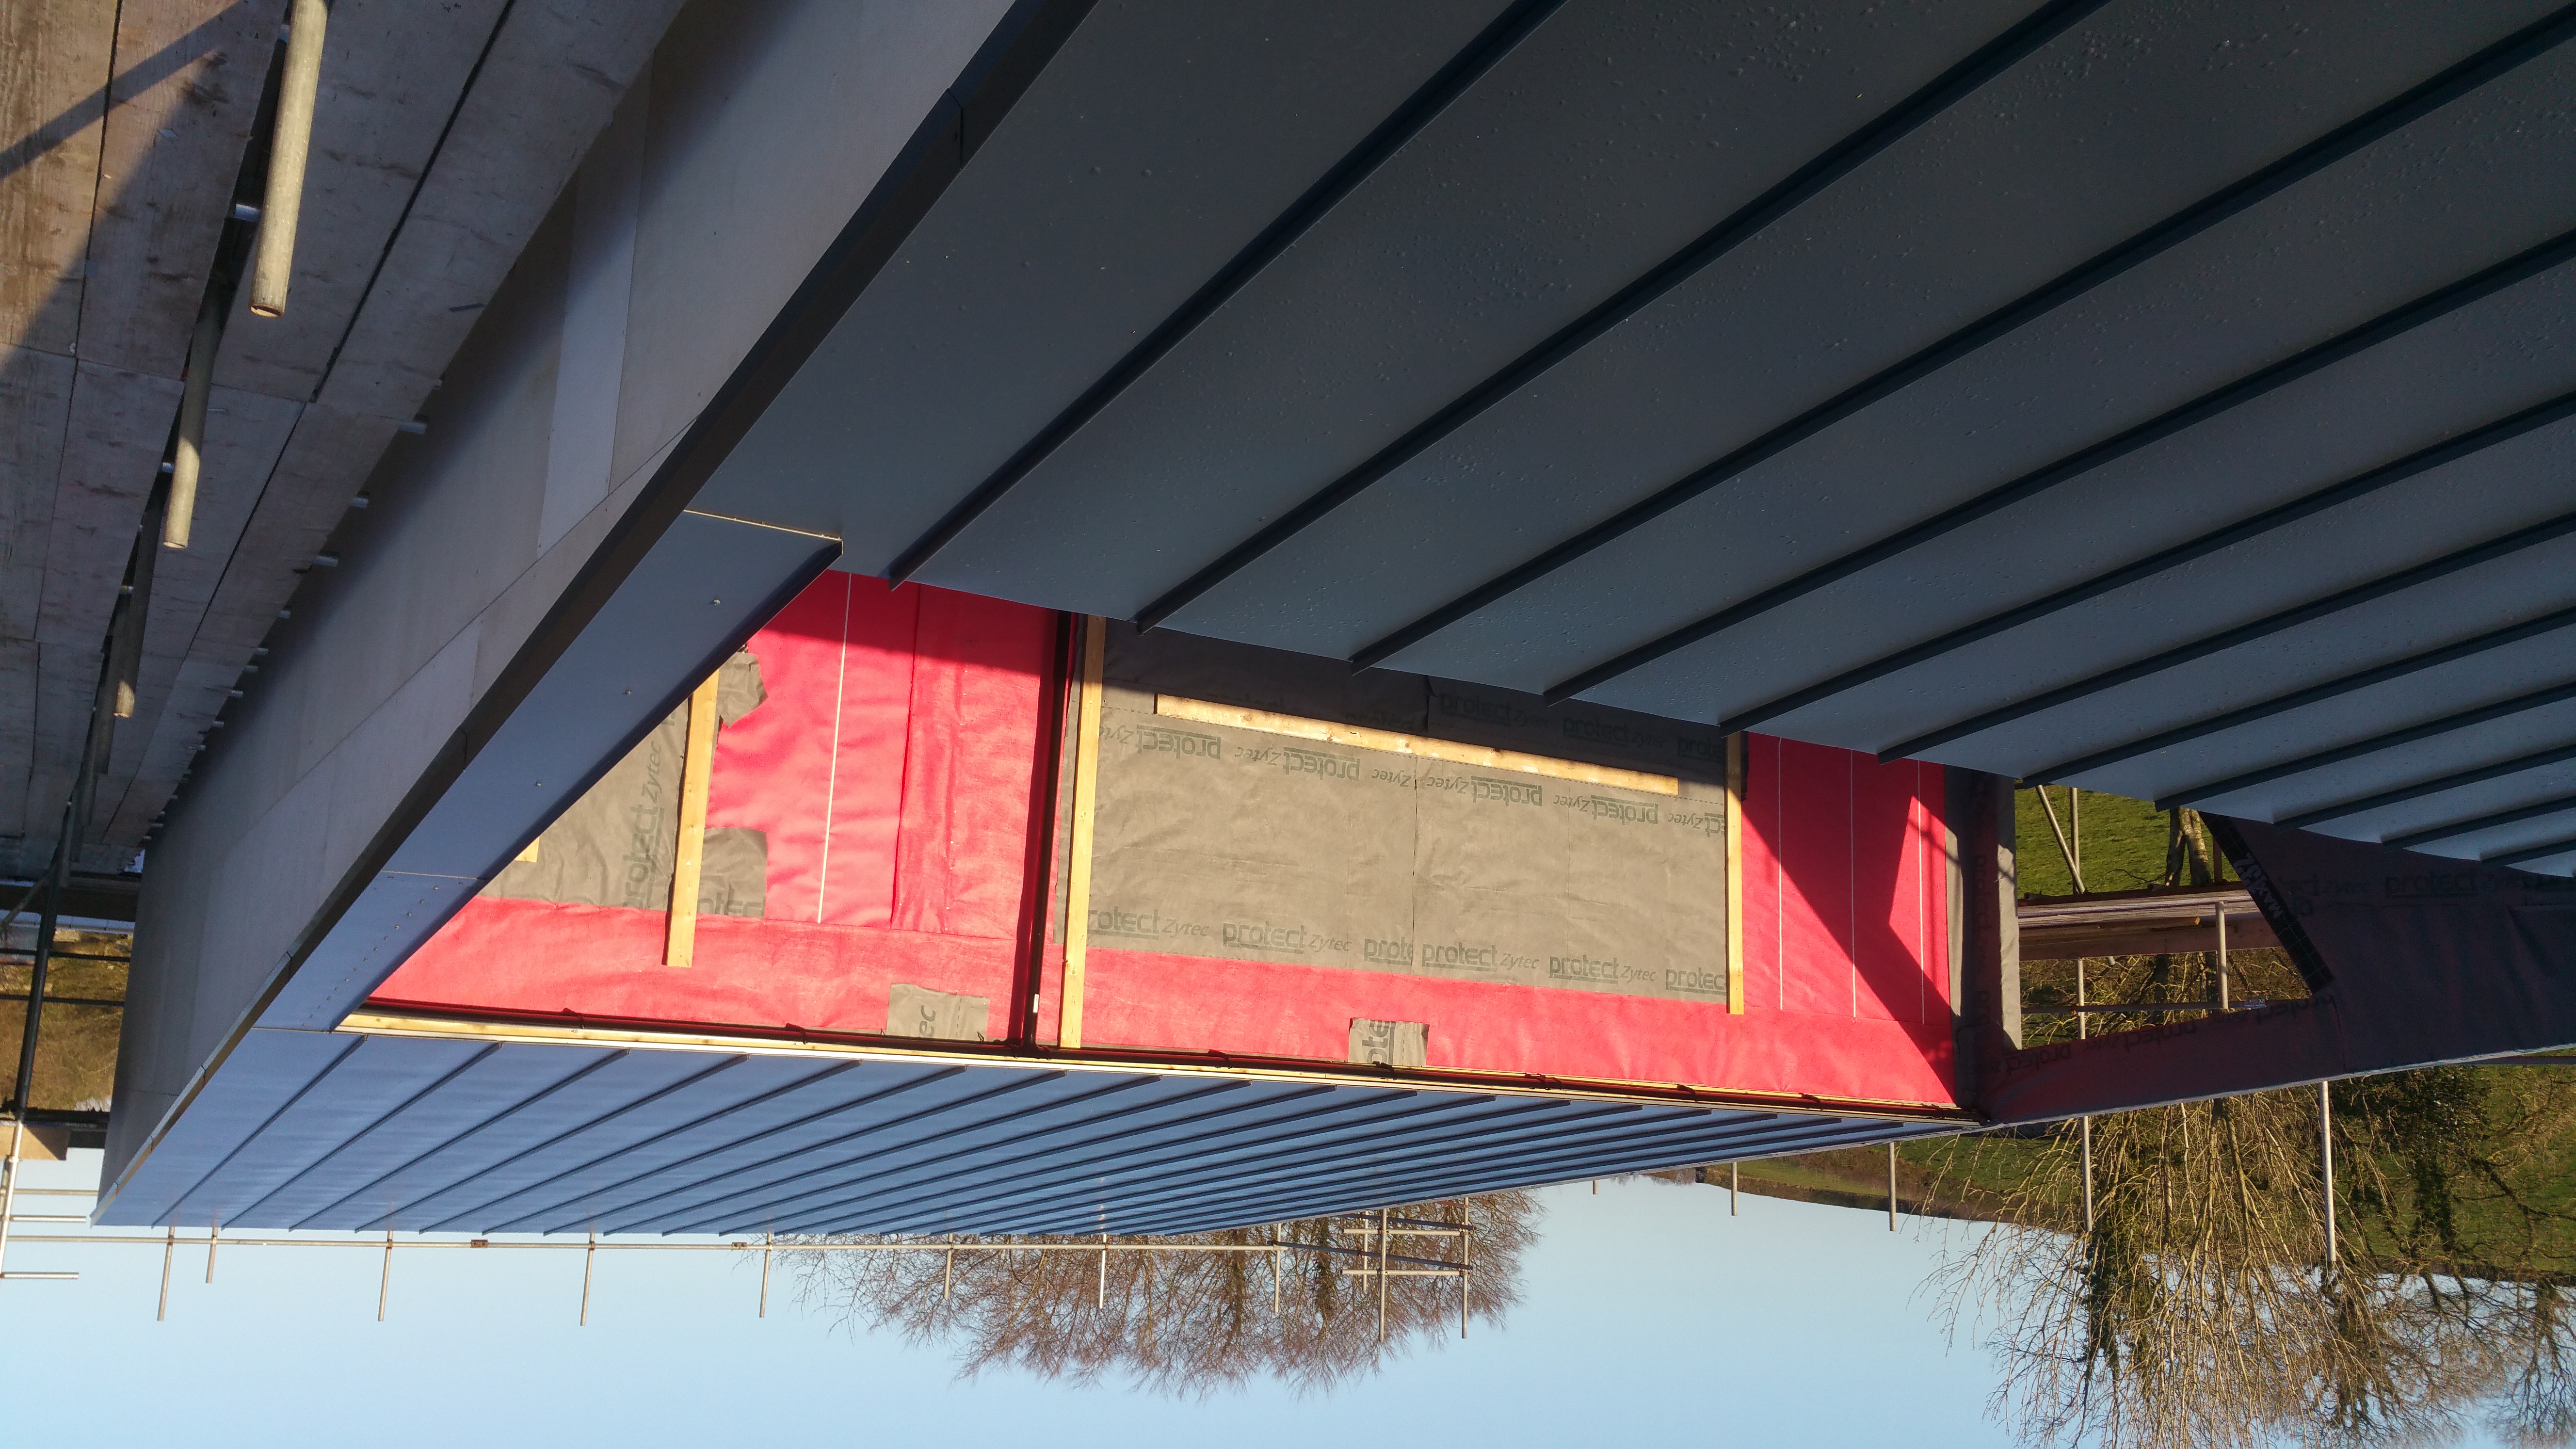
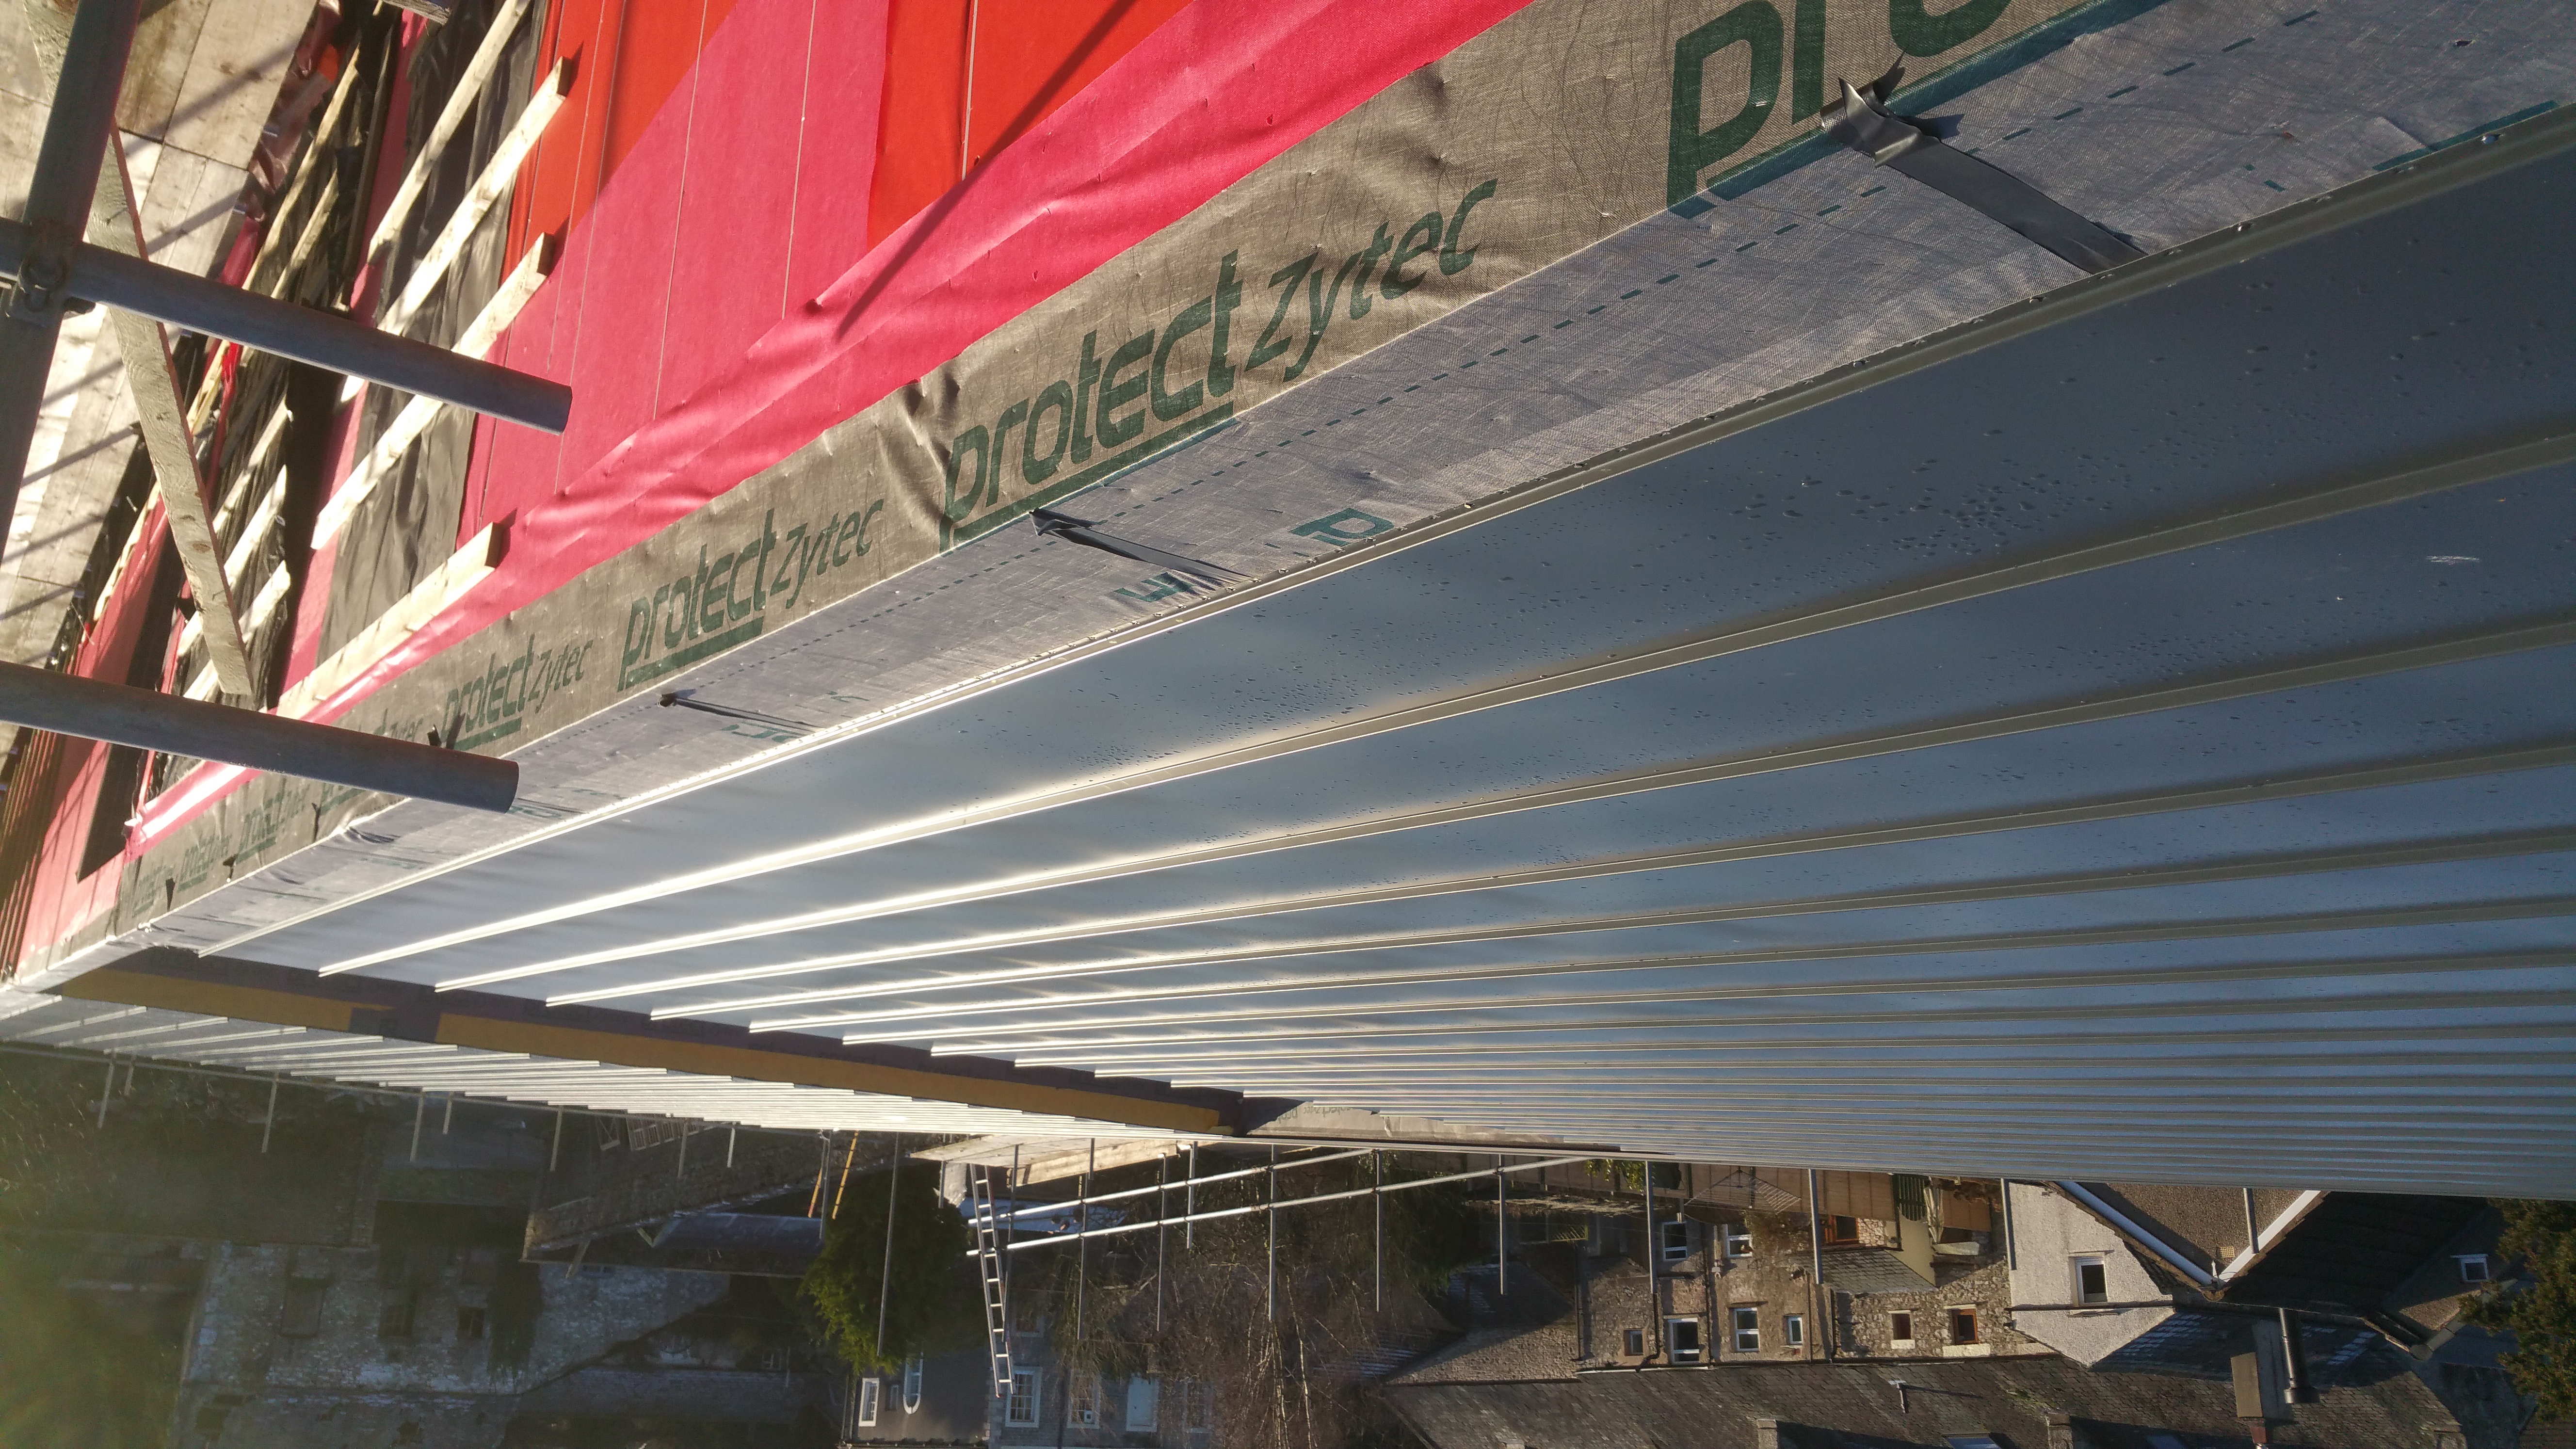
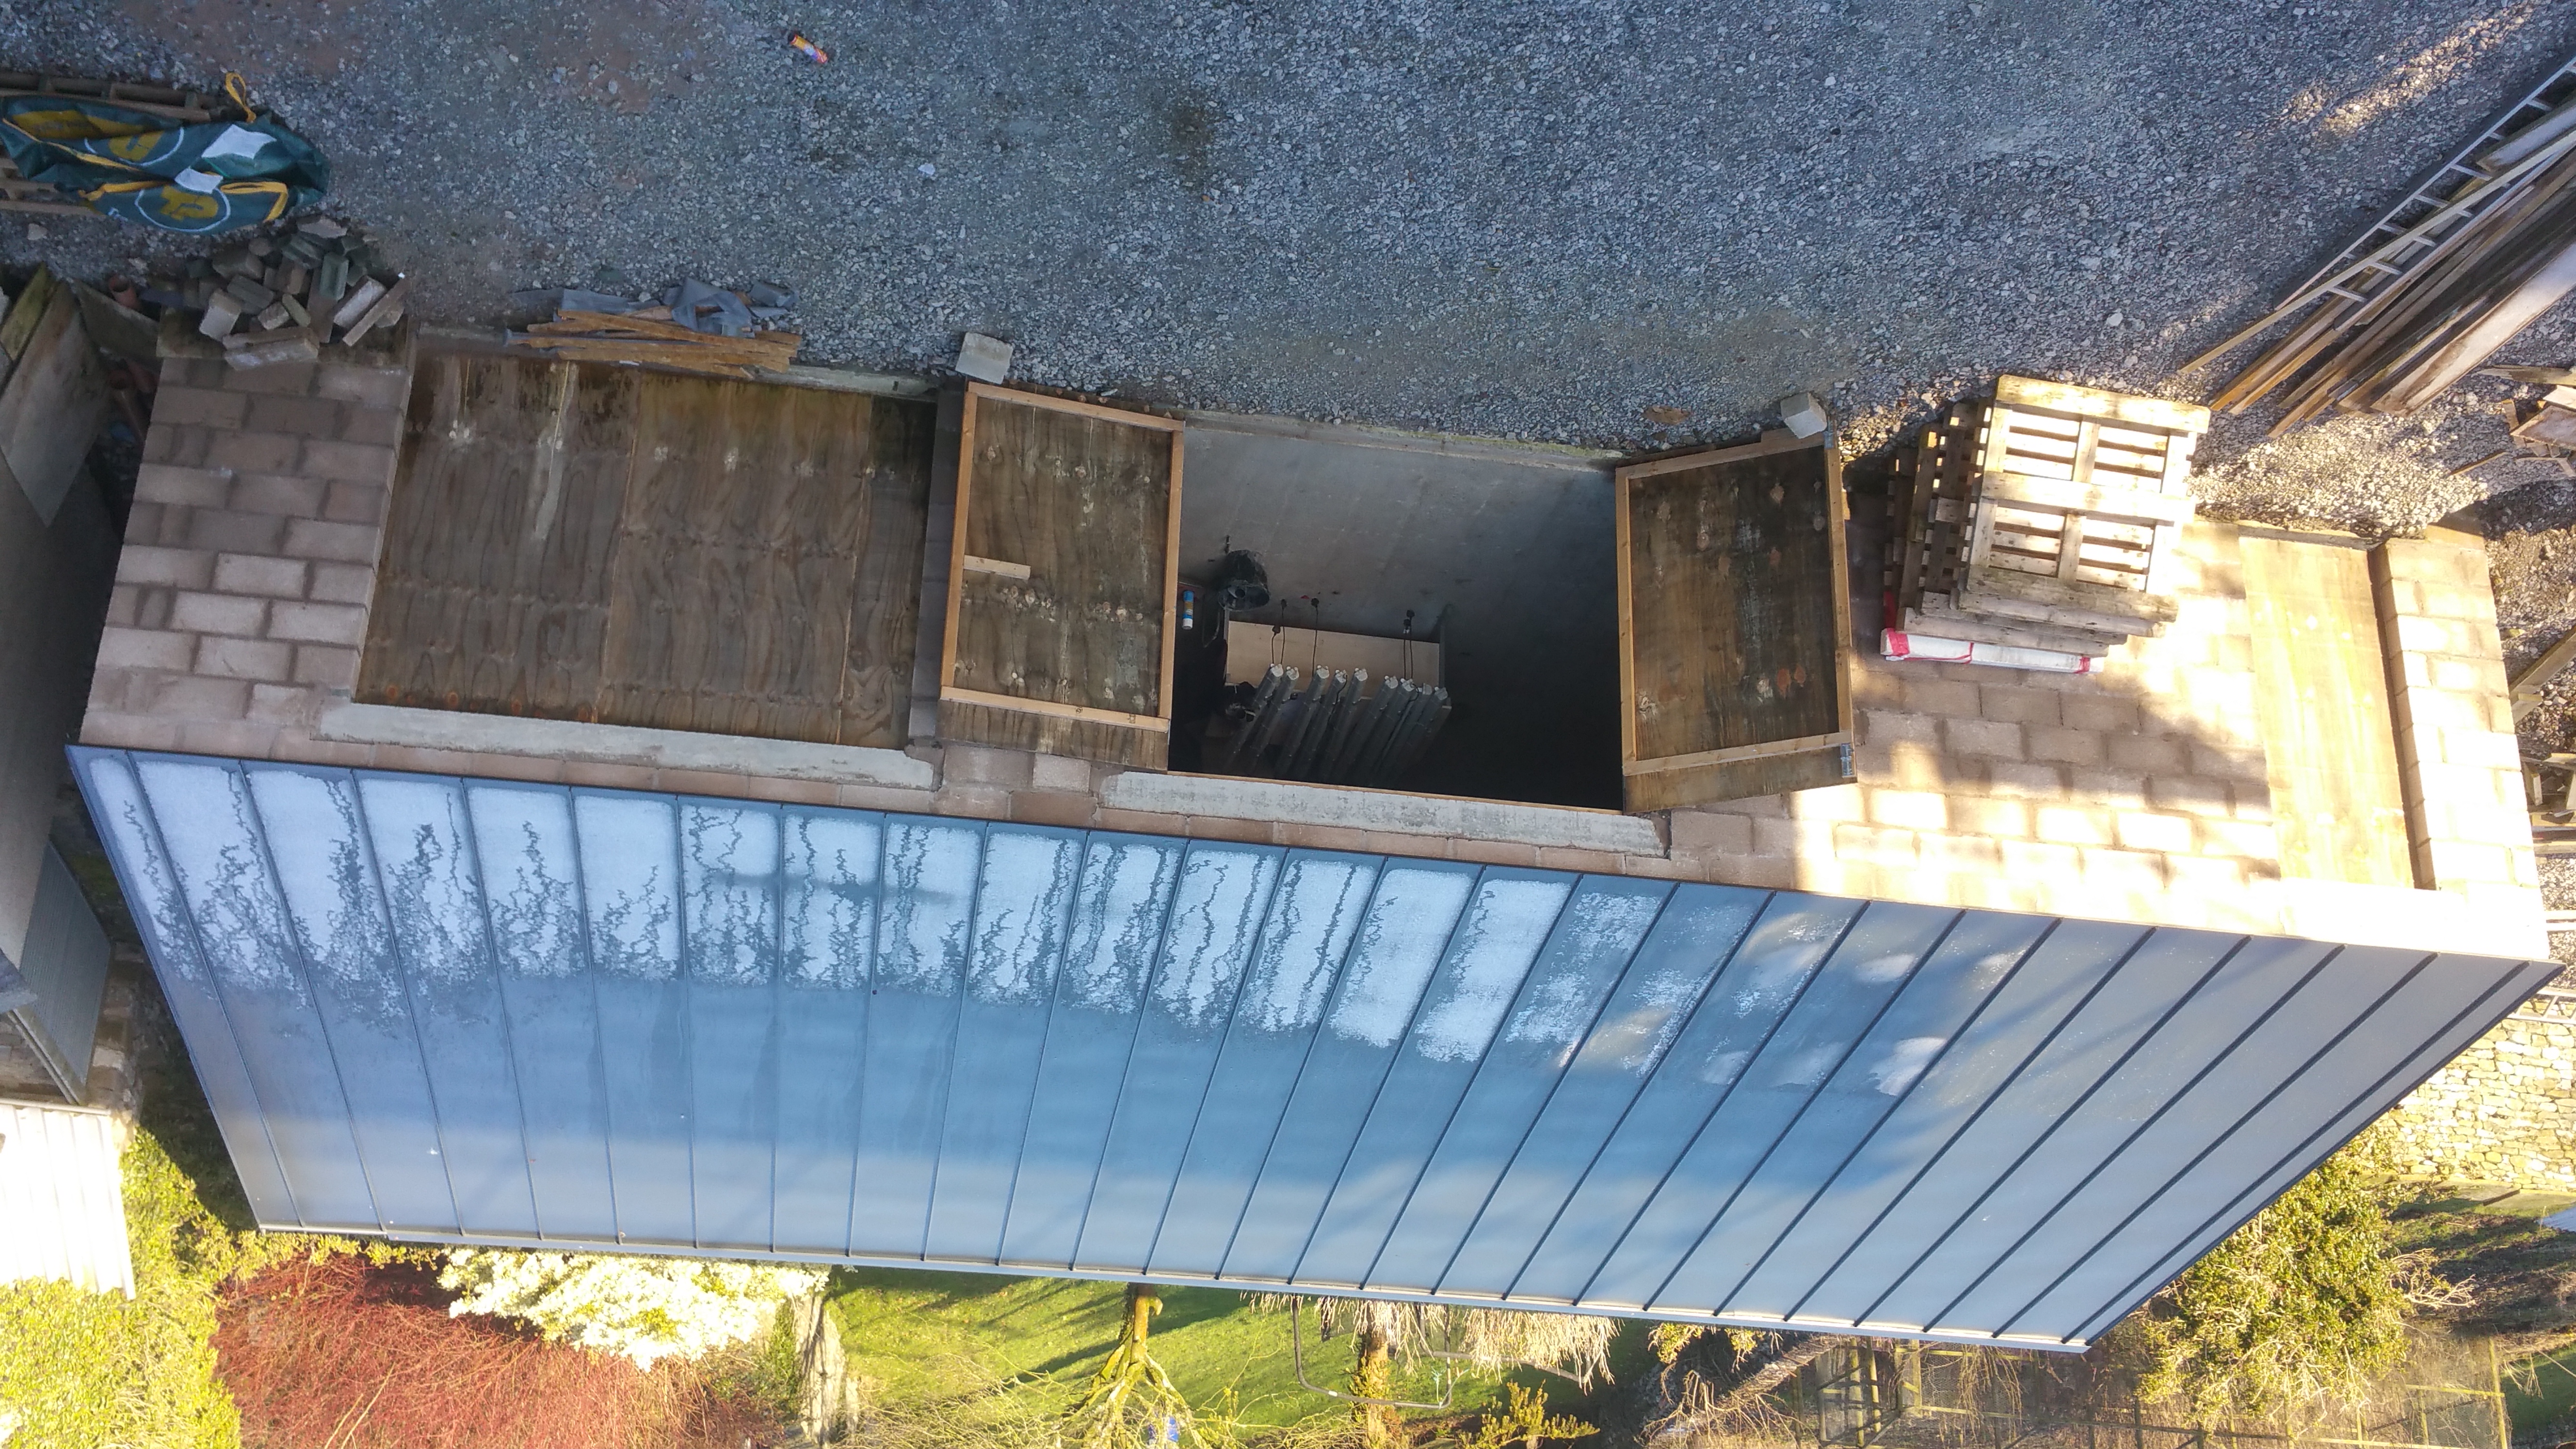
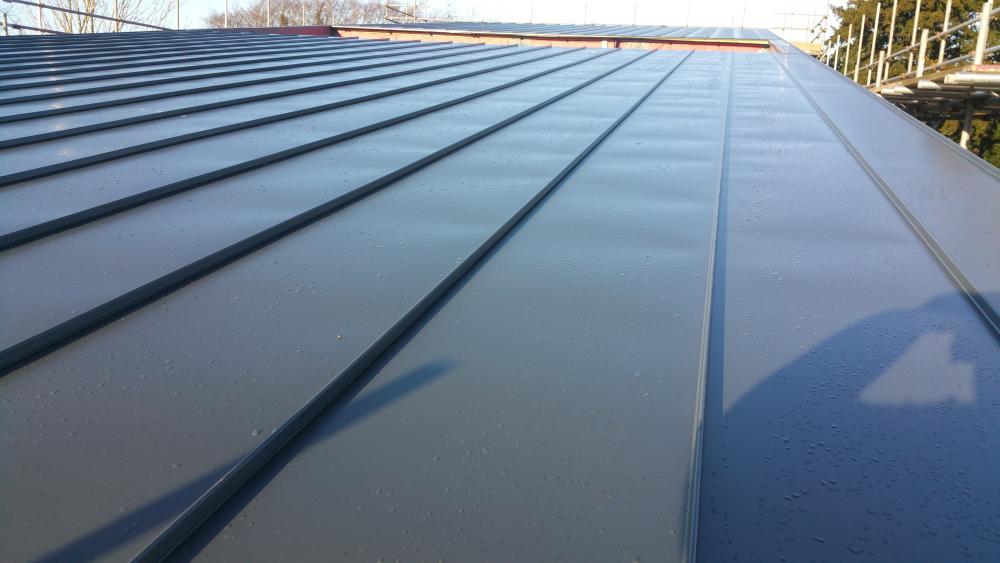
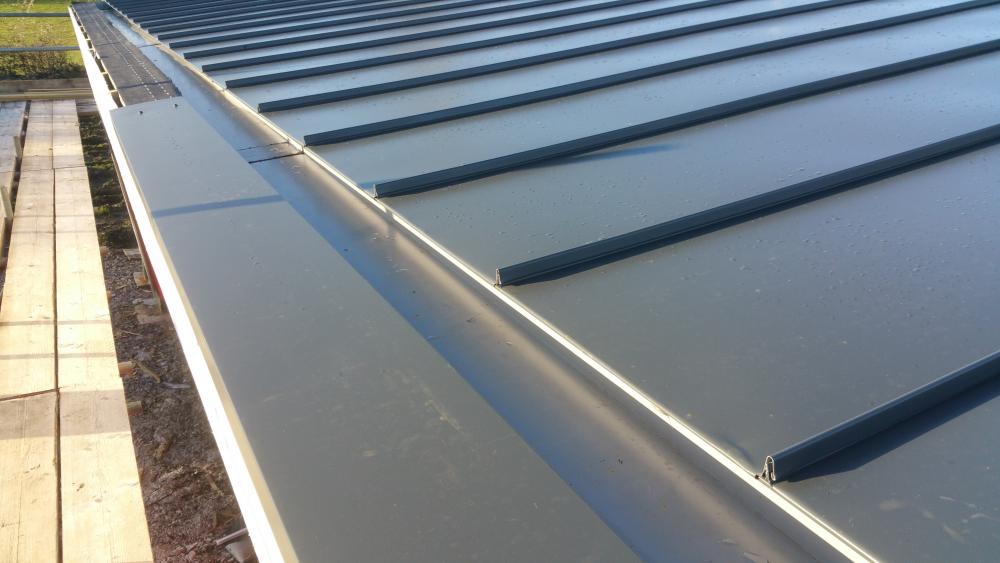
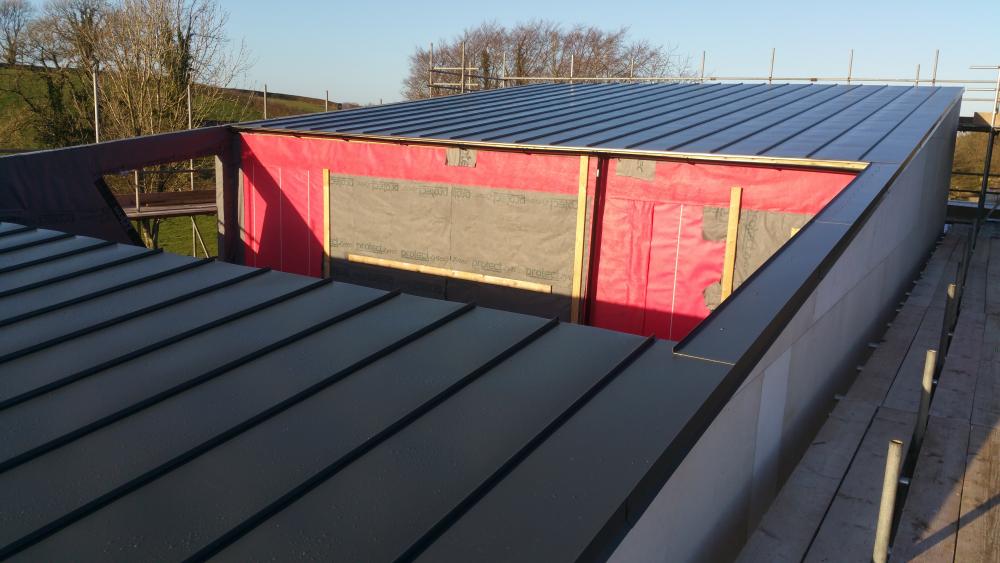
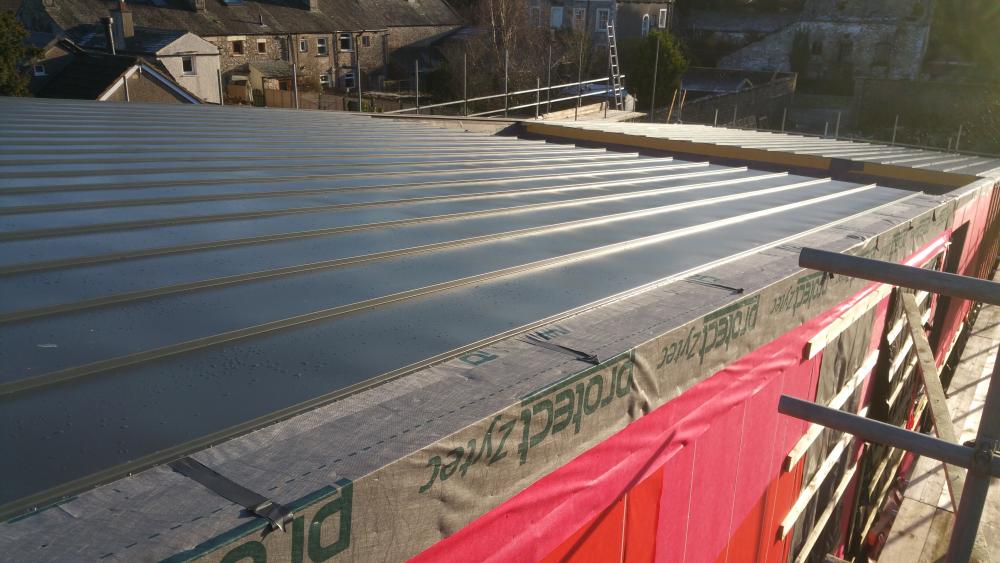
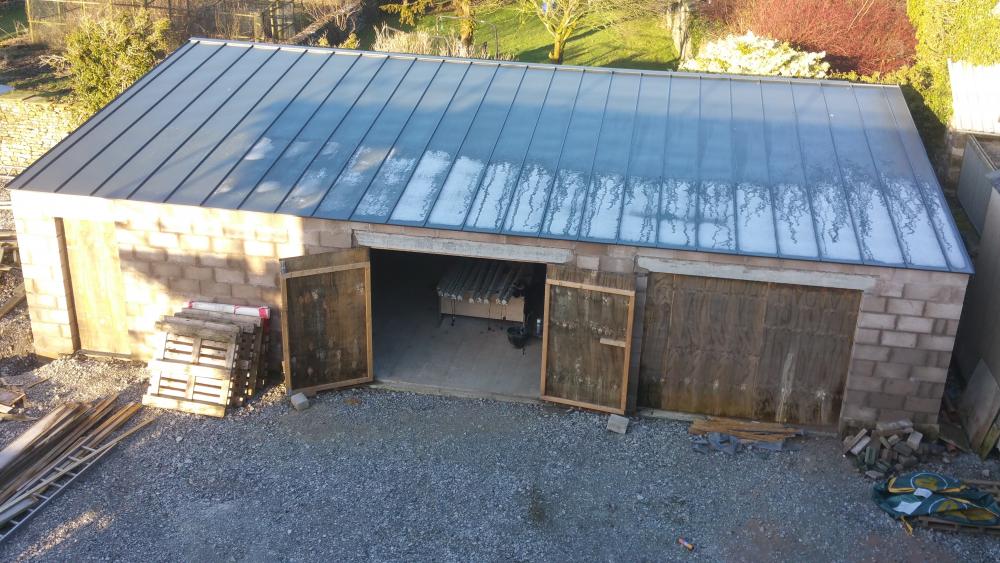
Roof nearly finished but just thought I would send some pictures of roof as quite a few people have messaged me about using this product.
 1 point
 -
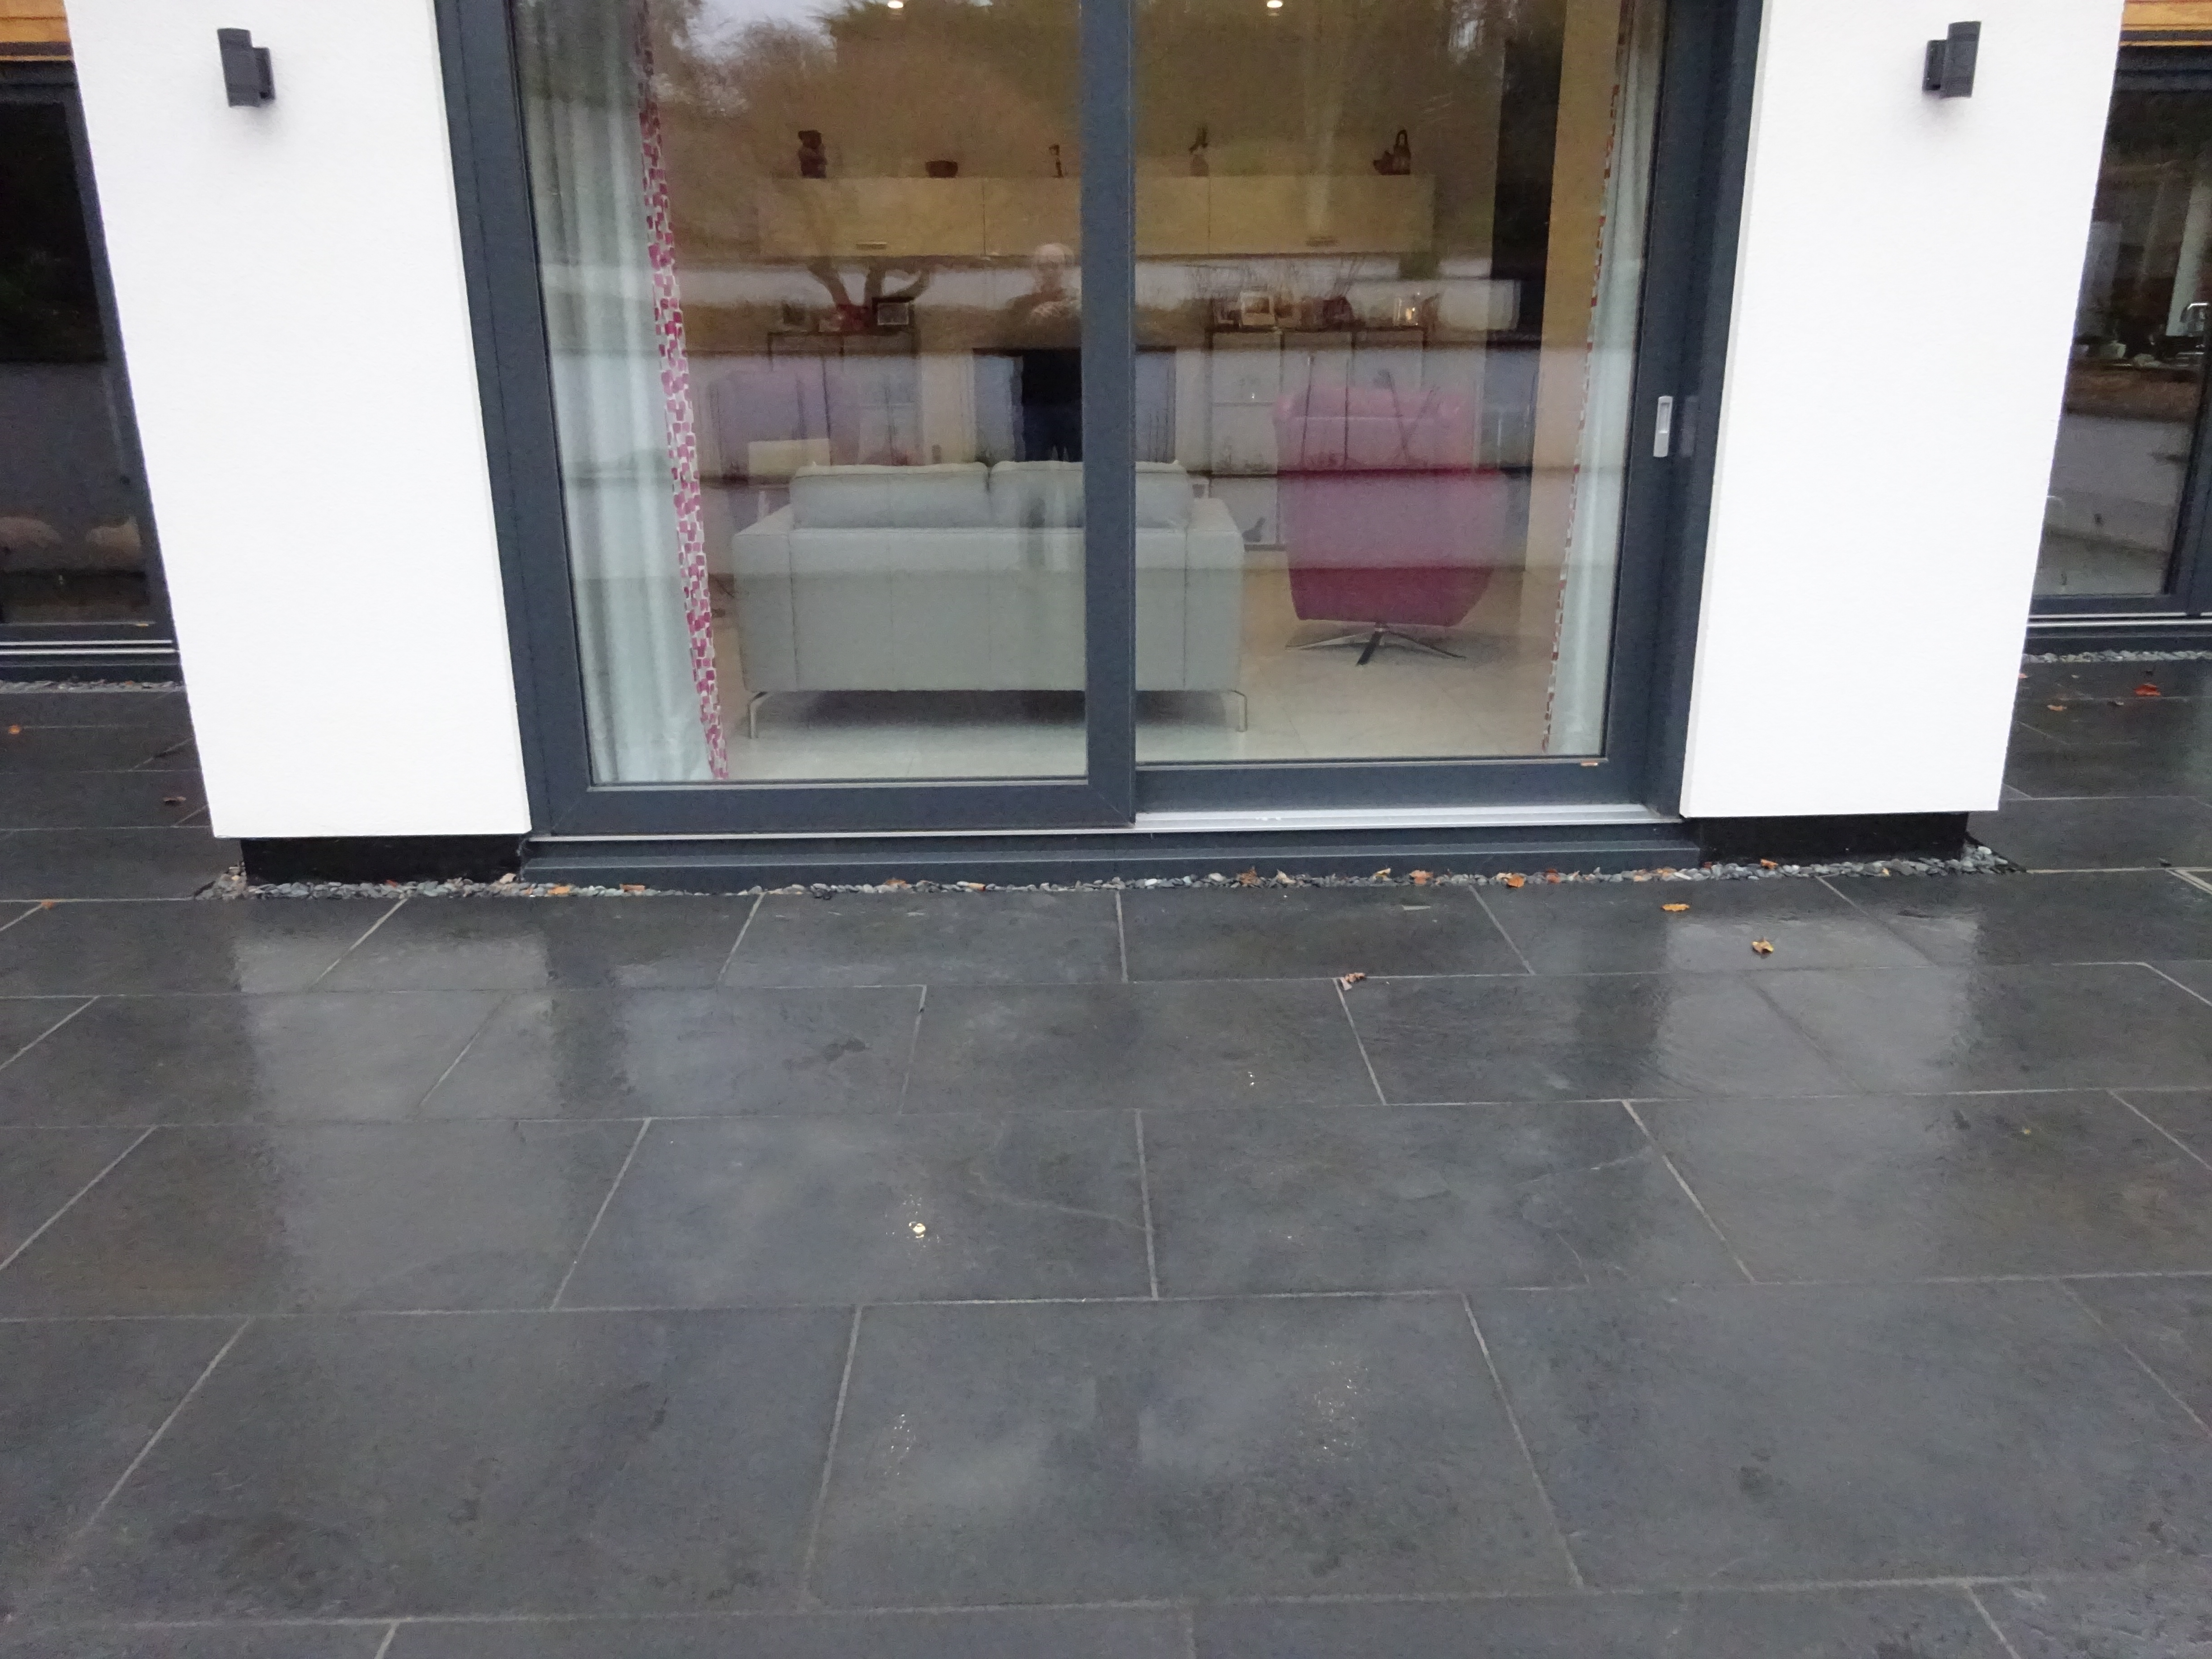
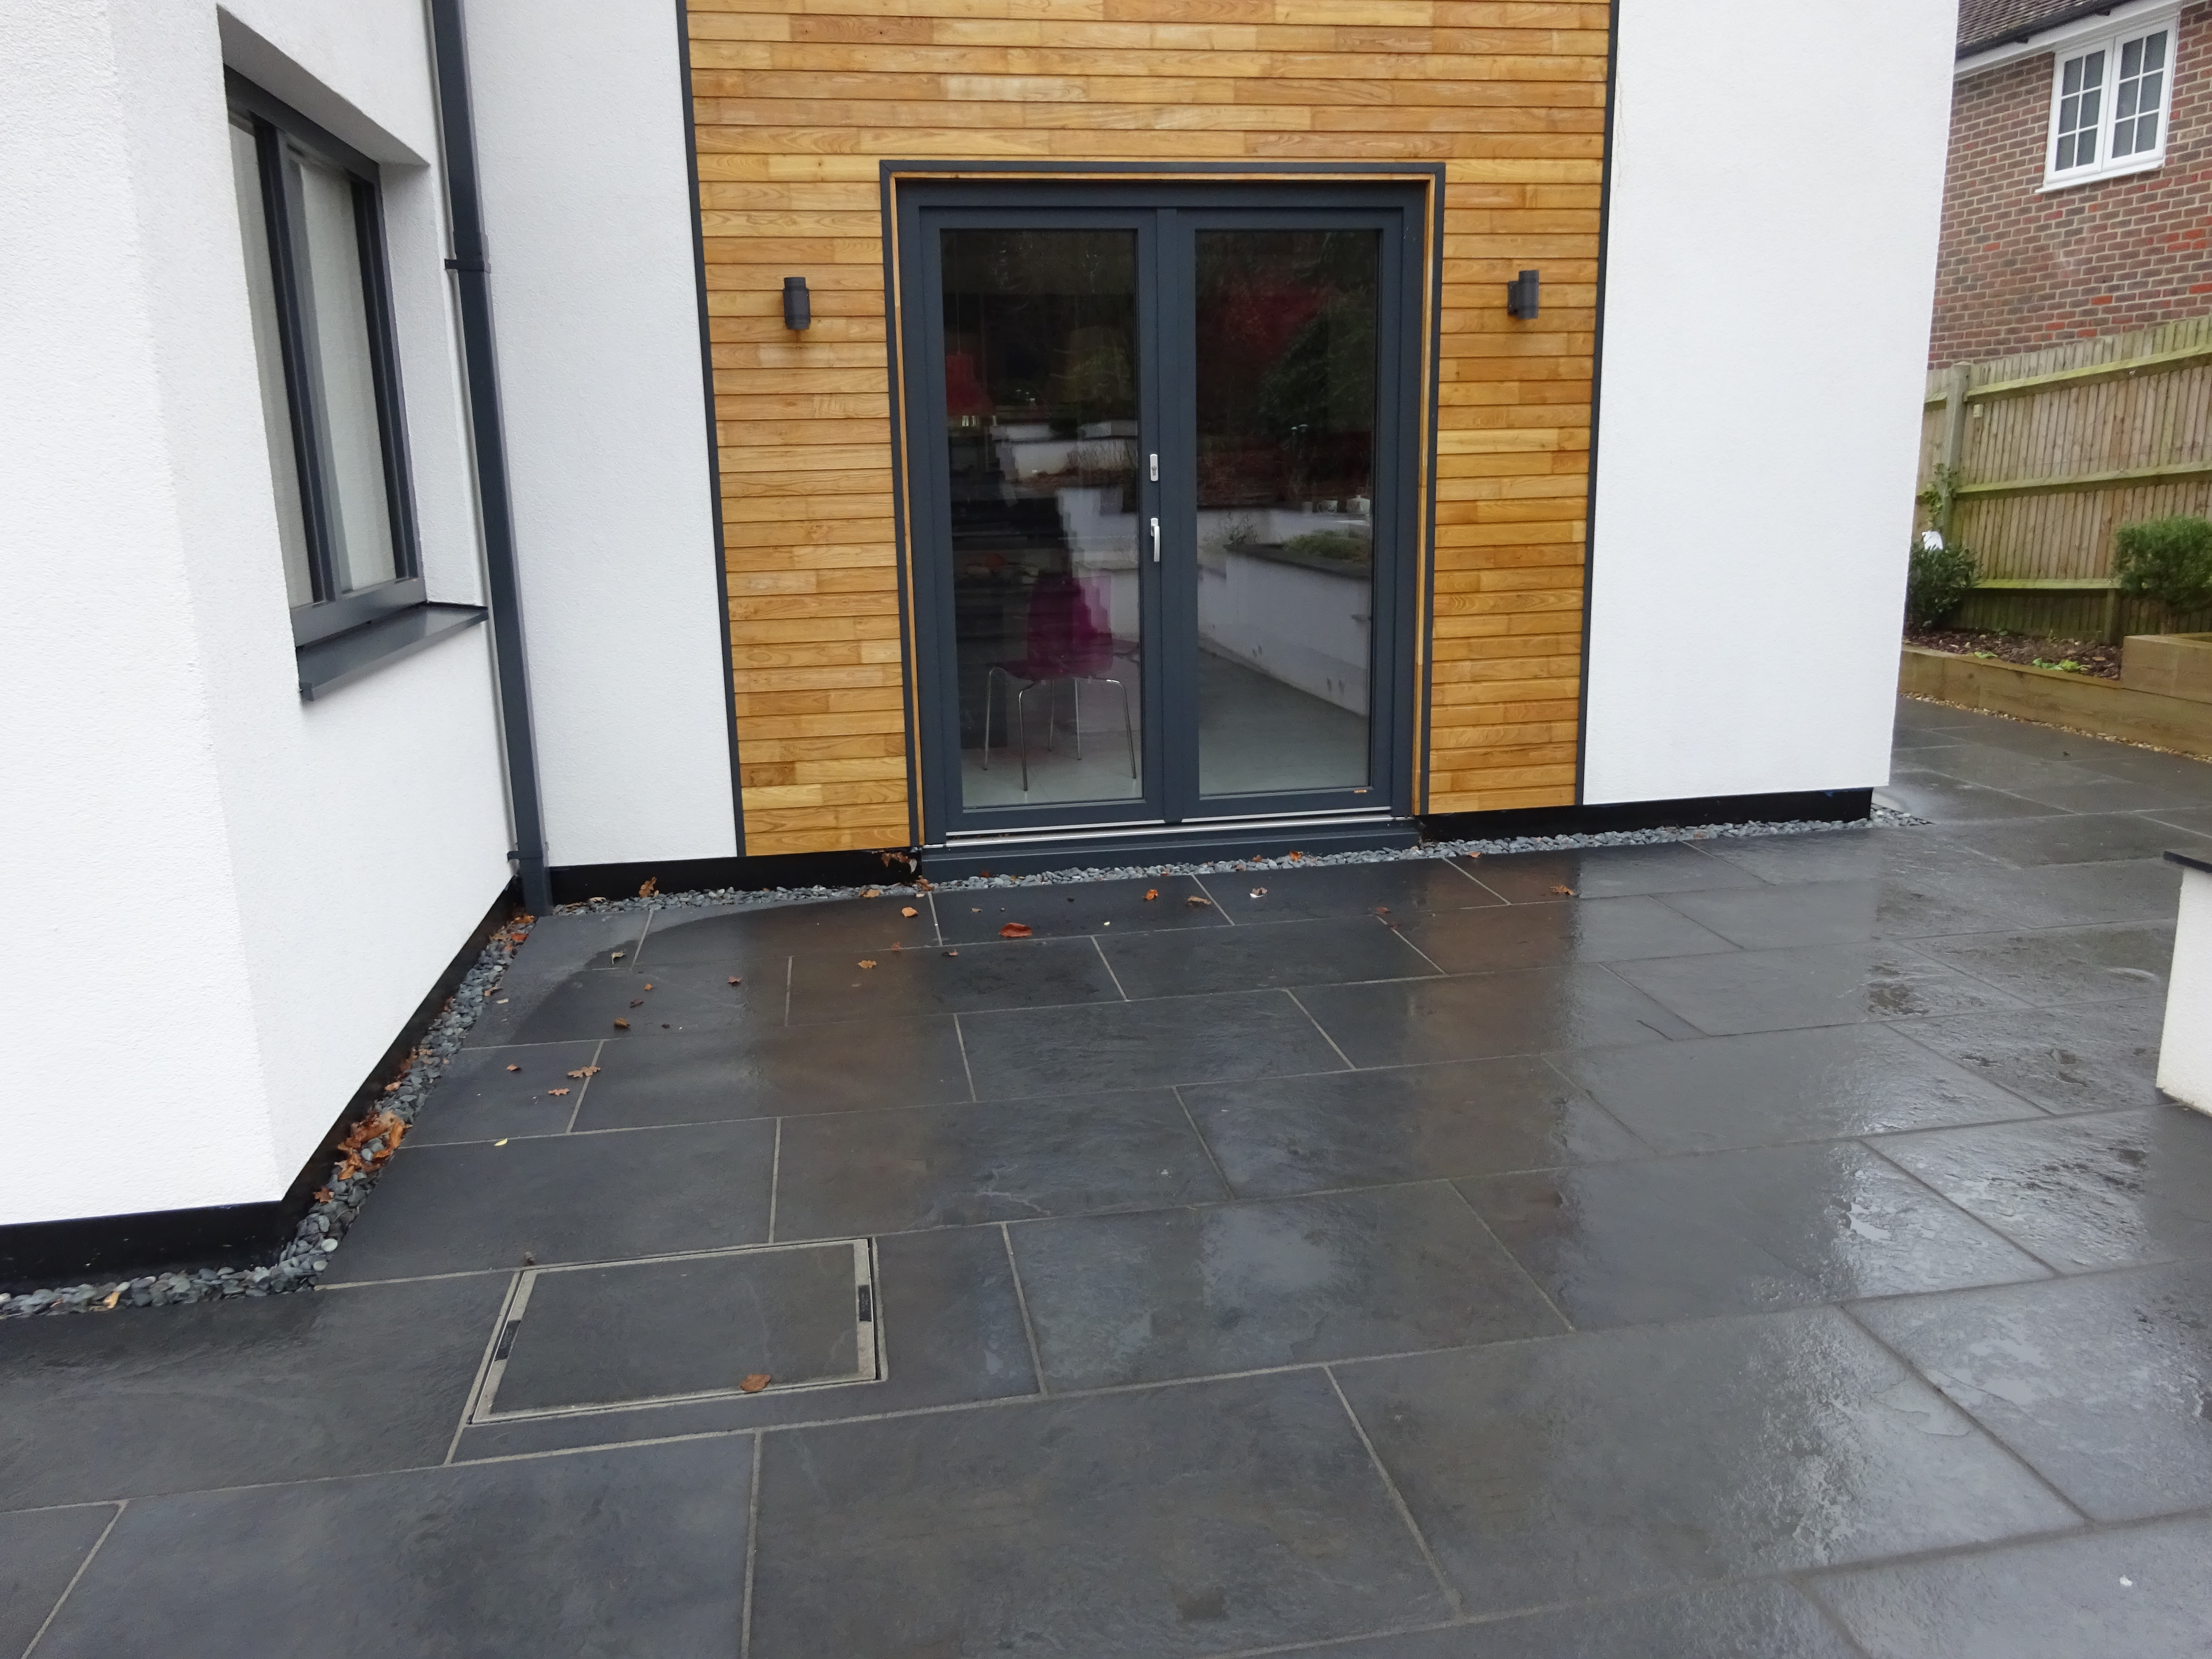
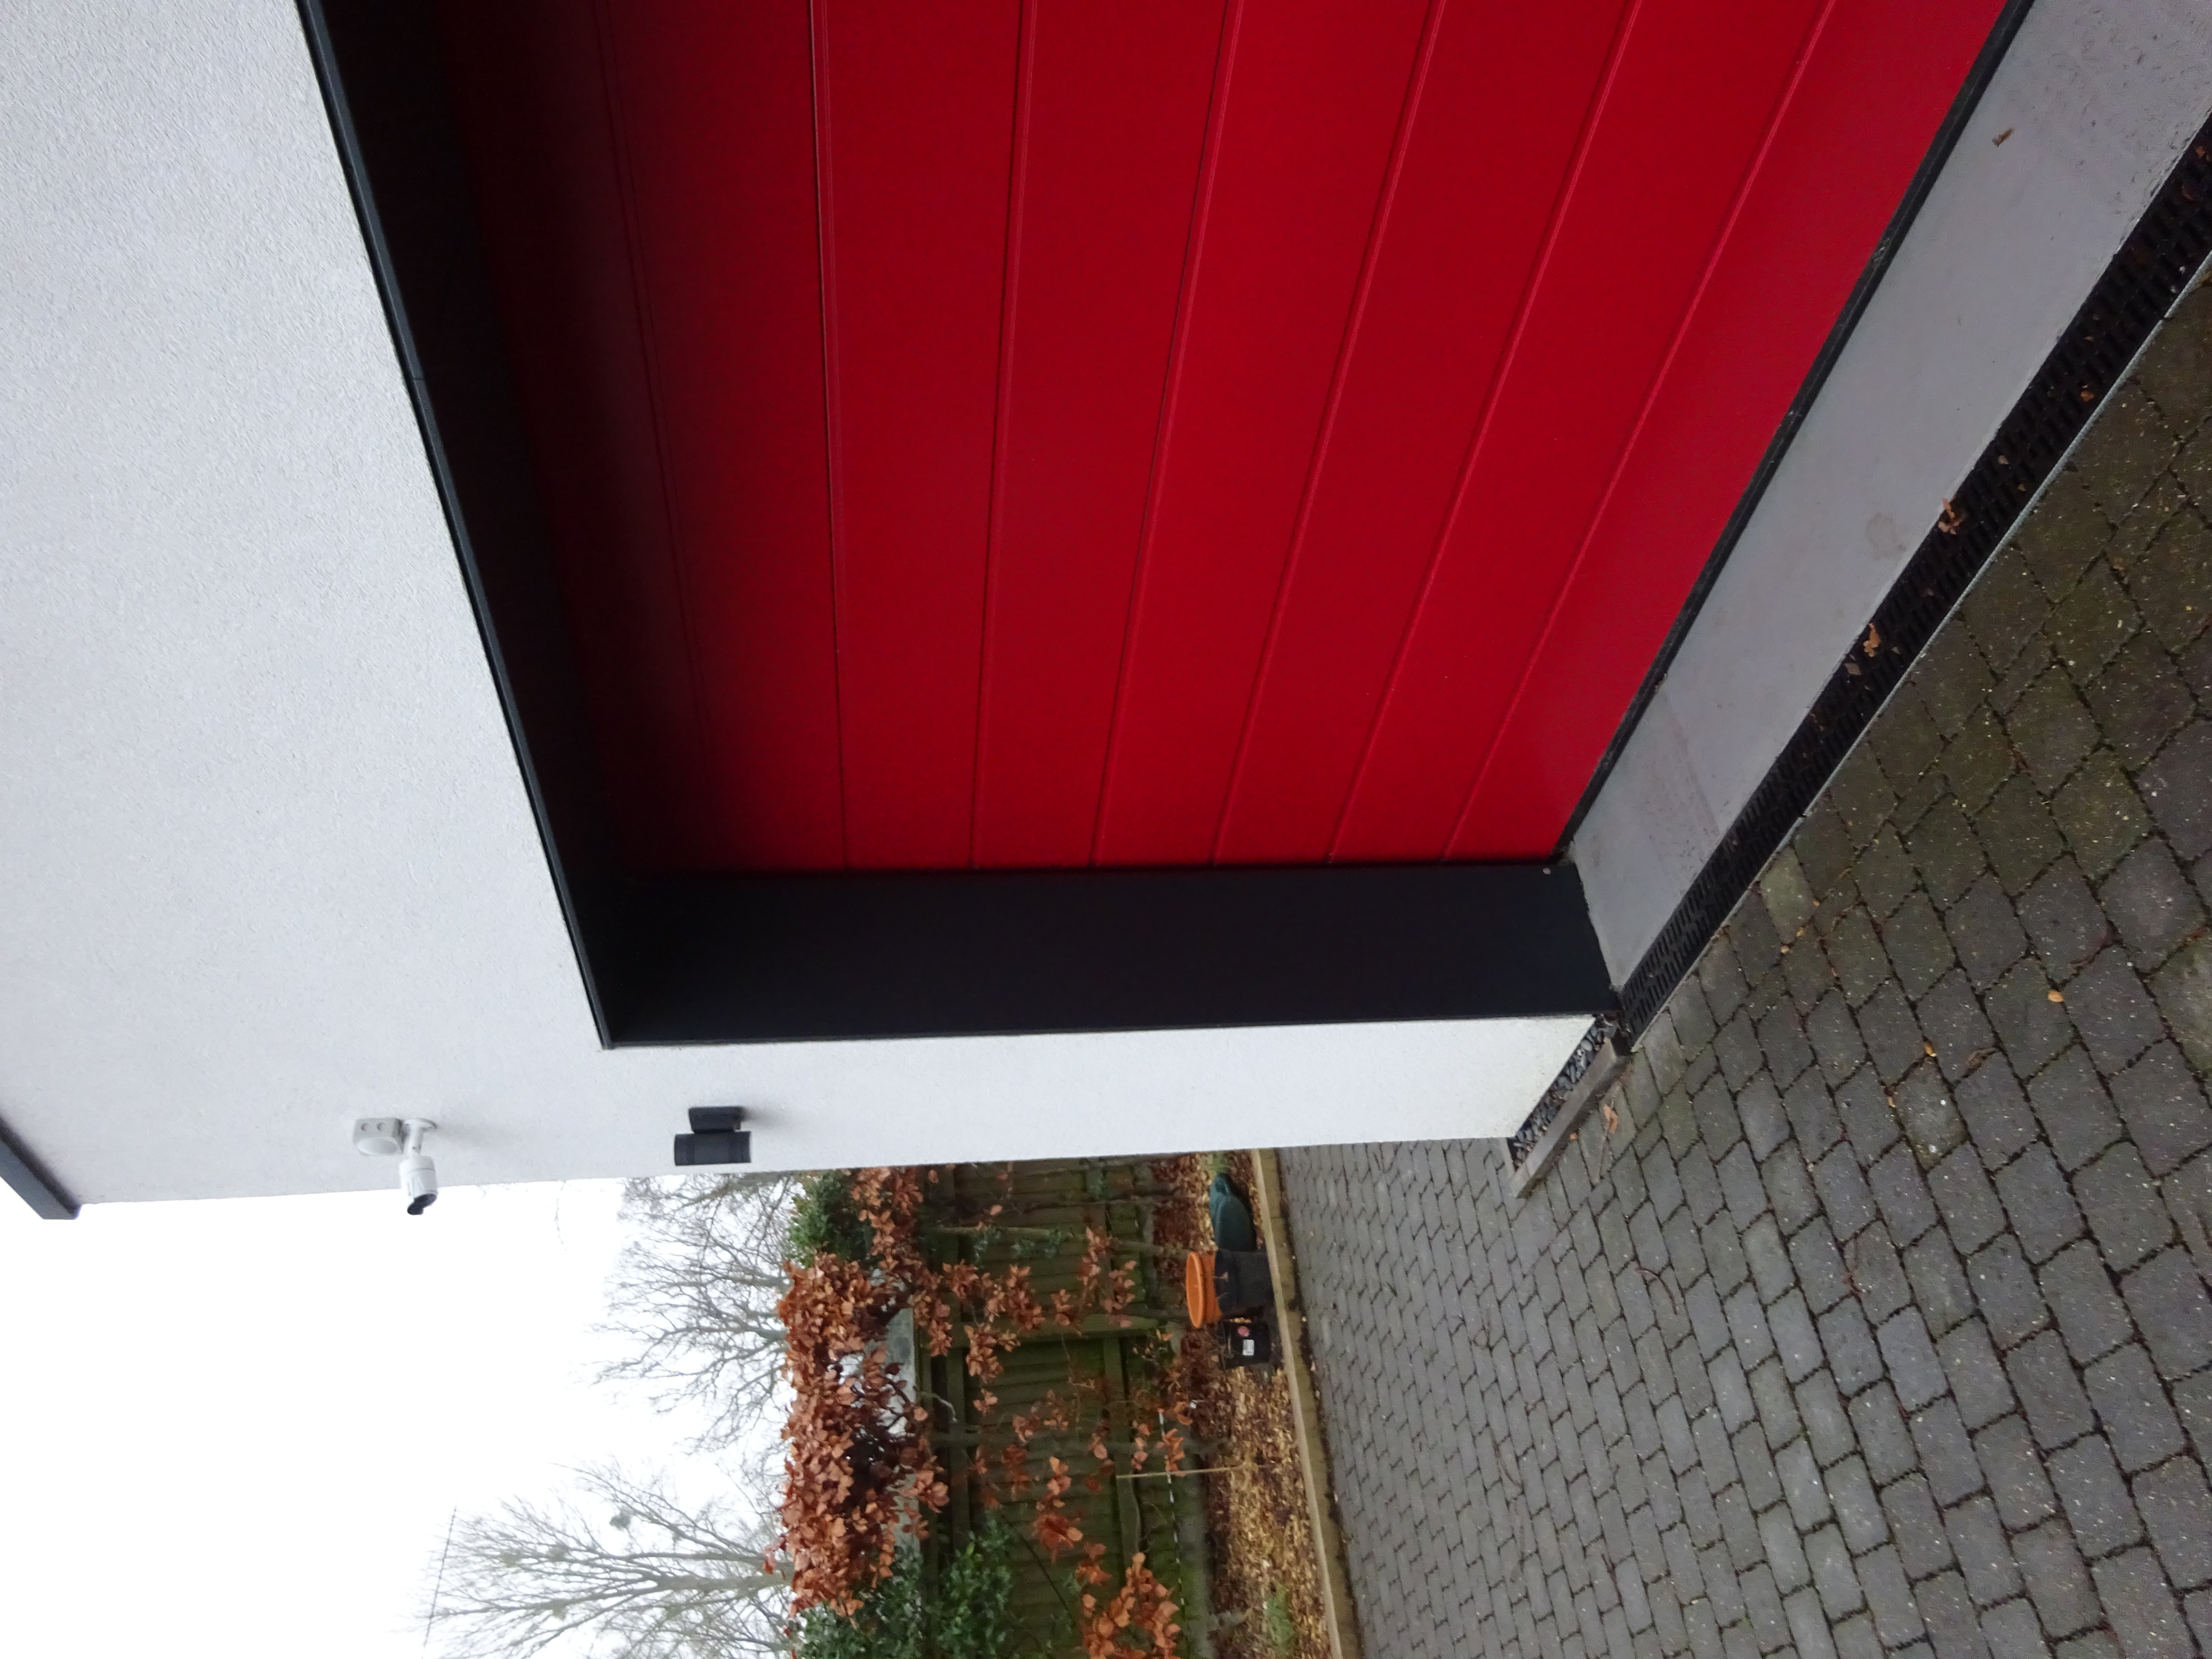
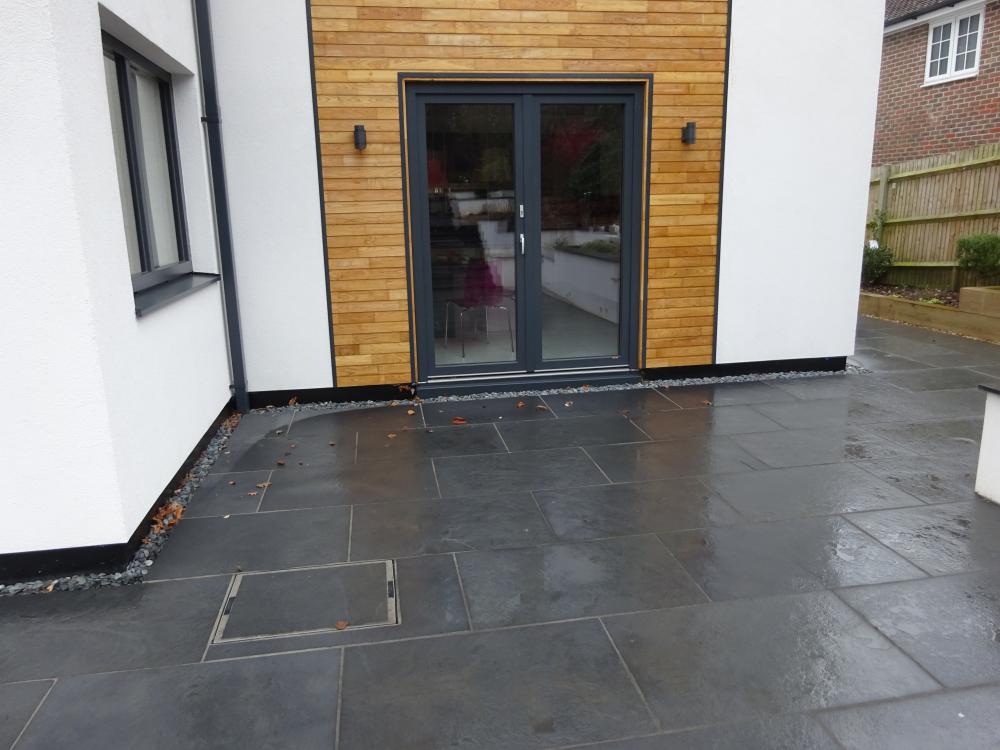
Great job -this is a very well considered detail and I wish I had seen it a couple of years ago when I was building my MBC house. I did ask around at the time and received various ideas. In the end I developed my own approach as follows: I installed an 300mm alumium flashing, it was actually the black powder coated aluminium roll used for seamless gutters but rolled as straight pieces with a seam rolled seam for strength. It seems to have worked out well - it is screwed and stuck to the EPS It was installed to form a flashing from underneath the external rendered finish , going across the soles plate and over the EPS to well below the nominal DPC level at which the extermal paving is installed. See the phot os attached, which should give you an idea. I had this flashiing made by the company that supplied and installed my seamless gutters, but they seem to be no longer installing seamless gutters and are concentrating on aluminium pressings , etc. I had some special aluminium flashings, coated to match the window frames, made for below the french windows/doors, ariund the garage doors etc. I attach some photos, during construction (though it at that stage still covered/protected by the blue external wrapping sheath used by MBC to keep render and other rubbish off the coating the flashing) and some taken today, to show the finished look. T

 1 point
 -
Hi Plus one to the above but I would think that's going to leave some salts behind when it does dry out. I'd have a word with the brick manufacturer to see if that's going to be a problem and how best to treat it1 point
-
We had 24V CAME arms on our last gates, though the power to the control box was 240V. There is a max pressure that the gate can apply for safety reasons, and the arms themselves are highly geared, so the max power is only 100W or so, so the wiring from the controller to the arms was single sheathed 5A multicore, IIRC, but this was only between the controller and the gate arms. This was run in a 20mm flexible PVC conduit.1 point
-
This works for me: Duct tape a vacuum cleaner hose one end of the duct. Cut a 4" round out of a decent carrier bag. Thread light string through centre of plastic and tape so it doesn't come loose. Insert plastic into duct. Switch on vac other end. Get a helper to pay out the string. Hope it doesn't catch on the dodgy repair joint! Wait till plastic gets sucked into vac and fish out. Use string to haul thru heftier draw string. Aka nothing lost to try.1 point
-
We have an Isoquick insulated slab which has 300mm Peripor under the 200mm thick concrete slab and a peripor upstand which is 200mm thick.1 point
-
Obviously there's a reservoir there filled with rainwater. That should be a relatively quick fix. To advise any further we would really need to be up some scaffolding poking around .1 point
-
TIP (please don't take it as a criticism) Most computer screens are lansdcape orientation, so turn the phone on it's side next time.1 point
-
I'll dig out pics when back home but our floor joists are Posi Joists. For our upstairs sitting room I wanted 300mm centres but the designer insisted 600mm would be fine. In practise I wish I'd stuck to my guns as the floor doesn't feel as solid as I wanted it. Don't get me wrong, it's acceptable, especially as it's carpeted but there is some small movement detectable. However our joists are hung from the top chord only - the lower is not attached - and we have acceptable, albeit not perfect, performance. I do recall the designer telling my most issues with bounce are due to installation...! I think I've said this before that when I coach bolted the string back in twice to each joist, and it made quite a difference. Anyway, in terms of solution, how far are you prepared to go @readiescards? If you are able to strip the ceiling you probably have a few options from fiddling with joist hangars, to doing some form of webbing onto the joists to stiffen to possible adding additional joists.1 point
-
Good luck with that, sir Get some cheap drain rods and use those to send a new fish rope through. Oh, and tie a new fish rope onto the Swa when you pull it for Justin ?1 point
-
This would seem to be your best option in the long term. Thinking in decades rather than years, get it right now and avoid issues in the not so distant future. You can also run the separate data duct.1 point
-
The big benefit of the WIBNIs is it give you something to take out again when other things come in more expensive e.g. my inset balcony lol1 point
-
It's hard to tell from those photos, but ideally the lower chord of every joist should be restrained so that it is held tight relative to the wall, A tiny bit of horizontal movement at the lower chord translates into a fairly large vertical deflection, in the centre and I suspect that the joist is not held rigidly enough at the bottom, and this could be the primary cause of the problem. It's hard to be sure without a close up of a joist end, though.1 point
-
@jackis correct. The foundation system, including the slab has to be designed to take account of the loads imposed by the house structure and the soil conditions. +1 @JSHarrisand@Alex C Well @Russell griffiths, that's telling me. about my capabilities and approach..... Actually, I am not sure that your strong assertion is correct and you have made wild assumptions about what my criteria were or how I executed my project. The foundation slab was supplied, designed and installed lump sum by MBC, who were bidding competitively against other suppliers.Just like @JSHarris I did a lot of competitive bid evalution and they were extremely competitive and I knew I had negotiated the best deal for me at that time (including exchange rates and other project risks). In addition MBC took responsibility for the integration of the slab and the timberframe design and installation. MBC supply and build dozens of these slab every year and, believe it or not, they operate a very successful busines and have their microscopes on the costs and labour required complete their projects. If there is a better and cheaper way o execute installation of these slabs, then I believe MBC will have worked it out and used it on the next project - as they have done with many other aspects of construction. I didn't offer my input as the answer to your very specific requirements but only to give you some input to a specific question. For you, the challenge is to find YOUR most effective and economic execution plan taking your site and requirements into consideration all the relevant factors, including budget. Hopefully, you will share your experience for others to benefit from when you have completed your project. There is nothing wrong with your thinking but it's the result has to work for you and your project.1 point
-
Here is my foundation, the walls lock into the foundations as they are the same manufacturer, also the slab is completely over engineered. 16-063-01B Foundation Layout.pdf1 point