
Leaderboard


Popular Content
Showing content with the highest reputation on 12/31/17 in all areas
-
I had already factored in for this going full circle twice, but glad we're on the same page I wonder if the van that delivers the grout will be driverless. ?3 points
-
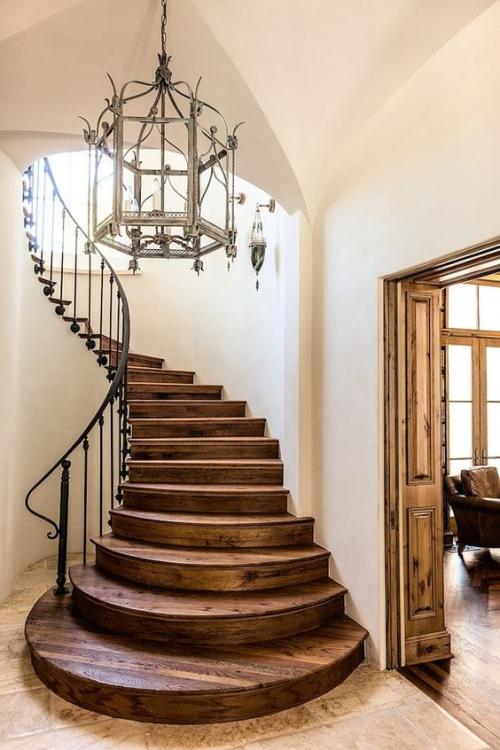
first image from Pinterest - http://residencestyle.com/architect-design/ credited but I can't find it on their site. Second image https://www.philipwattsdesign.com/bespoke/staircase-northampton I really like the second one but way out of my budget
 2 points
 -
These two sites helped us understand our consumer rights and how to deal with European suppliers when problems develop. Good luck, I hope you resolve it to your satisfaction. http://www.ukecc.net/ https://europa.eu/youreurope/citizens/consumers/shopping/guarantees-returns/index_en.htm2 points
-
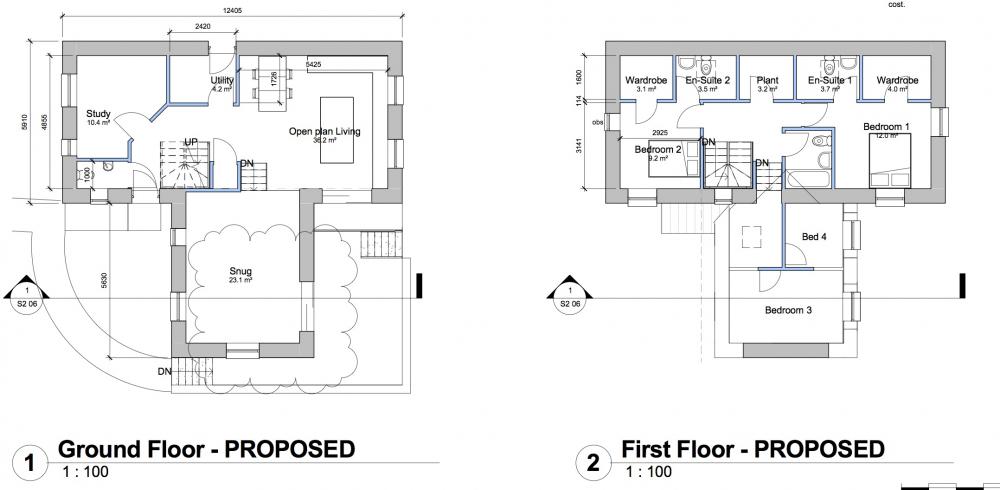
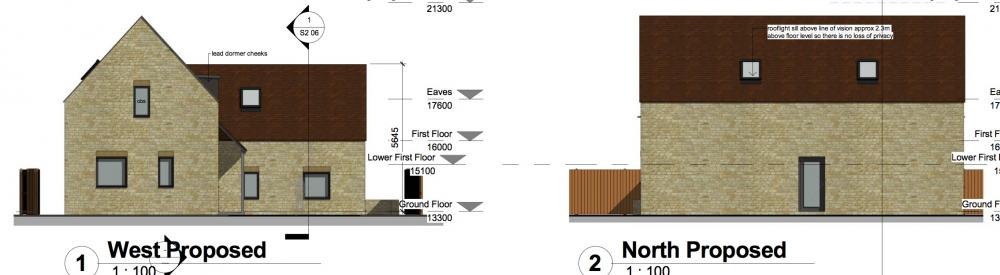
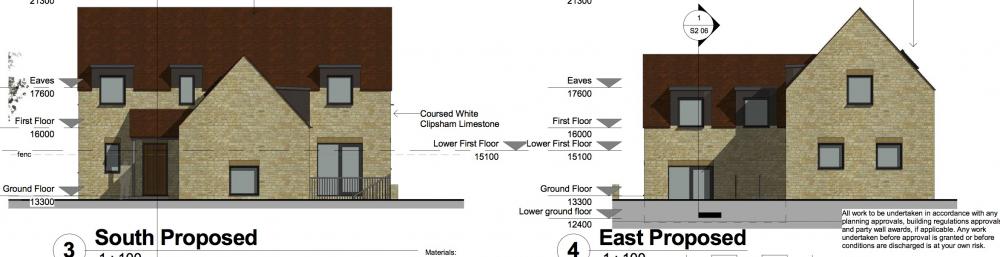
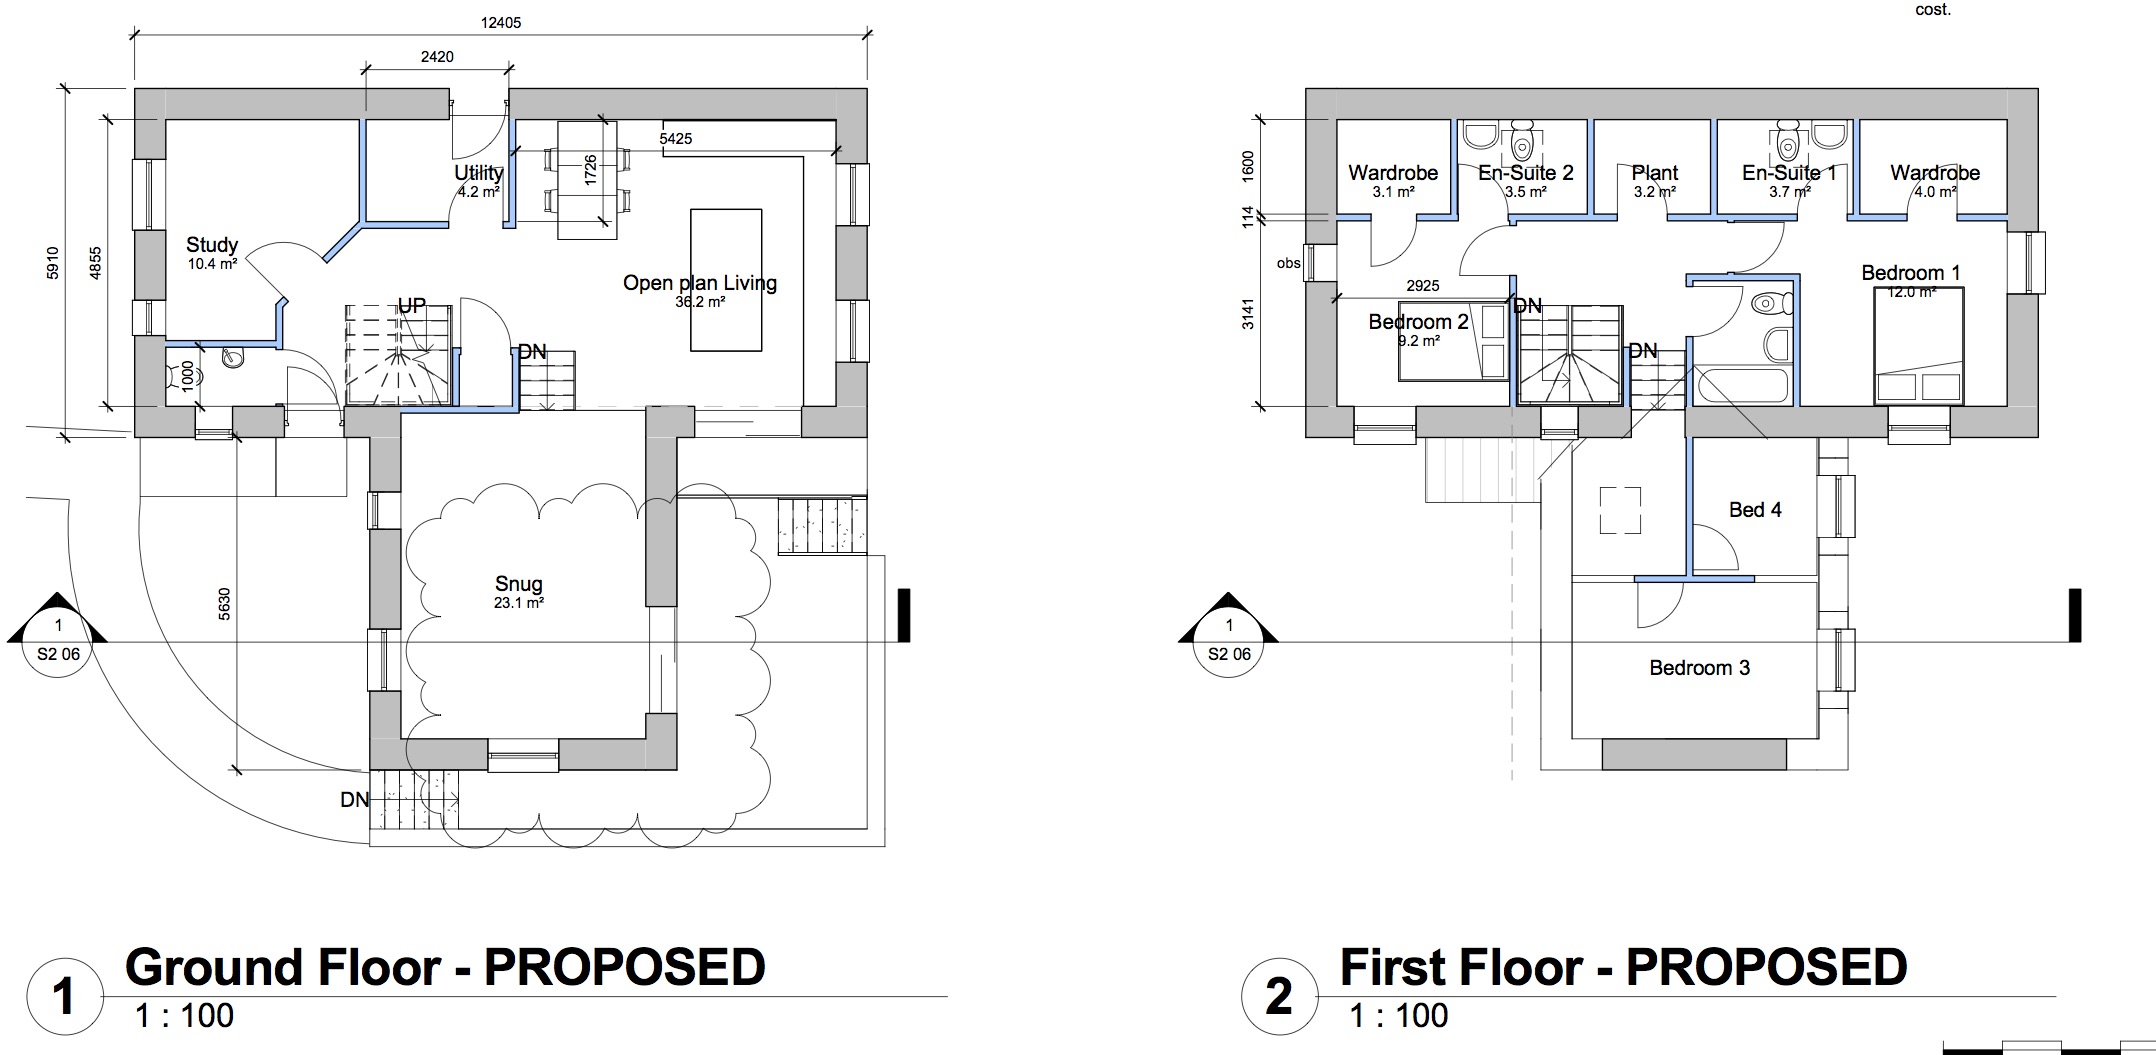
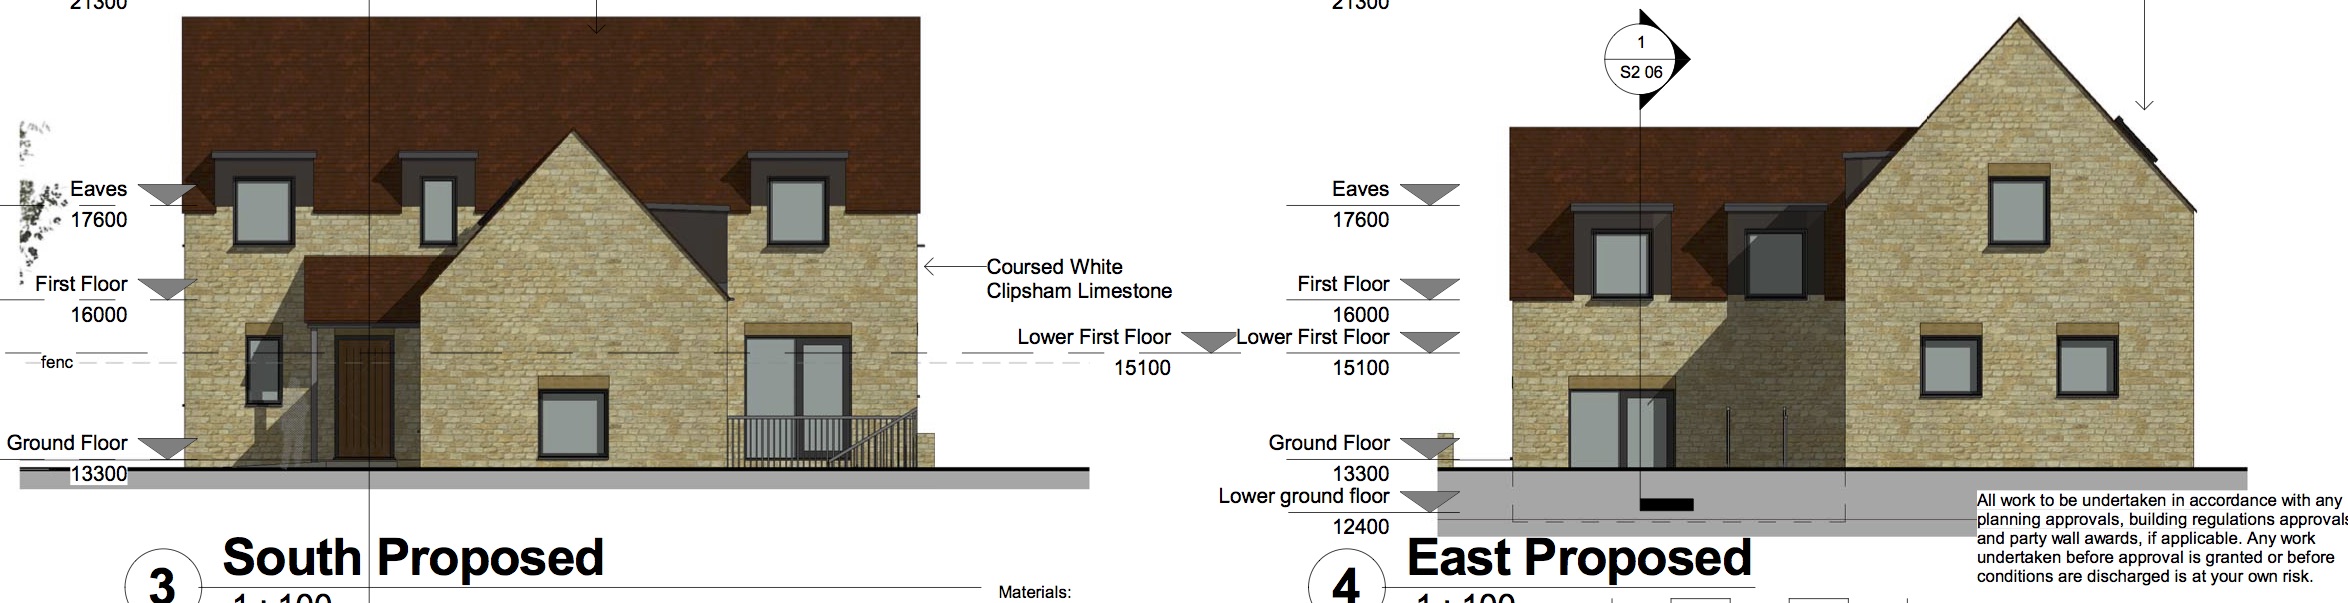
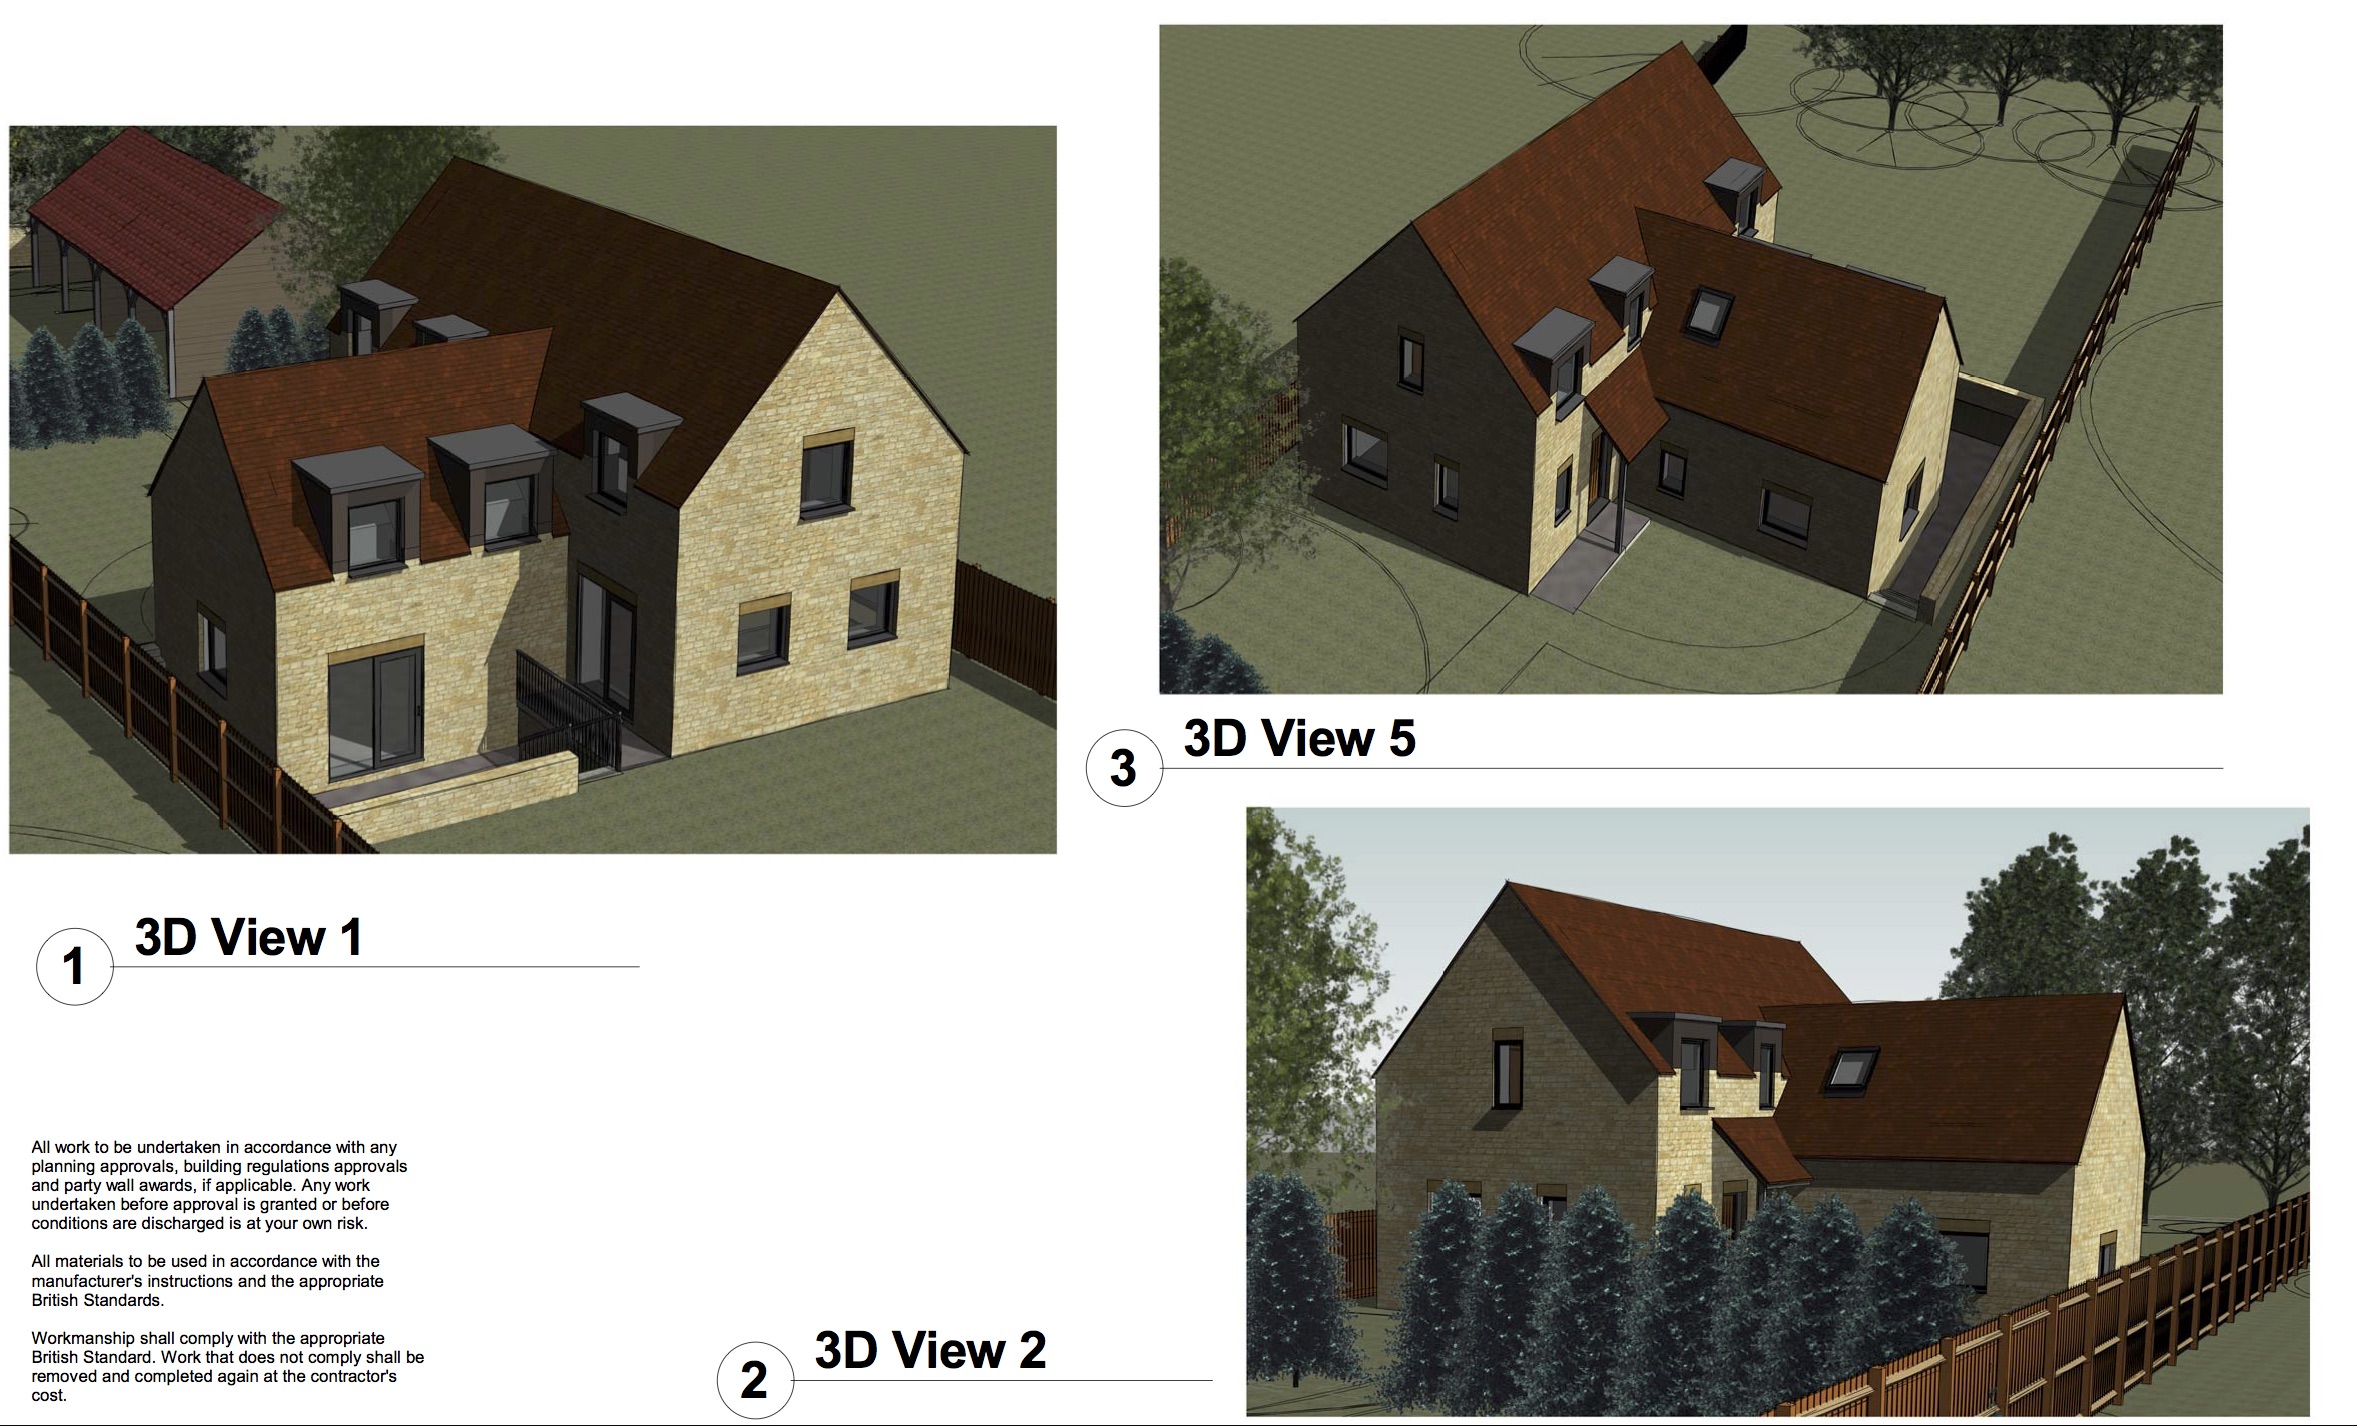
Hi - Been on here for a while and planning to start self build number 5 in 2018, so seems like a good time to introduce myself. We got planning permission towards the end of this year so time to share some plans. We're on the Cambs/Lincs borders, in a conservation area, in the grounds of a listed building and with a Planning Department which was split as to whether this should be approved or not, so it has not been an easy process.... We got there in the end, though. It's our "downsize" self build - the last one was about 320 sq. m and this one will be around 170m so quite a lot to try and squeeze in. Aim is to build to PH standard, but certification may prove difficult due to form factor. Got a PH designer on board (he did the drawings attached), so will get him to do a quick and dirty PHPP calc to see how close we can get. I think the form factor (dictated by planning, with little room to change) will preclude it, but we'll see. It'll be a timber frame - we're in discussions with some of the firms who regularly pop up here. We were aiming to hand over to a single builder but that is proving difficult, so may have to get more hands on than ever before. My son's in the building industry, so he'll prove a useful source of hopefully good tradesmen. Thank you to everyone on this forum - it has been a great source of information, inspiration and entertainment.... and I'm sure that it'll continue to be so during our build.
 1 point
 -
The latter. Looks much better and if tall enough you can put a glass divider to double the shelf space.1 point
-
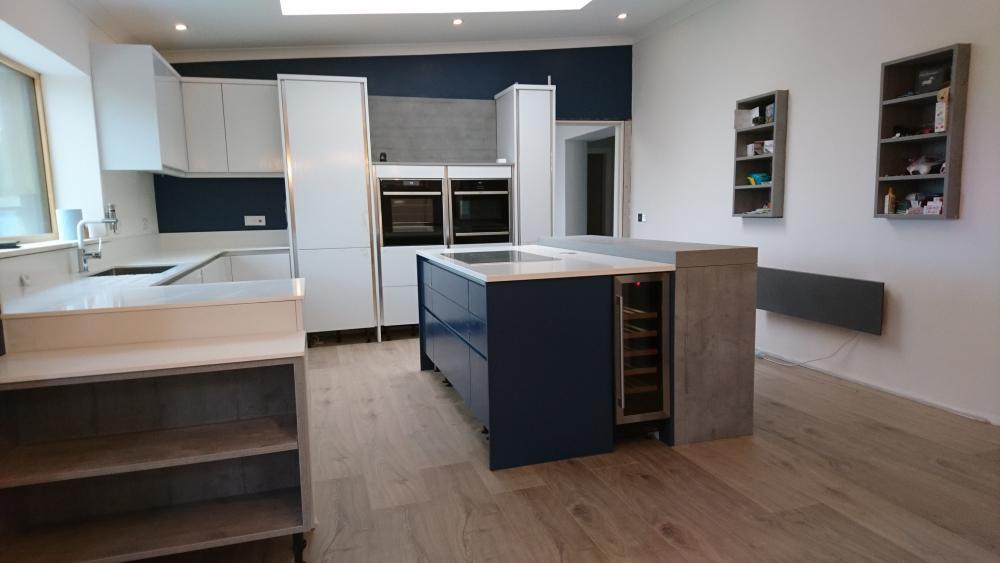
Got the floor in this afternoon which means the kitchen is now 95% complete :-) still got 2.5 bathrooms to complete tho. Really pleased with the kitchen.
 1 point
 -
alternatively, with some extra work try - http://www.theusedkitchencompany.com/product-category/kitchens-for-sale http://www.usedkitchenexchange.co.uk/product-category/used-kitchen/ https://www.kitchenexchange.co.uk/ save a fortune and recycle1 point
-
An update, spent Autumn fixing the Pavatherm 40mm Combi to all the external walls, about 240sqm and fitting membrane and battens. Then inside fitting Rockwool flexi 140mm in the walls and 70mm behind the rafters. Very easy to cut and minimal wastage. Another 150 rolls to arrive. Fixed timber horizontals to the walls for another 70mm insulation, planning on running the 75mm MVHR around the walls and roof once I have finished the internals walls before fitting another 200mm in the roof and 50mm on the walls. 70 sheets of 150mm Celotex (25% price hike) arrived for the ground floor, ordered 340sqm of Colorcoat Urban roof which should be ready for collection in January and finally ordered windows and doors, probably March arrival. Happy New Year all, thanks for the advice.1 point
-
Plenty good enough for 2 holes1 point
-
Same as drilling a composite kitchen sink tbh. Buy a diamond tile hole cutter, just a cheapy on off eBay, and use a hand operated spray bottle to keep the bit soaking wet whilst drilling. Make a plywood template first with a hole the same size, and that'll keep the drill bit central whilst drilling ( as the tile hole cutters don't have a pilot bit ). Have a mate hold the template whilst you start drilling, and when the hole cutter is about 2-3mm in, withdraw it very slowly at full revs and take the template away. Wash the hole out and then carry on drilling until you punch through. Top tip : cut a couple of squares of thick card about 50mm x 50mm and make a hole in the middle of each one. Slip these over the drill shank before putting it into the chuck of the drill. That'll stop the metal chuck of the drill striking the bath if you accidentally push through as the hole drilling is complete ?1 point
-
Hi @Nickfromwales, the self builds have been over a 20 year period with the last one being finished 10 years ago, so fairly standard building regs minimum stuff. This'll be the first real high performing one. All the builds have been contracted out to a single builder - it's more cost effective for me to keep working, so no great skills to bring to the build. My role thus far has been to find the land, get the designs done, get planning permission, spec the builds and find a builder. I do like to do one or two things to say that I have made a contribution to the build - last time was to install the piping for a central vac and also terminate all the Cat5 pulled by the electrician. I'm getting pretty good at making my mind up early, though..... I found early on that changing my mind during the build was an expensive mistake. It does help me to get nearer to cost certainty to get as much specified as I can, as early as possible in the process.1 point
-
Don't tell them the budget. Just say you'll pay accordingly for the kitchen you like. Ask them to omit appliances so you get the cost of the 'wood' only. Basically that'll de-cloak the cost of the actual kitchen. It's harder then for them to garnish the price with the usual 40% that they then revoke.1 point
-
Western Power then: https://www.google.co.uk/url?sa=t&source=web&rct=j&url=https://www.westernpower.co.uk/docs/connections/Moving-Supply-Guide.aspx&ved=0ahUKEwiL_syNs7TYAhUjBMAKHU3bC1YQFghcMAo&usg=AOvVaw0cG4nCe5Tj0dbuIsDJJTrh & https://www.google.co.uk/url?sa=t&source=web&rct=j&url=http://www.hse.gov.uk/pUbns/priced/hsg47.pdf&ved=0ahUKEwjq-86YtLTYAhVbFMAKHddaBqYQFggdMAA&usg=AOvVaw0dPNWnqyjY4KU_6_cK13l9 & This Openreach doc contains the useful Joint Utilities diagram. Tbh I'd worry more about the depths than having a 2m wide trench and pinch a bit here and there! https://www.google.co.uk/url?sa=t&source=web&rct=j&url=https://www.ournetwork.openreach.co.uk/resources/site1/General/Downloads/quick-guides/Quick_Guide_Duct_Laying.pdf&ved=0ahUKEwjVjqrrtrTYAhUFOsAKHQT_BTUQFghzMA8&usg=AOvVaw1_8NqgnwuSWGYLa7zs_aOc Tbh if you ignore the distance to the house and footpath it's about a metre wide trench.1 point
-
My wallet has just slowly retreated into a dark corner to hide. I cannot believe the prices of some of these kitchens. ?1 point
-
Second photo's approaching what I'm thinking albeit not a spiral. Saying that they're elipses rather than perfect discs. Reminds me of the pebble staircase on Pinterest. The missus just compared the second one to "the ribcage out of Alien". I love it. The underlying metalwork looks still molten!1 point
-
Deffo. BUT, with just the furthest rad on, and no others, the pump should be man enough to push through there. Ok. Let's put this to bed. Shut both valves on the furthest away rad that the attic feeds supply. Remove the blank cap opposite the vent / bleed cap. A bit of water will come out, then it should stop. If it doesn't, the TRV isn't on tight enough. Fit a hose to the radiator union with a flexi and run it to a drain. Top the boiler pressure up to 2.5bar. Switch the boiler on. Open the TRV to start purging water through the rad to drain. Open the filling loop up and keep the pressure above one. Open the regular valve ( wheel head ) on the rad and then instantly shut the TRV. Keep gong for a few minutes until you can't hear water and air from the hose. Switcg back to the TRV only for another couple of mins and shut the TRV. ( both valves shut at this point ). Switch the boiler off. Shut filling loop once you've topped up to 2 bar pressure. Remove hose, reinstate the blank cap, open the TRV ONLY to fill the rad, bleeding it until full. Open the wheel head and bleed again. ( both valves open at this point ). Switch the boiler on and see if that rad gets warm straight away. If it doesn't, come pick me up and we'll Thelma and Louise it. Once that's circulating open the other rad off the attic loops. Run for 10 mins until it's all hot. Then open the furthest other rad on the other loop, then the next etc until all on. Or not.1 point
-
I think rich tea are the wrong biscuit to be looking at. What’s their aspect ratio? 10:1? Would need a massive house for that to work. For pleb houses you’d be looking at something with the proportions of an Oreo and that does not have the same elegance. Spot the difference?
 1 point
 -
looks like you have used the rest of the tile you cut before the mosaic to carry on which IMO looks fine. only suggestion would be to mirror the same cuts on the left-hand wall. you cant rush perfection, but as Nick said earlier once its grouted you will be the only person that cares1 point
-
hopefully not the towel. Everybody needs to know where their towel is.1 point
-
What and miss all this?1 point
-
Not necessarily 'wrong', but if you can live on the change that's left over, I d'oth my cap....and the world salutes you sir. ?1 point
-
Essentially there are two different requirements in the Building Regulations themselves, but these aren't 100% clear in the guidance in the Approved Documents. The first requirement is that the foul drain has to be vented to atmosphere, such that there can be no build up of pressure inside it - the idea is to allow any gases to escape via a vent. The second requirement is that there has to be a means to prevent a partial vacuum forming in a soil pipe when a toilet is flushed or a basin or bath emptied. Common usage was to combine both of these requirements into a single vent pipe that does both functions, and either run it through the roof or run it up the outside of the house if the soil pipe is external. However, there's no need to do this at all, you can split the two functions and solve each individually. You can fit a vent pipe, to allow the foul drain to be at atmospheric pressure, pretty much anywhere along the pipe run. You can even fit one beyond the entry point of the soil pipe inside a hedge or flower bed, at fairly low level if you wish, or run an external vent pipe outside the house and up above eaves level. To resolve the partial vacuum problem you can fit an AAV inside the house, well above the highest outlet, in a position where it can be accessed for maintenance. This will open if there is a partial vacuum in the soil pipe and allow air to be drawn in, then close to prevent smells from escaping. An AAV cannot stop any build up of pressure in the foul drain, so if you fit one then you need an external vent as well. The advantage of fitting an AAV and an external vent is that there is less heat loss. Internal vent pipes act a bit like chimneys and constantly draw cool air up through them, so unless well-insulated they will draw heat from the house and can act as a focus for condensation. If you have an existing vent to the foul drain, then you should be fine with an AAV for the new upstairs bathroom. It needs to be well above the highest drain and accessible for occasional maintenance/replacement, so you can't build it into a wall without some form of access cover, plus it needs a reasonable air supply.1 point
-
So BW is your Building Warrant submission. In Scotland anyway, these are more detailed drawings than the plans, showing how each element will be built, and demonstrating how the house will be built to current standards. In our case, we had elevations, showing window openings, cladding, roof details etc. The floor plans showed layout, smoke alarms, door opening, stairs, kitchen layout, bathrooms, lighting plan, stop cocks, hot water, heating, ventilation amongst others. These were also accompanied by a Specification which provided written detail on various elements - walls, roof build up, heating spec, details on stairs, Handrails, insulation, and much more. The other set of documents are the engineer drawings to cover the structural elements, and drainage. As a package these are all submitted to Building Control (normally by the architect) who will approve these as the house being built - or seek clarifications or changes if they are not satisfied the submission addresses the regulations. Once you have the BW approved, you can start building - to the design submitted. You can change elements, however will require an amendment to warrant later on - or a whole new submission if major changes. The mortgage people seem pretty clued up hence the questions - although I'm surprised at the level of details they are going to. These questions are more the sort you expect from your BCO tbh. They are fair comment generally however and should be answered by the parties I listed above as part of their fee (because they need to be answered to mean a proper BW submission is being presented). I would add that the world over, engineers are possibly the worst people to deal with and I would suggest avoiding the temptation to sack him/her. Too far down the line for that. You need to stick with them - a visit to their office might help! I've found them useless tbh and not worth their invoices time for the value they added, which was box ticking more than anything else.1 point
-
We submitted our building warrant (BW) in early December, hopefully we don't get too many points back. I don't believe our building warrant is required to secure our self build mortgage, but we need our QS to sign off that the project is feasible within our price range. We used a local designer and structural engineer to provide structural drawings for the certificate of design. Most of the points discussed in the 36 above are included within our building warrant drawings so it would seem that either your SE or architect hasn't provided all of the necessary drawings and enough detail in the written specification.1 point
-
Ask for a mortgage extension to be on the safe side, there normally ok with this. Then continue with BR submission1 point
-
Quickest way to make progress may be to go down the road to your closest architect or designer and hire him for half s day to sort out the boilerplate. That may address 80% of it. Much is just variations of statements such as 'Utility room ventilation to comply with Building Regulations Section X Subsection Y Para Z". These things just indicate compliance with the minimum, not precise specification. BCO will be interested in X doing the job according to regulation 23465, not that X is constructed of pre-pulverised trilithium which has survived being sat on by Donald Trump in a Gimp Suit . It will say u-value of 0.2 (say - i.e. Meets Building Regs minimum) for a wall even if it is a Passive House with 6ft of sheeps' wool.1 point
-
I can only relate to our own case where our architect suggested an SE he'd worked with and he liaised with him for us - all the above was done without us having to chase anything, and as like Ferdinand says a lot of it was clearly boilerplate edited to meet each build anyway. Like you, no way would our lender have gone ahead without BR approval first (cant blame them of course, who would lend money for a house which might potentially not happen?) so what your SE is saying sounds nonsense to me. Maybe he's had clients with the cash where it did not matter, but you'd expect anyone to want to ensure they had BR approval anyway before starting to shell out. Seems like you may be seeing a reason perhaps why your SE and the local BCO do not get on if this is what happens with stuff not properly submitted, making more time and work for everyone concerned. Mind equally it's not very impressive if the inspector "rejects" things based on him just not getting on with them. If he's busy then that's tough, we all are, but we get our jobs done .1 point


.thumb.jpg.bac90f3bbf6868cf2118d010d936c99d.jpg)


