Leaderboard
Popular Content
Showing content with the highest reputation on 02/04/17 in all areas
-
While at the NSBRC at Swindon last week, I sat in on a lecture for self builders and having already done their 3 day course, I thought it would not be very interesting - heard it all before! However, the speaker was talking about the CIL and how self builders can avoid it but how easy is was to get caught out and end up paying the full mount, which in my area is £200 per square metre of build! I had forgotten this information and was glad to have been reminded. I thought it may be useful to remind everyone how they can avoid the charge - do not start ANY of the build till you ensure you have submitted the correct paperwork and the council have confirmed it is the correct form. I heard several stories of those who had not completed the form correctly; no one told them until it came to the end and they received a bill for the full amount. Self Build Exemption - Whole House Self-build Exemption Overview The Government is keen to support and encourage individuals and communities who want to build their own homes, and is taking proactive steps to stimulate the growth of the self-build market. One measure to help self-builders has been to grant them an exemption from the Community Infrastructure Levy. The exemption will apply to anybody who is building their own home or has commissioned a home from a contractor, house builder or sub-contractor. Individuals claiming the exemption must own the property and occupy it as their principal residence for a minimum of three years after the work is completed. Essentially, there are three types of self-build exemption: self-build exemption - for a whole dwelling [you are here] self-build exemption - for a residential annexe self-build exemption - for a residential extension Whole Dwelling You can apply for exemption from CIL if you are building your own home, and intend to live in it as the owner/occupier. To make a claim, you must: Assume liability to pay CIL certify that the scheme will meet the criteria to qualify as self-build development (using Form 7 Part 1) submit a Commencement Notice, before development commences within 6 months of completion, send us evidence to confirm the project is self-build (using Form 7 Part 2). This provides the evidence to confirm the project is self-build. The evidence must comprise: proof of the date of completion (building completion notice, compliance certificate), proof of ownership (a copy of the title deeds), and proof of occupation as your main residence (Council tax certificate, utility bills, bank statement, electoral roll). In addition, you must also provide a copy of one of the following: an approved claim from HMRC under VAT431C - VAT refunds for DIY house builders specialist self-build warranty approved self-build mortgage from a bank or building society Full details of what is required can be found on the forms. If this evidence is not submitted to the Council within the 6 month time period, the full levy charge becomes payable. Important Information It is important that you do not begin work until you submit your application for exemption and you receive notice from us with a decision. If you start any work, including digging foundations, your application for exemption will be refused. If you fail to submit a Commencement Notice before starting any work, then we will charge the full amount for CIL immediately. If you fail to submit the correct evidence on completion, then we will charge the full amount of CIL immediately. If you receive exemption, and then sell, or rent out, your home within 3 years of the house being completed, we will charge you the full CIL amount immediately. CIL is registered as a land charge and so if any of these disqualifying events occur within three years, we can revoke exemptions and the levy will then be due immediately. Be careful out there - they are after as much money they can get......3 points
-
The case on hers is one of those that form a stand, I've a feeling it's the genuine Apple one though, that cost an arm and a leg. I didn't buy it - I use a cheap Sony Xperia Z tablet, bought "refurbished" from Morgan's, with a case from ebay, and loaded with a de-Googled completely open source version of Android, but then: a) I'm a cheapskate b) I like devices that can communicate with pretty much any device or network, accept µSD card storage, µUSB OTG sticks, don't use proprietary connectors and don't infringe on my privacy...........2 points
-
Polyurethane & polystyrene foams have no acoustic properties. Must be mineral wool, glas or rock.2 points
-
1 point
-
The main issue with electric IWHs is that they are of limited power, and with cold water coming in they struggle to raise the temperature enough for a decent shower, although that depends on your definition of decent. We used to have a 10 kW electric shower, before we put a gas combi boiler in a few years ago. It was sort of OK, but the flow rate used to drop to a very low rate in winter, when the incoming cold water was around 4 deg C. In summer it was just about OK, but even then it wouldn't deliver over around 5 litres/minute, and a lot of people would consider that a bit low for a shower. When we installed the combi, the biggest difference (apart from the BIG reduction in our energy bill!) was that we could have a hot shower at around 10 litres/minute (I re-plumbed the bathroom at the same time that we changed the boiler and got rid of the electric shower). So, I guess a lot depends on your target market for guests. Personally, I quite enjoy staying in unusual, out of the way, places and will happily accept a few minor niggles, like less than perfect showers. My other half is, unfortunately, the opposite! You're right that it's better to heat water to just the right temperature for the purpose, and only heat it when you need it, unless you can get an E7 or similar tariff, where the off-peak price is so much lower that it makes a lot of sense to have a well-insulated store of hotter water. UVCs can be pretty low loss, and I believe there's still an option in your neck of the woods to have a very good off-peak tariff (I can't recall what it's called, but Dave mentioned it a while ago). I think your best bet might be to look at the relative cost of running either a few IWIs (accepting that the flow rate will never be more than around 5 or 6 litres/minute) and that of using an off-peak tariff and a decent UVC. The latter would have a higher capital cost, and take up space, but would definitely give a better "customer experience" and could be cheaper to run, IF you can get a decent tariff. BTW, you can put an immersion on a timer, or just pop in and turn it off, when you have no guests booked in, which gets around the standing loss wastage when not in use problem.1 point
-
After some dithering we built our own. We were going to spend £1500 on an off the shelf shed but built this one for a hundred quid less. It's WAY better. Much more robust, secure and solid than the bought sheds I've seen. The roof pitch is angled to suit the PV panels, as a useful consequence of that there's loads of space in the roof. It was fun to build too.1 point
-
For my money, if I was in that situation, I would pay for a structural warranty. If it's the ticket you need to avoid the CIL then it suddenly becomes much better value. At least this thread has outlined the hoops you need to jump through and the pitfalls that could make your claim invalid.1 point
-
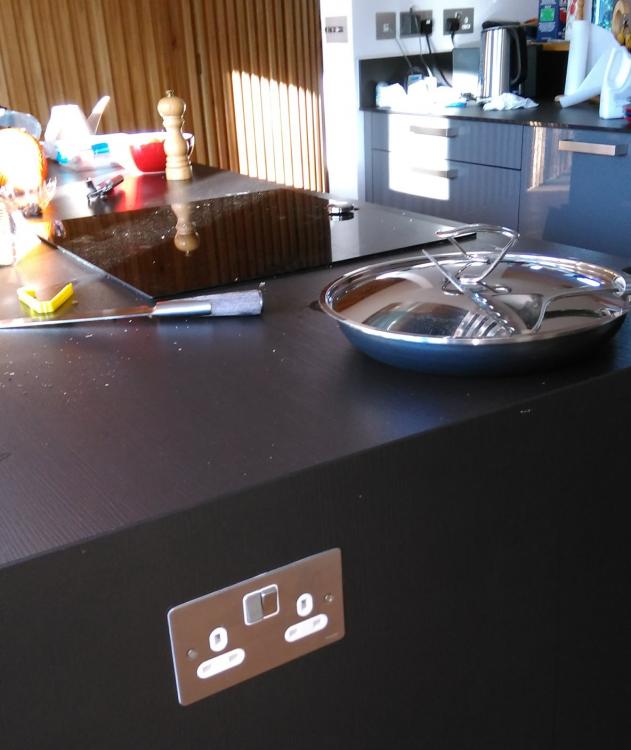
Exactly why the idea wont work in our house. There is no way a trailing lead plugged into the side of an island is Cocker Spaniel proof!1 point
-
So far i have made an insulated dog kennel and a few weeks ago i made a very elaborate hot composting box, this was a lot of work as the insulation must remain dry from both inside steam and moisture and outside elements. It was all worth the effort as now in the middle of winter i have a very effective composting system, when i open the lid there is a great waft if hot steamy air.... very satisfying.1 point
-
1 point
-
@ProDave Is this wall 'standard' timber frame? - the calculation does not appear to account for the thermal bridging of the timber studs. The default is 15% bridging and this would increase U-Val nearer to 0.15 W/m2K. Also there is a layer of '25mm spruce' - seems strange to have an inch of solid timber at this point! Should it be 25mm air space & batten.1 point
-
This has also struck me as a totally non-evidence-based piece of regulation. I remember the joys of sweating a copper spigot onto the lead pipe water supply that came into our house in Croydon nearly 40 years ago. Our current house is plumbed in copper with maybe 90% of the joints end-feed with 60/40 lead solder. In our new house I am going to have maybe a dozen or so joints in the potable DCW and another dozen or so in the (potable for the regs) DHW. The solder fills the joint by capillary action at the flow stops where the capillary action ends so the exposed ring of solder is maybe 1mm wide at most and ~60mm long per joint for 22mm pipe so a dozen joints will present ~0.0007m2 of 60/40 surface to the DCW flow. My supply in Croyden was about 10m of ½" internal bore pure lead pipe from the road or just under ½m2 of exposed pure lead surface, that's over 700 times as much. More to the point the effective volume of lead available for leaching into the supply is going to be down another order of magnitude on this. So my lead exposure from my living in Croydon for 4 years is going to be comparable to living in my new house for maybe 4,000 years and I've only got 30 or so to go at best. The health risks from Diesel engines, wood fires and the farmers spraying the fields around us are many orders of magnitude greater (and another order or two greater again for obesity and diabetes in the general population). If the government was that concerned about general public health there are a lot more sensible low-hanging fruit to pick. (End of rant.) Nonetheless I've just gone out and bought a 2m coil of the new solder which should be more than enough to do all of the joints that I need, and I will certainly have enough left over to show the BInsp if he asks.1 point
-
To calculate U value (approximately, without corrections for surface effects) you find out the lambda value for each material layer in the wall and then convert that to the R value (thermal resistance) using the thickness of that layer and then add all the R values and take the inverse (divide them into 1) to determine the U vale of the whole wall. For example, say you have a wall like this: 15mm plasterboard and plaster skim: λ = 0.22 W/m.K 50mm service void (calculated λ using method in BS EN ISO 6946 horizontal heat flow method): λ = 0.28448 W/m.K 12mm wood board inner airtightness layer: λ = 0.15 W/m.K 300mm cellulose insulation: λ = 0.04 W/m.K 12mm Panelvent outer wood skin: λ = 0.15 W/m.K 25mm partly ventilated void (calculated λ using method in BS EN ISO 6946 horizontal heat flow method): λ = 0.14653 W/m.K * 20mm outer timber cladding: λ = 0.14 W/m.K * Converting these to R values (using thickness in metres): 15mm plasterboard and plaster skim: R = 0.22 W/m.K x 0.015m = 0.068 m²K/W 50mm service void: R = 0.28448 W/m.K x 0.05m = 0.176 m²K/W 12mm wood board inner airtightness layer: R = 0.15 W/m.K x 0.012m = 0.08 m²K/W 300mm cellulose insulation: R = 0.04 W/m.K x 0.3m = 7.5 m²K/W 12mm Panelvent outer wood skin: R = 0.15 W/m.K x 0.012m = 0.1 m²K/W Sum of all the above R values = 7.924 m²K/W Take the inverse to get the U value: 1 / 7.924 m²K/W = 0.1262 W/m².K * Note that the outer void and cladding improve the U value by reducing wind washing heat loss and by changing the surface loss, so although not included in this simplified calculation method, the true U value for the wall will be lower as a consequence of this.1 point
-
Is it feasible for use to sound proof internal walls instead of rockwool? Or to wedge between joists to reduce noise transmission? I would still probably use rockwool between studs where I have services running down (cables etc) but I was considering using left overs elsewhere.1 point
-
This was the first time I'd used lead-free, because my old roll of 60/40 tin/lead plumbing solder ran out early on. The stuff is horrible to use, really, really horrible. It's non-syntactic, as you say, Nick, so the very slightest movement during cooling causes it to crystallise. Same with cold shock, no more wiping a joint whilst hot with a bit of wet towel to clean the flux etc and make it look better, or you risk the same. TBH, I understand why they've removed lead from solder, but realistically I don't think the people making the rules thought through how very little solder is exposed to water inside a pipe joint and did a proper risk analysis. Given that we still have older houses with solid lead piping, and we know the risk from that is pretty small, unless you live in an area with water with a very low pH, I'm of the view that forcing the use of a type of solder that is many times more likely to cause joint failure is not wise. I'll freely admit that I have never stopped using tin/lead solder for electrical work, because 99% of the bits of kit I've repaired in the past 5 or 6 years have been faults caused by broken solder joints, and it's always the lead-free stuff that's the cause. Luckily I can still buy (imported) 60/40 solder for home use, and that is orders of magnitude more reliable and easy to use than the lead-free stuff.1 point
-
The secret is :- 1) Clean pipe. 2) Mild NOT self cleaning flux ( dont use Laco / Powerflux etc ) I use Telux. 3a) Not too much heat. When the flux fizzes and starts to evaporate away, that's when your near to overheating the copper. Also, I use a flux brush to coat the internal of the joint but also to lightly coat the solder so the fitting gets re-fluxed as your soldering. Makes for clean sound joints. Remember to allow the joint to cool naturally after soldering is complete. Leaded solder is more forgiving but lead free isn't at all, and if shocked during the early stages of cooling, it will fracture like honeycomb. 3b) In support of 3a, buy a good torch with a 'volume' control so you can get the flame size according to what your doing. Oh, and as said, ask three times, measure twice, cut once1 point
-
In a previous house I used one of those and found the pipe crept out of the bung over time, I think it was the expansion and contraction when running hot then cold water. In the end I had to fit a DIY retaining strap to stop it happening. I now try and always use solvent weld all the time.1 point
-
Following on from the insulated cat box theme how about a carefully crafted, well insulated take away boxes? Useful for when you have to drive some distance to grab a pizza etc. Of course, depending where in the world you live take away CAT may be on the menu! (Pretty sure there was a special edition Ford Fiesta years ago with a built in gimmick/feature for keeping food warm!)1 point
-
If you are looking for power on a kitchen island, if at all possible my recommendation would be to install sockets recessed into the side panels of the island rather than these contraptions. None of they are really that sound.1 point
-
I made an insulated cat box for use in the shed. We also used it for padding at the bottom of garden planters, or insulating the sides thereof. F1 point
-
My BiL got a price for a steel frame cladded and insulated iro 8K , erected, if he had base and 600mm dwarf wall built, south down in NI. iirc,1 point
-
Useful as fairing boards for sanding down things like car bodywork, boat hulls etc.1 point
-
1 point


