


Ian
-
Posts
751 -
Joined
-
Last visited
-
Days Won
3
Everything posted by Ian
-
We’re now in our second winter of using our timber frame and timber clad holiday home and still no cracks in the skimmed plasterboard walls or ceilings. The timber stick frame was pre-manufactured offsite in sections and then erected and made weathertight in a nice warm dry spell in the early summer of 2016 in the space of just 2 weeks. Before the start of the winter we had the concrete floor slab properly dry and the underfloor heating working. None of the timber frame building structure had the chance to get wet and I think that’s probably the main reason why we haven’t had any shrinkage cracks in the plastered walls.
-
@Russell griffiths thats brilliant news!! Well done for giving it a go and for being persistent! It’s such a great feeling when you win against all the odds isn’t it! We had a similar situation with our own build in an AONB in N Wales . I had an initial meeting with the Planning Officer and showed her some drawings of what we wanted to do. She told me very bluntly that there was no way we would be granted PP. 2 years later (+ an appeal) we got full PP for a building larger than the one I’d initially shown her.
-
We did one large double height feature wall in matt F&B and it was okay although it marks a lot compared to all the other walls which we did with matt Dulux 'Endurance'....and yes, the F&B is v expensive. The paint that impressed me the most however in terms of ease of use was Dulux water based "Satinwood" in a mid sheen for all the (pre-primed) skirting boards and architraves. It was so much easier to use than traditional oil based gloss paints and brushes wash out cleanly in warm soapy water.
-
Now the build is complete - maintenance requirements
Ian replied to ragg987's topic in General Self Build & DIY Discussion
check gutters each Autumn if there is a risk of them getting blocked with leaves. -
if it's a ceiling to the underside of the roof then it won't need a fire barrier rating however you would normally need a surface spread of flame rating- usually Class 1 for housing. Coatings and paints are available for treating timber to achieve these classifications. Part B Building Regs reference document here. You need page 23 ono: https://www.gov.uk/government/uploads/system/uploads/attachment_data/file/485420/BR_PDF_AD_B1_2013.pdf
-
@Pseudomax another, more expensive option, would be strip off the existing paint on the u/side of the beam and use cathode protection. Personally ive only ever used it for repairs to rusting rebar in old reinforced concrete buildings but I know it can also be used for protecting steel beams and columns. Mapei’s website shows the kind of thing I’m talking about. Scroll down to the bottom of the page for their products that can be applied to new steel beams.
-
There’s an important difference between those 2 courses. One is ‘Passiv’ and the other is ‘Passive’
-
You’ve forgotten that the rebar will need to be held off the top of your EPS layer on small plastic or concrete spacers
-
@Visti A couple of points: - in the situation you’ve described s/c screed is normally a minimum depth of 50mm so you’d need that much over the top of the pipes. - check that the beams of your beam & block floor aren’t pre-cambered. If they are then this will affect your set-out and screed thickness calculations. - you’ve said that you’ll be power floating the sand cement screed but I didn’t know you could do this. I’ve only ever seen concrete floors being power floated.
-
Since the privatisation of Building Control in England & Wales about 15 years ago there’s no longer the same emphasis on inspections at set points in the build process. It’s now very much at the discretion of the individual BCO. The inspection schedule traditionally used to be: - inspect foundations before concrete - drainage testing - shell structure and any fire barriers - end of first fix - PC
-
@Moira Niedzwiecka Just a few thoughts if you are considering using glass as a Juliette balcony: Your two main choices for the glass are governed by British Standards and are (A) toughened glass, or (B) laminated and toughened glass. On the commercial projects that I get involved with as an architect I always specify laminated and toughened glass for use in critical safety locations such as balconies. The reason for this is that when toughened glass fails (and it occasionally does) it breaks into lots of sugar cube sized pieces and falls away from its supports so in a situation where you've used it in a balcony you are left with no protection from falling. If however you have 2 panes of toughened glass laminated together then the broken pane sticks to the unbroken one because of the plastic laminate layer and you still have effective protection to the balcony edge. For those who only have the budget to buy toughened glass then it's always a good idea to specify that the glass should be 'heat soaked'. The heat soaking reduces the incidence of spontaneous failure due to nickel sulphide inclusions in the glass. Heat soaking does not eliminate the risk entirely but it would typically reduce the risk of spontaneous failure from 1 in 500 for normal toughened glass to one where the risk is only about 1 in 50,000. Ian
-
@Dean Carpenter Just a thought but have considered a treatment product called Sioo?: http://www.sioox.org.uk/ its not a stain so shouldn’t affect your Planning Permission but it turns wood cladding an even light grey. The downside is that it isn’t cheap to buy. For the 100m2 of cedar cladding on my own new-build I costed it at about £500
-
@joe90 if your u/floor heating is working I’d explore your options for using it help to force dry your screed. I’ve read that it’s possible but it’s not something I’ve any personal experience of.
-
@joe90 Btw do you have underfloor heating?
-
@joe90 Testing. The target is 75% RH Air Hygrometer Test: This is the only method recommended by the British Standards. This involves the measurement of the moisture released by the screed into a sealed area over a time span of 72 hours (this is to reach equilibrium with concrete substrate). An accurately calibrated hygrometer is placed on the screeded floor and sealed for the prescribed time. The reading obtained shows the humidity in the sealed area, from which the moisture content is calculated. This is the traditional method and is not very widely used these days as the procedure is quite time consuming. Concrete Moisture Test (CM Test): This is a method that yields speedy and accurate results and is preferred by most specialist screed manufacturers. There are currently 2 methods followed for CM tests- destructive (Calcium Carbide test) and non-destructive (Tramex meter test) Calcium Carbide Test: A mid depth sample of the screed is taken and allowed to react with calcium carbide reagent. Upon reacting, the mixture releases acetylene gas, the amount of which indicates the level of moisture in the sample. Tramex meter: This is a more convenient method and is also accurate and speedy. The Tramex meter is an easy to use electronic device which can provide various measurement results. After choosing the CM measurement option from the menu, the meter simply needs to be put against the screeded surface to get the moisture content displayed in %.
-
The 1mm per day for drying is a rule of thumb and only really applies for thin screeds (like yours) and where you are drying the screed in ideal climatic conditions ie summer. In winter its a different matter. The rate of drying of the screed depends on there being a good differential between the relative humidity of the screed and that of the air that you are using to attempt to dry it. In summer that works well but in winter, unless you have heating available, the relative humidity of the air will be very similar to your screed and its not going to dry out to the required 75%.
-
@LadyBuilder There's a free U value calculator here http://www.changeplan.co.uk/u_value_calculator.php It's easy to use and has a drop down list of common building materials although the list doesn't include soil. For the soil I'd use the data in the link that @Onoff gave you.
-
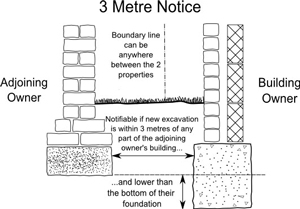
There's several parts of the regs which potentially apply to the work you are planning although it sounds unlikely that the 3 metre rule would apply to you. Extract from the regs: "Adjacent excavation and construction. (1)This section applies where— (a)a building owner proposes to excavate, or excavate for and erect a building or structure, within a distance of three metres measured horizontally from any part of a building or structure of an adjoining owner; and (b)any part of the proposed excavation, building or structure will within those three metres extend to a lower level than the level of the bottom of the foundations of the building or structure of the adjoining owner. (2)This section also applies where— (a)a building owner proposes to excavate, or excavate for and erect a building or structure, within a distance of six metres measured horizontally from any part of a building or structure of an adjoining owner; and (b)any part of the proposed excavation, building or structure will within those six metres meet a plane drawn downwards in the direction of the excavation, building or structure of the building owner at an angle of forty-five degrees to the horizontal from the line formed by the intersection of the plane of the level of the bottom of the foundations of the building or structure of the adjoining owner with the plane of the external face of the external wall of the building or structure of the adjoining owner."
-
Diagram below but it applies to your sewer too
-
Re Party Wall It will all depend on the relative depth of your neighbours foundations and your proposed new sewer(s). How well do you get on with your neighbours? If you are all on good terms with each other, once you have some proper idea of what you want to do you could explain it to them and ask if you could check how deep their foundations are. if your parents house and the neighbours house were built at the same time and are the same design it’s likely that the foundations will all be the same depth so you could possibly check your parents house first. On the road where my Mum & Dad live the ground is sand over a deep layer of peat. The older houses have shallow raft foundations but the newer ones all have very deep pile founds so you have to be a little bit careful making assumptions.
-
@Ed_MK also, as your new sewer pipes will be very close to your neighbours boundary and may be deeper than their house foundations you will need a Party Wall agreement with them in place before you start digging https://www.gov.uk/party-walls-building-works
-
@Ed_MK (typing this on a small phone screen so apologies in advance) some quick thoughts: 1) I’m guessing that the easement of 3m that Anglian Water mention would normally apply to a public supply - your pipe will be private so not subject to the same legal access requirements. You would normally lay the pipe to your boundary and they make the final connection. Having said all that it sounds like you now have the option of getting your water from the road on the opposite side which would be a good idea. 2) Foul sewer. You will need to find out the invert depth of the public sewer pipe at the point where you want to connect. This will be marked on a public record drawing that you should be able to access by making enquiries. You would normally be connecting to the nearest manhole located in the road next to your parents house. Once you have the invert level of that connection point you’ll be able to work out if you can get a normal gravity connection to it or whether you will need to have a pump. Foul pipes are normally 100mm diameter and fall at a gradient of about 1:40 so for a 50m run you will be dropping 1250mm just to get the fall you need on the pipe. Realistically therefore you will need the invert of the adopted sewer at the manhole in the road to be about 2M (or lower) below the level of your floor slab.
-
@LadyBuilder I googled “Nudura One” and I see that it’s an option within their system for ICF with the insulated former on only one side which I can see could be useful for lift and stairwell walls. However, I’m not sure what you mean when you talk about omitting “100mm inserts”. What are the inserts and what are they made of?
-
@TerryE @AliG your external wall design will normally be such that they are vapour open to the outside but vapour closed internally which means it's only the plaster that will be drying to the inside of the house so the bulk of the heat you're putting in will be forcing the structure moisture outward. Humidity shouldn't be a massive issue but it will take a long time to heat the house up because of the latent heat issue
-
@AliG part of your problem is likely to be that the building is still drying out. Unless the walls and slab were completed over a year ago 600 tonnes of concrete means that there will be a hell of a lot of excess water that still needs to evaporate from the structure of your building. I agree with @Nickfromwales that you need to crank the heat up although I personally wouldn't recommend paraffin heaters as they release approx 1 litre of moisture vapour for every 1 litre of fuel burned. With a building like yours is at the moment you could create a bad problem with condensation.
