mvincentd
-
Posts
495 -
Joined
-
Last visited
-
Days Won
1
Everything posted by mvincentd
-
Pure chalk base excavated to between 1m and 4m below topsoil...chalk rated by SE at nominally 125kpa so he was thrilled when i proposed 'mega' 300kpa insulation;
-
Strikes me you need to see a drawing in order to make a decision.
-
i have just this week fitted iron effect polyflow deep flow guttering....quote attached fyi. It was certainly easy to fit, and looks fine to me....although I don't think it's gonna fool any other than the most casual viewer as to its plastic content (min you, i'm generally a pretty casual viewer of guttering in general life!) Given how little i needed I would have been happy to go with any option almost regardless of price but this just seemed the best option for me anyway. Time will tell. img-180703100311-0001.pdf
-
Maybe d4 wood glue as used on seams of stuff like egger protect
-
So is that the ends of furrings beneath the deck we are seeing?....and clear space through into your joist cavity. in which case don’t you want those elements seriously protected. How much distance available from wood to render face?
-
Wouldn’t that need a movement joint?
-
I take delivery tomorrow of red cedar, cut down in the next village and milled to my spec 5 miles further down the road. Given I won’t treat it I’m unconcerned with its colour....it’s gonna end up ‘silver’. I showed the woodman a sample from a large supplier I might have used....... and he showed me that it had been kiln dried to within an inch of its life damaging the structure of the wood. On the other hand I know I’ll be fighting with a certain amount of warping and inaccuracy that I might not have suffered from the larger supplier. Not sure how it’s going to turn out yet but hopefully will add individual character to the house. Maybe it’s a Dorset thing but I see small sawmills all over the place now...and I don’t believe Cedar and Larch are essential types, they’ve just come to the fore through marketing. Cedar is actually rather soft and can pick up scratches on site during construction. Go find a small local old school sawmill and pick their brains....they might be able to offer you something rather competitive.
-
Cladding: vertical or horizontal - does it matter?
mvincentd replied to ToughButterCup's topic in General Construction Issues
A technical consideration regarding orientation - vertical cladding needs horizontal batons but these need to go onto vertical batons to achieve a clear vertical void.....so you’ll double the depth of baton off your wall face, which might throw off any carefully planned dimensioning. -
Actually it's IdealCombi i'm having, based on both a price/quality balance and a design/aesthetic requirement. For the record my scenario includes large sliders and tilt/turn floor to ceiling windows. I wanted every frame to look the same externally including having the same profile dimension, and I wanted as much of my constructed opening as possible to be glass but not at the expense of the first condition (or monumental £expense). The Futura+ are 53mm across the range. I lose 18mm to a baton and 12mm tolerance at top/side edge so a total of 83mm per edge....so a constructed opening of 1 metre gives me 834mm of glass. Velfac were the only others who could seemingly meet these requirements, but actually they are unwilling to meet them in so far as their policy is to only supply the tilt/turns for flats/upper floors juliette balconies! So i'd say if you know what you want to achieve, different brands design limitations will help you narrow the field.
-
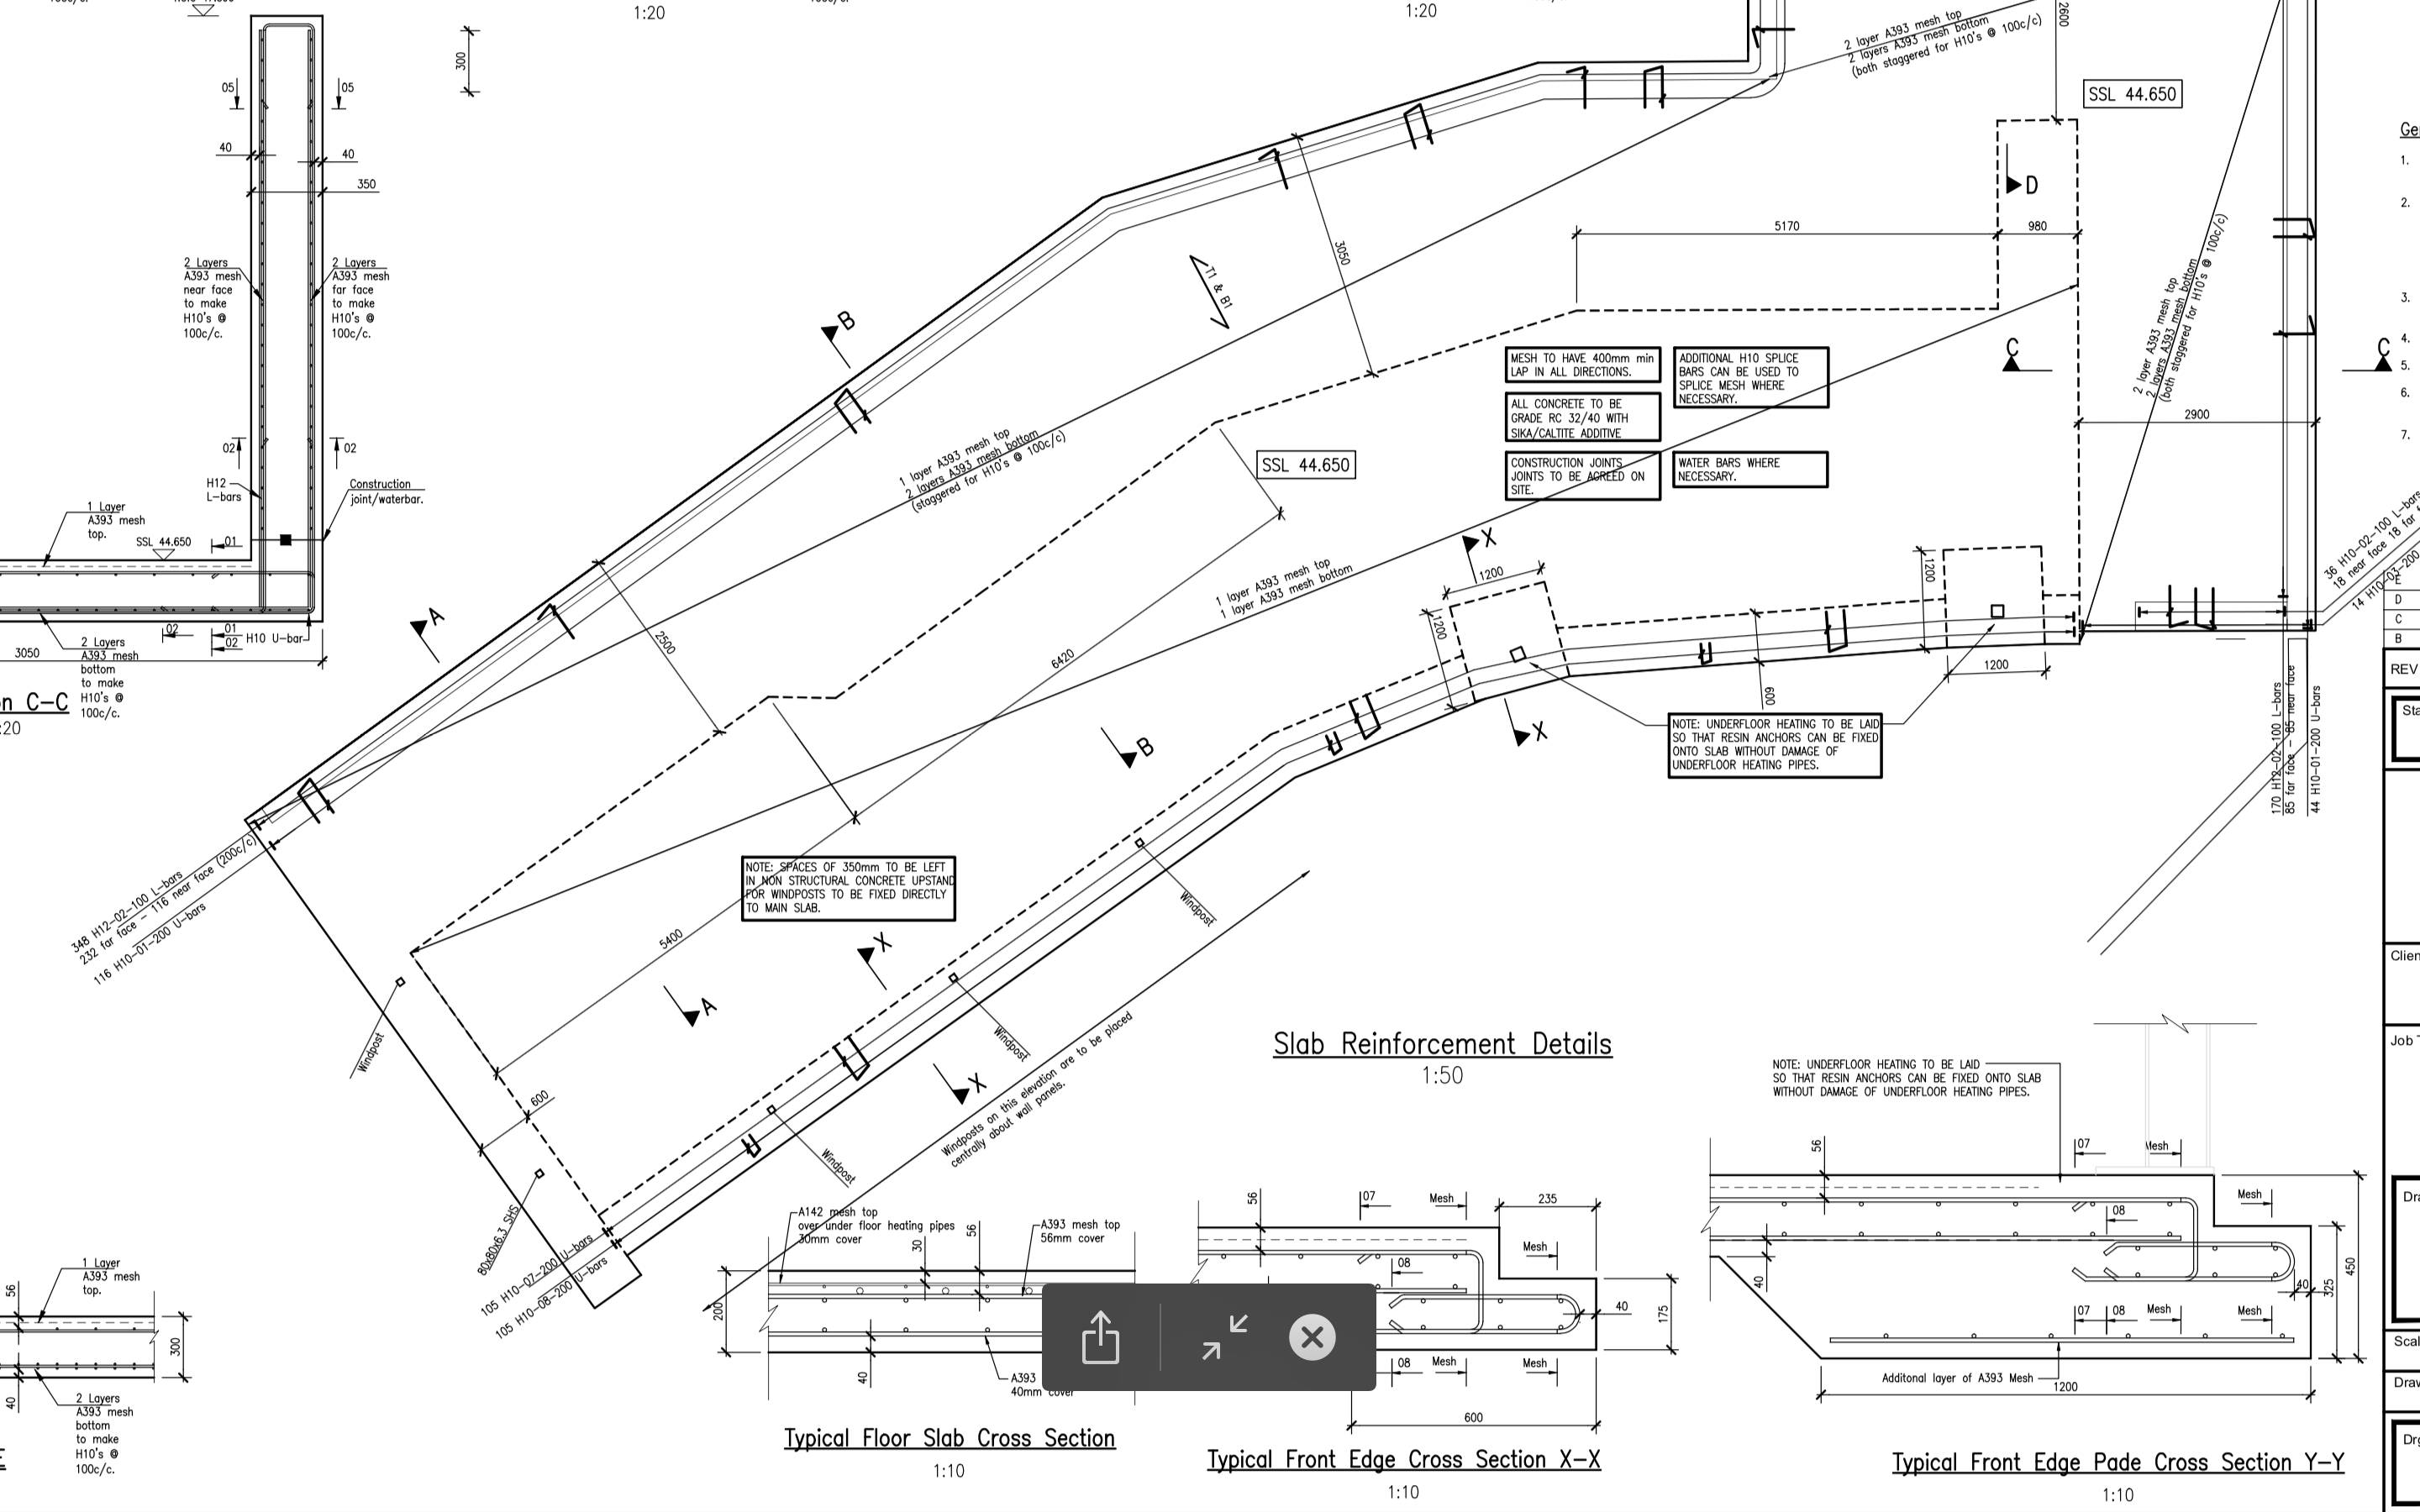
What goes more than 100mm deep into the slab.
mvincentd replied to MikeSharp01's topic in General Structural Issues
I thought it was usual to place ufh near the top....whats the rationale for it being at bottom, out of interest? Mine is 40mm below surface in a (min)200mm slab. Next process was drilling 50 x 100mm holes for temporary wall construction supports.....very stressful praying we missed all the ufh, which it appears we did! All my internal walls are stud and will be glued down.....but I won't use a topical sealer on the slab where i'm gonna glue. -
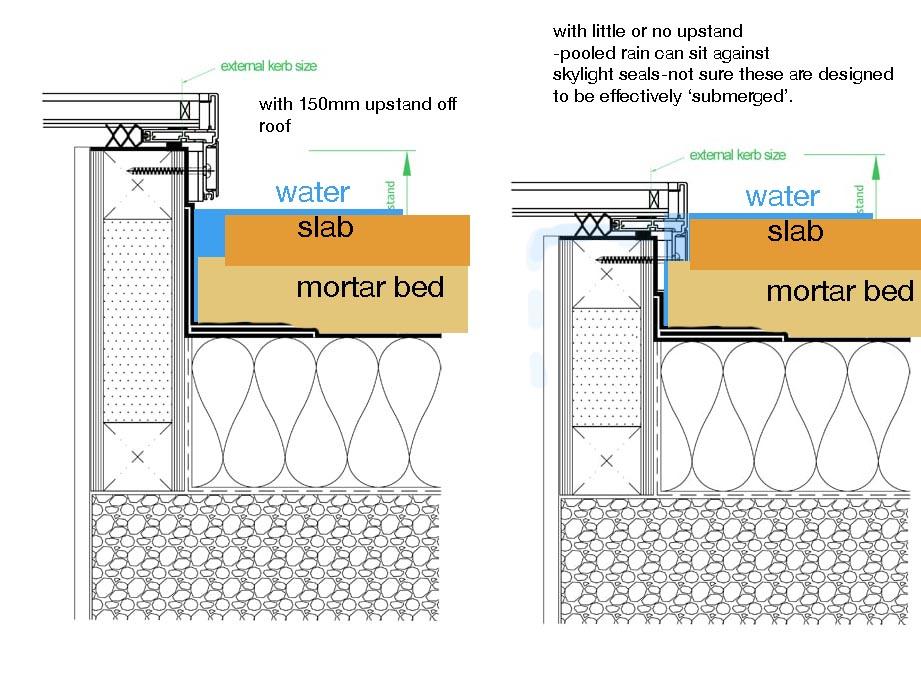
I wanted my roof skylights flat flush like you...my reason being issues over max height of my house, which with a standard 150mm upstand was represented by my skylights. The only thing on offer was a 'false' deck on pedestals 150mm higher than the membraned surface, so bringing the roof up rather than the skylight down...useless. Reason for not bringing skylight down as illustrated.

-
Ok, I’m getting you , so the Newton dimples lap over the top of that concrete ceiling but don’t reach to bond with the edpm, so while water running down the stone wall should be stopped by your (work in progress) flashing, dampness in the stone wall can reach down to behind the dimples....including on top of the dimples that are lapped onto the ceiling, so if it tracked far enough to exceed the lap of the dimples it would be onto the top of the ceiling. Thats how I’m reading it if there are no further damp proof membranes...is that right. In that case it looks to me like technically you are vulnerable, but realistically, it might never happen. Whether you should be concerned I’m not experienced/qualified to say. Based on what I understand of this though, If it were my build I’d drop a few quid on a surveyor who specialises in remediation of damp problems having a look, or get your building control guy (if he’s the helpful type) to apply his brain to it. Regarding “can make flush with final floor”...I believe your average walk on skylights that APPEAR flush only do so because the paving surrounding them is on pedestals raising them above a clear drainage floor that is somewhat below the top of the upstand on which the skylight is sitting. If your slabs are sitting on a mortar bed right up to edge of skylight I think you’ll have a problem.
-
Im trying to recall from your earlier posts........maybe I’m wrong but thinking that nice stone wall is sitting directly on top of your basement wall below. Without seeing a section drawing through that area to know what damp barrier is where in the construction below the Edpm I’m thinking at face value surely that stone wall should have a dpc across its width and the flashing should terminate into (directly under) that dpc. Even then, what’s happening on your neighbours side where that theoretical dpc would be.....if their yard floods and water sits against the wall, lower than the (theoretical) dpc, that will soak down the stone wall.........what is the route of your tanking for the lower structure? Surely you need that to ‘meet’ with the edpm ‘seamlessly’. Also hopefully it’s just my eyes but assuming you’ve cut that channel for flashing level it looks to me as if the fall on the edpm is towards the house not the gate?? Either way, hopefully the edpm against the house is getting flashed too. Also do I recall your skylights are designed as ‘drive on’...so I guess the upstand height has been planned to leave the glass flush with the height of the finished drive surface? I’d love to see the drawing of how this is being achieved if this is the case...but maybe I just misunderstood one of your earlier posts about drive on skylights. If they are actually standard skylights, have they all got sufficient upstand to go 150mm above finished drive surface?
-
Thanks for suggestions. I just spoke with a floor fitter/tiler who favours using a spot of self levelling compound, which seems to make decent sense.
-
I'm not entirely surprised given what winter threw at us and the time it's been vulnerable but my 22mm Egger Protect floor boarding has swollen along the edges, meaning each 600mm width of board is now effectively dished by about 3-4mm. It's glued and 5 screws per board (corners and centre) onto the metal web joists (600mm centres). Removal and replacement might not be so easy based on initial test....good glue colluding with unwilling screws resulting in stripped heads. IF I could sink screws further in, would it be realistic to take an electric planer to the high spots and reduce them. If I got within a 2mm tolerance say, would that be good enough to then either lay an engineered wood floor...or perhaps 9mm ply overboard and rubber floor. ? Just overboarding the Egger with more 22mm floorboard is an unattractive way of solving the problem because i'm fighting for every last mm of headroom!
-
Ordering concrete, how to sound like a trade pro.
mvincentd replied to epsilonGreedy's topic in Building Materials
When he purges the pump don't assume because you showed him earlier where to dump it that he will.....hound him. You've drawn the site road 3.5 x 1m squares and said its half that...so 1.75m.....so any obstructions or issues either side of that for the pump width including outriggers...maybe ask pump co' get their rep to drop by and see site so no-one gets surprises on the day. -
The blood and stomarch pills is happening to my slab!
mvincentd replied to MikeSharp01's topic in Foundations
Thanks @MikeSharp01 that's interesting....seems my white scum might be 'abnormal' then. Oh well, just another hurdle to get over! Bracing myself now for someone to say 'oh no, you can have an exposed powerfloated slab if it's waterproof concrete..." Great that you have so few imperfections in yours too.....ours has some 'gnarly' areas....we happen to be perfectly happy with this look luckily. If I were passing one thing onto people regarding powerfloats it's that it must be accepted that what you'll end up with is a bit of a lottery. Timing.....heh, all targets be they time, financial or quality seem only to serve as a record of what didnt happen. From the moment the first spade hit the ground i'd say we've dropped an average of a week a month, but from December to March we might as well have gone skiing, I think it was worth maybe 3 dry weeks work. All academic though Mike isn't it.....there's no turning back from these follies...keep the faith and soldier on. -
The blood and stomarch pills is happening to my slab!
mvincentd replied to MikeSharp01's topic in Foundations
@MikeSharp01 how has your powerfloat worked out? My interest is that I have what I think is efflorescence all over mine totally obscuring the underlying colour/texture. It was poured about 10 months ago and responds similarly today as it did a week after the pour, ie dull whiteish coating which when washed and brushed or jetsprayed reveals lovely powerfloat beneath but then dries back to the same whiteish coating. I'm now looking to seal the floor (not grind) with a penetrating sealer to end up with a look pretty much like when the slab is wet, but less shiny hopefully. I'm struggling for a convincingly unified viewpoint from google so very interested in your real life experience. I don't want to seal in the white scum appearance! Also, its waterproof concrete.....did you achieve a penetrating sealer on waterproof? Thanks -
Pictured in this guys blog....compaqfoam https://passivehouseplus.ie/magazine/upgrade/enerphit-upgrade-breathes-new-life-into-dublin-home
-
Keith never once took a tea off me...they'll sit in their truck rather than the site hut and drink from thermos....at this time of year anyway the way to their hearts is ice lollies. I'd agree that you might need the genny less than you imagine, but get caught out on just 2 days for 20 mins use and the hire fess plus time will balance the equation. Buy DECENT 2nd hand and you'll lose next to nothing.
-
I bought what I think was this generator (but badged as Neilsen not Bulldog), from these people. He gave me a compelling argument as a self builder himself on why to get this one...based around it being able to withstand whatever some errant tradesman might plug into it. Anyway I lost £150 on it when I sold 3 months after buying.....that's only a couple days of hire fees. It was faultless from my point of view. http://www.pjlallsorts.co.uk/bulldog-bde-6500e~15
-
I have a very close equivalent in my build. It's as specified by a SE (single skin 100mm dense block). I'm far less worried about it than say the fact I have 150sqm of flat green roof that ultimately relies on 120 x 10mm diameter thunderbolts to stop it come crashing down. That's also a fully SE solution. I had an intuitive wrangle with the concept of that. I suspect all builds are littered with details where the buck stops with small components that to a layman don't look like they'd cut it. It might be quite enlightening and put your mind at rest to have a general chat with a SE about 'how strong is stuff'.
-
Retaining wall structure and strength
mvincentd replied to David Chapman's topic in Landscaping, Decking & Patios
Any reason (like a nearby road imposing a heavy surcharge) why you cant just grade a metre of ground at 45 degrees....after all how is your client going to 'purpose' the high perimeter, which will probably end up half a metre thick anyway? -
Blimey, my last invoice from them at £350 is only a year old. Might cut no ice but feel free to tell Stuart you came to him on my recommendation and price guide so are 'surprised'.....i do vaguely recall him demonstrating a bit of flexibility.
-
I agree that you shouldn't initially diy in your situation. Luke SE will likely recommend Baypoint...charged me 350 per visit. They may suggest you'll need numerous visits, but once your piles are set it might be more viable to go diy thereafter. If Keith were to offer, for the pittance that might save you I wouldn't entrust the task to him (no disrespect).