Iceverge
-
Posts
4462 -
Joined
-
Last visited
-
Days Won
32
Everything posted by Iceverge
-

How to ensure walls all level for intermediate floor?
Iceverge replied to ruggers's topic in Brick & Block
A better detail would be a ledger board bolted to the wall external walls and the hangers hung on this. Parge the wall behind it and then and then set a line with a laser. Use chemical anchors to secure threaded bars and bolt it home. Much easier to get airtight and level than hangers built in by the masons. The inner wall plate can be done last. Just get it close enough with the blocks and leave enough space for a wall plate + a morter bed. By varying the thickness of timber and mortar you'll be able to make up any height from about 40mm to 100mm. -
Bitten off more than I can chew but persevering
Iceverge replied to OutdoorsDolly's topic in Introduce Yourself
Can you build a replacement house adjacent to the existing and then demo the existing later? You would have somewhere to live then at lease during the build. -
I would consider casting the pipes into the ICF from day 1 with a slight slope to the outside for condensation. You're about at the threshold (260m2) for units moving from 150/160mm ducting to 180/200mm so I would use the larger ducts.
-
Interesting idea, it would help dampen the fan noise somewhat too. In line with the passivhaus guidance you will only be able to add 10W/m2 of floor area before the air gets too hot and dust particles start to smell. With cooling, condensation from the radiator might be an issue. Cool project however. I'll follow with interest.
-
Maybe my makey uppy term is a little confusing. Local solar noon is 13:40 today here. (8.5deg W) That's when the sun is highest is the sky and directly south of us in the sky. About 11:40 is when we get "house noon" as the house faces South South East. This is when the sun shines directly in the largest windows. It moves the bulk of the solar gain to earlier in the day compensating for the heat losses during the night and reducing overheating potential in the evening.
-
I did for the garage. Nothing wrong with the windows but the flashing kit was very fiddly and not the most precise. I have never installed veluxs.
-
On overheating I find South Windows are no issue as they're so easily shaded from the high summer midday sun. It's the West windows that are the real bugger. We have only about 4m2 of glazing to the west spread over 4 windows but they definitely cause the most discomfort. In the evening ( summer or winter) you'll have the effect of sun shining directly onto your skin making an otherwise comfortable room temp too hot. Ok if you close the curtains. We faced the main glazed orientation of our house to about 155deg ( South being 180deg). This was partly for views but it also brings "house noon" forward by about an hour helping the house heat faster in the morning and reduce solar gain in the afternoon at the expense of overall daily global solar gain. Seems to work well.
-
Here's an interesting concept about drinking rainwater untreated lifted from Farmers Weekly. It seems too logical and straightforward to possibly work.......... Water supply To reduce costs, rainwater is harvested from the roof, with two separate pipe feeds set up to supply the shed and grazing block. Water is stored inside a 100,000-litre tank, which has a valve at the bottom to monitor the water level. If it dips below a certain level, it is automatically topped up from the mains. Still, with 70% of the water supply coming from the roof, it is saving about £2,000/year on average. Mr Rowe has also saved on a UV-system by turning to the Australian industry for advice. “When using rainwater harvesting systems, there is a risk of bacteria getting in the water from things like bird droppings. But the work done in Australia suggests the bacteria live in the top and bottom one foot of the tank. “The theory is: if you suck water out of the middle, you are never exposing the cattle to risk water. “I spoke to an Australian cattle vet who was using the method to provide drinking water for his house.” © Richard Stanton Subsequently, Mr Rowe has designed and engineered a system to do just that. Hoses are suspended from two buoys that are connected to 18in-long chains to prevent the hoses from floating to the top of the tank.
-
I too quite like the shape and design of a simple metal building. Maybe a portal steel frame with some insulated steel panels externally might work. https://www.steelroofsheets.co.uk/categories/insulated-cladding/ Couple this with a couple of cans of high quality airtight foam, https://www.uksealants.co.uk/illbruck-fm330-air-tight-expanding-foam-gun-grade.html You'll have a very cosy garage.
-
the windy roost Cabin Foundations and the Amenity block.
Iceverge commented on Jenki's blog entry in The Windy Roost
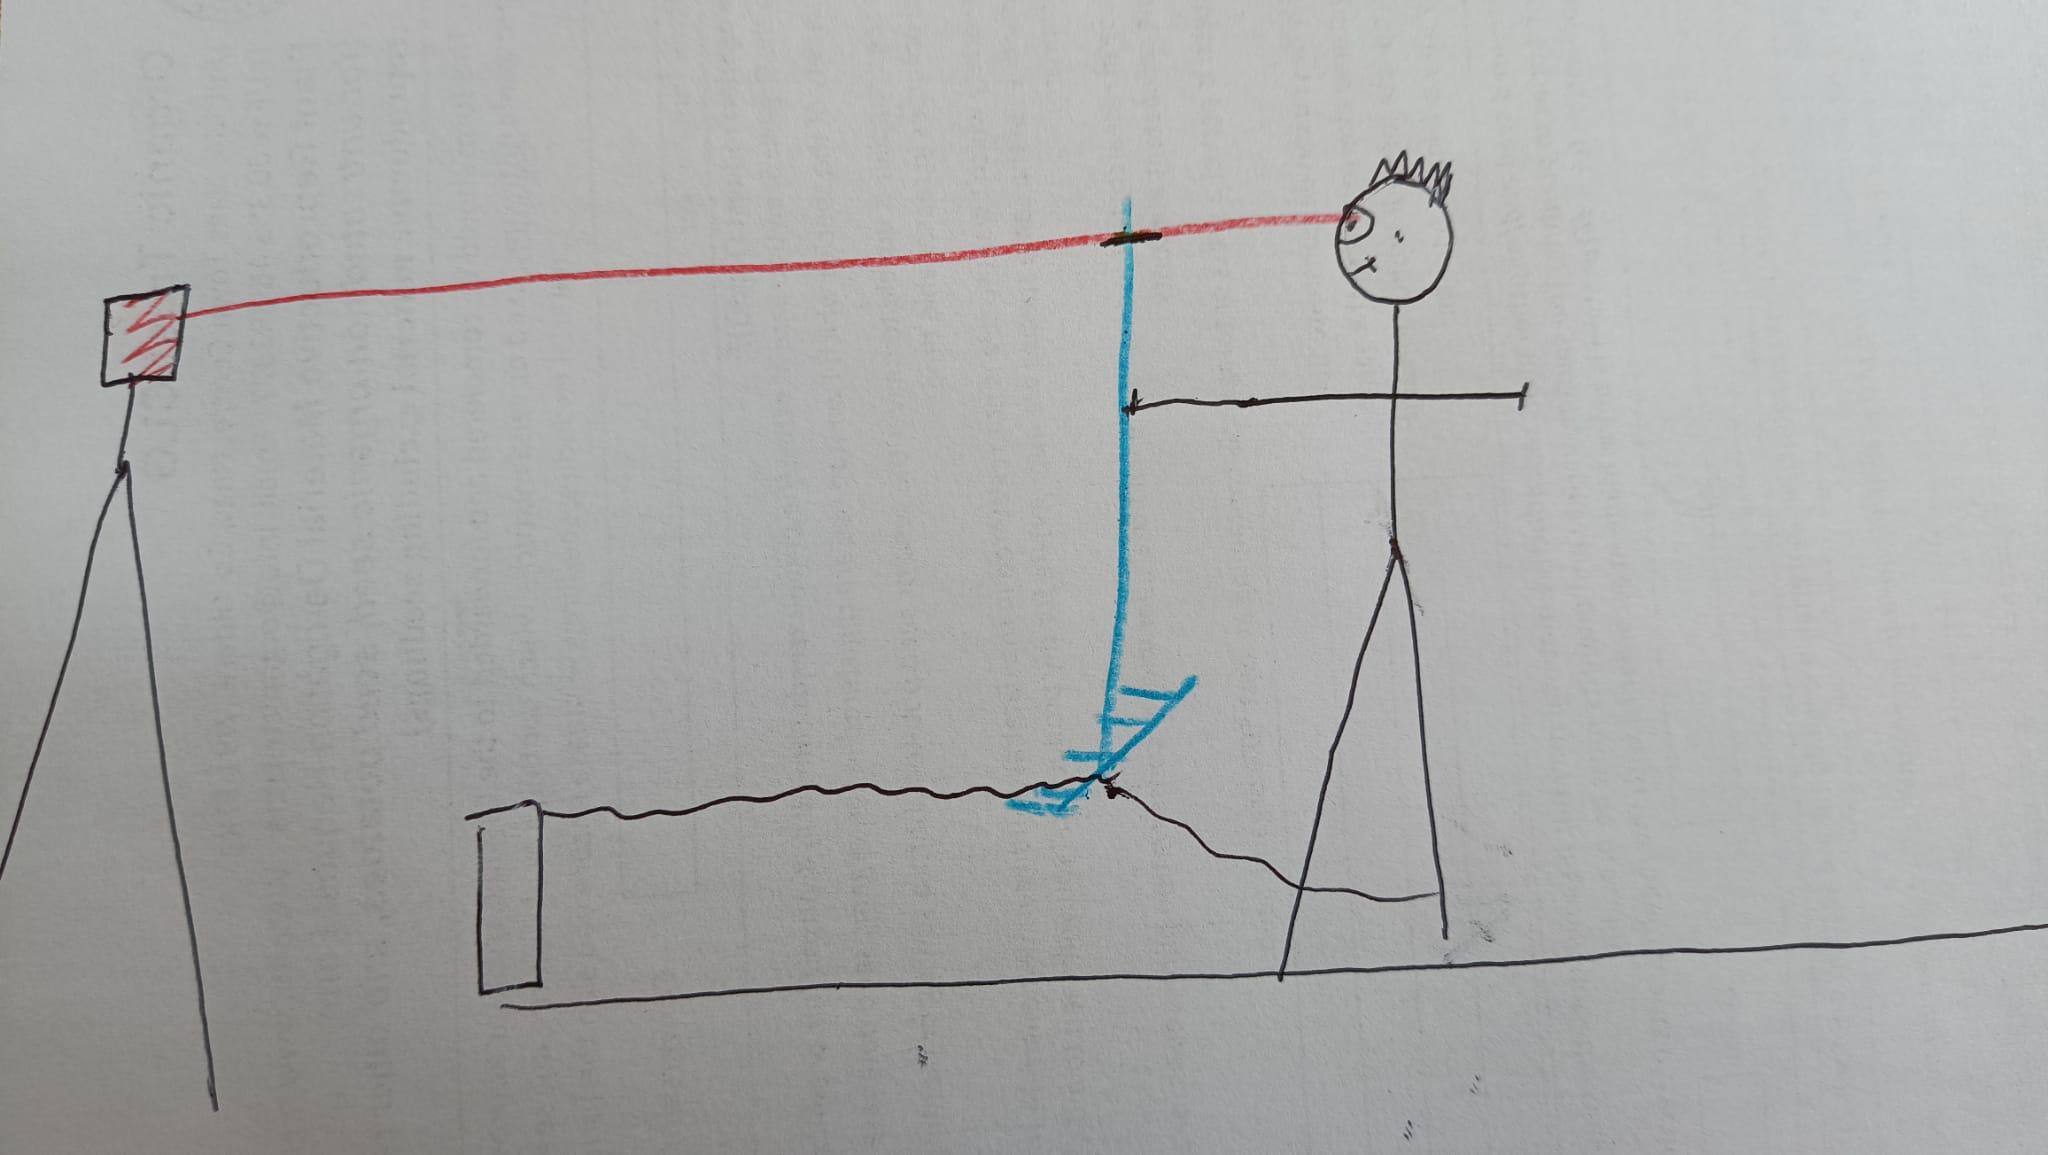
Nice to see a start made, and glad to hear your marriage is intact. Concrete requires an acceptance of suffering elsewhere largely absent from the 21st century! I poured a slab with a mate for his house earlier this year. We had a concrete belt on the truck which helped enormously. Also I've found if an owner driver comes they're normally more attuned to the customers needs. I'm sure someone will bollock me but the technique I used for levelling is was to setup a cheap Lidl self levelling laser with a view over the whole site. Looking into the beam (wait for the internet eye doctors to appear) I took a level on my rake and tightly fixed a cable tie as a datum. This enabled me to rake, check and level the floor very accurately and quickly. Especially as the "pro" beep beep beep level broke on the day. Have you considered eliminating the slab entirely for the main house. Pour a ringbeam and then put a floating osb floor over insulation.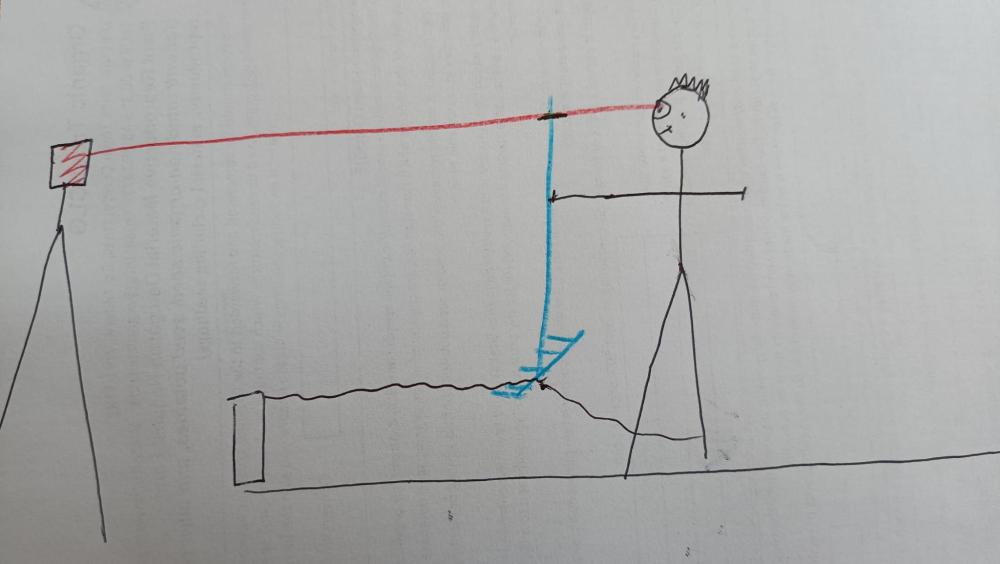
-
@yberllan do you work in the IMP trade yourself? Industry experience is always welcome. I watched Roger Bisby AKA Skillbuilder make a garden room last night from them and I was impressed with the kit of parts that turned into a building.
-
For this kind of job I wouldn't buy my own machine. I've had an 8t excavator and now a Massey backhoe. Again about 8t. They're absolutely fine for poking around, clearing scrub etc however when you take on the ground it turns out theres an awful lot of it and it's very heavy. You'd need something at least 13t and to get something serviceable probably spend £30k+. Anything cheaper will work for light jobs but once you start digging hard it'll break your heart. Seals and hoses will break daily and heavy equipment is very tough to work on. Everything seems to be inaccessible and incredibly heavy, and inevitably when it breaks it's stuck outside in boggy ground in the rain ( Ask me how I know!) Also parts are an order of magnitude more expensive than automotive/agri stuff. Get in touch with local farmers. They'll have a number for a man with an excavator who does this this every day of the week. Employing him you not only gain a digger but also his expertise. By all means buy machinery for lighter jobs, I use my digger all the time, but for serious earthworks pay for an expert man with a big reliable machine . I do.
-
Air tightness on masonry build
Iceverge replied to gravelrash's topic in General Construction Issues
Had a gander out of interest. A BMW 740 is 580w. Most cars probably about half that. One for an Insignia 2.0d online for £20 at the moment. Just make sure you get the plug with some wire from the scrappy too as the OEM sockets in the housing can be a pig to get into -
The more I hear the more I think your architect is really clued in. Three things being talked about here, Breathability (vapour permeability), Airtightness, and Ventilation. Impermeable internal insulation materials ( phenolic, PIR, polyethene sheets) are a bad idea. They pass the test of interstitial condensation only in theory because you can draw a perfect vapour barrier internal to them. In practice this is impossible. Doubly so on a retrofit. Every nail and screw (not to mention internal abutting walls and floors) will let humidity into the wall and condense into moisture at the cold side. Mould and fungus will grow and your old walls will weaken and crumble if the moisture cannot escape. Breathable materials like mineral wool, gypsum, woodfiber, cork, hemp lime, clay + intelligent membranes are a far superior and safer option. If moisture gets in it can get out. It's the difference like between wearing goretex and wearing a plastic bag. 2 Airtightness is different. This a continuous layer somewhere into your building that allows no drafts to blow through. It is probably the most important for energy savings and comfort. It is also important to protect the structure of the building by not allowing humid internal air into the walls as much as possible. High quality retrofits like yours will tape/mastic all penetrations diligently back to an airtight but breathable layer of render like clay or lime. Make a DIY blowerdoor fan to hunt down leaks. 3. Ventilation. Firstly air for human health . It needs to have appropriate temperature, humidity, free from pollutants, pathogens and excess CO2. Secondly for the health of buildings, this really is only appropriate humidity. In practice it's only practically achieved by some electric fans running continuously somewhere. Sucking out, blowing in or both with the added comfort and energy savings of a heat exchanger. Vent holes in the wall only are as practical as a hole in the roof for drinking water, always too much or too little. Opening windows as required doesn't happen in reality. I looked at the video, it's effectively a PIV (positive input ventilation) module but ducted. It has the advantage of filtering the incoming air but will rely on good airtightness to blow stale air out through the bathrooms. Given the same constraints and the access to ducting a DCV or MEV would run ducts to the wet rooms and extract the moist air while letting fresh air in through trickle vents or wall vents. Aereco is a French company that has an elegant system of passive humidity controlled inlet vents and humidity controlled fans to only vent to the required level. It's the most efficient system without using MVHR. Another alternative is an exhaust air heat pump for DHW like this https://www.atlantic-comfort.com/Water-Heaters/Heat-pump-water-heaters/Explorer, again made in France. Whilst not MVHR, it will ensure you're not dumping hot air overboard whilst heating the hot water. @Thedreamer is pleased with his version from Joule. I'm glad to see someone is taking off gassing seriously. When burnt phenolic, PIR and polyurethane are very poisonous. Aerogel for a house can see limited use. For instance upgrading an existing heritage door in a money no object passivhaus refurb. For normal humans to buy in any meaningful quantity it's far too expensive. I found a US store selling Aerogel blankets for $325 for 0.75m2 @ 10mm. To achieve a U value of 0.2 ( 7cm) would cost about €3000/m2. Mineral wool at 22cm would cost €18/m2 for the same U value. Vacuum insulated panels are very vulnerable to puncturing, expensive and come with the same breathability issues as plastic board based insulation. Forget the space age materials is my opinion unless you have NASA's budget. Just carefully install something breathable everywhere. Maybe 10cm at 0.035w/M2k will be fine. TLDR My advice is: A good layer of cheap breathable insulation. Meticulous attention to airtightness. A continuously running mechanical ventilation system. A heat pump. Bon chance!
-
Mineral wool/Rockwool every time. Cheaper, better fit, fire performance. Overheating protection. The list is long. Once you have any insulation at all ventilation losses become a far more significant factor, especially in small buildings. What airtightness/draft proofing strategy have you agreed on?
-
Air tightness on masonry build
Iceverge replied to gravelrash's topic in General Construction Issues
No, I paid for an official test. A very thorough German came and did it. -
You could put the coil inside an overheating room of the house, or even the car to extract some extra heat.
-
Air tightness on masonry build
Iceverge replied to gravelrash's topic in General Construction Issues
DIY blower fan. We tested 0.31ach after only a scratch coat of sand cement plaster. Most of the gaps I found were the backs of wall chases and around windows. -
ASHP, Just an outdoor fridge ?
Iceverge replied to Post and beam's topic in Air Source Heat Pumps (ASHP)
I too couldn't see the ridiculous price for install making sense. You can buy an ASHP for 2.5k yet the install seemed to add 12.5k to the build. Direct electric here. We insulated our way out of the conundrum. -
Hi Dan, Is the front remaining open? If so insulation won't make any difference.
-
Is plain concrete an option, usually cheap and readily available. Do the best you can and then chuck a few hundred quid at self levelling compound if needed.
-
ASHP with 1-2000L thermal store
Iceverge replied to Tommytipee's topic in Air Source Heat Pumps (ASHP)
Fair enough, no to convection so. Radiation is a nicer heat. Infrared heaters can give a nice localised radiation boost to skin temp (they feel warmer) while not having to heat the air temp of the whole house. I'm not a fan of celotex. Prefer bog standard EPS , mineral wool and celluose. Just use more of it. -
Not 100% sure what the arrangement is here. Are the green lines ducts ? Where is the fan located? A pen sketch would suffice.
-
ASHP with 1-2000L thermal store
Iceverge replied to Tommytipee's topic in Air Source Heat Pumps (ASHP)
If dhw isn't a considerable why not use mini split A2A units. Great COP and cheap. -
How about, something like 100mm Rockwool between the joists. Its main purpose is to prevent the reverberating drum effect but can double up to heat insulate in your case. Structural flooring on acoustic strips on the joists. Membrane, Pipes and screed. If you want to do more acoustic improvements consider resilient bars underneath and greater mass of plasterboards (soundbloc or thicker boards or double board). An essential part of soundproofing is closing any air pathways so downlighters etc are best avoided.