Iceverge
-
Posts
4462 -
Joined
-
Last visited
-
Days Won
32
Everything posted by Iceverge
-
Old "pile of stones" buildings are very forgiving. Lots of lovely flexible lime and timber and thatch. Making our houses out of rigid concrete isn't without its disadvantages.
-

Heating & hot water for temporary accommodation
Iceverge replied to SuesieG's topic in Boilers & Hot Water Tanks
WBS is an expensive and inconvenient solution in a building with such low heat demand. Your heating load will almost certainty be less than a 2kW resistance heater. I dragged one home from the dump for free and it heats out passive house just fine. A stove would cost £1000 minimum and wouldn't be as healthy or safe or convenient. A cheap electric shower and an undersink water heater for the hot taps. -
Excellent. Now get your DIY blower door fan rigged up and you're sorted.
-
I'm intrigued but also confused. Do you have any sketch/schematic of your setup to share?
-
Welcome welcome. Congratulations on finding a great place. Is the base worth keeping? Too often any retained part of an old building compromises the new one and ends up being worse and more expensive long term. We build PH. It was cheaper than Bregs once you factored in our lack of central heating. (Simple design and masonry build) ASHP on the other hand would need 25 trouble free years to pay back. The unmentioned factor is comfort, a colleague with an overglazed kitchen in their new build can see 40 deg in the evenings. I saw some automated motorised blinds installed in a supermarket recently that seemed to be actively responding to the sun. Very cool. I imagine someone did the sums Vs A/C and it was a favourable. No harm in subbing it all out. Gives you more time to think and direct!
-
Can the existing boiler be fixed? My parents have an oil boiler that's about 25 years old. It died a couple of years ago but from memory €20 or so of parts got it running again.
-
Agreed. I think if the main stopcock is accessible then you're fine. It's very quick to pop in a blanking peg when you need to spend more time fixing something.
-
I managed 5 x plastic Hep + olives into brass fittings on my UVC install, too late to see the above advice. It's been ok.......... So far............ ~~rushes hurriedly to the UVC to check for impending disaster~~
-
Have a look at your grant of planning. It'll normally be a condition on there. The council will expect the person who certifies the house that it is built in accordance with planning. As you can self certify in Ireland you can change materials take a chance than you won't be subject to a random inspection. I gather these normally happen when someone has an eagle eyed neighbour who they've peed off and tips off the council. However you may still be able to apply for retention at a later date. I assume your building needs a mortgage and sign offs from an architect/engineer for the bank. The bank also normally require that the professional states the house is in keeping with planning. This is the real building control in effect. Maybe test the water with them. They'll have a better insight. A tiled roof is the cheapest and most common one you'll get however.
-
Injected Closed cell foam like Walltite would give you the best insulation for the cavity width but it's not cheap. https://youtu.be/z7c_vMCzZ-g EPS beads are much cheaper buy may not flow well in such a small cavity. Avoid injected mineral wool or open cell foam.
-
Rookies diving into the passive house deep end
Iceverge replied to Jake Smith's topic in Introduce Yourself
UFH pipe costs about £3/m2 plus clips ( you'll need long ones for EPS) install and manifolds. £10/m2 won't be wildly out. Roughly a 100mm concrete slab ( which is installed anyway) heated uniformly by 5 deg is 0.3 kWh of storage. That equates to £33/kWh of storage, A tesla powerwall 2 at about £10000/13.5kWh is £740/kWh. Similarly our UVC is about £40/kWh of storage. I'm unconvinced of the benefits of battery storage for domestic installations. Indeed PV much beyond 3-4kWp doesn't appear to have any reasonable payback from my calcs ( we have none yet). Wind turbine domestically are generally seen as gadgets (nothing wrong with that) rather than economic shrewdness. I was mistakenly under the impression that a passive house might need no heating. We tried, but at 17-18deg it wasn't comfortable. It won't need much however and a full blown central heating system will be a waste. I made a thread somewhere of you want to search. Generally 90% of the tradespeople are really good. Don't be afraid to part company with the rest as they'll cause more hassle than they're worth. It helps to be on site daily before they begin work to make sure everyone is on the same page, all the drawings and instructions in the world can't replace 5 mins face to face. Try not to make the classic self builders mistake, especially with family, of trying to physically do too much work yourself. I did and found myself burnt out towards the end, unable to put enough effort into the management and oversight. Also don't ne shy to share ideas on here. I wish i'd done more asking during our build, lots if helpful folk. Enjoy the process however. You'll have a great house when you're done. -
How do you plan to tie the internal leaf to the external? Pir boards are not a great option, mineral wool Batts or Eps beads are better.
-
Rookies diving into the passive house deep end
Iceverge replied to Jake Smith's topic in Introduce Yourself
Good luck on your journey. We built a passive House in 2019/20/21 with a 250mm cavity and strip foundation's. Most of the detailing was based on Denby Dale. These videos are definitely worth a watch. There was still plenty of reinventing the wheel as we went along. Interestingly the trades we dealt with directly were much easier to align out thoughts with rather than those subbed through the builder. For heating we use a plug in rad. It works fine but if I was DIYing I'd put in a very simple UFH loop on a timer to shift all the heating to cheaper night rate electricity by using a thick concrete slab as a heat battery. Immersion only UVC here works well. 300l for 2 adults+ kids can be heated all on cheap night electricity. Solar PV is in the pipeline somewhere in the future. -
Exactly this, I could see a real issue when thinking about plasterboard over the top however when you don't have this issue you'll be fine. Maybe if you're feeling particular a few strips of expanding foam on the back of the pir to enclose any air gaps but I'd crack on. otherwise.
-
Topps. Beyond my knowledge I'm afraid but I can't see why you'd need one. No idea sorry.
-
Direct 400l UVC for the DHW with PV divert. Should be ok all year round with 12kWp solar. Willis heater for UFH. Program the diverter to heat the water first and then the slab. Your shortfall will still be 90% (quick calcs) for space heating (without the stove) in the coldest months, but will ensure you don't export any solar. Make up the difference with the Willis on E7. A thicker (super insulated) slab will help to buffer the heating and avoid complex control systems. Pre-plumb and wire for a cheapy ASHP when one turns up, but in the interim monitor the house performance to see what your actual usage is.
-
We put all the top of the sockets 750mm above the floor , no regrets apart from the bedside table which is 600mm so my phone charger with bottom exit leads snag . In fact I would probably put sockets higher. Completely by accident we positioned other sockets beside windows and the socket gets completely hidden by the curtains.
-
Adding extra insulation to the wall service-void?
Iceverge replied to Dreadnaught's topic in Timber Frame
sounds familiar, something to do with the eps and the plastic coating of the cables. -
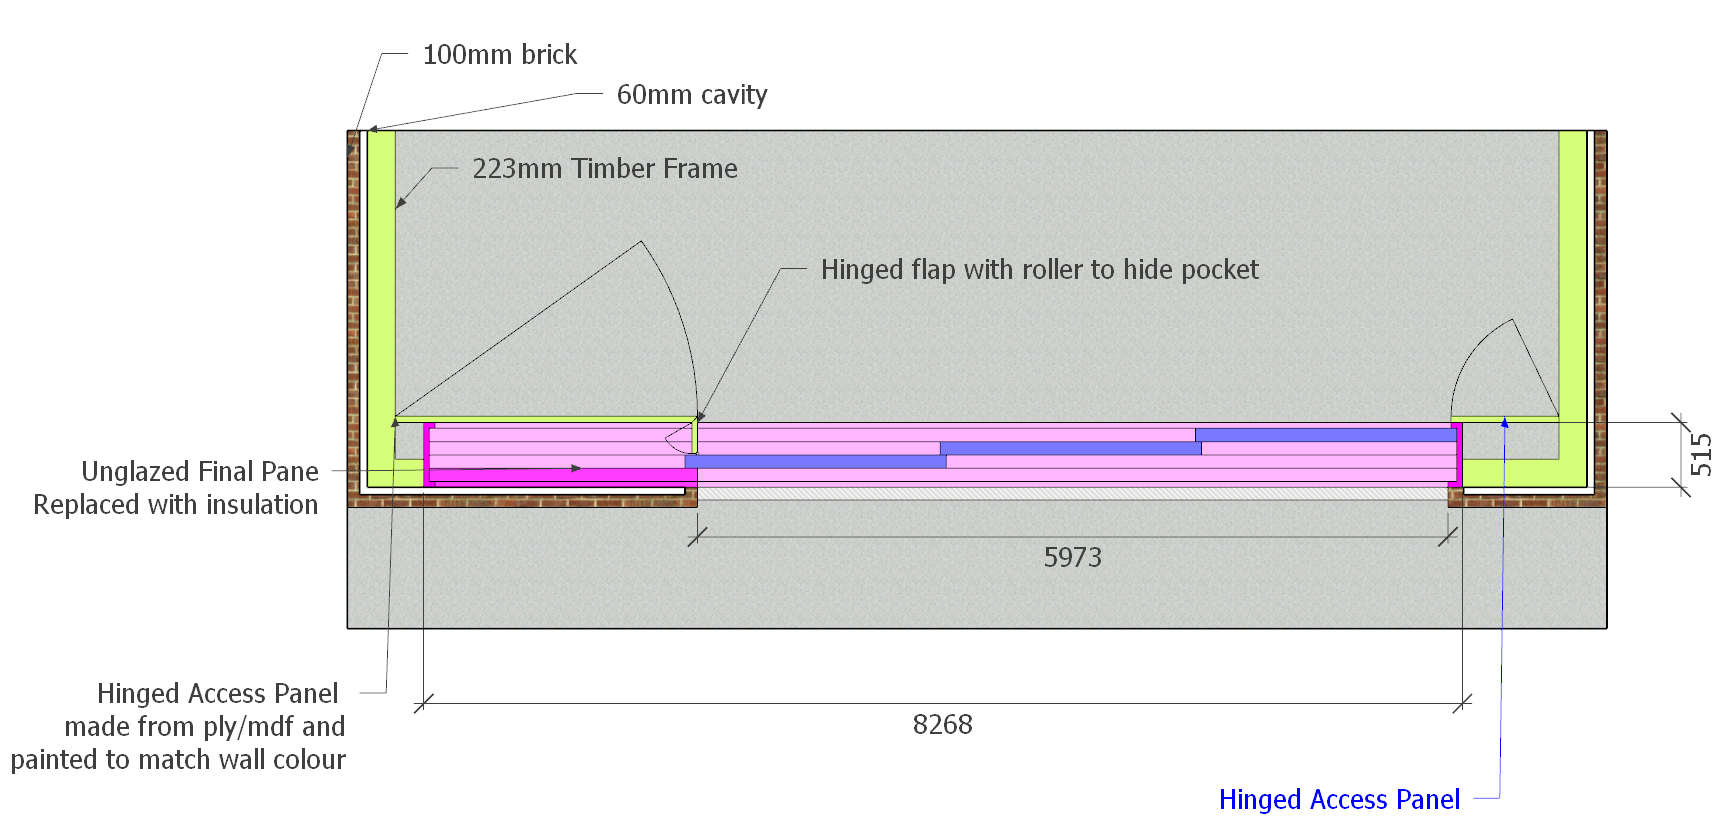
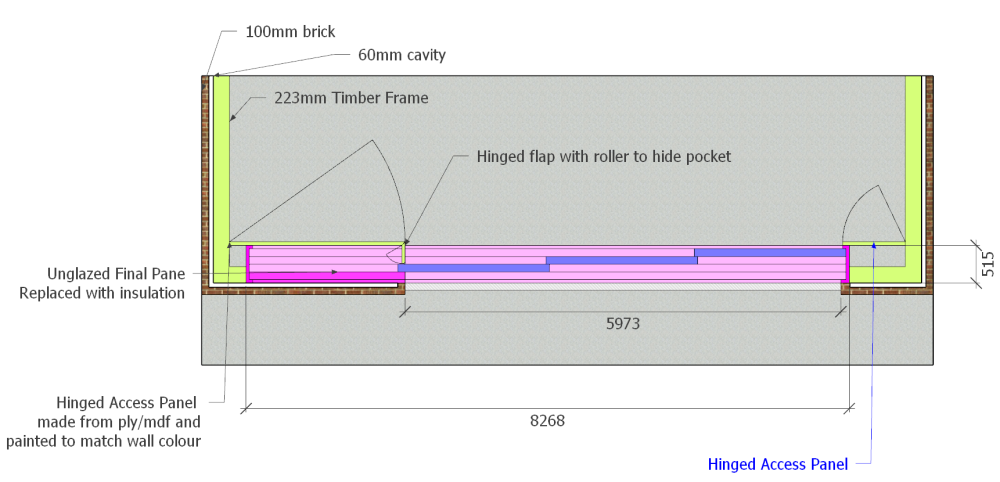
Here is a workable rat free solution I think. Maybe some of our onboard glazing genius's will elaborate if such a sliding door is possible. Pros. 1. Creates a perfectly open 5.9m expanse of frameless door when open, and a tidy hidden edges when closed thanks to hinged flap ( integrated rollers on the tip so it doesn't foul the sliders. 2. Full access to all the mechanism of the door via internal access panel. The pocket will be cleanable and not outside for vermin to inhabit. 3. Relatively easy to tape the perimeter of the frame for airtightness and wind tightness and detail for weathering, I have drawn an aco drain at the threshold too. 4. Secret cubby hole to created to the right of the drawing for aesthetics! Cons. 1. Supporting the brickwork outside the unglazed panel. I can't imagine fixing wall ties to the window is recommenced! Perhaps a decorative external pier or internal strengthening of the wall would be enough. 2. 8.3m span is chunky. You can buy 140mmx630mm glulam's off the shelf. This would be better for thermal bridging and fixing to and fit nicely with your 140mm stud wall. I imagine your SE will know better but I'd push them away from steel if I could. The window suppliers will require a tolerance above the frame to allow for settlement in the house too. I don't know much about sliders but it would seem prudent to fix the frame in a manor that allowed for adjustment later to keep the windows running smoothly. 3. You loose quite a lot of internal space and cannot put anything to the left of your plan to allow the access panel to be opened. 4. You will need a tidy joiner to make the internal access panels look well and function properly without fouling the doors. 5. It's different from the norm so inevitably you'll have to fight hard and pay lots of extra "just in case" money to the builders and designers. Best of luck!
-
Rats will move in.
-
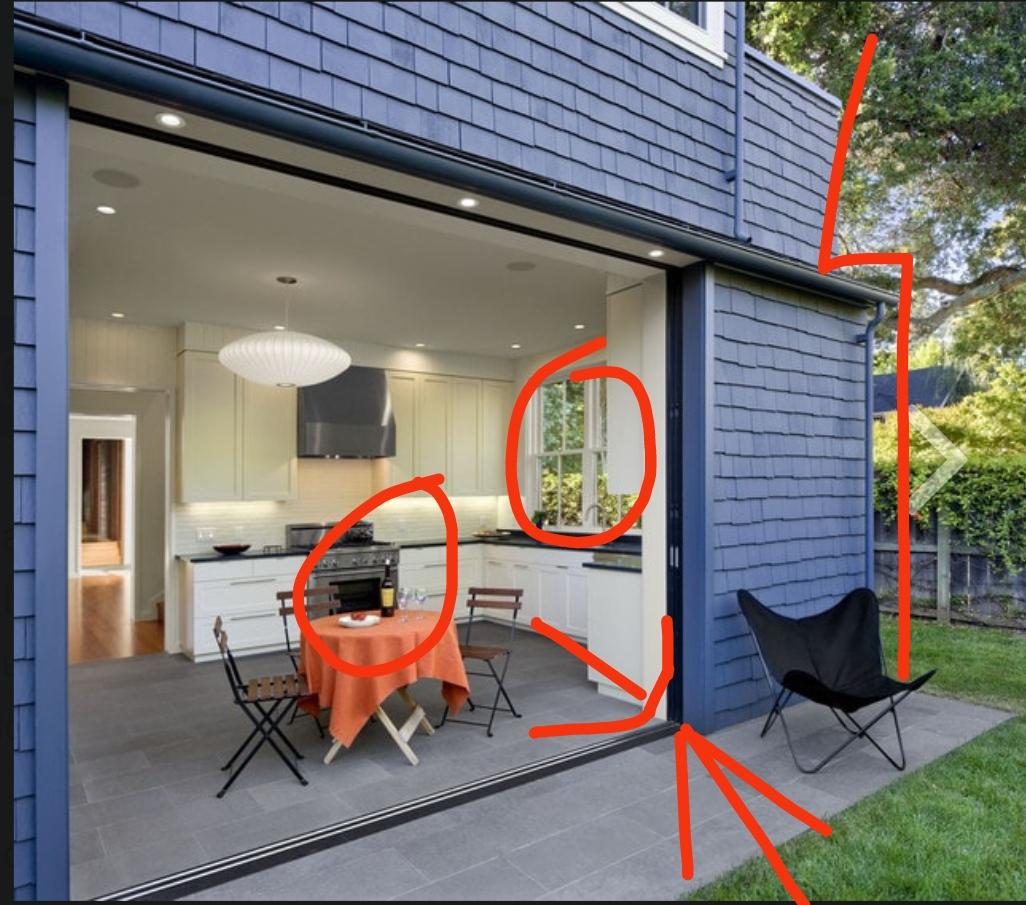
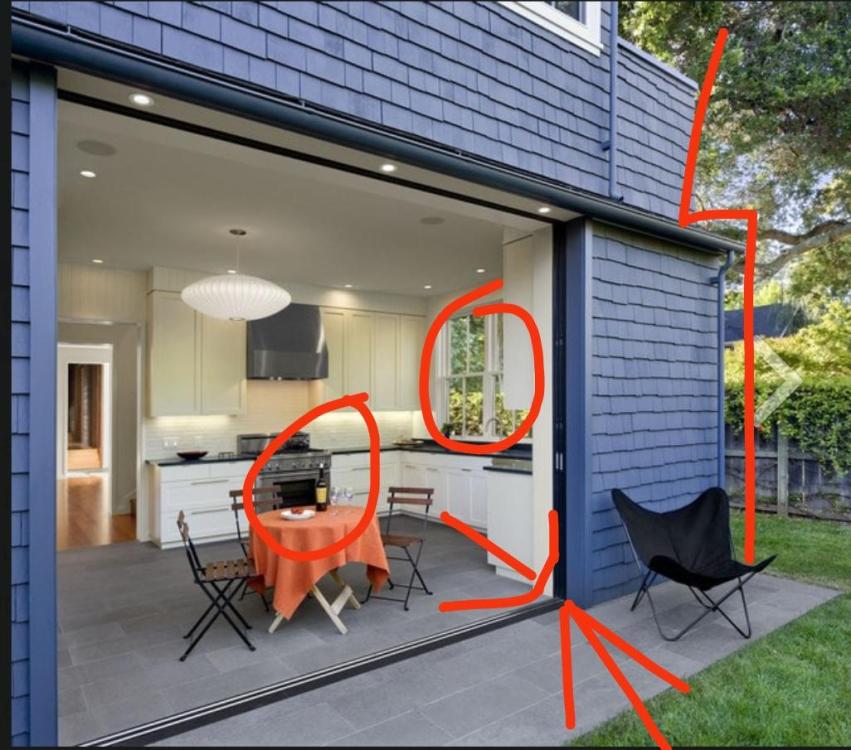
Beware of the internet when idea searching. The picture you showed has a few things that won't work for you. As Dave said it slides both ways, not one. The "pocket" shown is external to the main structure and there's a step in the fasade to accomodate. An external pocket will be full of leaves and starlings before you know it. The door sliders are very thin and wouldn't meet building regs. Fine in the Southern US ( where I suspect this pic is from, note the sockets and gas stoves and sliding sash windows). What you want to do is no doubt possible but perhaps not within a reasonable budget. I think you would need build say an 8.5m aperture with all the associated steelwork etc. It'd need to be seriously beefy to avoid too much deflection. Then install a full 8.5m wide slider with 4 panes, 3 of them sliding and 1 fixed. The fixed one could be just a solid insulated panel. Then brick up outside to only reveal the sliding doors and not the fixed one. Get a joiner to make an internal pocket to hide the doors once open. It would need a sprung flap to hide the pocket when the doors when closed and be able to be completely removed for access for cleaning and maintenance.
-
Attic trusses, warm loft, internal PIR location
Iceverge replied to Thorfun's topic in Heat Insulation
Jam it full of offcuts, better than going in the skip. It'd be a good place to hide any secret documents... -
Converting wooden workshop to office
Iceverge replied to Adthrawn's topic in Garage & Cellar Conversions
Use plain plasterboard. There's a risk with your external poly of trapping moisture in the wall otherwise. Take care to seal all air gaps in the ply. Most moisture problems within walls/roofs are caused when drafts take damp air into the structure. -
Here you go. ePM2.5 is probably your min spec. Maybe run the house at a positive pressure to ensure all indoor goes through the filters.
-
If fitting the ducting is too much hassle you can get decentralised systems. They're not as efficient, quiet or cheap however.