


Temp
-
Posts
10691 -
Joined
-
Last visited
-
Days Won
43
Everything posted by Temp
-
Could be a faulty blender. Can you tell if the noise is coming from the pump or the blender? Use a length of wood as a stethesoscope?
-
I noticed that the noise reduces when the mixer temperature is turned down. In that situation more water is being recycled around the floor loops and less new hot is added from the boiler. Does it ever make this noise when the burner is lit? I'm wondering if the boiler pump is stopping when the burner switches off? If that is preventing water flowing to the UFH mixer and pump it might be the cause?
-
Gosh its loud. Double check that the flow and return from boiler to blending valve is correct.
-
Google can find examples.. This one for a development of 4 houses.. https://www.ribblevalley.gov.uk/planx_downloads/17_0385_Const_Plan_&_Traffic_Plan.pdf 5 houses https://digital.flintshire.gov.uk/FCC_Planning/Home/NewDocView/160917 Knock down two and build flats. http://planweb01.rother.gov.uk/OcellaWeb/viewDocument?file=dv_pl_files\RR_2016_2430_P\RR_2016_2430_P-TA.pdf&module=pl
-
Its not common to need a Traffic Management Plan. Do you know why they asked for one? If not I would contact them and find out if they have any specific concerns they think you need to address. It might be a neighbour objected to your planning app and raised concerns about trucks delivering materials at all hours. As a sop they asked you for a Traffic Management Plan. In which case it might be as simple as one page note saying deliveries will be restricted to normal working hours (6.30 to 4.30 ?).
-
Is it UFH? Can you just turm off that loop or Rad?
-
Its hard to know what your definition of "large is". I would make a list of the rooms you want. Go measure up some you consider to be the size you want for each and build a spreadsheet to add it all up. Our house is a wisker over 3000 sqf/300sqm. For that we have virtually a 6 bed (4 reasonably large bedrooms, 1 small bedroom, home office big enough to be a 6th bedroom), large living room, dining room, kitchen, family bathroom and two ensuite. Garage not included in the 3000sqf. Our house is on a slope so split level and has a T shape roof with rooms in the roof and several dormers. This meant quite a bit of steel in the roof and even the first floor. If building again I would go for a more traditional shape to reduce cost (eg rectangular shape, two storey on flat plot). But keep some of the non standard internal layout features we have. Staircase in the dining room, full height window etc. Money saved would use to add a decent conservatory!
-
+1 Means you probably need to stick with same type, size etc Take one of the existing tiles to builders merchants. My local Travis Perkins aren't cheap (unless you have an account and get discount) but were helpful. Recommended a tile that matched, got me samples, spotted a mistake in the quantity of half length tiles I had ordered etc.
-
6 months isn't very long for a pump. Did the previous pump also make this noise? Do you know what mode the UPS3 is set in? A single press of the button and it should tell you. Instructions here..
-
Can you post a photo of the manifold. No noise from the pump at this stage? So this is the boiler reaching its max flow temperature limit and shutting down the burner. The UFH loop pump should continue to run if the room stats are still calling for heat. Does it do that? On most UFH systems there is a mixer that blends boiler flow and UFH return to make the UFH Flow. You can get some strange effects if the flow and return from boiler are connected to the wrong ports. I would double check that first.
-
We have an oil boiler that heats a thermal store (300L tank of water to) around 55C. A pump circulates water from the TS to the UFH manifolds. Pumps on the manifolds circulate the water around the floor loops. The thermal store also has a heat exchanger/coils in it. Cold water from the mains goes through the coil to mak the DHW which goes to showers and hot taps etc. The result is mains pressure hot and cold water everywhere. Well not exactly, on most taps we have pressure reducers/regulators to avoid water spraying all over the place. In addition to providing lashings of hot water the TS allows the burner in the boiler to run flat out without cycling on and off. Without a TS you can get a situation where only one or two rooms need heat. However the burner in an oil boiler cannot modulate down like a gas boiler so instead it has to switch on and off (cycle) to reduce its output to match demand. This is less efficient like stop start driving in a car. With a TS Basically the stat on the TS controls the boiler. When the TS calls for heat the burner runs flat out until the TS is satisfied. The TS then feeds whatever the UFH needs at the time. Its like driving at 56 mph all the time with fewer stops. As for running costs.. These depend on the heat loss from your house (which in turn depend on how well insulated and ventilated it is) and the DHW consumption. There are very few sources of data that compare the running costs of different fuels. The only one I know of is this one and its possible to argue with some of the assumptions they make. https://nottenergy.com/resources/energy-cost-comparison/ See the column headed "Pence per kWh (after boiler efficiency)" This takes into account the cost of electricity (at 19p/kWH), oil (29.4 p/L) and the COP of the ASHP (270). Kerosene 3.33 p/kWH Mains Gas Standard Rate 3.85 p/kWH ASHP 7.19 p/kWH On their figures oil is currently a lot cheaper to run and compares with mains gas. What do others pay for electricity at the moment?
-
It seemed very real when we were paying over 16% interest on our mortgage in the late 70s. For something like 20 years it was over 10%.
-
Appliances Widths.. Washing machine, tumble dryer, boiler - 60cm each Freezer - 60 or 70cm but they get wider with the door open so care needed if there is a wall on hinge side. Add another 10cm for this? Depth (Wall to front edge of top, doors may stick out bit further) Washing machine, tumble dryer, Freezer & Boiler all need about 70cm. That is typically 60cm for the appliance and 10cm for pipes and wires behind them. For servicing allow a clear area in front of the boiler. eg pretend it has a door on the front like a fridge at least. Flue means it will also need to be on an outside wall and correct distances away from opening windows and MVHR vents. UFH manifolds Width.. We have an 11 loop manifold that came ready assembled on a metal plate that's bolted to the wall. The plate is 100cm wide but needs another 10cm on one side for pipes so call it 110cm wide. Depth.. The pipes go into the floor with a gentle bend. The whole assembly allowing for the pipe bend projects out about 20cm from the wall. Typically the top of the manifold plate is low enough that it can fit under a work top but perhaps unwise to put a sink in front of the manifold. . If anything is going in a kitchen unit (or under a worktop needing support) then remember to allow say 20mm for the walls between appliances. Consumer Unit We put ours in a cupboard in our home office room, also in there the BT master socket, Modem, router, DECT cordless phone base station, TV distribution amp. This also means any PowerLink devices (Ethernet over mains wiring) work well.
-
https://www.kbbreview.com/34044/topstory/post-brexit-chaos-rising-shipping-costs-and-import-delays/
-
If the second one is marked Approved that suggests it was formally processed as an amendment. See if the planning officer can produce any other paperwork relating to the amendment. I think the wording of that paperwork could be key.
-
Normally they stamped the official approved plans with "Approved" and the date. Any other file drawings are of dubious value. You will need to get a good look at the planning file and the exact wording of the planning condition. It might be the condition refers to a specific version of a drawing, the one that does show the green area. Later changes to the layout of the houses may or may not affect the location of green area. In other words if half the plot was shaded green then that half could be subject to the planning condition regardless of the layout or number of houses that were eventually approved and built within that half. The exception would be if the builder submitted a totally new planning application or applied to specifically amend the green area boundary.
-
Heatmiser Neostat v2 temperature sensor problem
Temp replied to Ultima357's topic in Underfloor Heating
I know the self heating effect isn't ideal but the internal temperature of the stat should still track external changes in temperature provided they aren't subject to changing draughts from the MHVR or your desk fan. I would try and recalibrate them then monitor to see how well they track your thermometer over a few days. Cheaper than replacing them all. You don't actually want the stats to respond to short term fluctuations in room temperature because that causes cycling of the heating system. I have wax cartridge actuators that take several mins to open/close so fluctuations shorter than that are effectively ignored anyway. So the fact that changes in room temperature take awhile to reach the sensor buried in the stat shouldn't matter too much. Obviously you don't want it to take hours to catch up but 10-20 mins shouldn't hurt. -
Heatmiser Neostat v2 temperature sensor problem
Temp replied to Ultima357's topic in Underfloor Heating
Are any of the MVHR vents directly above the stat? If so I would adjust any vanes to point the air flow away from the stat and then recalibrate the stats. See how they work then. -
Heatmiser Neostat v2 temperature sensor problem
Temp replied to Ultima357's topic in Underfloor Heating
Here is a photo of the remote sensor I built. Just a small project box from Maplin with three holes drilled top and bottom and an NTC inside. Cant remember if its a 10k or 20k Ohm but it was in the manual for the stat somewhere. and this is the old Heatmiser stat we have showing the vent holes. Same both sides and similar on the bottom. None on the top - probably to keep dust out?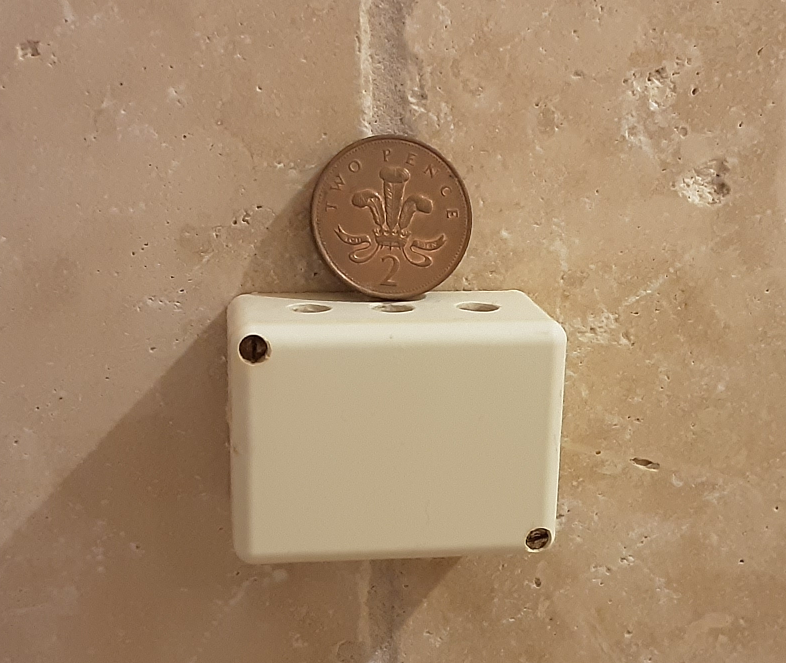
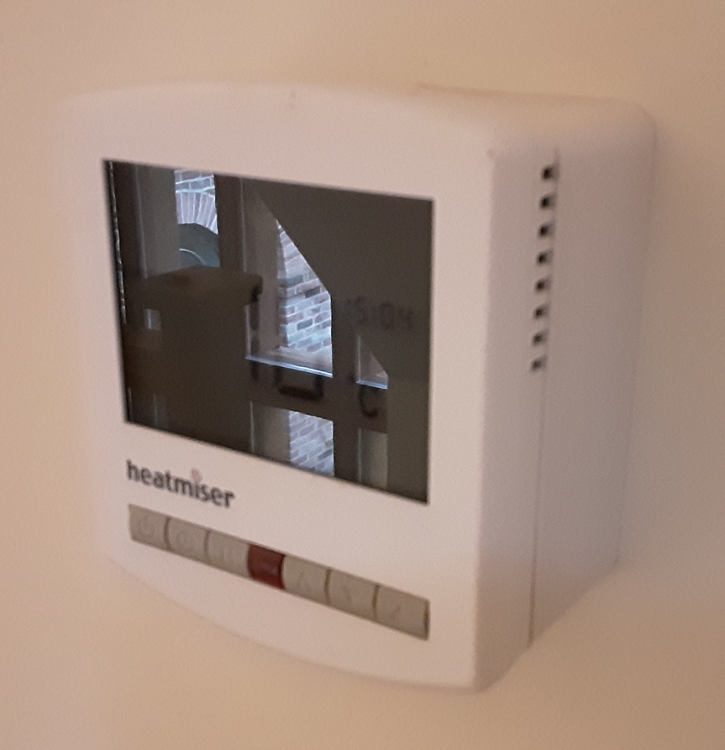
-
Heatmiser Neostat v2 temperature sensor problem
Temp replied to Ultima357's topic in Underfloor Heating
You would expect them to track room temperature but only if the power they dissipate is constant (probably true) and the thermal resistance between inside of stat and the room is constant. Sounds like the latter it isn't true due to changing air flow from the MHVR. In other words they can only be calibrated with MVHR either on or off not both. -
+1 The big risk is that printing money and a poor balance of trade leads to inflation and higher interest rates. Then we start having to pay a lot of tax just to service our debt leaving less for public services and investment.
-
Its quite hard to make money actually building houses, I'd suggest most of your gain would be planning gain. Parking is likely to ge a planning issue?
-
Ground floor shower tray - concrete slab headache.
Temp replied to SuperJohnG's topic in Waste & Sewerage
Dont know why I didn't think of this before but.. If you make the shuttering from pressure treated timber with strips of 12mm WBP on top the shuttering could be left in place and form part of the timber frame supporting the tray. Just remove the 12mm WBP strips and replace with the 12mm WPB panel. -
Ground floor shower tray - concrete slab headache.
Temp replied to SuperJohnG's topic in Waste & Sewerage
Have done two trays in screed floors. This is what I've done.. Shutter the area under the tray full depth of the screed. Arrange for waste pipe to enter void as far away from likely waste position as possible. I suggest near a back corner but not right in the corner. Say 2" away. Low as possible. Have it enter at 45 or 90 degrees to the side of the tray not some random angle (to avoid needing a flexible pipe). McAlpine have a range of top access traps that have different minimum depths for the pipe and different flow rates. Use the diagrams to see how far down the pipe must be. I would use 50mm pipe. https://mcalpineplumbing.com/traps/shower-traps-accessories Pour screed to top of shuttering. Later when you have the tray you will make a timber frame with WBP on top to support the tray in the void. When you have the tray.. Take waste trap apart so you are working with just the bit that goes below the tray. Trial fit the waste pipe work to get trap in right place and height. Construct timber frame to support tray. Add >12mm WBP on top with oversize hole for waste. Top of waste should be flush with top of WBP or a few mm above it to allow for mortar bed. It helps if the pipework allows the trap to move up and down say 10 mm and a few mm in other directions. But do not allow it to fall down too far. Put a small block under it if necessary. Thus is to ensure the top part of the trap will reach it. Trial fit tray and top of waste and check tray level. When 100% happy take it all apart. Solvent weld the waste plumbing and recheck position. If you use a lot of solvent adhesive you get a few seconds to twist joints to get correct alignment. Test for leaks. Screw down WBP. Double check waste position. Do all this next bit in one go... Mix mortar for bed. Lower tray in place on mortar and check level. Run bead of sealer around waste hole in tray. Insert top of trap through hole in tray and screw into lower part of the trap. Tighten but don't over tighten. Wipe up any sealer that squeezes out. Recheck tray is level. Let mortar set. Before laying the tray inspect the bottom of the tray around the trap area. It should be smooth and flat so the sealing washer on the lower part of the trap works. If not then may need sealer on washer before laying tray as well as around the hole on top. If the timber frame is resting on insulation I would put WBP down on bottom as well to spread load. Forgot to say all timber should be pressure treated. -
Heatmiser Neostat v2 temperature sensor problem
Temp replied to Ultima357's topic in Underfloor Heating
Mine are 230V but most are in surface mount back boxes. The stats don't have massive vents but never seen this issue. They seem to read pretty accurately. If anything the one we have with the remote sensor is the least accurate and I made the remote sensor myself.

