


Temp
-
Posts
10690 -
Joined
-
Last visited
-
Days Won
43
Everything posted by Temp
-
Typically you run SWA cable in the ground and use potting boxes to make waterproof T joints one per light. The wire from the T joint up to the light is typically rubber and sometimes prewired to the light. About the loops.. I mean run the SWA to near where a light is going and make a loop in the ground. Put the T joint in the loop. The loop is just to give you some slack/spare wire in case you need to dig up a joint in the future.
-
Welcome to the forum. The idea is to prevent water vapour created inside the building from getting through the plasterboard and insulation to the cold structural timbers where it may condense into water causing them to rot. So the vapour barrier should go between plasterboard and insulation.
-
+1 I used Hikvision wired POE cameras, each on its own cable back to a hub in the loft that supports POE to power them. I also have a server on the same hub so not all the camera traffic goes over the main house network. If you go a similar route note that with some hubs only half the ports support POE so worth checking before you buy. I had lot of issues getting motion detection working reliably, typically I got too many false triggers due to wind moving tree branches, spiders, moths etc. If I turned down the sensitivity it missed people walking about. So I've ended up recording pretty much everything on the server. In an ideal world I would have seperate IR illuminators so spiders aren't attracted to the camera and PIR sensors connected to the system to trigger recording... but perhaps that's overkill.
-
I think its quite rare for a 110mm vertical stack to freeze. More common for smaller diameter "horizontal" feed pipes to freeze (eg from kitchen sink to the stack).
-
I'm not a Hetas installer but I would build a 150mm or 225mm ID diameter chimney using pumice liner blocks. Then use a register plate/adapter to connect to the stove. They can be painted black to match the stove pipe. The manual here.. https://www.hunterstoves.co.uk/Content/Images/uploaded/Instructions New/Aspect Eco Dry Instructions.pdf says.. Something like this or one with a flat rectangular plate that can be screwed to the underside of the cast lintel.. https://directflues.co.uk/isokern-dm36/adaptor-increasing-stainless-125mm-to-150mm-isokern Do check exact dimensions before ordering. Took me three attempts to get the right adaptor for my stove. They mixed up ID and OD and things like that. I think some places make them to order. I note that the manual also says... There is a diagram in the relevant Approved Document that describes this. In short this means the stove may raise the temperature of the hearth over 100C or at least its not certified that it wont. The latter would allow a thinner hearth (eg 20mm slate/granite/glass).
-
Planning conditions typically say something like.. "Before occupation..." or "Before work starts on site..." So you only need to discharge the ones that say "Before work starts.." at this stage, however if you are able to discharge the others as well then do as many as you can at the same time because the fee is per application not per condition. In my case I sent them lots of documents and several brick samples as they lost some. Eventually after several email exchanges and revisions to drawings they wrote back saying they were happy so I applied to have to conditions discharged and sent the fee. These days they may want the fee up front with the request to discharge all on one package. Just a reminder: If the CIL is a thing in your area remember to get the exemption paperwork done and confirmed by the council before starting work. Some people have been caught out.. They asked the council if they were exempt and the council said "yes the project will be exempt"....but that's not the same thing as actually applying for the exemption on the proper forms and getting the reply back, you still have to do that.
-
Could put the insulation on the outside of the duct if you can be sure it won't flood and float. How about filling part of that void with 500-750mm mm gravel so it's effectively buried.
-
Don't just run the wire past where the lights are going to be. It's better to form a loop of wire as it makes ita lot easier to work on later if there are any problems.. __0_______0________0______
-
Example part m door threshold. Most people design out the internal ramp/"transition unit"..

-
Youtube just served me this. Spray foam under UFH. Not seen it done before. Think its french vid but there are limited English subtitles. They sand (grate?) the spray foam down to make it level..
-
You might be able to get a test kit to measure the inhibitor concentration but I think these are specific to the make of inhibitor?.. https://www.bes.co.uk/sentinel-x100-central-heating-test-kit-7583/ https://www.plumb2u.com/fernox-62514-express-inhibitor-test-c2x32812924 Next time it gets drained measure the volume of water and work out how much corrosion inhibitor is needed. Depending on how your TS works you heed quite a few bottles of the stuff.
-
I paper around windows. Helps to wet out the paper. If yours is still wet use a pin or sharp knife to pick the bubbles and roll it back down.
-
+1 We ran 110mm under the floor to the sink area but I think it's too late for the OP to do that.
-
Indeed, I just got a quote and it wasn't mentioned. https://octopus.energy/go/ Says.. Octopus Go is a beta product. If you're OK that some things may not work first time, that installations and processes may take longer than we'd like, and that on occasion data issues with smart meters can take significant time to fix or prevent things working at all, but that you'd like to work with us to make world-changing energy tariffs a reality, check this box so we know you're onboard. You will always be able to switch to one of our fairly priced standard tariffs at any time. I'm ok with this!
-
3mm is nothing. Our beam and block floor wasn't that smooth.
-
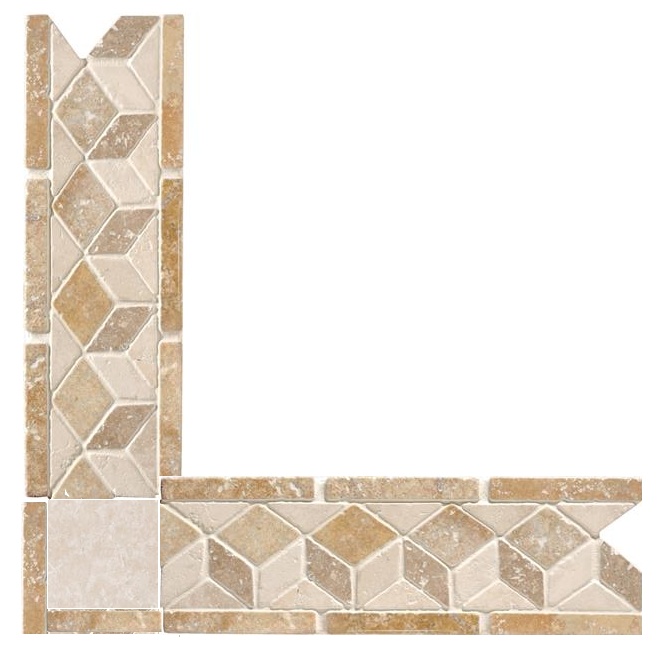
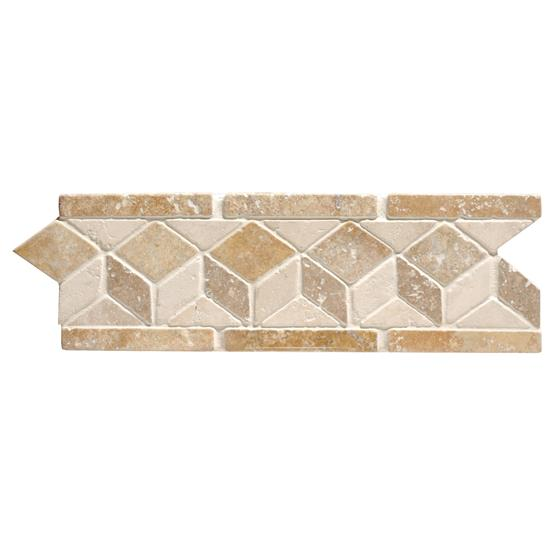
The angles aren't 45 degrees in that first pattern ( I mean the one with 3D cubes).
-
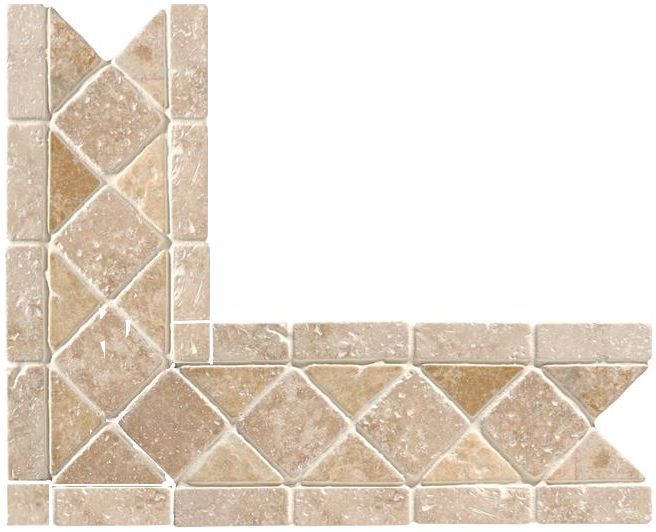
Looks better..
-
Just been trying that. Doesn't really work..
-
Looking at tiling a 3x3 bathroom in light coloured travertine stone. Would like to add something to one wall to break it up a bit. Thinking of inserting a rectangular "picture frame" using a border like the one below. Looking for ideas for how to do the corners.. Doesn't look like you can just mitre them at 45 degrees. Is there an obvious way of cutting them so they fit together neatly? Otherwise thinking I need to insert a small square tile in the corners? Anyone seen neat ideas?
-
New home insurance without build warranty
Temp replied to magutosh's topic in New House & Structural Warranties
We originally insured through Halifax. I don't think they asked us anything about a 10 year warranty. I recall questions asking if construction was complete. -
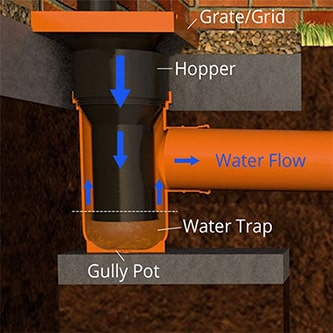
+1 Unless they specified a particular Inspection chamber you might be able to combine the two into one unit. May also depend on the depth of the red pipe. Google Bottle Trap Gully.. https://www.jdpipes.co.uk/knowledge/underground-sewer/what-are-gullies-and-where-do-you-need-them.html
-
. If you haven't already done so see pages 26-27 for Permitted Development rules on wrap around extensions.. https://www.gov.uk/government/publications/permitted-development-rights-for-householders-technical-guidance If you are applying for planning permission then yes in theory you can ignore the permitted development rules. The planners should judge your proposal on its merits not compare them with the PDR rules. However the planners do sometimes use the PDR rules as a guide if they think the end result will be too big/over bearing/over development/just plain ugly. In general its always best to go apply (or pay for pre application advice) for what you want or even a bit more and be prepared to compromise if necessary.
-
Indeed, he popped uo in news feeds only last year working on solid state battery tech at age 98... https://www.prnewswire.com/news-releases/nobel-prize-winning-inventor-of-the-lithium-ion-battery-has-his-eyes-set-on-the-next-big-breakthrough-in-energy-storage-301132645.html
-
Well the crack was expanding:-)
-
We have a mix of stone and tile over UFH in screed. Used flexible adhesive without a decoupling mat. Only issue we had was where we screeded and tiled through a doorway from one room into the next. The two areas of screed shrank towards their centres causing a curved crack at the doorway. This propagated through the tiles. Should have made a deliberate straight crack in the screed (aka expansion gap) and arranged for it to be under a sill or on a grout line. Or perhaps used decoupling mat in that area.


