


Temp
-
Posts
10675 -
Joined
-
Last visited
-
Days Won
43
Everything posted by Temp
-
Soil pipe across neighbour land broken by them
Temp replied to ashthekid's topic in Waste & Sewerage
Normally the BCO won't look at existing drains unless alterations or new connections are being made. I'm wondering if the BCO knows they should have got approval from the water co and that's the real reason for his concern. I think its unlikely given there haven't been any problems with it and nobody is making any changes to it. If the neighbours are building over the sewer then they should be getting approval from the water co. The water co might insist the sewer is diverted around their foundations or allow them to build over. In some cases it is not possible to do what water co insist on. In such circumstances it might not be possible to build what/where they want. -
Soil pipe across neighbour land broken by them
Temp replied to ashthekid's topic in Waste & Sewerage
I think worth notifying them of "problematic work on a shared drain that you believe the water company own". I think it will be easier to get the right thing done while there is still work going on site. Once its all covered up they will see it as your problem and since you own your drains it will be down to you to fix. -
Soil pipe across neighbour land broken by them
Temp replied to ashthekid's topic in Waste & Sewerage
So I think this is your situation..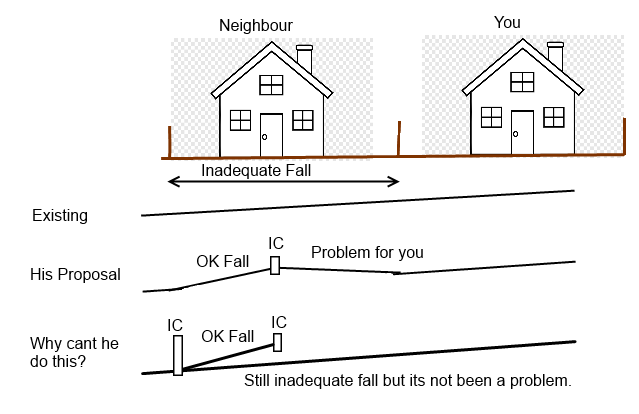
-
Soil pipe across neighbour land broken by them
Temp replied to ashthekid's topic in Waste & Sewerage
The builder must get the water company involved. It's not his pipe to mess with. You could consider contacting them yourself. I don't think he can just steal all the fall causing your drains to stop working. Check both title deeds for any explicit rights. You may have other rights if none in the deeds. Why can't he leave the existing drain in place and connect his new pipe into a new nanhole near his downhill boundary? That would get him all the fall without affecting you. -
On the radio yesterday a recruitment company owner was claiming wages were up 4-8% due to major shortage of workers. He thought it might continue to be a "employees market" for 10 years!
-
This is a new one to me.. https://www.bristol247.com/news-and-features/news/planning-hell-over-for-family-as-self-build-houseboat-granted-permission/
-
If this was an application for a wind farm you would take the photo from a position where your development would be hidden by a tree ? Seriously though.. imagine the planning officer drawing your development on the photo. You want them taken from a position where the result won't make it look like its towering over the neighbours house. So I'd take photo from the fence line with the neighbour looking towards your house rather than from the other side of the garden where your development would hide the neighbours. You can include photos of any similar development in the road but make sure you mark them to avoid confusion and take them from angles that make them look similarly favourable.
-
I think they have used several different connection methods over the years. Our 13 year old Britania Rangemaster dual fuel (lpg hob, electric oven) has a "rigid" copper gas pipe coming out of the floor into the gas hob. Makes it difficult to pull out for repairs. Has to be moved a bit then spanners used down the back to disconnect the gas pipe and allow further movement. @fiaraziqbal Looks like the previous owner just cut the solid pipe. I would buy a new flexible pipe to bayonet to make servicing easier. The installation manual for some Rangemasters are online.
-
You can still get syphon flush valves from screwfix. Some are dual flush.
-
First you need info from the tub supplier on the support required. Do the tubs have a frame that must be supported or must it be supported everywhere? Ask them about use on decking as they may have a recommended joist layout or other advice. This may feed into option 3 nicely. I'd be a little concerned about putting 2 ton right close to the retaining wall (option 1)unless I was sure that retaining wall was up to the job. For same reason I think I'd want the posts supporting the deck either very deep or on the house side of the retaining wall. I would sleeve all wooden posts with post saver or even galvanised steet metal at ground level to protect the thin pressure treated skin from accidentally wear by strimmer. Better still use metal below ground and keep all wood off the ground. This sort of thing but shop around as they look expensive.. https://www.ebay.co.uk/itm/Stainless-Steel-Timber-Fence-Post-Shoe-Post-Support-100-x-100mm-Square-Posts-/193679535664?var=0&mkcid=1&mkrid=710-53481-19255-0&campid=5338268676&toolid=10044&customid=CjwKCAjwmeiIBhA6EiwA-uaeFTsUfcqgJi-7rzjHx3YQfElN1zW8P7Cw3NElOP_hhgbkS4J48pkioRoC0JIQAvD_BwE&redirect=mobile
-
There are special eaves vent tunnels you can get to put between the top of insulation and underside of the membrane. They come in different sizes to match 400 or 600 rafter spacing.. https://www.roofingsuppliesuk.co.uk/collections/eaves-ventilation/products/manthorpe-refurbishment-eaves-panel-600mm-box-of-50
-
Not sure if this is a lead or stone cap but just for comparison.. https://mobile.twitter.com/ldmslateroofing

-
We have an engineered wood floor over UFH and had a joint open up over our first winter. It's true that Engineered Wood is much more stable and safer than solid but it does still move a bit with the weather.
-
In my area we have had quite high humidity recently and that's when wood expands.
-
Design services are standard rated and cannot normally be reclaimed. "Mixed" invoices (eg supply and fit) should be charged at the lowest of the two rates on the lot. Since "Fitting" is zero rated the whole of a supply and fit invoice should be zero rated to you. However in this case they are providing Design Services and materials both of which are standard rated. There are at least three possibilities... 1) Two seperate invoices. You can only reclaim VAT on the one for the materials. 2) One invoice with design and materials separately priced. The whole lot should be standard rated but only the Vat on the materials would be reclaimable. 3) One invoice with just one figure for the total and VAT. HMRC should allow you to reclaim all of the VAT.
-
Lining and painting is a cheap alternative to replastering/skimming. It's never as good though.
-
Permission refused - not in keeping with the area
Temp replied to RichyC's topic in Planning Permission
I think your architect has picked up on design features from those other houses but has taken the idea just a bit too far. I think if it was simplified a bit it would get through and be cheaper to build as well. On another issue: Our house has some tall triangular windows in wood and maintenance is a pain. A scaffold tower helps but the steps make it hard to move from one window to the next. I would go for metal clad or upvc. -
"Not mentioning them" would need to include not mentioning them in the planning application or on site plans for same. You have to send copies with the reclaim.
-
Seems reasonable if the incoming main can always supply 112L/min. I'm not familiar with the regs. Are you allowed to pump the mains direct these days?
-
Just to be clear.. its the splitting of the title that solves the VAT issue not getting PP for seperate occupation.
-
I would try the council naming dept as they have to approve names to get them onto the post office database. See if they will let you do that now. We didn't live on site but frequently had vat receipts sent to the delivery address instead of our rental, so we put up a post box on the fencing. The postman probably found it easier to find "Land south of the church" than our final official address. Even now PayPal and Amazon have "(house on right of church)" in the address field to try and avoid problems.
-
Soil pipe across neighbour land broken by them
Temp replied to ashthekid's topic in Waste & Sewerage
@ashthekid The responsibility or shared pipes changed from the neighbour (home owner) to the water co in 2011. There is a guide here with a lot more example illustrations.. https://www.water.org.uk/wp-content/uploads/2019/03/Private-Sewer-Transfer-Water-UK-Template.pdf -
Soil pipe across neighbour land broken by them
Temp replied to ashthekid's topic in Waste & Sewerage
..but still inside the dotted property boundary. I won't matter if the pipes are in front or back gardens or under the house itself, just if they are inside or outside the property boundary. -
One possibility might be to apply for planning permission to use/convert the outbuilding to a separate dwelling. Split the title so you have two plots (with shared driveway if necessary). Then you wouldn't have a VAT problem with the new house because you would be demolishing everything on that plot. Once the new house is complete and you have the vat reclaim done then you could merge the titles back into one plot. I don't think planning permission would be needed for that but check. I see two possible issues... Getting planning permission for separate occupation might be difficult. However the same trick should work even if you only get temporary planning permission for separate occupation during construction. That might be a lot easier to get. The land registry don't like splitting land if the same person will continue to own both parts. Its something to do with not being able to enforce covenants on yourself. Anyway it might delay the splitting process. It might smooth/speed things if you own one and your spouse/partner/children own the other. However self building can be stressful and you should think about the consequences of a split or even a death. Ditto taxes. Edit: If you go this route I think I would recommend getting two separate planning permission. One for separate occupation of the outbuilding and another for the new house. I think it could cause vat issues if it was all on one planning grant. This might not be possible it the seperate occupation one is temporary.
-
Yes I believe that's correct. I'm sure this has come up before but couldn't find it when I looked. See... https://www.gov.uk/vat-builders/new-homes

