
Leaderboard


Popular Content
Showing content with the highest reputation on 01/04/19 in all areas
-
For anybody who cares, it's: Silicone: the rubbery stuff. Silicon: the hard crystalline semiconducting element. Silicone is made up of silicon, oxygen and other chemicals in much the way rubber is made of carbon, oxygen and other chemicals. Sand is also made up of mostly silicon and oxygen though with less other chemicals and in a rather different structure. So it's silicon chips but silicone tits. A few years ago I bought some 3M “silicone carbide” sandpaper from a box store. Only noticed when I got home but happened to have a beer that evening with a recently retired fairly senior 3M manager so mentioned this, wondering if it was counterfeit or whatever. He popped off an email to his ex-colleague, the head of consumer products, who checked up and found that, yes, embarrassingly 3M had got the spelling wrong themselves.3 points
-
Can be done & cheaper than gym membership! 1) The bathroom had a concrete floor some 60mm higher than the adjacent rooms. It was in fact pretty much dead level with the DPC (damp proof course). That was slate on the two original solid brick walls and some sort of bitumen felt on the two cavity walls: 2) Not the only room in the house with level issues. So out with the BiL's vintage Kango: 3) I bagged it and hand balled it out the front door. About 80 bags from memory: 4) Got down to top soil: 5) And started to DIG! Someone worked out the tonnage that I shifted, again by hand. 7 tonnes? Can't remember though I did lose weight! 6) Hit our wonderful clay not too far down: 7) So then to build it back up. I didn't now how but knew I wanted UFH. Started the questions on eBuild! So I banged a load of level pegs into the clay allowing 2 - 4". Tbh nearer to 2" in most areas. Sprayed the pegs so I could see them: ? First off I graded a load of the hard core that came out of the floor thru a 40mm mesh sieve. Basically I'm too tight to buy Type 2 etc. Laid it roughly level: 9) Somewhere around this point I shuttered off and squared up, with concrete, the ragged tops of the footings: 10) Any old bags of cement, plaster etc got thrown in to help get rid of it and fill voids in the hard core: 11) I then bought a second hand electric wacker plate and compacted it all down. (Did take a slight diversion and started making an electric wacker plate. THAT story is to be continued! ) It WILL live one day! 12) Anyway.....back on thread. Wacking: 13) Sharp sand went down next to fill all the voids. Me being me it was all levelled off: 14) At this point I was feeling pretty happy, I mean it just looks FINISHED! 15) 25mm of EPS went down next. EPS doesn't suck up water like PIR can so can be in direct contact with damp "ground". It's why so many here put 300mm of EPS under their concrete slab under the whole house. The combo of the sharp sand and EPS is to ensure no sharp bits of hardcore poke up thru the DPM (damp proof membrane). Think the sand and deffo the 25mm EPS was @Nickfromwales idea. 16) I'll openly admit I went full @pocster and had a sneaky, naked lie down on it at this point. It felt SO WARM! 17) I continued the EPS over the squared off footings and up the walls a little as a nod to cold bridging. Glued on with Soudal Low Expansion Foam, thanks to @JSHarris for that tip. You can see where the damp is coming thru: 18) Probably OTT but I applied a liquid DPM up to the level of the DPC. 19) Whilst the second coat was wet I blinded it with sand to give something for the Soudal foam to key to and when dry foamed the EPS in place. 20) Thick, blue DPM next. From Screwfix, on a roll: 21) Bit of a pig folding it into the corners: 22) Next 150mm of PIR as a 50 and 100 layer. Better to put the 50 down first the the 100 - wish I had! I'd suggest 150mm as a minimum. With hindsight I'd have dug a bit deeper and gone 200mm: 23) The DPM carries on up the wall with the intent of sticking to / overlapping the vcl on the stud walls to come. It's why the room is so draught free. 24) Now at this point I could have laid a plastic membrane over the foil faced PIR and stapled my UFH pipes down.....I didn't. Instead I used Polypanels as I think suggested by @PeterW. They serve 2 purposes; to act as a separating membrane between foil face and screed or concrete (you can get a reaction) and also to aid laying the UFH pipe. They also save a bitbon concrete: 25) I used a self adhesive edging strip, basically a corrugated cardboard/EPS sandwich. This takes up any expansion of the slab as it heats up.....or it can push against your walls! Probably overkill as I've already the ESP upstand: 26) With my homemade pipe decoiler it makes laying it a breeze as the video shows: 27) A142 reinforcing mesh was laid next as per @JSHarris's build / suggestion. Probably the only thing the houses share in common! I attached screeding rails (Unistrut) to the stud walls which were only affixed at this point to the walls and ceiling. A drag board went between. It's the reason my slab is so level: 27) A strong., wet concrete mix went down to give me a 100mm slab. Pockets left for the wet room tray which I cast later and one to "sink" the bath a bit: Et voila: From top of the original concrete I dug down a minimum of 385mm. Final, conservative floor build up was: - 50mm compacted Type 2 on clay - Sharp sand blind - 25mm EPS - 1200 gauge DPM - 150mm PIR (100 + 50) - Polypipe panels - A142 mesh - 100mm concrete (though I forgot to add the fibres ). - Ceramic tiles @oranjeboom has done similar to his WHOLE HOUSE. Tbh that's my plan eventually.2 points
-
Ahhhh, you need to factor in the value of having a new project to interest you into the cost-benefit mix.2 points
-
Yes, it seems so. I've confirmed that it's a dual rate E7 meter they are fitting, not a smart meter. As it happens they already knew that we couldn't have a smart meter, as our location is flagged as one with no mobile signal, it seems. The lady on the phone mentioned that there was no point in asking if we wanted a smart meter as her system was already telling her that one won't work here. Tricky one, as it's not very clear that it will make sense in terms of return on investment within its usable lifetime. I'm betting on energy prices rising over the ~10 year life of the battery system, allowing for some benefit we'll have from having some circuits powered from a big UPS, in effect (we get a lot of power cuts here) and some (fairly pessimistic) estimates of how much we may save from load shifting from peak to off peak using the battery system, plus storing excess PV generation during the summer. It's a bit chicken-and-egg, in that I won't know whether it makes sense until I've tried it over at least a year, to find out how accurate my estimates are. The idea at the moment is to always charge my car during the off peak time. To always use excess PV generation to charge the Sunamp first, then charge the battery system, and to use off peak to charge, or top-up, the battery system to avoid using peak rate energy. Only time will tell if it works out, but I am pretty sure I'll have fun playing around with it (perhaps I need to factor in the value of having fun with it, too?).2 points
-
Anyone know anything about this ? I got a free hat and car smelly for registering ... claims dry alternative to screed for ufh ....1 point
-
We make a start on 15th October with the diggers arriving on 16th October. By the 17th October, state of play is as per the picture below. The gabion wall on the right of the plot was put in by the vendor as part of the infrastructure works. The trench on the left is for a gabion wall that we are putting in on the other boundary. As there is quite a slope from back to front, we are putting another gabion wall across the plot to act as a retaining wall. All OK so far, but there is a surprising amount of muck that came out of the trench for the gabion wall which will need to be taken off-site. On the plus side, the plot had already been stripped of topsoil and as we are using a passivhaus foundation there was not too much extra muck on top of this. The builder we are using has been involved since the early stages of the project. We didn't go to competitive tender but worked with the Architect to look for someone with experience of the build method we are using who we felt would be able to build to our budget. We are living around 3 hours drive from the site and made a decision out of necessity to continue working in our day jobs throughout the build, however we are purchasing all of the materials ourselves or via our own accounts which we expect will make the build more cost effective. This arrangement works to my strengths as whilst my practical building skills aren't great, I should be OK tracking costs and getting good prices on the materials. Original plan was to get the gabion cages in place and fill them as time allowed, but the Passivhaus foundation could not be delivered for the requested date of 24th October, so once the drainage is complete, filling the gabion cages becomes the main task to keep the team onsite busy. By 26th October, the majority of the drainage and gabion walls are complete The following week is spent finishing of the gabion walls, landscaping, groundwork and preparing the grit base for the Passivhaus foundation. There is however a further delay on the Passivhaus foundation, so a decision is made to push on with the garage to keep everyone on site busy. At the end of the week (2nd November), the slab for the garage is laid The garage progresses quickly the following week and the Passivhaus foundation arrives on 8th November. There are some small dimensional inaccuracies with the Passivhaus foundation base that need to be corrected, but I am thankful this is spotted before the concrete pour when it is relatively easy to fix. It is however another delay and distraction we could have done without. On the bright side however, there have been no nasty surprises with the groundwork / drainage. Work continues on the garage w/c 12th November with prep for the house slab starting at the end of the week. DPM and steelwork for the house slab go in on the 19th and 20th and following a review of the weather forecasts, we go for the 23rd November for the concrete pour. The concrete and concrete pump are ordered again, the rain holds off, temperature is ok and the pour goes to plan. Garage has also now been boarded.1 point
-
Thanks Lizzie ! . I fail at many things but I succeed at the big things - like getting planning ?1 point
-
aw @pocster sorry to hear that...good luck with selling them.1 point
-
Nothing ventured... time to focus on a better sex life, it’s the new year fella1 point
-
This'll be my approach: all wiring for sensors and outputs back to one or two positions then control from there. So, as @jack says, replacing the control system would be possible without digging up wires but still a major project. Personally, I'd regard wall switches as separate sensors and wire them separately back to the central point(s) and interconnect there. Then it's fairly easy to change them so lights are controlled by different switches or whatever. How much does another reel of 1mm² cost?1 point
-
I won't derail this thread, but I did have a look and did a quick program to see what was happening to the humidities in each direction of the MVHR. Not terribly conclusive as the RH data is so noisy but I'll write a note about it, probably a separate thread here would be best, I guess.1 point
-
I don't know about that. There are various open source solutions that continue to be developed, as well as proprietary solutions like Loxone which (for the moment) don't charge for their app. The app is updated reasonably frequently (I should say that I only very rarely use the app - a couple of times a month at most). I think the bigger danger is a company going out of business and leaving you with unsupported hardware. That said, as long as you stick to non-proprietary input and output hardware (eg, retractive switches for inputs, relays and/or DMX for outputs), you're reasonably future-proof. I could replace my Loxone system with another solution with little change to any of the wiring, although it would be a pig of a job just based on complexity.1 point
-
I think that building in the ability to completely change the control system is essential. Anything controlled by a 'phone app will most probably be obsolete within a few years - look at the number of "old" apps that are no longer supported on even a 5 year old device; we've direct experience of this with a five year old colour laser printer no longer working with a five year old iPad and have just run into exactly the same problem with my 4 year old Android tablet not being able to run apps to control some car charge points (meant I've had to go and buy a new 'phone just to do this - damned annoying). Being able to rip out any proprietary control system and replace it with a new one, without major redecoration work, would be high on my list of essentials. I regret not having put power in for electric blinds. We have blackout blinds in the bedrooms and several other sets of blinds around the house, and it seems far more tedious having to go around the house opening and closing them than it ever did when we had curtains. I'm looking at fitting battery powered motors and remotes to all the blinds, which will means having to charge them up two or three times a year, but seems likely the only easy option, given that getting power neatly to the top of the window apertures would make a heck of a mess to do now.1 point
-
Maybe have a read through Basements For Dwellings.pdf1 point
-
Just to add - I've also gone the same route as @AliG - I chose to 'star'/radial wire everything back to a central point and then install all the dimmers in a central box. My reasoning was that if I ever wanted to switch away from Fibaro I could either just join the wires together to make it act like a regular dumb light and switch or put in different dimmers from another manufacturer. I've got - Fibaro Dimmers - Lounge, Kitchen x 2, Playroom, Bed 1, Bed 2 Fibaro Relays - Worktop Lights, Outside Lights, Landing Lights, Bed 3, Bathroom Fan Plug in dimmers - TKBHome x 2 Plug in relays - TKBHome x 1 The Fibaro dimmers are quite nice in that they have a "B" switch input... so in the lounge and bedroom I've put a 2 gang switch in, 1st one does the ceiling lights and the 2nd one does the "B" input which tells the dimmer to send a command to some extra plug in dimmers I have for table lamps, bedside lamps etc. You get all the benefits of those 5 amp lighting socket but without having all the extra wiring and fixed positions. (hopefully this makes sense, harder to explain in writing). All of this works without the 'brain' as such but I'm also using Home Assistant (https://www.home-assistant.io/) to integrate with other services and Alexa/Google assistant. The Fibaro Home Center is better if you want less tinkering. Same as AliG - switches work every time, app works 95% of the time. Switches also get 100% wife approval factor. - I think I went for a slightly different switch to AliG - I'm using the MK 4885WHI which is a single push switch, not a two position one. @AliG - re: Having to move homecenter to add new modules - this is correct. When you put the modules in inclusion mode they only transmit at low power, this is to reduce the risk of you or someone else including them in their network by mistake. I'm using the Aeotec ZStick which is quite nice as it has a battery backup so I can pull the stick out and put it right next to the new module when including then plug it back in to my raspberryPi. All the above sounds quite complex but I found it a really easy system to work with (DIY & IT confident). Good online community as well. The drawback with some of the more proprietary systems (Rako, Lutron etc) was that you had to be a paid up installer to get access to the manuals and secrets. Purchased from Vesternet - https://www.vesternet.com/1 point
-
I saw a tv programme a few years ago about a small housing estate going up in America. All roads and services laid then a small modular “factory” built and all “stick frame” houses constructed indoors and dragged onto the plots and connected up. The “factory” was dismantled and taken away. I was impressed.1 point
-
Then you need to insulate the floor of the garage. Leaving 150mm will only allow the same 75mm of insulation in the floor later. Yes you have to have it ventilated. The silicone render your using doesn't allow air or moisture to pass through it. If you put insulation in that void the timber frame won't be able to dry out and you'll have serious issues. The alternative is to fit wood fibre insulation and a breathable render. As both of these allow moisture to pass through you should be ok but it's a much more expensive option to just increasing the insulation you have internally. The UFH will easily fit in the 75mm sand and cement screed so that's not an issue. As others have mentioned the insulated B&B floor is a good idea to overcome your floor problem of losing heat.1 point
-
I have it on excellent authority from our resident Welsh plumber that white CT1 goes yellow after a while- so for aesthetic reasons he suggests using clear CT1 with a white silicon over the top if necessary. Btw I used Forever White myself and am perfectly happy with it, but time will tell...1 point
-
Aclass Technology http://www.aclasstechnology.com There is a lot of good info on this kind of stuff on AVForums.com1 point
-
I am by no mean an expert on Fibaro, but here goes. The main item you use is probably a Fibaro Dimmer 2, the manual gives pretty clear wiring instructions. Assuming there is room it should is in the box behind a light switch. https://manuals.fibaro.com/content/manuals/en/FGD-212/FGD-212-EN-T-v1.3.pdf It can work on a 2 wire system for retrofit, but 3 is better in a new build. It works with most kinds of light. You need a Fibaro Homecenter to control the system. The Dimmer 2s or other wireless units create a mesh network using z-wave technology. Theoretically you can add new units using the mesh, however, I have found that I could only get them to add if they were in direct range of the Homecenter (I had to buy a 30m ethernet cable and move it around the house). The mesh seems to work fine otherwise. Thus the main benefit of having the supplier set up the system was that they powered up the individual units and connected them to the Homecenter before sending them out, saving this step. However, where we ended up making changes to the system I was easily able to add or subtract extra units. Assuming that your electrician's skills are sufficient to wire in the units, the set up on the Homecenter is pretty simple. The Dimmer 2s auto calibrate on first power up and set some of their own parameters. You can go in though and set things such as are you using toggle/two way/one way switches. This is a simple web based system. The parameters that you can be changed can be seen in the manual. Really the things you are looking at for most circuits are pretty basic, switch type, dimmable etc. We have 13 units in the house plus the Homecenter 2. The electrician charged £50 per unit extra to wire them up, some of the LEDs require an extra component to increase resistance for the dimmers to work correctly. The whole system including £350 to set it up before hand cost £1700 including VAT. 3 of the units are for blind/curtain control and not currently used. I can control the lights from an app and also have cloud based remote access. There are no ongoing charges. I also got it up and running on Alexa a few weeks ago pretty painlessly, there is a pre written Alexa skill available. You literally just tell Alexa to switch on "name of the light in the system"1 point
-
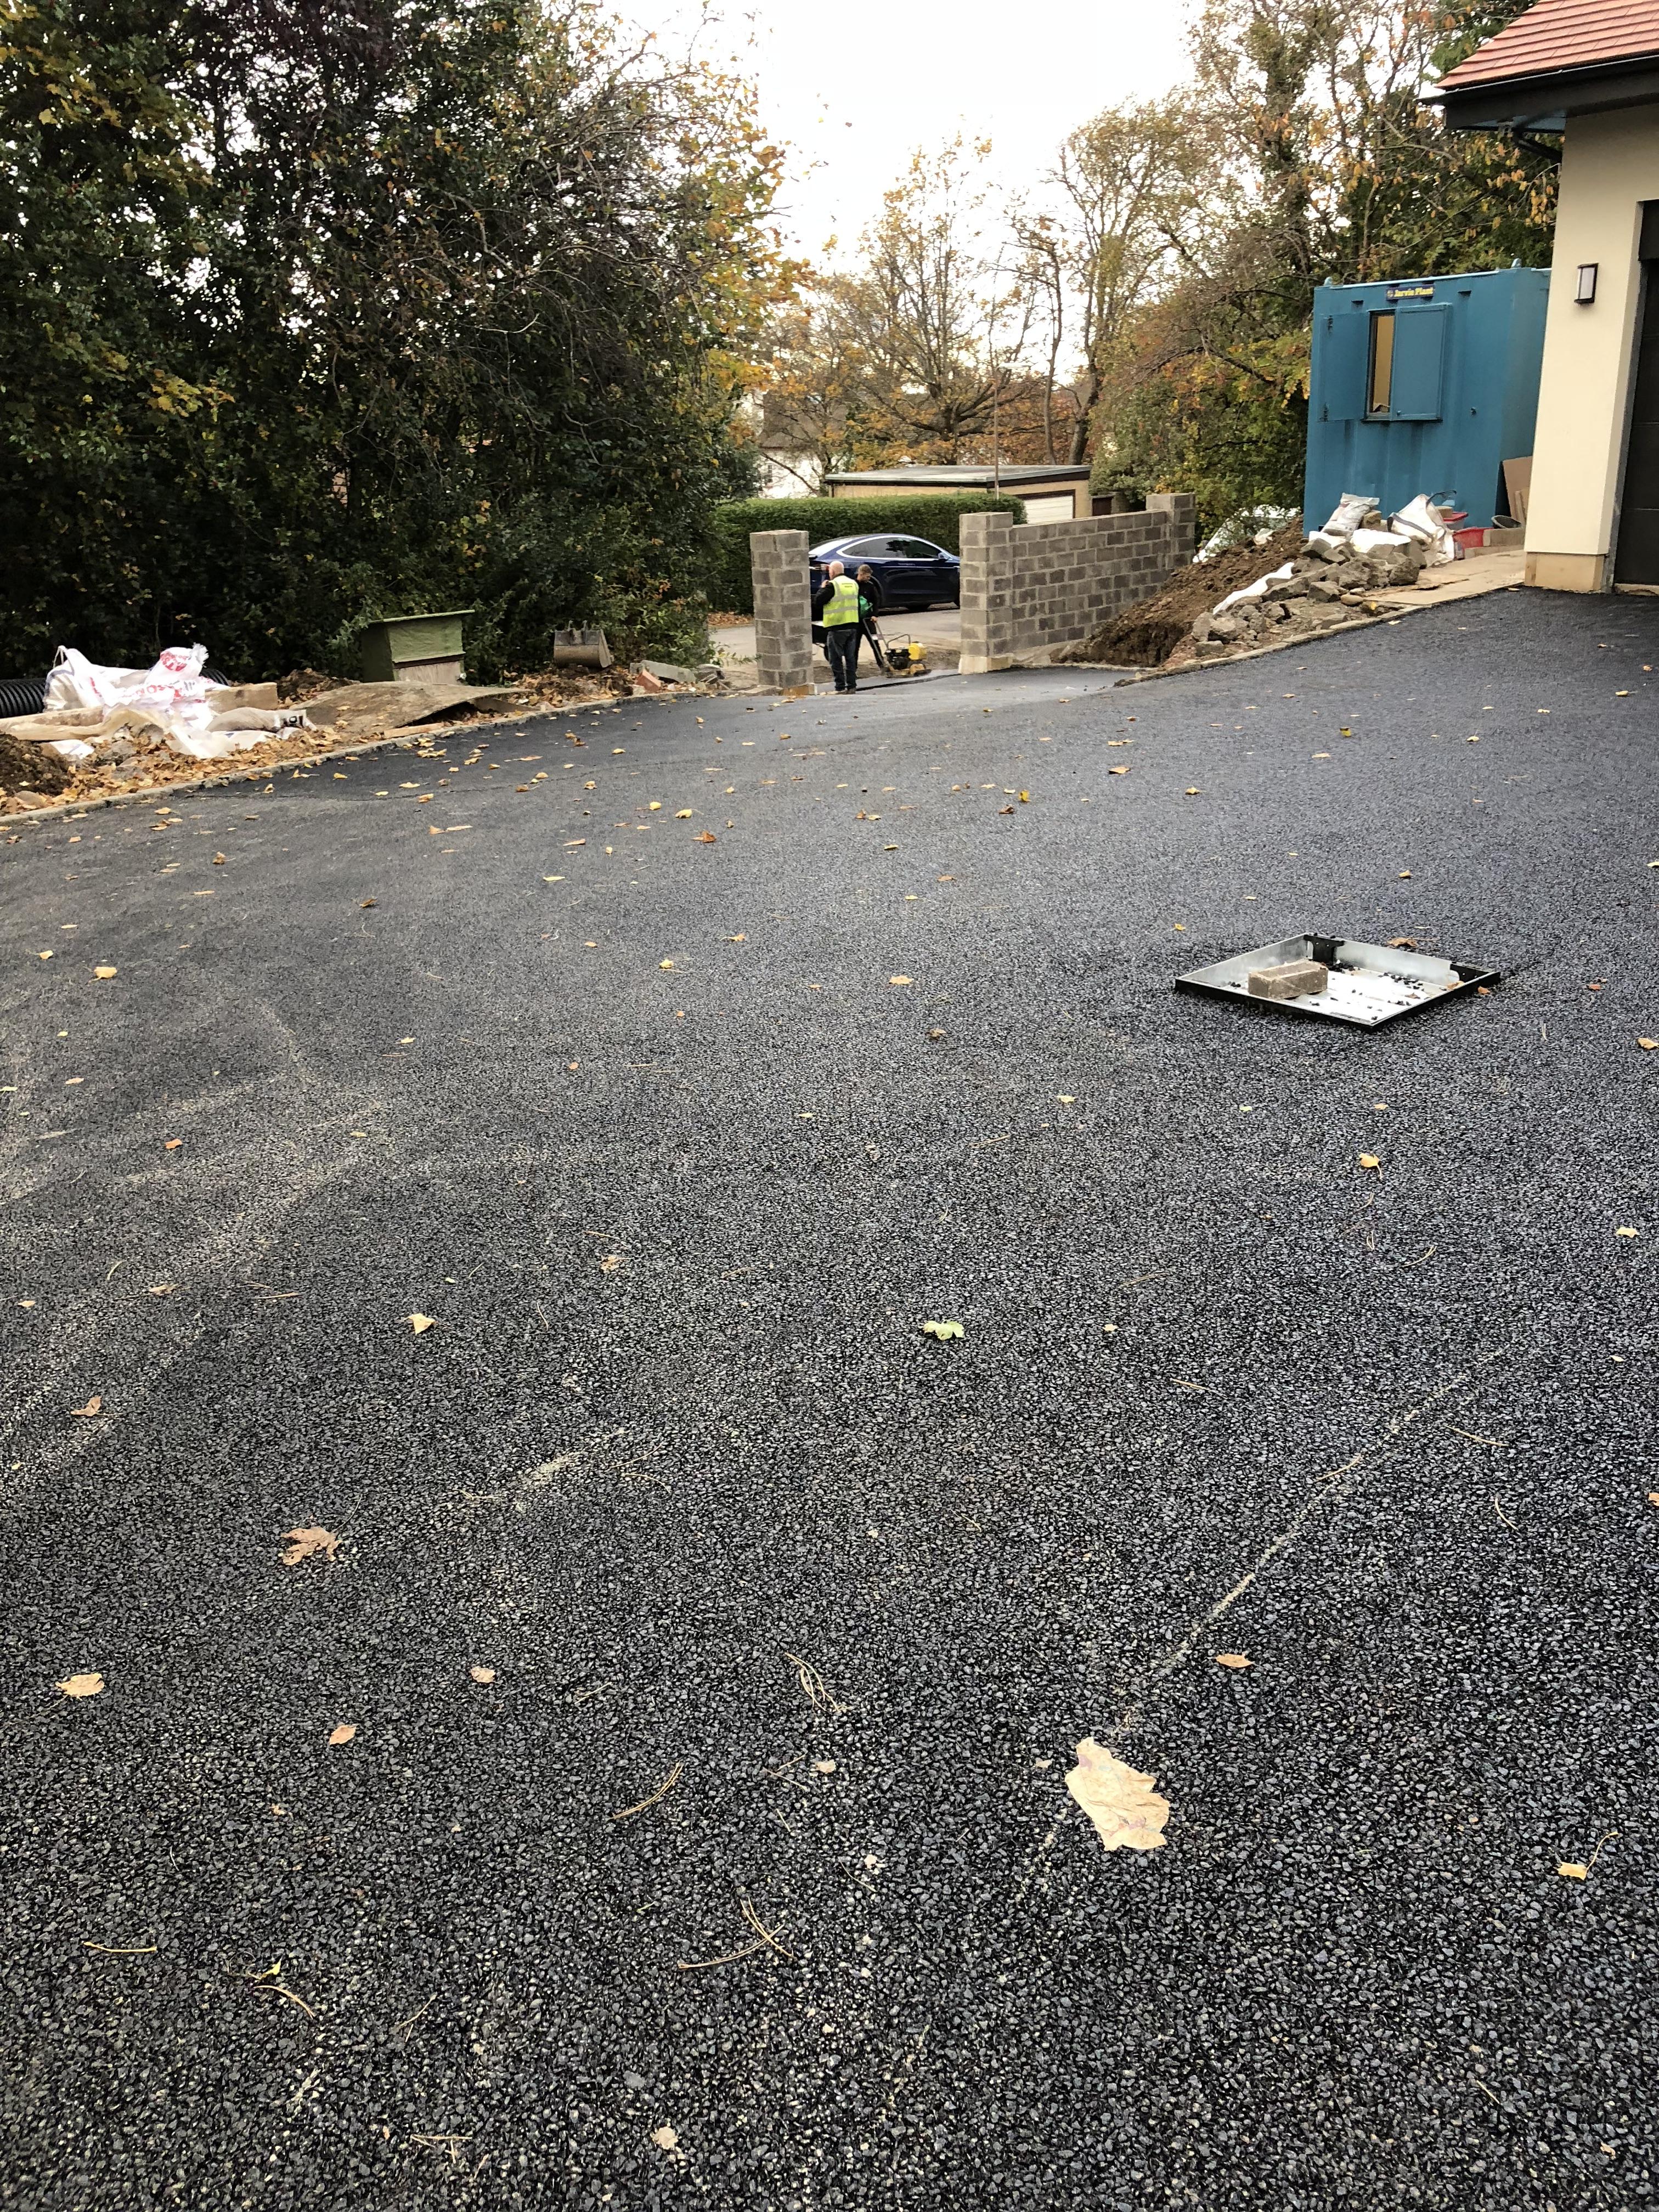
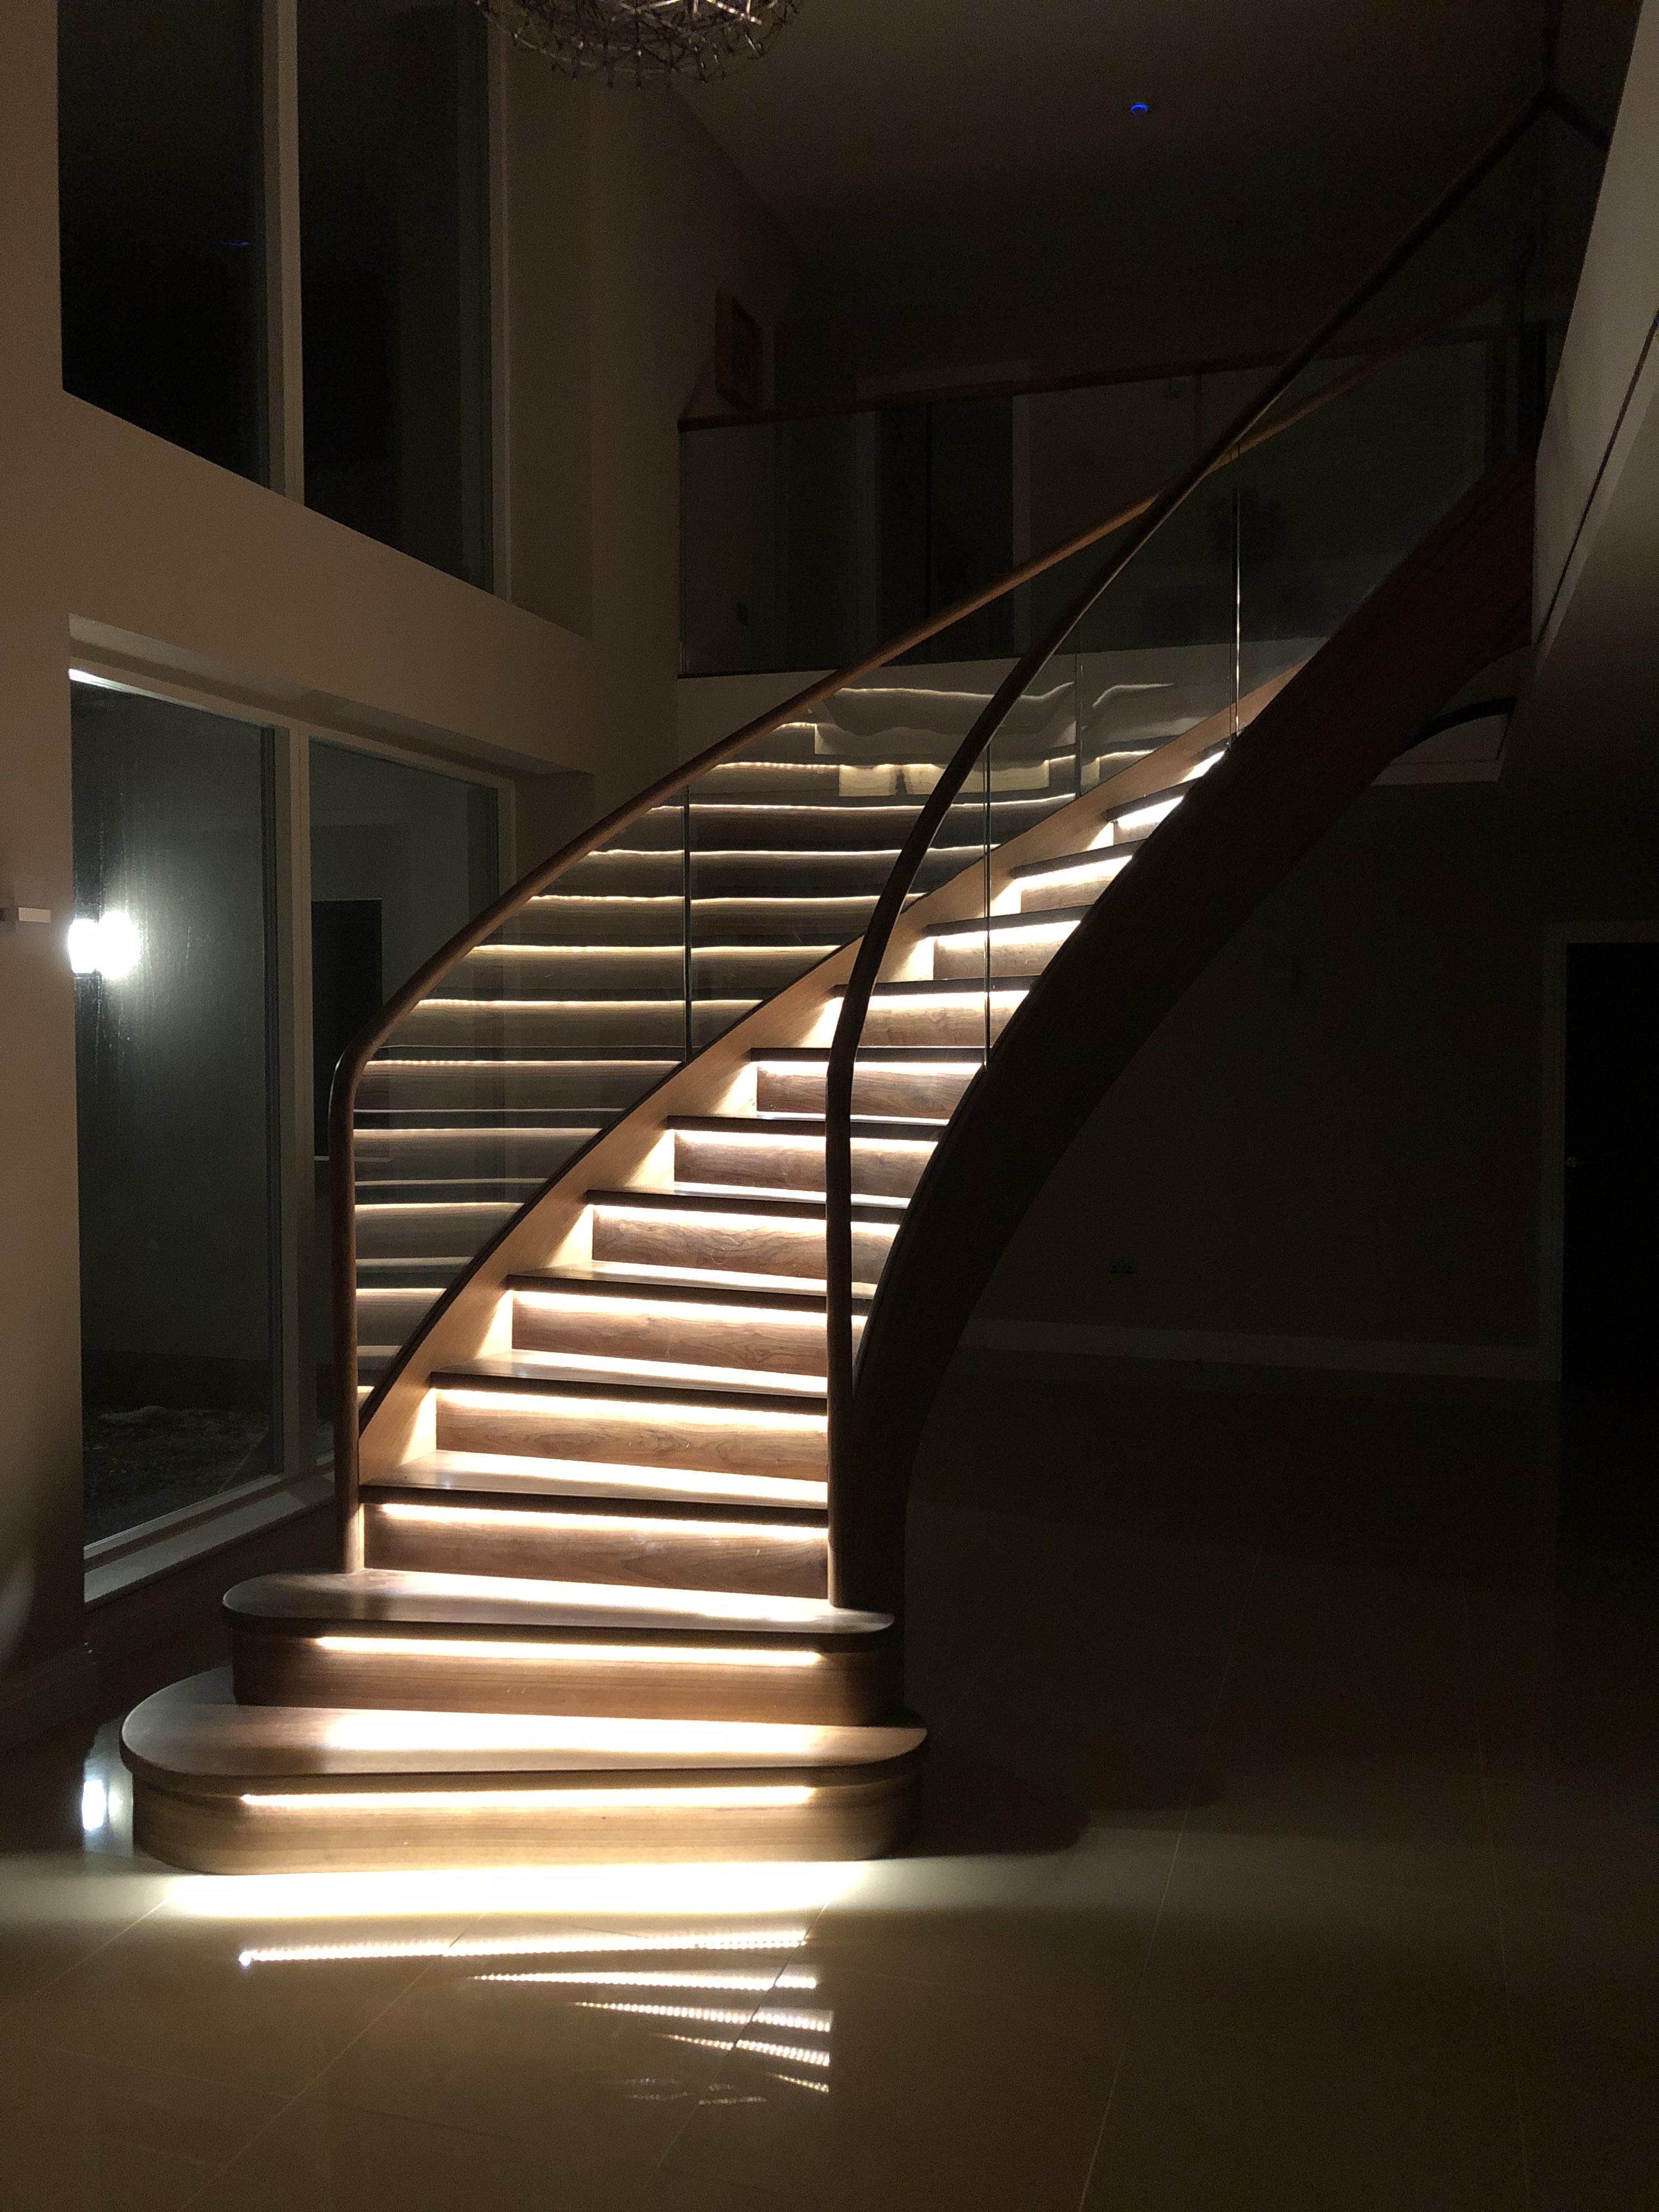
I had hoped we would be finished by now and I would do a photoshoot of the house, but it is dragging along. We are mainly doing landscaping and snagging. We finally have a driveway, the resin bound top still has to go on. They seem very intent on us taking a specific colour and we are suspicious that is just what they have readily available so have refused to install it until we see more samples. I hated the untidy bush along the road in front of the house, I thought it really let the place down, so I applied to build a new fence and then we tarmaced the pavement. Hopefully the neighbours are enjoying their nice new pavement. The lights are connected up on the stairs and I think they just look fantastic. Driveway, gates are also going in. Pavement and hedge before we tidied it up New pavement and fence Stairs
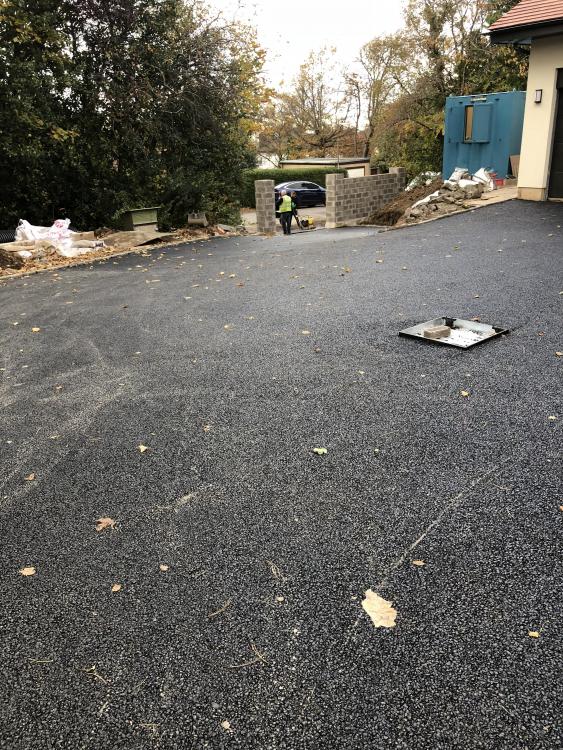
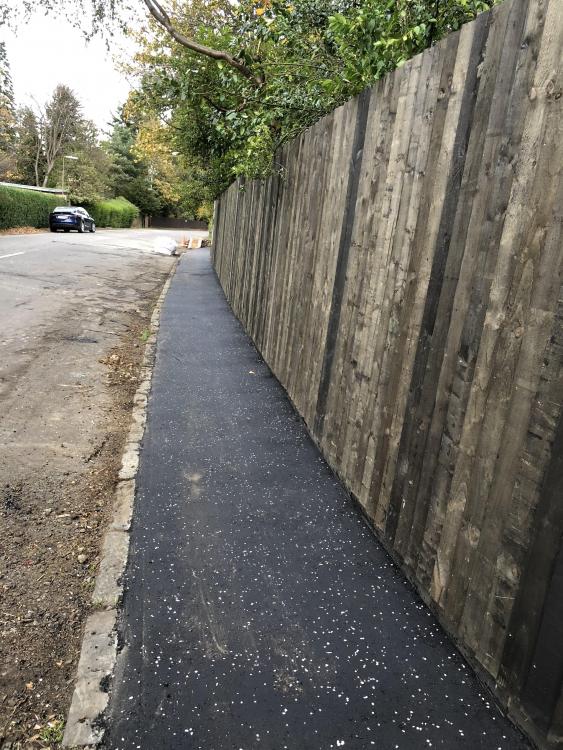

 1 point
 -
@DundeeDancer Are you a hoary old landlord-developer with all the scars, or fairly new to this with only a few years and properties? I think my most useful comment would be that while tenants and purchasers will look at bling and finish when they move in, the place not to skimp is the stuff that means your tenants will stay for 6 years not one-and-a-half, and love living in your flat, since those extra 3 tenant changes could cost you the equivalent of six months rent. If you run the numbers a 5% higher rent takes 2 years to recover the loss of one month of rent if you have a one month longer void - without all the tenant swap costs. Even a 10-15% higher rent will take ages to cover all those. I would argue for not skimping on, for example, sound insulation, ventilation, energy efficiency, very bottom of range appliances, letting the first T choose the carpet colour, perhaps allowing pets (dog tenants stay longer) Mira shower, walk in shower not a telephone box type, and so on. It is very easy to get the things right that make a tenant move in, but avoiding the things that make a tenant move out is equally important. As one example, I have just had a T move into one of mine whose previous 3 bed end terrace was running energy bills of £200 per month. In my semi of the same age they will be saving about £120 a month, as they should come in for £750-1000 per year - not itself very good but reasonably OK and very comfortable. All depends on your market, mind, Ferdinand1 point
-
There was nothing wrong with the drawings ...........0 points
-
Who are ya, who are ya. Shouted in football hooligan type voice.0 points


.jpg.c21f3ac78c9b7efd90cbdcb312744dc5.thumb.jpg.7adcad4c0e384f5ecd7d56b0618df6e5.jpg)


This leaderboard is set to London/GMT+01:00