Leaderboard
Popular Content
Showing content with the highest reputation on 10/02/24 in all areas
-
I haven't, against popular misconception, I don't really take pleasure in others misfortune.2 points
-
We've had to keep this a big secret. About 2 years ago, we were approached by Channel 4, asking us if we wanted to feature on Grand Designs. Like many of us on here, having watched the show a lot, and seeing how they typically go, we immediately said 'no' 😂 . After a fair bit of discussion, we came round to the idea, as we thought it would be a nice professionally produced story of our self-build, and so here we are. You can catch our full story and how it all went, on Wednesday 2nd October, Channel 4, 9pm. And for a sneak peak, you can see what we've been building on our Instagram: @thefoxesmaltings1 point
-
The last bit of soil pipe and inspection chambers that are close to the house are completed. The ICF is delivered and by the end of the week we have the start of door and window openings. The insulation is extruded polystyrene XPS 100mm each side of the concrete cavity. U value of 0.14 The windows have rebar in them before 50mm insulation closures are added. At the weekend we had a yellow wind warning for the South West, our home weather station recorded top gusts of 40mph. I’m pleased to say the R-wall ICF survived with no problems. Total man days of labour week 4 is 22 man days split between Groundworks and ICF builders. The build is going on very close to our workshop entrance which makes the delivery of vehicles and test drives limited. This week we took delivery of a previous customers Jensen CV-8 which now has a new owner who has sent it to us for further works over winter.1 point
-
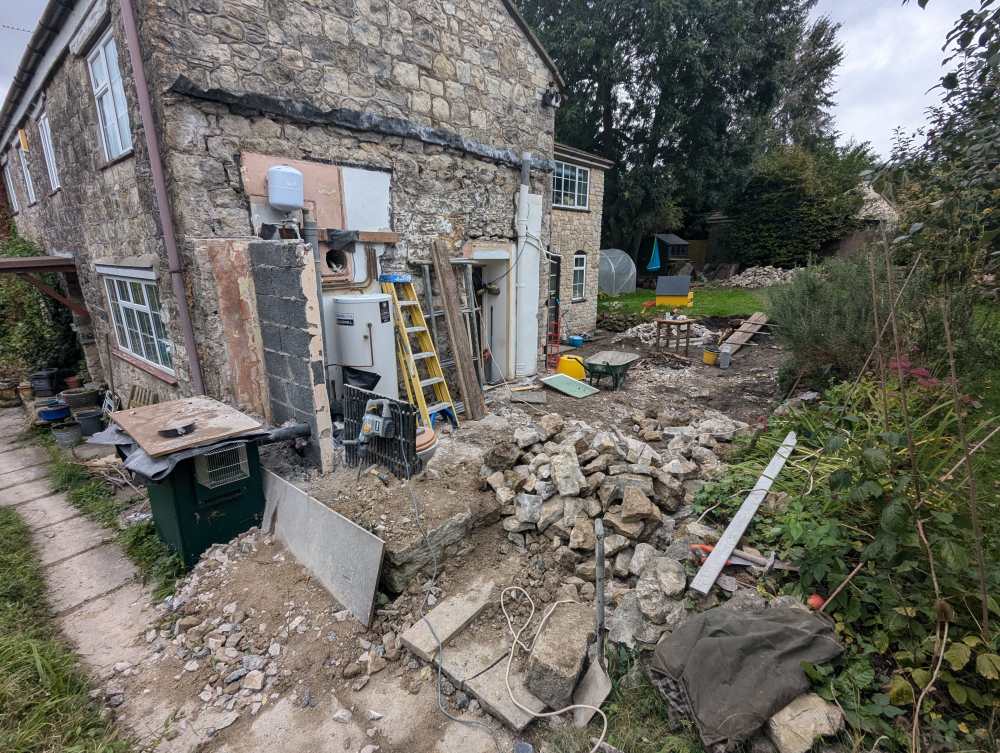
This is due an update I feel. We've commenced work under a building notice, after a builder that our architect has worked with many times before became free at relatively short notice. We've yet to finalise all the plans, but are getting started on the first discrete part of the build which is the single storey extension which will become the master bedroom and will have the roof terrace on top. We had planned to renovate the current utility room and excavate the floor to bring level with the neighbouring rooms but realised quickly that it has no foundation (built on clay) and was likely an external WC which was connected to the rest of the house at minimum cost. We've decided therefore to take it down and incorporate that into the new extension construction. Here's the current state a couple of weeks in with the utility demolished and patio cleared ready to start digging the foundations. Our current quandries are about the flat roof buildup for the terrace due to limited thickness to work with, and what the larger plan for heating/insulation is going to be (I've posted topics on both of these recently). Since I previously posted we've also had some structural calcs done, and we're going to put in a new roof with ridge beams so that we can vault the ceilings and insulate at rafter level, because the existing rafters are only 70mm deep unfortunately. As much as I'd like to have a 'full' plan to work off at this point, I can see this one is going to evolve over time, which is the benefit of working with our builder who charges a day rate and is happy to work to a changing set of plans.1 point
-
If it were me I'd do it but it's your choice. Remember if challenged you need to be confident that it's built substantially of non-combustible materials1 point
-
Just go with a pitched roof and a flat roof with a parapet - it will look nicer.1 point
-
1 point
-
Not with screws in the post I linked, they are designed for the job I’ve screwed through 180mm of insulation and believe me once the batten is tight to the EPS it won’t droop. I checked with the ICF manufacturer and the screws manufacturer, Theres someone else on here who’s done it with heavier cladding than mine The James Hardie VL plank is about 11kg a square meter so with battens and screws at 500mm centres plenty strong enough1 point
-
i have a LuxPower system with 6.4kWh of battery storage with EPS but it's max 16A and only runs 'essentials' like our sump pumps, the MVHR and (eventually) the networking gear. we have a few 13A sockets wired up too which i can run extension leads from if required. so having the Loxone backup battery to run 24V lights is perfect as pretty much every room has an LED strip of some kind and so we can navigate the house in a power cut at night.1 point
-
Floor designer has redone the clacs based on a 500kg point load and the joists will be fine. I will however spread the load over three joists as suggested. Thanks. The ministry of fun will now be able to shower at her leisure without worrying about how much water she's using. Happy days.1 point
-
You'll need a foundation. No point risking all the effort and cost to find out the slab breaks under the weight.1 point
-
had a power cut last night and was without lights. had to run an extension lead from my 230V batteries and plug some table lamps in which wasn't ideal. so while i was waiting for the power to come back on i bought 3 of these https://www.tayna.co.uk/mobility-batteries/yuasa/rec14-12/ should give me 42Ah so we'll see how we get on. we have a scheduled power outage next week so if i can get them installed before then i can do a good test run.1 point
-
Something like this? https://help.magicplan.app/import-and-digitalize-an-existing-floor-plan For electrical layout, lights, circuits, switches, sockets etc I just used Powerpoint.1 point
-
Lovely thought. I favour the simplicity of doors and windows for air, and curtains for glare.1 point
-
Surely there is a standard detail from the icf manufacturer? A 100mm screw through eps will be susceptible to bending under cladding weight.1 point
-
It’s pretty much like ours (which is a Heb Home) and we also have a 45° degree pitch although I decided not to fit the PV on the roof. How deep is the porch section? We made ours 4m deep as when we visited some other HH their standard depth seemed too small.1 point
-
Very nice design. Be careful about those large Westerly facing windows though as you'll have lots of overheating on sunny evenings. I think a provision for external shades would be wise. I would consider getting rid of the roof lights in the western roof too. Building a slightly wider cavity and putting more insulation in there will be cheaper than the 25mm IWI. My preference would be wet plaster internally. Keep us posted.1 point
-
IF you want maximum yield. But if self using and not getting paid for any export there is a big argument for a much steeper pitch, even near vertical, to get more production in winter at the expense of less than optimal production in summer, but you usually generate more than you can use in summer anyway.1 point
-
Either insulation fixings or plasterboard adhesive foam 🤷♂️ - make sure you tape over any fixings Work Go for as much as you can afford / space allows Good question - I'd want a mechanical fixing in there, maybe foil tape over? I'd do some research on best approach. The wall I have done this on has a stud wall in front of it, so no penetrations as fixed to ceiling and floor Work out the biggest depth you need, might be easier with fast fix boxes, but I'm never as happy with them as a proper backbox1 point
-
1 point
-
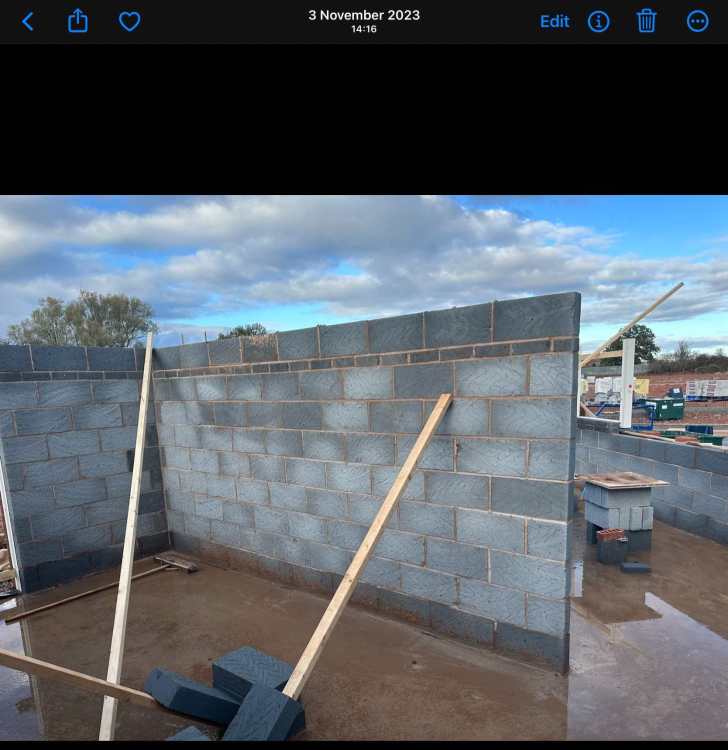
Do you know about profiles for your blockwork ends/ corners. if your 1st floor is in it’s easy to make some 4x2 upright at the exact location of the wall ends, simple screw into some scrap timber and plumb up and fix to the floor joists. you can then mark your blockwork gauge or height on this timber and slide your string line up a course as you go.1 point
-
The bonding adhesive is fairly sketchy. I wouldn't want to core a 4" hole after filling.1 point
-
Excellent. Good to see, and you have some great hardstanding's for the winter's inevitable wet weather.1 point
-
until the aircrete gets slightly damp or even worse wet then they are horriffic.1 point
-
I’m doing same but through 180mm of insulation so am using these in 280mm https://timberfixings.com/7-4-x-280mm-TX40-Blue-Power-Timber-to-Masonry-Screws-Box-of-100-p141878564 they are expensive but specially designed for the job They do shorter lengths1 point
-
I used 75/80mm concrete screws to fix battens straight to block wall. Can’t comment how it works through insulation, suggest you test on a sample area.1 point
-
Might there have been a chimney there at some stage that was taken down? If so it's possible it was providing some structural benefits. Whatever the case I wouldn't be overly worried about it if there's no sign of water ingress. However I would get up there with a few 2*4s, a bottle of glue, some clamps and a few screws to patch it up if it was in any way flimsy. If it is allowing in water however, allow maybe £5k to get that side of the roof sorted.1 point
-
Rough opening for doors is too tight, you need to leave room to pack the lining and get it squared up. just think you can make a wall as soundproof as you want, but as soon as you put a door in it it becomes pointless.1 point
-
I’d like to contribute financially to running this forum. How do I go about it? Buildhub has been a tremendous resource. From general advice to answering specific questions to just being a place for me off load. It also saved our bacon by putting us in touch with @Gus Potter who helped address a number of issues the builder caused us. We have a far better house in no small part due to this forum. We shall be forever grateful.1 point
-
Good to talk earlier. Good luck! In other news we got the temporary occupation certificate this morning. I had assumed this was a straightforward thing to get but not necessarily. The default position is building standards want your house completely finished before you are allowed to move in. They ‘may’ grant you a temporary occupation certificate but it’s not guaranteed. Something for everyone to be mindful of. This is in Scotland and Perth & Kinross council.1 point
-
1 point
-
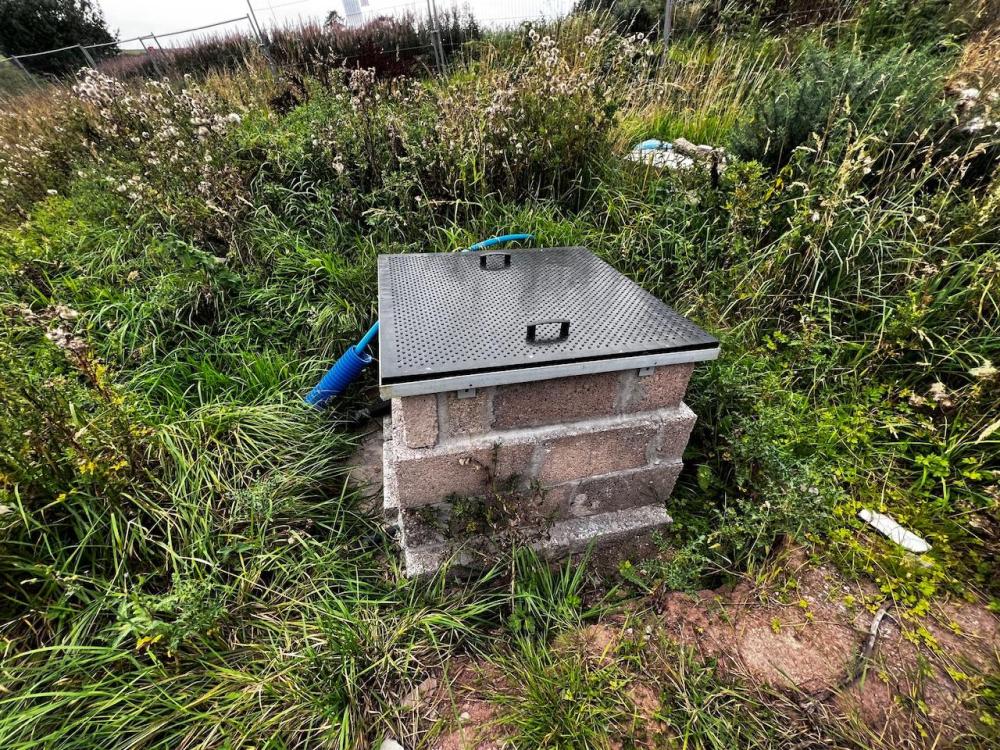
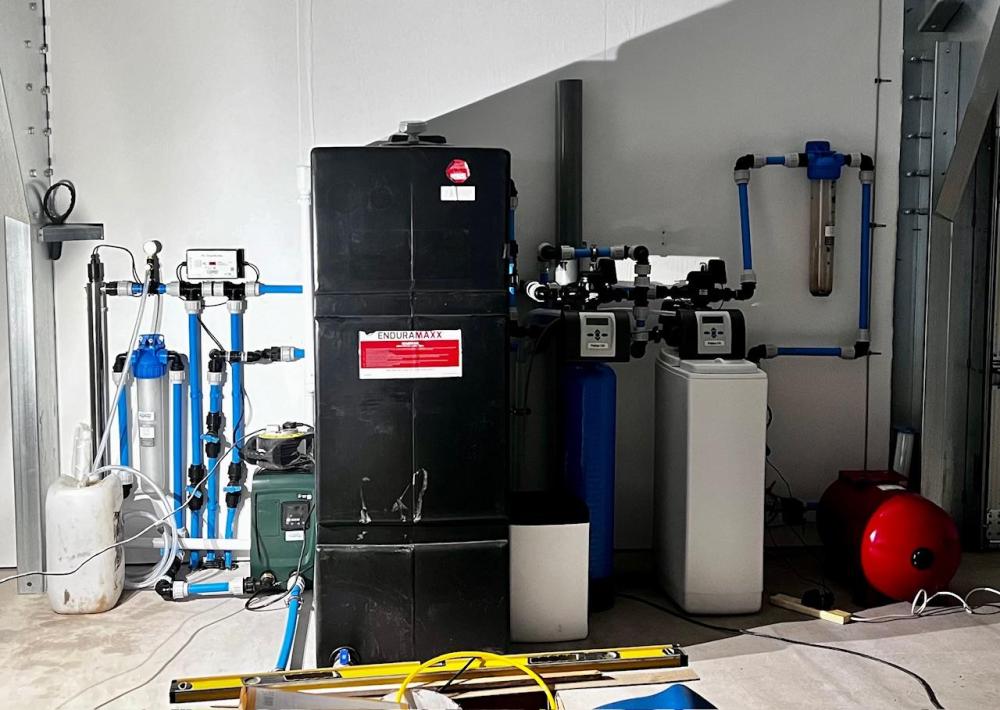
I thought I’d do a longer write up about my water supply as it wasn’t that straightforward to get where we are now, a plentiful supply of potable water, and I’ve learnt a few things along the way. As we all know, no water no house so it’s an important part of the self-builders due diligence when buying the plot. While there is mains water nearby our plot it’s insufficient for the existing few houses. The few houses get their water via various sources, mains, boreholes, a well, and out of the burn. I made it a condition of the sale of the plot that the farmer had to find a water supply on the land which, in our case, was going to be via a borehole. There are lots of people out there that can drill holes in the ground but the lesson here was definitely if you buy cheap you buy twice as the first guy the farmer used failed to find water and made a right mess of the neighbouring house. I recommended he use the same company that drilled the other boreholes in the area which he did and they eventually found water at 147m. Most boreholes are mapped by the British Geological Survey and generally a scan of the drilling report is attached to the map location. This isn’t going to tell you if you’ll find water on your plot of course but it is useful to know. https://mapapps2.bgs.ac.uk/geoindex/home.html?layer=BGSBoreholes&_ga=2.140231729.386343147.1696503272-1218241145.1696503272 When a borehole is drilled you need to make sure you also get the drilling report and the water analysis. This will confirm if the supply is viable as it will tell you the yield and what treatment may be necessary, if any. This is important to know as the difference in cost can be many thousands of pounds and might dictate how and where you put all the necessary equipment. For example, if the yield is significant and no treatment is required then you need minimal equipment therefore less space and cost. Typically the drilling company will pump the borehole for a while. In our case this was two weeks. It’s worth noting that drilling a hole in the ground is a messy process. There’s a lot of material comes out of the hole. If they don’t damp the drill with water this sandy material will go everywhere. In our case it covered the neighbour’s house in red sandstone dust. Not a great start with our only neighbour. Our drilling report showed there was enough water for 60 people assuming a daily water use per person of 150 litres/day. Our borehole yield is 380 litres per hour. It sounds a lot but it isn’t in reality and one company I spoke with described it as technically dry. They look for at least 500 litres/hr as a minimum. The water analysis showed that it was moderately hard and borderline for a water softener. It also showed very slightly elevated nitrite levels in the water. Nitrites can be treated in the same way as nitrates and removed via reverse osmosis or ion exchange. Two companies I spoke with reckoned the nitrite levels would probably reduce over time such that no treatment would be necessary. After a bit of research I decided to install both the water softener and the nitrite treatment filter anyway. However, I wanted to have non-softened drinking water in the house as well as the softened water. This complicates the plumbing of it all slightly which I’ll talk through later. The borehole comes up to a wellhead and into a headworks chamber. For very simple installs, that requires no treatment or intermediary storage tanks, the chamber could be a large kiosk that houses all of the equipment for your water supply to your house. These kiosks are quite large and stand 1.2m tall typically. That’s not an issue if you are able to site it all at your boundary or at the bottom of the garden hidden out of view. If your install isn’t as straightforward then you might need a separate shed or space to house all the equipment in. In this case the headworks chamber just makes safe the borehole and associated control electronics for the borehole pump. It might also include a heating element. I found it quite hard to get specific information on how to build the headworks chamber. All of the companies I spoke with said this is to be supplied by others. The only thing they stipulated was it had to have at least 300mm of space above the borehole and ideally 400mm of space around it. They can be above ground or below ground but if below ground you need to make sure that excessive ground water can’t contaminate your water supply. A friend has a poorly installed borehole chamber that floods when there’s heavy rain and contaminates his water with groundwater. SEPA handily provide a guide on best practice for building your headworks chamber which I mostly followed. http://www.groundwateruk.org/downloads/SEPA_borehole_construction.pdf I also considered using concrete well rings with a secure cover but this became expensive and logistically hard to achieve given the weight of them but worth considering if you have the space and means to do it. I spent an inordinate amount of time deciding on the chamber dimensions. It needed to be big enough for ease of access without being too big that it dominated that part of the garden. To some extent this was determined by the manhole cover dimensions. I decided on 750mm x 750mm and ordered a Clark Drains cover from the drainage superstore. I built the headworks chamber out of concrete blocks as I already had the materials on-site with a dimension of 800mm x 800mm. This turned out to be a poor decision for a few reasons. It seems 750mm square manhole covers aren’t that common so the choice was limited. They are also really heavy so aren’t very accessible if they aren’t at ground level which mine isn’t. The Clark Drains cover I bought was poorly made as the frame is very flimsy and the lid quite heavy which only fitted if I hammered it into place. Concreting the frame in place didn’t work as the concrete fell apart as soon as I tried to remove the lid. Ideally I really wanted a plastic lid for ease of access but they don’t seem to exist other than specialist lids that cost a fortune. I then happened across this company: https://www.forecourtsolutionsltd.com They make bespoke plastic covers among other things. I sketched out what I wanted and they turned that into a workable metal frame and plastic cover. I’m really happy with the final chamber. The lid is watertight and easy to access. I have included a drain at the bottom protected with rodent mesh at either end. The electrics and MDPE water pipe enter through a sealed hole. I’ll backfill around it to reduce the height of it a bit and eventually plant around it to hide it. I’ve included the electrics for a heater but haven’t installed a heater yet. I’ll insulate it for this winter and see how it goes. The borehole is 147m deep with the pump at 80m. It has water level sensors at 10m then every 20m. It’s designed to pump the water from 50m to 80m then stop to let the borehole recharge. This is controlled by a control unit in the garage. Our borehole recharges quite slowly, too slowly to use the water directly without an intermediary tank. The picture below shows the layout. From right to left we have a 30 litre pressure vessel which takes the incoming borehole water. This goes through a 50 micron filter, then into the water softener. From here it goes through the nitrite reduction treatment then into the 1000 litre storage tank. It comes out of this tank into the Dab Esybox mini 3 (which is very quiet) then into the 5 micron filter and finally through the UV disinfectant system. From here it then goes out to the house. In addition there's an outlet to an outside stand pipe. We also have ‘raw’ water outlet to the house for a single drinking water tap. It goes through the 50 micron filter and the nitrite treatment then into the house. I’ll have to add another 5 micron filter and another small UV disinfectant system in the plant room in the house. It’s also not pumped so will just rely on the pressure vessel to get it to the house. The total cost for the plant equipment, installation, and commissioning including a type B water analysis and 4 bags of salt was £9909 ex VAT. The borehole cost was separate and very expensive (£18,000) but I didn’t pay for that. I looked at a number of companies to supply and install the equipment as follows: Highwater - they drilled my borehole and did a neighbour’s install. I found them difficult to get a quote from and when I did it was extortionate at £18,000 not including the nitrite treatment and estimated £24,000 including it. They are known to be expensive. Rayburn - couldn’t get them to return my calls GRC - spoke to them a couple of times but didn’t get a quote from them The Water Man - really helpful, estimate was around £8000 but he’s a one man band and extremely busy so decided not to use him. He has a good reputation though. Filpumps - The company that I went with. I attended a webinar on private water supplies hosted by The Scottish Self Build team which Filpumps presented. I’ve found them great to deal with throughout. Very flexible and quick to respond. The installation guys were great, neat, tidy, and helpful. A long post but hopefully of some use to anyone that might need to install private water supply.1 point
-
how come people can build a mansion from nothing in a year of graft yet i spend every sodding day for 3 years on my 3 bedroom semi and still havent got a ceiling...0 points
-
I trust you inserted the words “Buildhub” into every recorded interview. If not, expect abuse from members.0 points


